

Esp32 Personal Bat Signals With Light And Sound

Made by Dan / 3D Printing / Communication / Home Automation / Notifications / IoT
About the project
3d printed devices that live on my neighbors' wifi and alert them to impromptu gatherings in my workshop, which is also my bar
Project info
Difficulty: Moderate
Platforms: MicroPython, JLCPCB
Estimated time: 3 days
License: GNU General Public License, version 3 or later (GPL3+)
Items used in this project
Hardware components

View all
Story
The hook: My workshop is also my bar. Sometimes, later in the evening when the family is asleep, I wonder if any other neighborhood dads are in a similar predicament and would be happy to come over. We are mostly in her late 40s, and a blast text message thread to 8 – 10 people is really disruptive, especially when the recipients and/or their wives and children are sleeping... so I made an over complicated solution, that is also pretty awesome and bad ass.
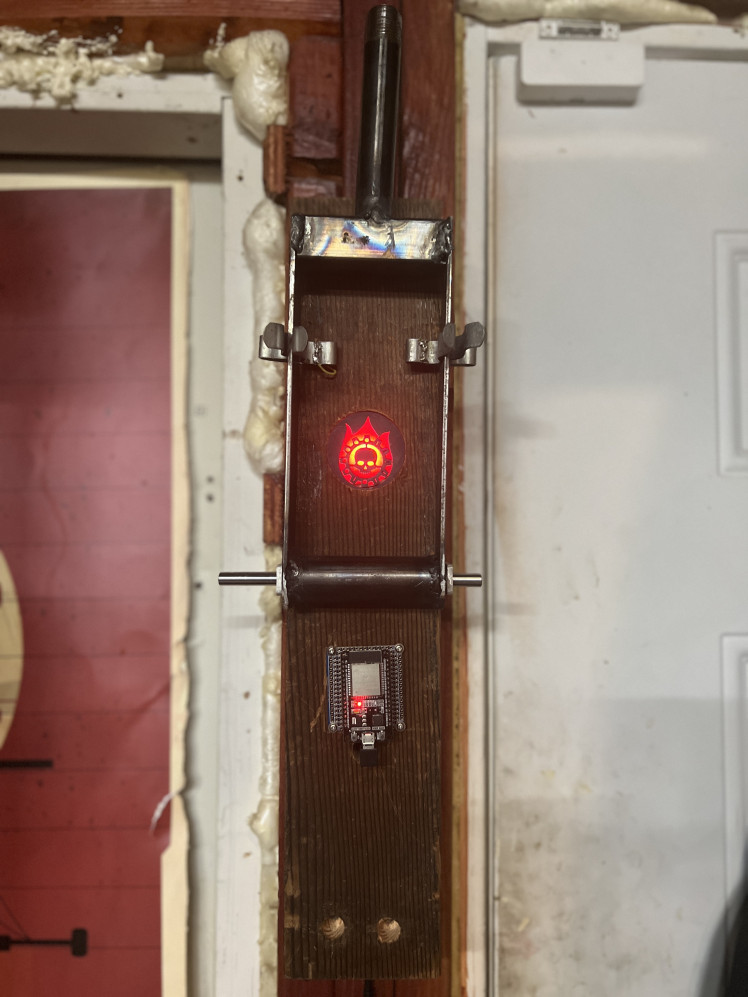
I made devices that project my logo onto ceilings of neighborhood dads to alert them we can gather at my workshop, which is also a bar. I kludged together a 12V LED and a fresnel lens to project the image. An ESP32 checks my server to see if there is a party and activates the LED and a speaker, which plays a guitar riff. The owner of the device can then hit one of three buttons to indicate if they are coming, unsure, or not coming. This information comes back to my home automation server so I have a sense of how many people will show up. The device is was designed in Fusion360, and the PCB's were designed in EasyEDA.
Instructions
1. Choose an Approach
You could approach this project from the electronic side first or from the 3D printing and optics side. We are going to start from the optics and housing part first for the purposes of this tutorial. I also did a video on this build (above), which gives more of a top-down description of how I assembled these, but certainly read below for the concise version. Not sure where else to put that I am an Amazon Affiliate (mods/ webmaster feel free to replace links with your own).
2. Printing the Housing

If you print out all of the stl parts from this tutorial, you should have everything you need to assemble 99% of this. This was one of my earlier ones, and my sanding and paint job didn't come out to great, but it will do for this. I added rubber feet to the floor, which friction fits into the housing. I printed most of the parts out of high temperature PLA using a 0.6 mm nozzle and 4 mm layer height. The only resin printed parts are the template (which I have since learned is referred to as a "gobo") and the buttons, just to give a much higher degree of resolution.
Please note, the fresnel lenses are available in 40 mm and 50 mm focal lengths. I don't entirely understand what this means, but the column at the top should be the taller of the two options (50 mm) if you can only find 50 mm focal length lenses.
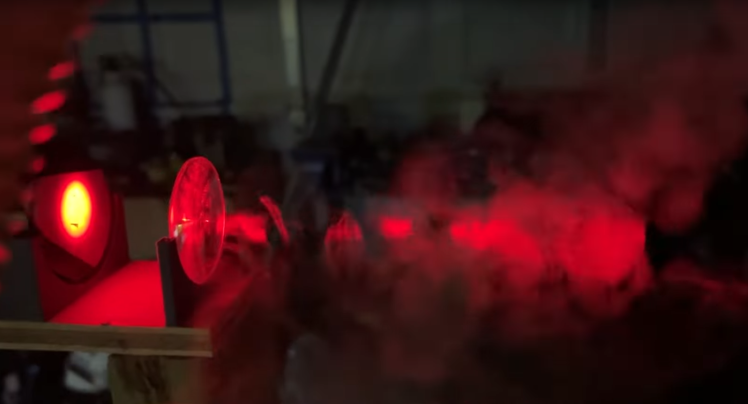
Below: I am not going to lie, I still don't fully understand how I got the image to project the way I did, or at least, I don't understand why the first to ways I tried to do it didn't work. I will revisit this someday. This is a picture of me using my iguanas misting humidifier trying to figure out what the heck was going on.
3. PCB's
Aas much as I like working with electronics, I freely admit that my soldering skills are not great. You might want to assemble this on a breadboard first:
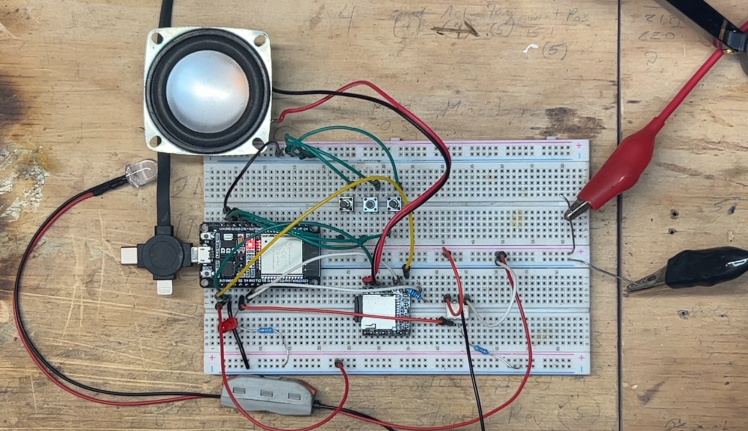
Above: Since this looks like complete chaos...
Below: ... here's a pic of the schematic if that's easier to follow:
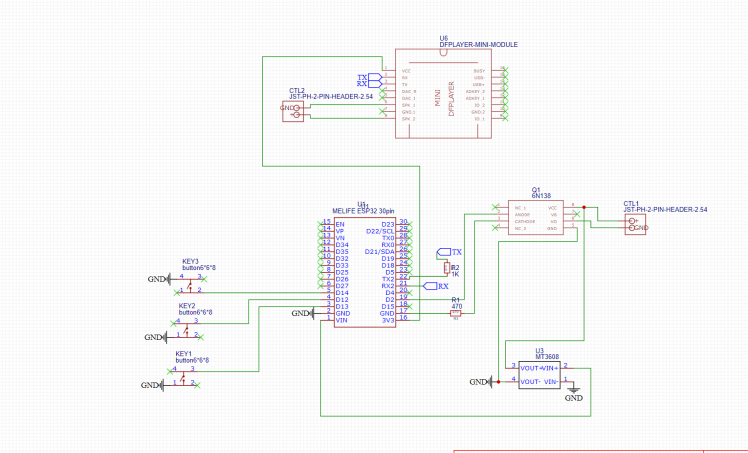
***Giant note*** I forgot to connect pin seven of the DFplayer mini clone to ground. You should do that. If you wind up using my Gerber files to print these, it's pretty easy to connect that pin to ground after the fact ( I also use a ground plane).
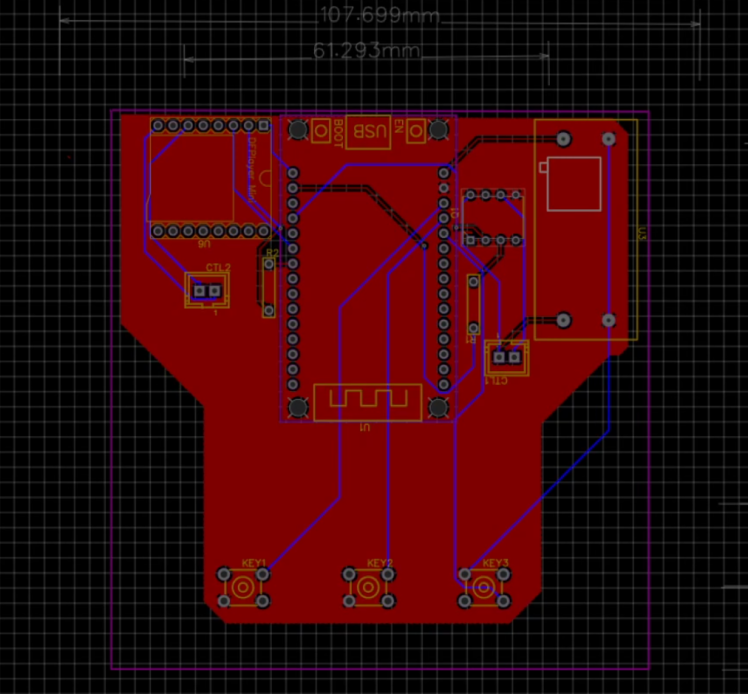
Below: This is what the file looks like before I uploaded it to be printed (I used JLCPCB because it's integrated with Easy EDA easily).
To be clear, I have never printed out somebody else's design before, but I'm pretty sure you can using the attached files:
Gerber_PCB_BatSignal2000_2023-11-25.zip
-and/ or-
EasyEDASchematic_BatSignal2000)2023-11-25.json
4. Assembly
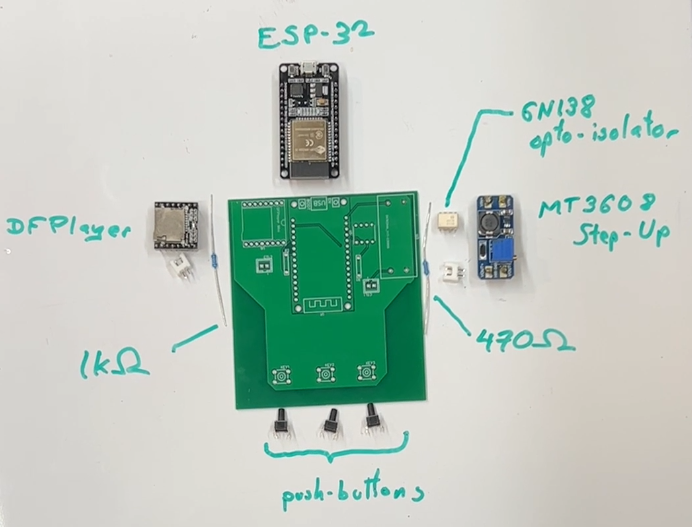
Above: Look at that pretty PCB, just waiting for everything to be nestled into it, all while completely ignoring white balance. I strongly recommend using headers for the dfplayer mini clone and the boost converter... it makes it a lot easier to swap out parts when there is a "whoops."
Below: Here is a finished board. The entire thing doesn't pull much current at all; I programmed them and ran them from a powered USB hub with no problems. While you might be able to connect it directly to your computer USB, it's always a good idea to put a powered USB device in between projects like this in your main USB power supply, just to avoid messing up your motherboard.
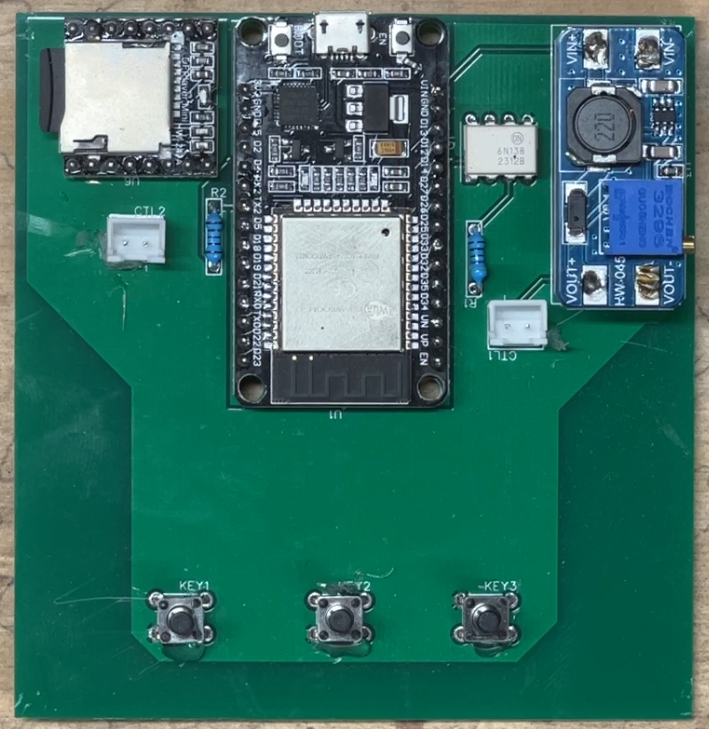
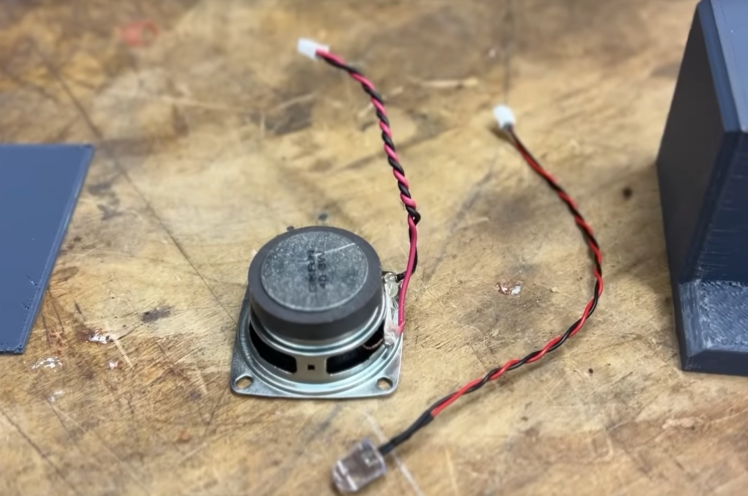
The headers or for the speaker on the left, and for the LED on the right. I used 12 V LEDs because 5V LEDs were not putting out enough light to project the image brightly on the ceiling (as is their purpose).
Below: I put tailed connectors on the speaker in the LED so they can be easily swapped out and unplugged.
5. Code
I used micropython, because I haven't used it for a project yet and I was shocked how well it worked for this. There are many tutorials on how to use Thonny with an ESP32, and I found it to be much quicker than doing this in Arduino/ C++.
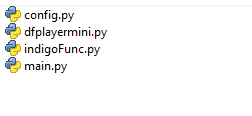
The main files are as follows:
I wrote this to work with my home automation platform of choice, Indigo Domotics. I am not paid by them at all, rather, I am happy to give them a reasonable yearly fee as the actual developers will respond to your questions on the forums. I imagine the code could easily be adapted to work with Home Assistant or any other server-side software.
Since I made nine of these, and since I coded information for each recipient into only their own unit (a light measure of security), all that information is contained in config.py (wifi name, wifi passsword, name of person, and an ID for their status kept in my home automation server).
config.py
WIFI_SSID = 'XXXXX'
WIFI_PASSWORD = 'XXXXX'
OWNER = 'XXXX'
OWNER_ID = XXXXXXXX
dfplayermini.py is hosted on get her by it's generous writer: DFPlayer Mini: simple mp3 player for micropython
indigoFunc.py really just contains helper functions that I wrote for communicating with Indigo. Indigo gives your site a "reflector" and allows generation of various API keys for easy communication. As a relatively new feature and a great addition especially as far as security goes.
import urequests
import ujson as json

REFLECTORNAME = "YOUR-REFLECTOR-NAME"
APIKEY = "YOUR-API-KEY"
VARIABLEID = XXXXXXXXX  # Indigo variable id for testing

def updateVariable(varID, value):
    # The message to send to the Indigo Server
    message = json.dumps({
        "id": "optional-user-generated-id",
        "message": "indigo.variable.updateValue",
        "objectId": varID,
        "parameters": {
            "value": value
        }
    })
    headers = {'Authorization': 'Bearer %s' % APIKEY}
    url = 'https://%s.indigodomo.net/v2/api/command' % REFLECTORNAME
    response = urequests.post(url, data=message, headers=headers)
    reply = response.json()
    #print(reply)
    return

def readVariable(varID):
    headers = {'Authorization': 'Bearer %s' % APIKEY}
    url = 'https://%s.indigodomo.net/v2/api/indigo.variables/%s' % (REFLECTORNAME, varID)
    response = urequests.get(url, headers=headers)
    var_instance = response.json()
    #print(var_instance)
    return var_instance['value']

def main():
    print("Running main")
    # usage
    # updateVariable(VARIABLEID, "True")
    # readVariable(VARIABLEID)

if __name__ == "__main__":
    main()
Lastly, main.py contains some really sloppy code that I wrote. Let me walk you through how it works.
1. A variable on my server, isParty, contains the string value of a Boolean, True or False
2. The bat signals poll my server every minute, checking the value of isParty.
3. If isParty becomes True, a bunch of things happen...
a) The light turns on
b) Electric guitar power chords play
c) The device waits for user input on one of the three buttons. The leftmost button indicates that someone can come over, the middle button indicates a "maybe," and the rightmost button indicates someone cannot come (I will discuss the SOUND EFFFECTS later).
4. Upon hitting a button, the light turns off, and the music will not repeat (it is presently not set to repeat, as it would drive my neighbors' dogs insane). Additionally, the specific response, RSVP if you will, is sent back to my server so I have a sense of how many people might be coming over. Further, once a user has responded, they can mash away on the buttons all they want to hear all the fun sound clips.
main.py
import time
import machine
import network
from machine import Pin, Timer
import urequests
from indigoFunc import *
from dfplayermini import Player
import config
import urandom

isPartyID = XXXXXX
overrideHostID = XXXXXXXXX
ownerResponded = False
alertTimeout = 1
numAlerts = 0

#introMusic = 1
#yes responses = 2-25
#maybe = 26-30
#no = 31

music = Player(pin_TX=17, pin_RX=16)
music.volume(14)
led = machine.Pin(2, machine.Pin.OUT)

class LastSeven:
    def __init__(self):
        self.integers = []

    def add_integer(self, num):
        self.integers.append(num)
        while len(self.integers) > 5:
            self.integers.pop(0)
        return self.check_sequence()

    def check_sequence(self):
        return self.integers == [3, 2, 1, 3, 2]

checker = LastSeven()

wlan = network.WLAN(network.STA_IF)
wlan.active(True)
if not wlan.isconnected():
    print('Connecting to network...')
    wlan.connect(config.WIFI_SSID, config.WIFI_PASSWORD)
    while not wlan.isconnected():
        pass
print('Network connected:', wlan.ifconfig())

# setup the buttons on GPIO 13, 14, and 15
button1 = Pin(13, Pin.IN, Pin.PULL_UP)
button2 = Pin(12, Pin.IN, Pin.PULL_UP)
button3 = Pin(14, Pin.IN, Pin.PULL_UP)

debounce_time = 1000 # in milliseconds
last_press_time = {13: 0, 12: 0, 14: 0}

def button1_callback(p):
    global last_press_time
    global ownerResponded
    global checker
    now = time.ticks_ms()
    if now - last_press_time[13] < debounce_time:
        return
    last_press_time[13] = now
    this = checker.add_integer(1)
    print(this)
    print('Button 1 pressed')
    randomVal = urandom.randint(2, 25)
    print(f"Random value of {randomVal}")
    music.play(randomVal)
    if (ownerResponded==False):
        ownerResponded=True
        turnOff()
        print(f"{config.OWNER} responded {ownerResponded}")
        updateVariable(config.OWNER_ID, "yes")
    return

def button2_callback(p):
    global last_press_time
    global ownerResponded
    global checker
    now = time.ticks_ms()
    if now - last_press_time[12] < debounce_time:
        return
    last_press_time[12] = now
    this = checker.add_integer(2)
    print(this)
    print('Button 2 pressed')
    randomVal = urandom.randint(26, 30)
    print(f"Random value of {randomVal}")
    music.play(randomVal)
    if (ownerResponded==False):
        updateVariable(config.OWNER_ID, "maybe")
        turnOff()
        print(f"{config.OWNER} responded {ownerResponded}")
        ownerResponded=True
    print(type(this))
    if (this==True):
        #this part is if the person who wants to host is triggering it
        updateVariable(overrideHostID, f"{config.OWNER_ID}")
        updateVariable(isPartyID, "Override")
        ownerResponded == True
        updateVariable(config.OWNER_ID, "yes")
        partyOut(config.OWNER_ID)
    return

def button3_callback(p):
    global last_press_time
    global ownerResponded
    global checker
    now = time.ticks_ms()
    if now - last_press_time[14] < debounce_time:
        return
    last_press_time[14] = now
    this = checker.add_integer(3)
    print(this)
    print('Button 3 pressed')
    music.play(31)
    if (ownerResponded==False):
        updateVariable(config.OWNER_ID, "no")
        turnOff()
        print(f"{config.OWNER} responded {ownerResponded}")
        ownerResponded=True
    return

# set the interrupt
button1.irq(trigger=Pin.IRQ_FALLING, handler=button1_callback)
button2.irq(trigger=Pin.IRQ_FALLING, handler=button2_callback)
button3.irq(trigger=Pin.IRQ_FALLING, handler=button3_callback)

def partyOn():
    global numAlerts
    print("***function partyOn started...")
    led.on()
    print("Start Music!!!")
    music.play(1)
    numAlerts+=1
    return

def partyOut(hostId): #this is for the override function
    global numAlerts
    print("***system override message...")
    print("Start Party Out Announcement!!!")
    music.play(32) #this is the override audio
    numAlerts+=1
    return

def turnOff():
    print("***function turnOff started...")
    led.off()
    return

def partyOff():
    global ownerResponded
    global numAlerts
    print("***function partyOff started...")
    led.off()
    ownerResponded=False
    numAlerts = 0
    return

def check_status(t):
    global ownerResponded
    global alertTimeout
    global numAlerts
    global overrideHostID
    print("***fuction check_status begun")
    resp = readVariable(isPartyID)
    print("read variable")
    print(resp)
    print(type(resp))
    if resp=="False":
        partyOff()
        return
    if(ownerResponded or numAlerts > alertTimeout):
        return
    if resp=="True":
        partyOn()
    if resp=="Override":
        #check the value of indigo overrideHostID
        print("***checking the value of overrideHost")
        resp = readVariable(overrideHostID)
        #call a function similar to partyOn, called partyOut
        partyOut(resp)
    print(f"{config.OWNER} responded {ownerResponded}")

# create a timer object7
timer = Timer(-1)
# schedule the timer to call check_status every minute
timer.init(period=60000, mode=Timer.PERIODIC, callback=check_status)

check_status(timer)

# main loop does nothing, all work is done in interrupts now
while True:
    pass
I added a little Easter egg in their… my friend wanted an override function so he could alert people to come to his backyard instead. He still doesn't know the code yet. He unlikely could figure out the code from reading this tutorial. I'm gonna make him work to get it :)
6. (Optional) Party Switch
Yes, I can easily change the status of isParty through my home automation software, but where's the fun in that? So I made a gigantic switch to do it which is a little out of the scope of this tutorial.
7. Questions
I've been clutching together stuff and shooting video of it for a long time now, but the full on produced YouTube documentation is new. That said, I am into this for the community, and not trying to rack up viewers on whatever I can rack them up on. In that light, if you have any questions, please don't hesitate to ask me, and at this point I've been able to respond to people pretty easily!
Schematics, diagrams and documents
CAD, enclosures and custom parts
Code
Credits
Related products


Leave your feedback...