
Controlling Hexabitz Rgb Led Module Using 4x3 Keypad Via Ras

Made by Aula_Jazmati / Games & Gaming / Home Automation / Kids & Family / Lights / Security
About the project
Controlling Hexabitz RGB LED Module Using 4x3 Keypad Via Raspberry Pi
Project info
Difficulty: Moderate
Platforms: Raspberry Pi, STMicroelectronics
Estimated time: 1 hour
License: MIT license (MIT)
Items used in this project
Hardware components


Story
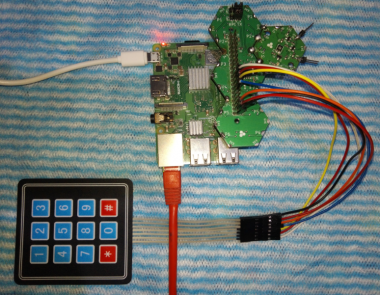
In this tutorial, I will show the connection of such a keypad matrix and how to easily read them with the GPIOs.
Then I use it for Controlling Hexabitz RGB LED Module Via Raspberry Pi Interface module.
A small keypad is a convenient way of providing users of your custom projects with a way to interact with the system.
HF1R0x is Hexabitz Raspberry Pi interface module

HF1R0x module enables you to seamlessly interface your Hexabitz modules to a Raspberry Pi 3B/3B+/4B single-board computer.

Small form-factor with options to connect Hexabitz modules all-around the interface and power the modules from Raspberry Pi on-board 3.3V supply and most of GPIOs is free to use with anything (except txrx GPIO)
Use our C++ Hexabitz Interface library on Raspbian, Ubuntu or other compatible Linux distributions from within your C++ or Python applications.
HF1R0 is an open source project which enables the community to use the projects that are available off-the shelf, make your own projects using the library core or modify the library for your own custom needs and requirements.
https://hexabitz.com/product/rgb-led-h01r0x/
https://hexabitz.com/product/raspberry-pi-interface-hf1r0x/
Note:
It’s easy to connect a simple keypad to a Raspberry Pi and provide Hexabitz users with a convenient way to input data and interact with your custom Raspberry Pi based projects.
The keypad only requires a few digital I/O pins to operate. The Raspberry Pi doesn’t need to supply the keypad with a power source, as the key-matrix solely consists of simple push buttons. The Raspberry Pi sends pulses to each row of the keypad’s internal matrix, and when a user pushes down on a button, the button closes a contact that connects a single row to a single column. The Raspberry Pi listens to changes in the column signals, and when it detects one, the software can decode which button the user pressed. This procedure is easy to implement in any programming language supported by the Raspberry Pi ?
Schematics, diagrams and documents
Code
Credits
Related products


Leave your feedback...