

Connect Esp32 To Qubitro With Micropython

Made by pradeeplogu0 / Communication / Environmental Sensing / IoT
About the project
In this tutorial, I will show you how to use Qubitro MQTT in MicroPython. The idea is to exchange sensor readings or commands to Qubitro.
Project info
Difficulty: Easy
Platforms: Arduino, RakWireless
Estimated time: 1 hour
License: GNU General Public License, version 3 or later (GPL3+)
Items used in this project

Story
First, you need to install Micropython IDE to work; go to https://thonny.org/ and download the appropriate platform-based file and install it on your pc.
?Thonny IDE web page

?Thonny IDE web page
After that, download the ESP32 micropython firmware file. Go to https://micropython.org/download/esp32/, then download the latest version.
?Micropython Firmware

?Micropython Firmware
Once you have installed the Thonny IDE, connect your RAK11200 to the pc. Then open up the IDE, go to the Tool > Manage Packages, type 'esptool' in the search bar and click install.
?esptool package on Thonny

?esptool package on Thonny
Now go to Run > select Interpreter, select Micropython(ESP32), and the COM port.
?Select Interpreter Tab

?Select Interpreter Tab
Next, select 'Install or update firmware' and then select the COM port and select the downloaded firmware file, Then hit install, wait until the process completes.
?Firmware install window

?Firmware install window
So, now your Rak11200 is ready to run with Micrpython. Let's do some code…
Programming:Download the below git repo into your pc; this repo contains the sample code and library for the MQTT connection.
Qubitro-MQTT/Qubitro-Micropython at master · pradeeplogu0/Qubitro-MQTT
Now open up the Thonny IDE and connect your Rak11200 with pc, then click Open Icon and select from Micropython option.
?Open device page

?Open device page
And create a folder with the name of lib; inside this folder, we will add our MQTT Library files. Follow this below folder structure.
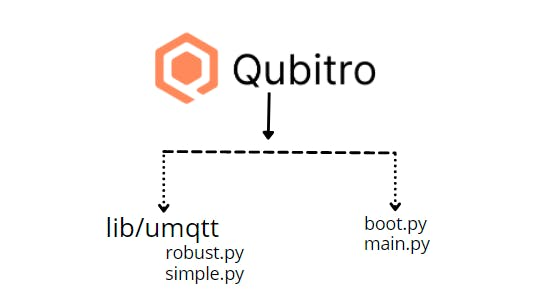
Change the SSID and Password according to your Wi-Fi Credentials. Create new files based on the structure and replace the codes (from the above git repo). Then open the boot.py file. This boot.py only runs once the device is booted up.
import time
import network
import machine as m

sta_if = network.WLAN(network.STA_IF); sta_if.active(True)
sta_if.scan() # Scan for available access points
sta_if.connect("SSID", "password") # Connect to an AP
sta_if.isconnected()
time.sleep(3)
We have to add our Qubitro Credentials in the main.py code; this will run once the boot.py runs; refer to my previous tutorials to set up the Qubitro and for Credentials.
from umqtt.robust import MQTTClient
import machine as m
from machine import Pin


led0=Pin(12,Pin.OUT)
led1=Pin(2,Pin.OUT)

DeviceID = ""
DeviceToken =""

client = MQTTClient(DeviceID, "broker.qubitro.com", 1883, user = DeviceID, password = DeviceToken)

def checkwifi():

    while not sta_if.isconnected():
        time.sleep_ms(500)
        print(".")
        sta_if.connect()


def publish():
    checkwifi()
    client.connect()

    while True:

        msg = b'{"Latitude": 72.7661 ,"Langitude": 337.7772, "Temperature": 27, "Humidity": 76}'
        print(msg)
        led1.value(1)
        time.sleep(5)
        led1.value(0)
        client.publish(DeviceID, msg)
        led0.value(1)
        time.sleep(5)
        led0.value(0)

publish()
Change the Device ID & Token according to yours. I have sent some dummy sensor values in the JSON format and added LEDs to blink whenever the data is published.
Once you complete all the above steps, we are now to get into action. Click the Run icon.

?Rak11200 data in Thonny
Ta DA ? !!! You can see the payloads in the Terminal Window. Then open up your Qubitro Portal and navigate into the device page and let's observe the readings. You can see all the readings in the portal.
?Rak11200 data in Qubitro
?Rak11200 data in Qubitro Portal
Now you can add some sensors to the RAK11200 and send some values to Qubitro. That's all about this tutorial, let's do some cool projects, and don't forget to share with our community and Discord Channel.
Code
Credits
Related products


Leave your feedback...