
Blackout: The Power Button

Made by electrouser829 / Automotive / Home Automation / Productivity
About the project
Complete guide to create led power on/off button for your project, includes different options of hardware and software implementation.
Project info
Difficulty: Easy
Platforms: Adafruit, Microsoft, Raspberry Pi
Estimated time: 2 hours
License: MIT license (MIT)
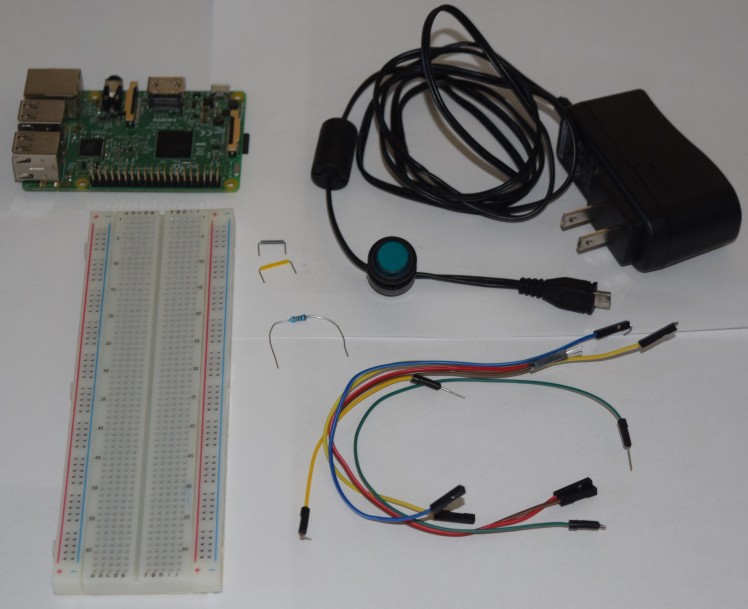
Items used in this project
Hardware components


Story
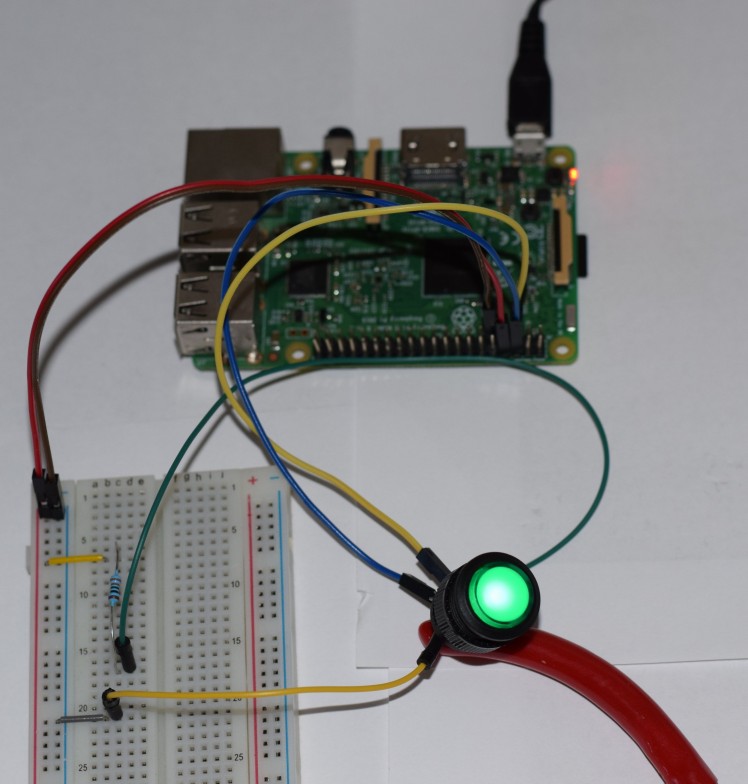
Connecting to Breadboard
Introduction
Raspberry Pi is an awesome and cheap computer allowing us to build interesting electronic projects and to gain expertise in electronics in general. So as it is cheap it lacks some features, like power button, which is not an issue for us, is it? You can buy a module to support this functionality around $20 or simply build yours and get some fun and valuable experience. Why power button is important and I want to focus on it in this article? You should avoid "hot" powering off (pulling the power cord out) any computer like device, as this can lead to severe data corruption (and in some cases, physically damage your SD card). Let's move forward and check the suggested solution.
Required Hardware
The hardware you need is pretty simple and common: Raspberry Pi, power supply, micro SD card (8GB+), any LED momentary push button (you can use even button with no LED but it has less fun) I used pretty big button (16mm) but you can find smaller ones for your projects, resistor 330 ohm, breadboard and some jumper cables to test and... that's it.
 Required Hardware
Wiring Things Up
The first thing we'll do is wiring up a button and test the functionality using a breadboard. This is a very simple circuit, but it's good to make sure it works before moving on. There are two contacts for the button and two contacts for the LED, one marked + and one -. The forward voltage of the LED is about 2.2V so connect a 220 to 1000 ohm resistor (we use 330 ohm) in series just as you would with any other LED to your 3V or higher power supply (we connect to GPIO it uses 3.3 V). We are going to use two pins 5 and 8 (GPIOs 3 and 14) and any two ground pins (GND). I attached circuit diagrams to this guide in case you have any questions or issues with wiring it up, unfortunately I did not find LED button among built-in components so I used regular button and LED with same GPIOs/Pins.
 Connecting to Breadboard
Wiring Button
Let's connect one cable to SCL pin 5 (GPIO 3) and the other to ground pin 6 (GND). Then connect them to the breadboard with a button in between. Since the button is normally open, the circuit will be open until the button is pressed.
You can consider alternative option to connect your button through custom GPIOs and setting up GPIO input and listening to the GPIO event, however I would not recommend this option for power button as it is not organically efficient and you loose natural and simple way to wake up your Raspberry Pi.
Wiring LED
There are at least couple of options one is related to software approach and one is related to using serial GPIO. Serial approach is more efficient for power button project as it connects directly to serial TxD pin (GPIO 14) which monitors the serial console. The LED will flicker while booting, stay solid while your Pi is running, and turn off when it's safe to remove power. To build this circuit, we connect one cable to pin 8 (GPIO 14) and one cable to ground pin 9 (GND). Then connect them to breadboard with a 330 ohm resistor and button's LED between. The LED is powered by the Raspberry Pi's TxD serial output pin and the resistor protects the Pi against your LED requesting high current draws and vice versa.
Newer versions of Raspbian Jessie have the GPIO serial port disabled by default; so your LED will not light up. However, it can be easily enabled, edit your /boot/config.txt file:
sudo nano /boot/config.txt
and add the following line:
enable_uart=1
You can edit this file by connecting to your Pi via SSH (requires network connection) or by connecting your Raspbery Pi to any kind of display and keyboard.
That said alternatively you can connect to custom GPIO output, I used pin 16 (GPIO 23) and ground pin 14 (GND) and added software solution to handle GPIO output for button's LED (code attached below). For pure power button I would not recommend this solution, however if you need some more complex logic or specific behavior for your LED you can give it a try.
Raspberry Pi OS Setup
If you have questions or doubts related Raspbian OS installation on your Raspberry Pi you can take a look on my other article it has this information.
Wake Functionality / Power On
There's nothing to build here (from software point of view), but we need to understand how to wake up the Pi from a halt state before we build the shutdown functionality. Simply put, shorting pins 5 and 6 (GPIO 3 and GND) together will wake the Pi up from a halt state.
An easy way to test this is to shutdown the Pi with:
sudo shutdown -h now
and press the button you wired up earlier. Then you should find that the Pi is "awake". Alternately you can connect pins 5 and 6 with a female to female cable. You only need to short them momentarily and check the result.
 Testing LED Connection and Software
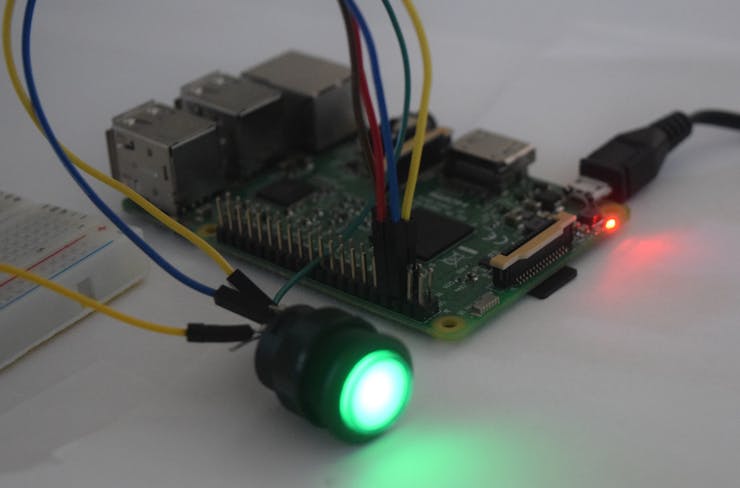
Sleep Functionality / Power Off
In order to safely shut down the Raspberry Pi we're going to have to use a software solution. Since we know we're going to use pins 5 (GPIO 3) and 6 (GND) to wake the Raspberry Pi, let's also use these pins to shut it down. That way we can wire up our button to those pins and it will both shutdown and wake the Raspberry Pi.
We'll have to write a script that listens for a button press and shuts down the Raspberry Pi. Before we look at the script, let's discuss a few different approaches. First, we could write a script that starts an infinite loop and waits for a change in the state of the GPIO pin. Using pseudo-code, that might look something like:
while True:
   if GPIO.input(3):
       subprocess.call(['shutdown', '-h', 'now'], shell=False)
This definitely works, however there is actually a better way. We can listen for an interrupt (edge detection). An interrupt is the change in state from LOW to HIGH (RISING) or HIGH to LOW (FALLING) or BOTH (recommended). The RPi.GPIO library provides a method called wait_for_edge that will block execution of our script until an interrupt is detected. We will setup GPIO 3, and once we detect a either FALLING or RISING edge we'll shutdown the Raspberry Pi. I advise to use GPIO.BOTH option as it handles any button case including switch button as well, we do not care about initial state of the button (HIGH or LOW) we just care about changing the state
First, we need to connect to the Pi via SSH (with PuTTY for example). Then, we'll use a script called power_button.py.
To create the script, we can use the nano editor. After connecting to your Pi, run the following command to create a file called listen-for-shutdown.py:
sudo nano power_button.py
Then, paste the following code into that file, and press CTRL-X to exit, and Y to save when prompted.
#!/usr/bin/python
import RPi.GPIO as GPIO
import subprocess
# Starting up
GPIO.setmode(GPIO.BCM)
GPIO.setup(3, GPIO.IN)
# Wait until power button is off
# Recommended to use GPIO.BOTH for cases with switch
GPIO.wait_for_edge(3, GPIO.BOTH)
# Shutting down
subprocess.call(['shutdown', '-h', 'now'], shell=False)
To confirm that this is working properly, you can connect to Raspberry Pi via SSH run this script:
sudo python power_button.py
and confirm you loose session when button is pressed.
In case you want to implement alternative solution using other GPIO (mentioned above in Wiring LED section) and add GPIO output logic to it, you can use the code below:
#!/usr/bin/python
import RPi.GPIO as GPIO
import subprocess
# Starting up
GPIO.setmode(GPIO.BCM)
GPIO.setup(23, GPIO.OUT)
GPIO.setup(3, GPIO.IN)
# Light up the led button on boot
GPIO.output(23, True)
# Wait until power button is off
# Recommended to use GPIO.BOTH for cases with switch
GPIO.wait_for_edge(3, GPIO.BOTH)
# Shutting down
subprocess.call(['shutdown', '-h', 'now'], shell=False)
I added link to Github (in Code section) so you can easily download both solutions. Here are instructions how to download and unzip Github source code:
wget https://github.com/UBayouski/RaspberryPiPowerButton/archive/master.zip
and extract the files with this command:
unzip -j master.zip
Several important points:
- Usage of subprocess over os.system is highly recommended, as it is newer approach to handle command line
- Now we need to auto-run functionality, so we can handle power button behavior when Raspbery Pi boots. There are at least three different options, I would start with the best one (at least from my point of view).
-
If you want to test your script by running python command you need to include
sudoto it, becauseshutdownrequires root access.
Auto-run Power Button Functionality
Now we need to auto-run functionality, so we can handle power button behavior when Raspbery Pi boots. There are at least three different options, I would start with the best one (at least from my point of view).
Runlevel (rc.local) Option
I would recommend this approach because it is really straightforward, also it helps to run your script pretty soon after Raspberry Pi boots. Update rc.local file by running:
sudo nano /etc/rc.local
and adding line of code before the final exit 0 :
/usr/bin/python /home/pi/power_button.py &
Please notice several important points:
- If your command runs continuously (perhaps runs an infinite loop) or is likely not to exit, you must be sure to fork the process by adding an ampersand to the end of the command. Otherwise, the script will not end and the Pi will not boot. The ampersand allows the command to run in a separate process and continue booting with the process running.
- Be sure to reference absolute filenames rather than relative to your home folder.
-
You apparently don't need the
sudohere, since rc.local runs as root.
LXDE Autostart Session Option
Alternative but still pretty simple way to implement power button functionality auto-run. Open the Pi user’s session autostart file using the following command:
sudo nano ~/.config/lxsession/LXDE-pi/autostart
Add the following line to the end (bottom) of the file:
@sudo /usr/bin/python /home/pi/power_button.py &
Please notice an important point:
-
You need the
sudohere, since LXDE-pi runs under default Pi user.
Registering As Service Option
The most complex one, my personal opinion it has less pros (usage and quick launch) than cons (complexity). We'll place the script in /usr/local/bin and make it executable:
sudo mv power_button.py /usr/local/bin/
sudo chmod +x /usr/local/bin/power_button.py
Now add another script called power_button.sh that will start/stop our service. To create the script:
sudo nano power_button.sh
Enter the following code in that file and save it:
#! /bin/sh
case "$1" in
 start)
   echo "Starting power_button.py"
   /usr/local/bin/power_button.py &
   ;;
 stop)
   echo "Stopping power_button.py"
   pkill -f /usr/local/bin/power_button.py
   ;;
 *)
   echo "Usage: /etc/init.d/power_button.sh {start|stop}"
   exit 1
   ;;
esac
exit 0
Place this file in /etc/init.d and make it executable.
sudo mv power_button.sh /etc/init.d/
sudo chmod +x /etc/init.d/power_button.sh
Now we'll register the script to run on boot.
sudo update-rc.d power_button.sh defaults
Since the script won't be running, we'll go ahead and start it with:
sudo /etc/init.d/power_button.sh start
Instead of Conclusion
The only thing left, you need to restart your Raspberry Pi, just run:
sudo shutdown -r now
The Button's LED should illuminate solid once fully booted and you can enjoy your upgraded device with a new useful and awesome functionality.
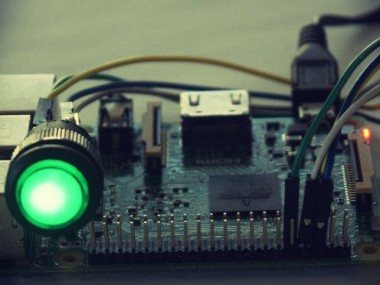
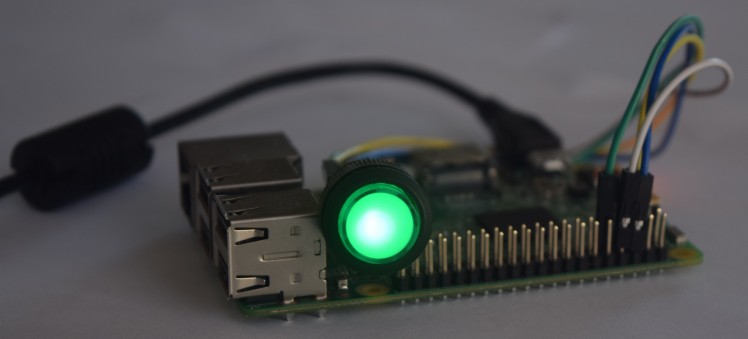 Connected Directly to Rapberry Pi
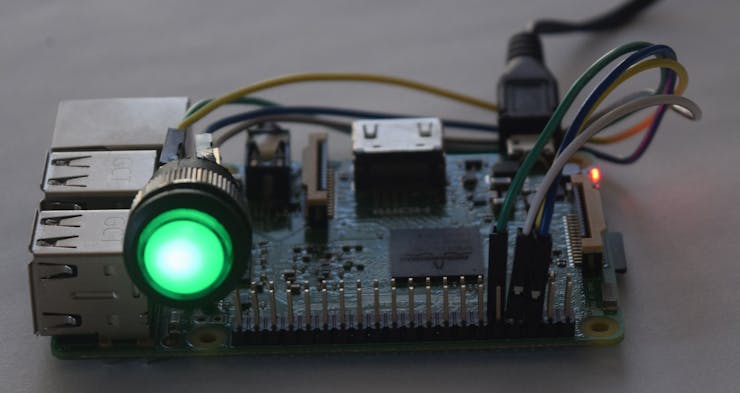
Schematics, diagrams and documents
Code
Credits
Related products


Leave your feedback...