
Arduino Nano: Debouncing, And Toggle Button With Visuino

About the project
Used Debouncing to remove the noise when switching a button, and implement a stable Toggle On/Off Switch - quick and easy.
Project info
Difficulty: Easy
Platforms: Arduino, SparkFun, Visuino
Estimated time: 1 hour
License: GNU General Public License, version 3 or later (GPL3+)
Items used in this project

Software apps and online services
Story
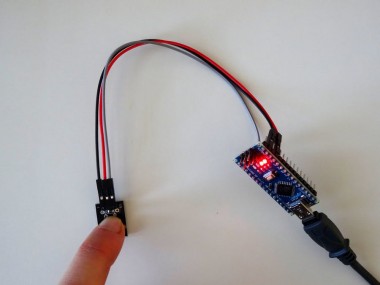
Buttons connected to Arduino can easily be used as On/Off Toggle Switch. Unfortunately the buttons tend to create bouncing noise when they connect/disconnect, making the toggle functionality unreliable. The noise can be suppressed with a technique called Debouncing. In this Tutorial I will show you how you can implement a Toggle switch with Arduino, and how you can add Debouncing to reduce switching noise. This will be done with the help of Visuino, an easy to use graphical development environment for Arduino.
Step 1: Components
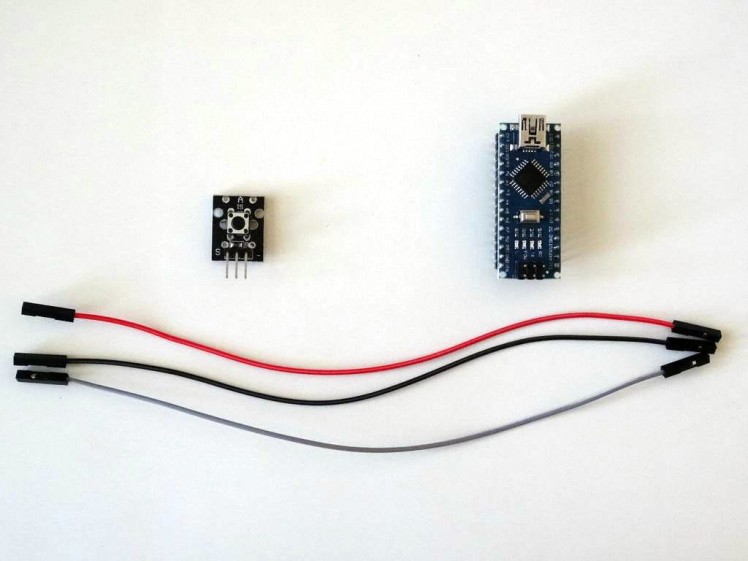
- One Arduino compatible board (I use Arduino Nano, because I have one, but any other will be just fine)
- One Button Sensor module I got from this cheap 37 sensors set.
- 3 Female-Female jumper wires
1 / 5 • Picture 1

Picture 1

Picture 2

Picture 3

Picture 4

Picture 5
- Connect Ground(Black wire), Power(Red wire), and Data(Gray wire) to the Button Module (Picture 1)
- Connect the other end of the Power wire(Red wire) to the 5V power pin of the Arduino board(Picture 2)
- Connect the other end of the Ground wire(Black wire) to Ground pin of the Arduino board(Picture 2)
- Connect the other end of the Data wire(Gray wire) to Digital pin 2 of the Arduino board(Picture 3, and 4)
- Picture 5 shows where are the Ground, 5V Power, and Digital 2 pins of the Arduino Nano.
1 / 2 • Picture 1

Picture 1

Picture 2
To start programming the Arduino, you will need to have the Arduino IDE installed from here: http://www.arduino.cc/ .
Please be aware that there are some critical bugs in Arduino IDE 1.6.6. Make sure that you install 1.6.7 or higher, otherwise this Tutorial will not work!
The Visuino: https://www.visuino.com also needs to be installed.
- Start Visuino as shown in the first picture
- Click on the "Tools" button on the Arduino component (Picture 1) in Visuino,
- When the dialog appears, select Arduino Nano as shown in Picture 2
1 / 3 • Picture 1

Picture 1

Picture 2

Picture 3
First we need to generate event only when the button is pressed. For this we need an edge detector, to detect the change of the digital level from False to True (or optionally from True to False).
- Type "edge" in the Filter box of the Component Toolbox then select the "Detect Edge" component (Picture 1), and drop it in the design area
- Connect the "Out" pin of the "Digital[ 2 ]" channel of the Arduino component to the "In" pin of the DetectEdge1 (Picture 2)
- Optionally: If your Button is Inverted (Sends False when pressed), set the value of the "Raising" property to False (Picture 3)
1 / 4 • Picture 1

Picture 1

Picture 2

Picture 3

Picture 4
To implement the Toggle functionality, we need to use a Flip-Flop. The most convenient for this purpose is the Toggle(T)-FlipFlop.
- Type "flip" in the Filter box of the Component Toolbox then select the "Toggle(T) Flip-Flop" component (Picture 1), and drop it in the design area
- Connect the "Out" pin of the DetectEdge1 to the "In" pin of the Flip-Flop(Picture 2)
- Connect the "Out" pin of the TFlipFlop1component (Picture 3) to the "Digital" input pin of the Digital[ 13 ] channel of the Arduino component (Picture 4)
1 / 2 • Picture 1

Picture 1

Picture 2
- In Visuino, Press F9 or click on the button shown on Picture 1 to generate the Arduino code, and open the Arduino IDE
- In the Arduino IDE, click on the Upload button, to compile and upload the code (Picture 2)
1 / 2 • Picture 1

Picture 1

Picture 2
On Picture 1 you can see the complete Visuino diagram.
If you run the project however, from time to time you will see that when you press the button once, the LED changes state more than once :-( . The problem is that there is a noise - bouncing of the signal coming from the button when the button switches. The signal will go up and down multiple times before it settles. You can see the problem shown in Oscilloscope on Picture 2.
To fix this problem we need to use technique called Debouncing. Visuino includes Debouncing component, and makes implementing this very easy.
Step 8: In Visuino: Add Debounce Button component
1 / 4 • Picture 1

Picture 1

Picture 2

Picture 3

Picture 4
- Type "but" in the Filter box of the Component Toolbox then select the "Debounce Button" component (Picture 1), and drop it in the design area
- If necessary make some space for it between the Arduino board and the DetectEdge1, so we can have a cleaner diagram(Picture 2)
- Connect the "Out" pin of the Digital[ 2 ] channel of the Arduino component to the "In" pin of the Button1 component(Picture 3)
- Connect the "Out" pin of the Button1 component to the "In" pin of the DetectEdge1 component(Picture 4)
1 / 2 • Picture 1

Picture 1

Picture 2
- In Visuino, Press F9 or click on the button shown on Picture 1 to generate the Arduino code, and open the Arduino IDE
- In the Arduino IDE, click on the Upload button, to compile and upload the code (Picture 2)
1 / 5 • Picture 1

Picture 1

Picture 2

Picture 3

Picture 4

Picture 5
On Picture 1 you can see the complete Visuino diagram.
If you start the Arduino, every time you click on the button, the LED on Pin 13 will change its state - If it was ON it will turn OFF, and if it was OFF will turn ON as you can see from Pictures 2, 3, 4, and 5, and in the video.
Congratulations! You have implemented a noise resistant Arduino Toggle switch, by using Debouncing.
Also attached in the ZIP are the two Visuino projects, that I created for this Tutorial. You can download and open them in Visuino: https://www.visuino.com
Credits
Related products


Leave your feedback...