
Wireless Linux Data Logger

Made by electrouser805 / Environmental Sensing / Food & Drinks / Sensors
About the project
A linux based data logger over SSH Wireless made with Giant Board
Project info
Difficulty: Moderate
Platforms: Microchip, Linux, balena
Estimated time: 2 hours
License: Creative Commons Attribution CC BY version 4.0 or later (CC BY 4+)
Items used in this project
Hardware components


Story
Introduction
Giant board is a single board computer based on ARM Cortex-A5 Processor-based SAMA5D27 microprocessor that runs at 500 MHz.
Goal of this project :
- Prepare hardware for the project before working with software
- Setup micro SD card with Debian Linux image using Balena Etcher program
- Login into Giant board with Putty Terminal over USB-Serial
- Enable Overlay for ADC and Wifi support
- Setup WiFi FeatherWing for Giant board
- Install SSH on giant board
- Connect and Login to Giant board wirelessly over Wifi-SSH
- Read ADC wirelessly
- Logging data on a text file with timestamp
Step 1: Preparing the hardware
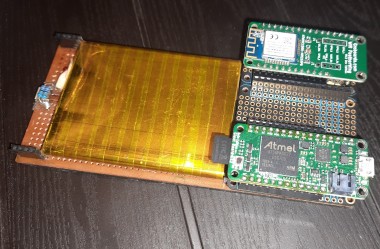
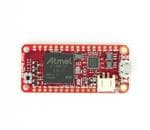
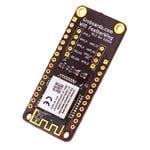
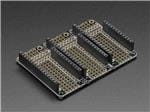
Here are the hardware needed for the project - Giant board, Wifi Feather wing board, Card reader and micro SD card, Feather wing trippler, LiPo Battery.

I salvaged the LiPo from an old laptop, it has 4000 mAh capacity. The Feather wing trippler will connect the battery to the Giant board and Wifi feather wing board through Vbat and Gnd pins.
I have soldered 0 ohms link to connect positive terminal of the battery to Vbat of Giant board and negative terminal of the battery to Gnd.
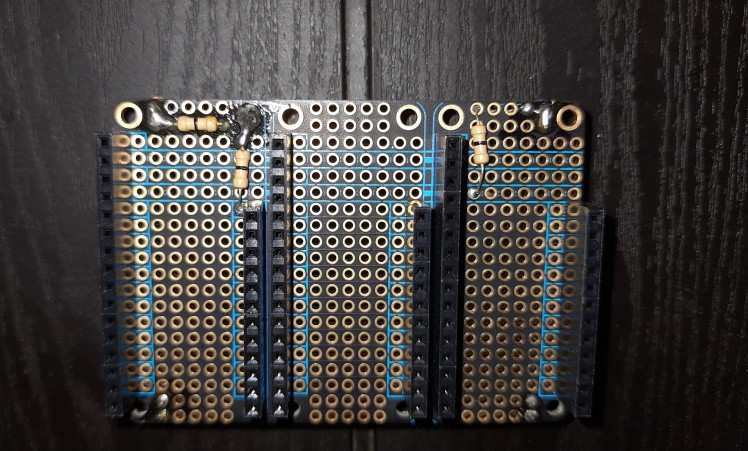
Feather wing trippler interconnects all the power and signal traces between Giant board and Wifi Feather wing. Putting all the pieces together, I end up with assembled hardware like this :-

Step 2: Flashing Debian Linux on a micro SD card
For this step I first downloaded the Balena Etcher program from here https://www.balena.io/etcher/ and installed it on a windows machine.
This program can flash any linux image into a micro SD card. As for the Debina Linux image for Giant board, I downloaded the latest image from here ftp://downloads.groboards.com/giantboard-debian-9.12-1GB-6-9-2020.zip
Next, I inserted the 32 GB microSD card on a card reader and connected it to an USB port on my windows machine. Then, I run the balena Etcher program, selected the downloaded image, selected the micro SD and hit Flash.
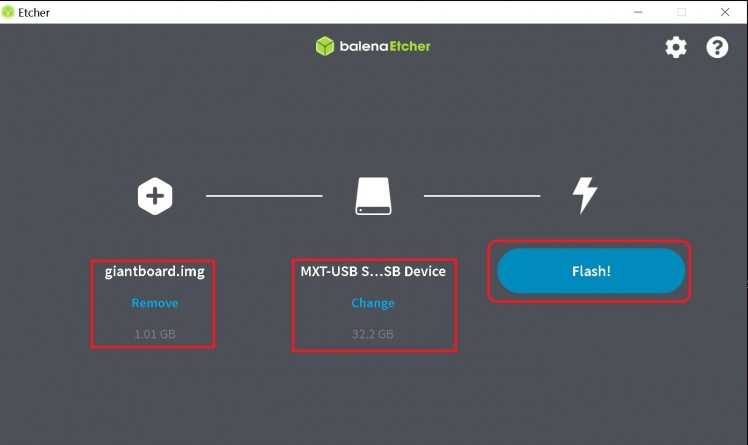
After few minutes the linux image is successfully loaded on the micro SD card. Finally, I took the micro SD card from the card reader and insert it on the micro SD card slot on Giant board.
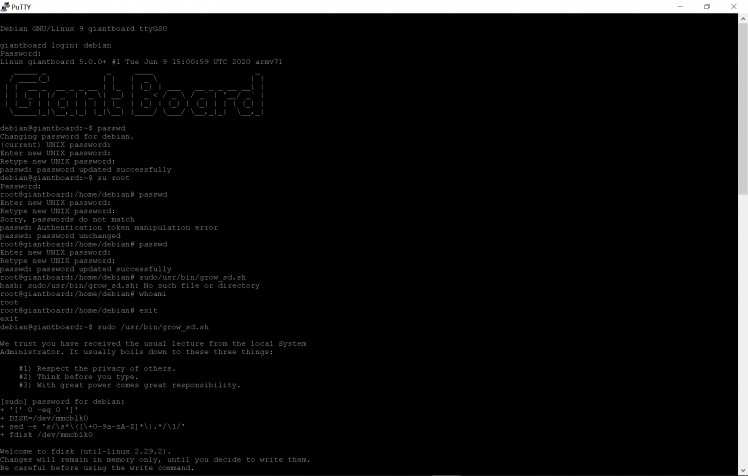
Step 3: Login into Debian Linux on Giant Board
Giant board has some power supply issues (keeps restarting) while powering only with USB cable. This issue can be resolved by powering the board from a LiPo battery while using USB cable for communication. There is a Green power LED and Orange data LED on Giant board. A successful boot up will cause the Orange LED to rapidly flash for the first few seconds after power up as shown in the following video :-
If the Orange LED does not blink for some reason during boot, here are few things to try :
- Disconnect both LiPo battery and USB, then power the board again
- Take out the micro SD card and insert it back again
- Try a new micro SD with a fresh image (step 2)
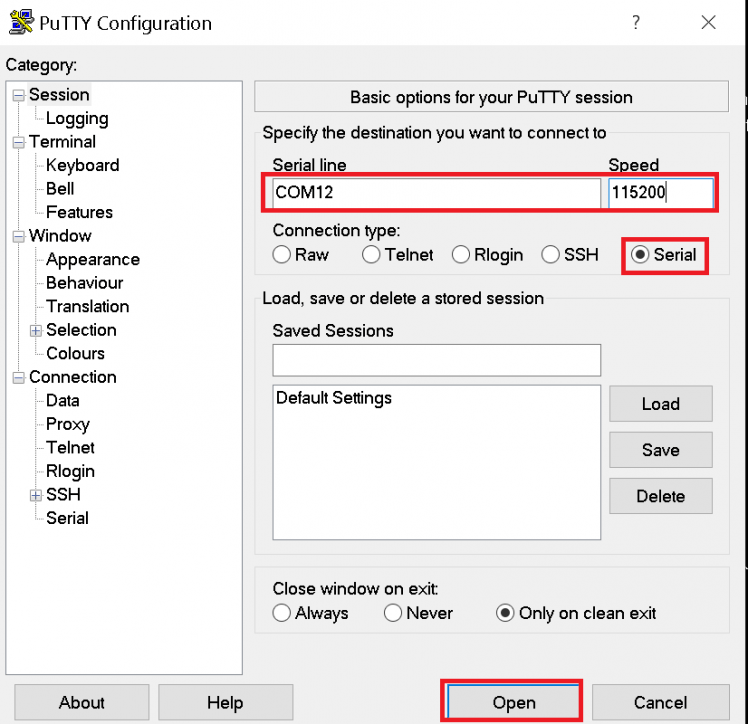
Next you would want to download putty terminal program, install and run the program. Connect the Giant board to computer with a USB-micro data cable. Find the Serial COM port from device manager, type in the COM Port number (COM12 in my case) and baud rate 115200 on Pytty, then click Open.
A window like following should appear if everything went well. This is the CLI interface for Debian Linux running on Giant board. You type here commands to get things done !
If you don't see anything, press enter. If that does not solve, disconnect power from giant board (both battery and USB) and try again.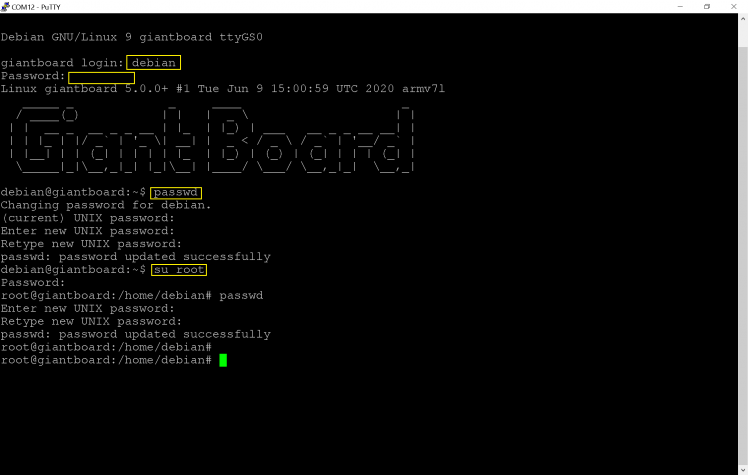
- username name is debian
- default password is temppwd
- default root password is root
root user privilege command is su root
(press enter after typing each command to execute)
After successful login you may change the password. But you must expand the file system with following command : sudo /usr/bin/grow_sd.sh
Giant board will reboot after this task is completed.
Once this step is done, Linux goodies (applications) can be installed on the device.
Here are the official documentations for login and file system expansion :-
- https://groboards.com/docs/getting-started/how-to-boot-and-login/
- https://groboards.com/docs/getting-started/how-to-expand-the-file-system-to-the-microsd-card/
Step 4: Enabling Overlay for ADC and Wifi support
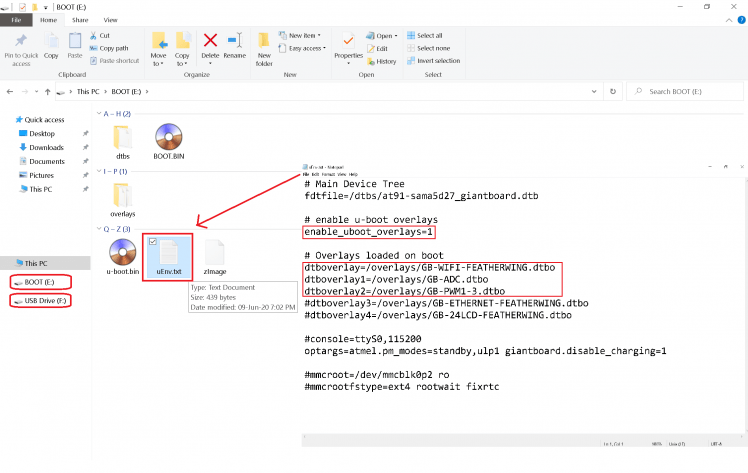
This board runs with only 128 MB DDR2 RAM. Something that you are not going to use should be kept disable for smoother operation. To use ADC and WiFi from next boot, these must be enabled. This is done by editing the uEnv.txt file resides inside the BOOT directory. BOOT directory shows up on your PC as a removable drive when the Giant board is connected through a USB cable.
Following modifications will enable ADC and WiFI :
Remove the # to un-comment and enable overlays
enable_uboot_overlays=1
Add following 2 lines after that and save the file, then restart the Giant board !
dtboverlay=/overlays/GB-WIFI-FEATHERWING.dtbo
dtboverlay1= /overlays/ GB-ADC.dtbo
 Step 5: Setup Wifi featherWing for connectivity
Giant board connects to Wifi FeatherWing board through FeatherWing Tripler. Wifi FeatherWing is ATWINC1500 Wifi module based board.
When the board reboots after the overlay step, login to Debian. Then type following commands one by one on Giant board CLI terminal, (press enter after typing each command to execute) :-
Start the network manager with command
- sudo connmanctl
Once connmanctl is running following commands will work.
Now enable Wifi hardware with command
- enable wifi
Scan for SSID with command
- scan wifi
Then list all available SSID in the vicinity with command
- services
Enable connection agent with command
- agent on
Connect to your Wifi network with command
- connect wifi_*_managed_psk
Where wifi_*_managed_psk is the number next to your Wifi networks name (see image below)
When prompted for password for WiFi with passphrase ? , Type the password on CLI terminal and hit enter (in my example WiFi password is Hydrogen, you have to type your WiFi password !)
Once the connection is completed Exit connmanctl utility command
- exit
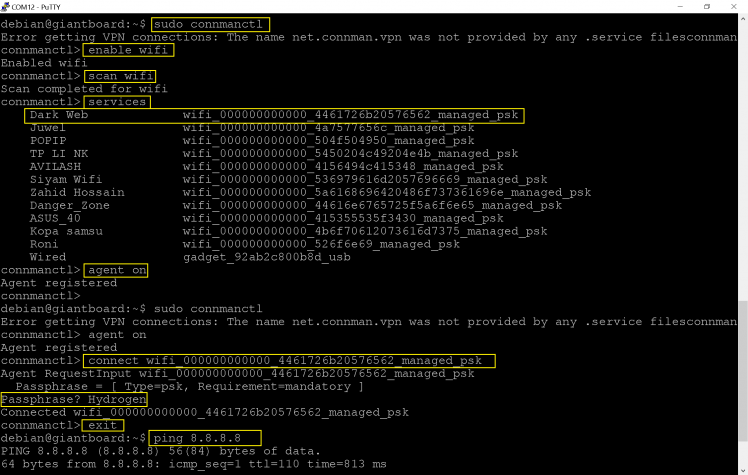
Now check internet connection with command
- ping 8.8.8.8
If everything went all right you should see ttl messages with ping delay !
Step 6: Install SSH on Giant board
If everything went well, Giant board should be connected to the internet by now. Now you can install almost any Debian package on the device !
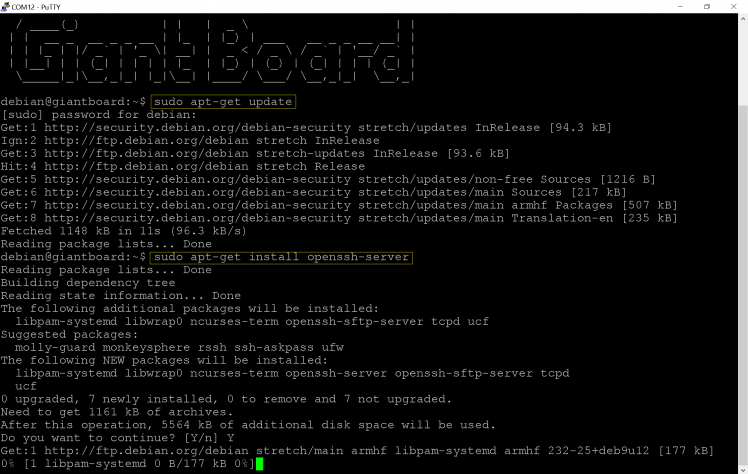
Before installing the SSH update the apt package repository cache with following command:
- sudo apt-get update
It will take few seconds to to update the cache. Once that is done, type following command and hit enter:
- sudo apt-get install openssh-server
When prompted with message "Do you want to continuse ?" , Type "Y" and press enter to download and install the package. Wait until the installation is completed.
Now, make sure that the SSH server is running with following command :
- sudo systemctl status ssh
By default, it will automatically run after boot unless you disable it. It will listen on port 22
Now type following commands to restart the board:
- su root
- <provide root access password when asked>
- reboot
Step 7: Wirelessly Login on Giant board over Wifi SSH
Now, you can access your Giant board without any USB connection. Disconnect the USB data cable and power the board only with LiPo battery.
To login on your Giand board, you need to figure out it's local IP address from your WiFi router's user interface/configuration page like this. This step is slightly different for different brand's routers.
(You can find your router's default IP and password on a sticker attached on the bottom ofyour router )
Login into your WiFI router's UI page with IP 192.168.0.1 from a web browser, find the Wireless Client list, locate the client name giantboard and note the IP address next to it.
In my case, the IP address is 192.168.0.100 (see image below)

Now, run Putty terminal application on your PC, select SSH, type the giantboard's IP address, 22 as SSH port, then click Open.

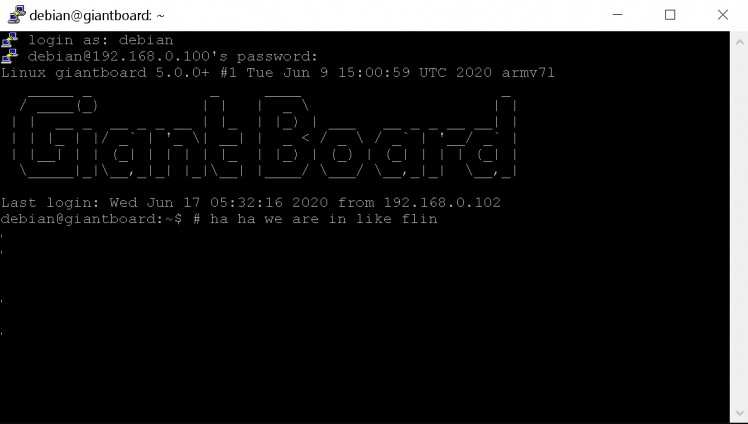
Type debian after login as: and hit enter. Provide the password (temppwd or whatever you have changed).
You will see the welcome screen of Giand Board. Now you can run the Giant board untethered !
If you want to access your Giant board from Android phone, this app works :
https://play.google.com/store/apps/details?id=mobileSSH.feng.gao
Step 8: Read ADC wirelessly
On this step I want to poll ADC channel 4 data every second with a bash while loop. This while loop will execute following commands:
(type one line at a time on Giant board CLI terminal and hit enter)
- while :
- do
- echo "ADC raw value $x"
- x=$(cat /sys/bus/iio/devices/iio:device0/in_voltage4_raw)
- sleep 1
- done
This will pring ADC data every second on the terminal. Use keyboard keys Ctrl+Z to stop.
Alternatively you can make a script with these commands, save it on the sd card and run whenever is needed.

Step 9: Logging ADC data on a text file with timestamp
Finally, I am going to show you how to log these ADC reading on a text file. For this step you need root access with following command :
- su root
Provide the password root (or whatever if you have changed it before)
Now create a text file named ADC_log.txt with touch command
- touch ADC_log.txt
If you don't have root access, this touchy step will be denied. Make sure your text file is in the root directory with following command
- ls
You should see ADC_log.txt and bin in the root directory
Now write a bash while loop to read ADC data with timestamp and put it on the ADC_log.txt
(type one line at a time on Giant board CLI terminal and hit enter)
- while :
- do
- x=$(cat /sys/bus/iio/devices/iio:device0/in_voltage4_raw)
- y=$(date)
- echo "On $y , ADC data is $x" >> ADC_log.txt
- sleep 2
- done
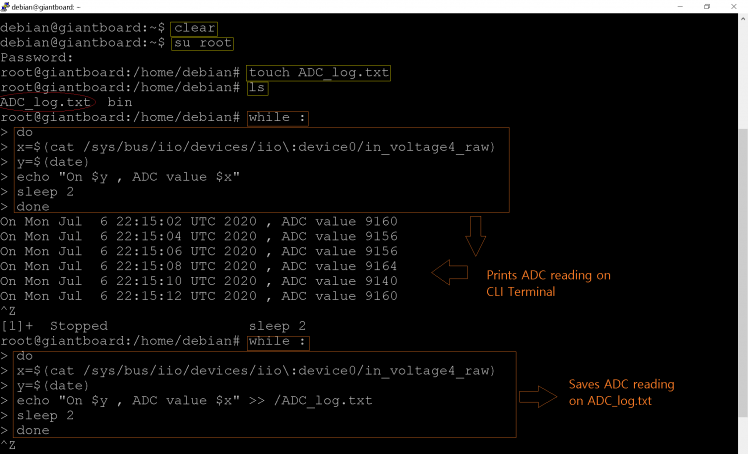
Once you hit enter, nothing will happen ! Because, it's running in the background. Wait about 10 seconds, so at least 4-5 reading are saved. Press Ctrl + z with your keyboard to stop the job (process).
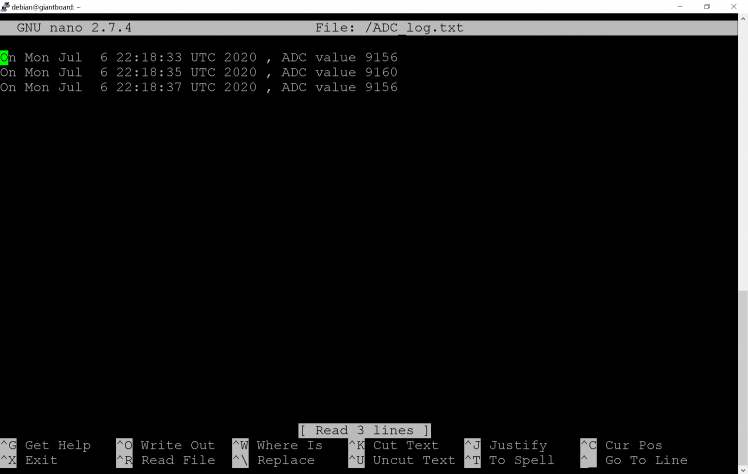
Now you want to check if you were able to log some ADC reading over last few seconds. Issue following command to open the ADC_log.txt file with nano utility
- nano /bin/ADC_log.txt
Type "Y" and hit enter to continue.
You should see the logged info like this :-
There you have it, a basic sensor data logger with Giant board on linux. You may want to write a script for the while loop block, so you can reuse it again without rewriting the commands.
Add your voltage dividers on ADC pins, scale down voltages according to your need. Using similar technique you can save data from I2C or SPI sensors too.
For details about ADC on Giant board, check this link:
https://www.linux4sam.org/bin/view/Linux4SAM/UsingSAMA5D2ADCDevice
Conclusion
Here are some excellent resources that can help you explore linux and python on Giant board:-
I played with some commands, most of them worked (curl didn't for example). I ran some math series (fibonacci) on python 3 to heat up the 500 MHz mpu. Also, installed some packages like Samba Server, LXDE gui on giant board and experienced sluggishness.
Heck, I even installed and played Pac-man on Giant board CLI terminal. My linux knowledge is pretty basic but it was fun playing with Giant board, lots of things to explore and learn.
Schematics, diagrams and documents
Code
Credits
Related products


Leave your feedback...