
Wind Speed Monitor Via Mqtt

About the project
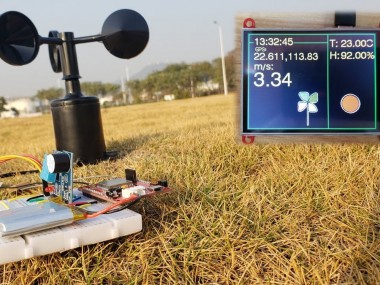
In this project, we will learn How to Monitor Wind Speed with MQTT, to get the wind speed data of a specific place and display it
Project info
Difficulty: Moderate
Platforms: Arduino
Estimated time: 3 hours
License: GNU General Public License, version 3 or later (GPL3+)
Items used in this project
Hardware components

|
jump wires | x 1 | |
|
|
breadboard | x 1 | |
|
|
battery | x 1 | |
|
|
SIM card | x 1 | |
|
|
buzzer module | x 1 | |
|
|
DHT11 | x 1 | |
|
|
anemometer | x 1 | |
|
|
ESP32 3.2 | x 1 | |
|
|
Maduino A9G | x 1 |
View all
Story

Once I failed to control the drone because of the wind so I want to measure the wind speed to know whether it is suitable for the drone flight in the wild. So I am thinking of how to measure the wind speed in the field I can check it anywhere remotely. Thanks to Arduino and MQTT, after days of learning/ studying, and also some hardware modules from Makerfabs, I solved this perfectly.
In this tutorial, I want to simply introduce the MQTT and how to build an MQTT network to get the wind speed of a specific place.
What Is MQTTMessage Queuing Telemetry Transport (MQTT) is a machine-to-machine protocol designed to widely lightweight publish/subscribe message transportation. It minimizes network bandwidth and resource requirements while ensuring reliability by keeping packet headers as small as possible.
MQTT is a transmission protocol developed for the Internet of Things. It is specially optimized for devices with low computing power. And it makes devices suitable for various IoT application scenarios. Setting up an MQTT system to handle your pub/sub messaging needs can bring powerful benefits to your process:
- Development easily.
- Strong scalability.
- Transmit and receive information quickly and efficiently.
- Reduce network bandwidth consumption.
MQTT usually runs over TCP/IP but can also use other bi-directional transports. MQTT defines methods to indicate desired actions to be performed on identified resources.
Methods in MQTT are:
- Connect -Waits for connection to be established with the server.
- Disconnect – Waits for the MQTT client to finish any work, which needs to be done and for the TCP/IP session to disconnect.
- Subscribe – Requests the server to let the client subscribe to topics.
- Unsubscribe – Requests the server to let the client unsubscribe from topics.
- Publish – Returns immediately to application thread after passing requests to the MQTT client.
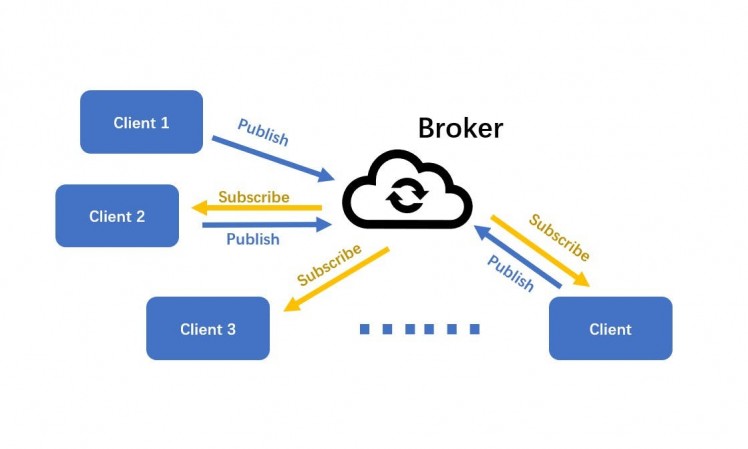
An MQTT network consists of MQTT client and MQTT broker. MQTT Client can be any device, from a microcontroller to a fully-fledged server, which runs the MQTT library and is connected to MQTT broker over any network. MQTT Broker is responsible for receiving all messages, filtering, decision making and sending messages to subscribed clients.
Instead of communicating with a server, MQTT client devices and applications publish and subscribe to topics handled by a broker. The messages are published to "topics" instead of delivering directly from client to client. The broker then delivers those messages to any subscribed clients. MQTT fundamentally is a publish/subscribe protocol. It allows clients to connect as a publisher, subscriber, or both.
MQTT MessageThe message MQTT transmitted is consisted of “topics” and “payload”. “Topics” is the core of MQTT. “Payload” is the specific content that the subscriber wants.
In the MQTT network, the client must first send a subscribing request to the broker to subscribe to a topic. The request can include multiple topics. The broker responds to the request with a subscription acknowledged response. Subscriptions also have a QoS setting which can be used to downgrade the QoS of the published message. Three different Quality of Service (QoS) levels allow network designers to choose between minimizing data transmission and maximizing reliability.
- QoS 0 (zero) is used to ensure that a message reaches its destination no more than once.
- QoS 1 is used when message delivery is critical. This is achieved by queueing messages until the subscriber is able to receive it.
- QoS 2 is used when the message needs to arrive once and only once.
In many cases, the message is always published in the lower QoS setting. MQTT can allow for messages to be stored at the broker until a device is ready to receive them.
MQTT BrokerMany MQTT brokers have been developed and they are offered in open source, commercial implementations and managed cloud services. A detailed list of MQTT brokers can be found at mqtt.org. I used the developed server to a broker in my project instead of the server built myself. Mosquitto is a readily available, open source MQTT broker that will be used during this tutorial. The Mosquitto server link is test.mosquitto.org. The client can publish and subscribe to the broker by connecting to the Mosquitto server.
What Is My Project
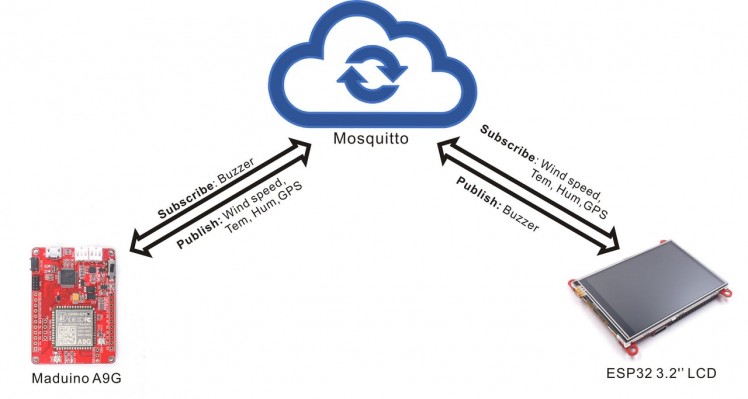
According to the above information, I wanted to build two clients to complete communication with an available broker. As the below figure shows, one client gets the data (wind speed, temperature, humidity and so on) and the other receives and displays it.
Maduino A9G As a Client

I used the Maduino A9G as a client and put it outdoors to get the wind speed, GPS location, temperature and humidity. Maduino A9G module can sent the message to the MQTT server by A9G. It means the module can publish and subscribe to the MQTT broker. Besides, A9G has abilities to get GPS, sent messages, take a call and so on. I wanted to get GPS for preventing the loss of module placed in the wild. I added a buzzer connected to the module that I could use another client to publish messages to control the buzzer to ring.
I prepared a SIM card to support A9G connects to the network in everywhere.
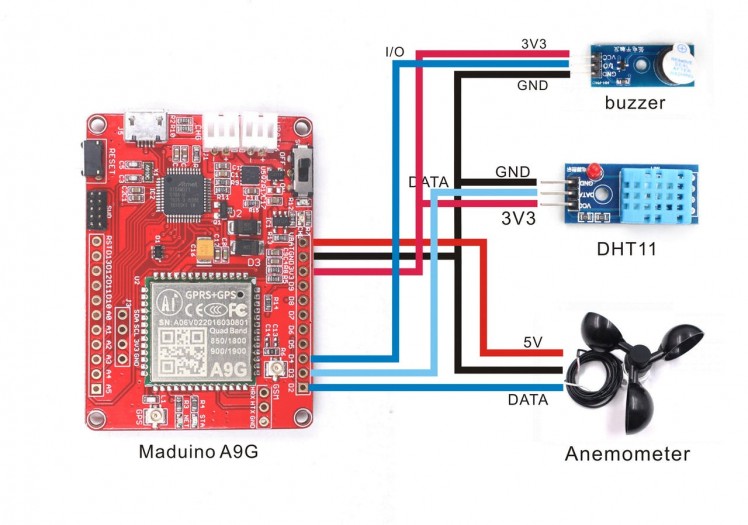
The preparation:
- Maduino A9G module
- Anemometer
- DHT11 module
- Buzzer
- SIM card
- Battery
- Breadboard
- Jump wires
1. The firmware can be obtained from https://github.com/Makerfabs/Project-Wind-weather-station/tree/master/Example/Monitor_Wind_MQTT_V1, and it would be uploaded to the Maduino A9G.
2. The AT commands for A9G to set the MQTT client and get the GPS. The client ID must be set to be the only one.
AT+CGATT=1 // Connect to the networkAT+CGDCONT=1,”IP”,”CMNET” // Set PDP ParametersAT+CGACT=1,1 // Active the PDPAT+MQTTCONN=” test.mosquitto.org”,1883,”XXXX”,120,0 // Send MQTT connection packetAT+MQTTSUB=”TOPIC”,1,0 // Send MQTT subscribe packetAT+MQTTPUB=”TOPIC”,”PAYLOAD”,0,0,0 // Send MQTT publish packetAT+MQTTDISCONNN // Disconnect MQTT3. The command for A9G to get the GPS.
AT+GPS=1 //Open the GPSAT+LOCATION=2 // Get the locationAT+GPS=0 // Close the GPS4. Connect the MQTT broker.
sendData("AT+MQTTCONN="test.mosquitto.org",1883,"mqttx_0931852d34",120,0", 1000, DEBUG);5. Subscribe to the message to controlled the buzzer.
sendData("AT+MQTTSUB="/public/TEST/makerfabs-B",1,0", 1000, DEBUG);6. Get the wind speed.
float windspeek = 0;if ((millis() - lastDebounceTime) >= debounceDelay) {int currenTime = millis();windspeek = Count*0.0875*debounceDelay/(currenTime-lastDebounceTime);lastDebounceTime = currenTime;Count=0;Couttime_t++;SerialUSB.print(windspeek);SerialUSB.println("m/s");}7. Publish the wind speed to the broker, the topic is “/public/TEST/makerfabs-W”.
String topic_W = "AT+MQTTPUB="/public/TEST/makerfabs-W",""+(String)windspeek+"",0,0,0";sendData(topic_W, 1000, DEBUG);
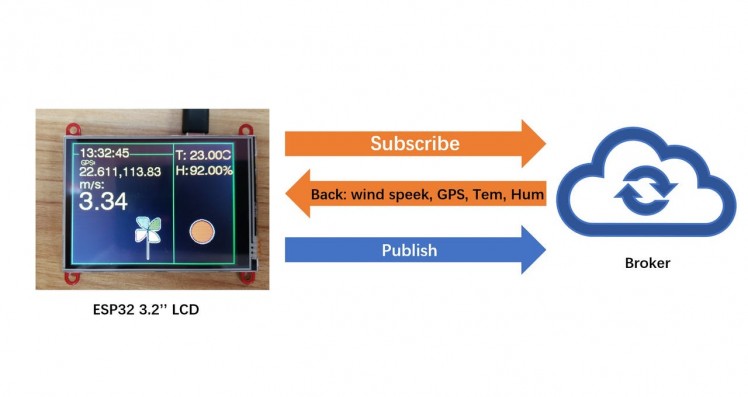
I used the ESP32 3.2’’ LCD as the other client to subscribe to the message of sensor data. ESP32 3.2’’ LCD that runs the MQTT client library of Arduino can be a client to communicate with the MQTT broker through WiFi. And it has an LCD to display the subscribed message. Also, ESP32 3.2’’ LCD has the touch ability that the LCD can be as the input device. Touch the circle on the screen to publish a message to control the buzzer which connected with the subscriber (Maduino A9G).
The Firmware for ESP321. The firmware can be obtained from https://github.com/Makerfabs/Project-Wind-weather-station/tree/master/Example/Monitor_Wind_MQTT_V1, and it would be uploaded to the ESP32.
2. Connect to the server.
const char *mqtt_server = "test.mosquitto.org";client.setServer(mqtt_server, 1883); // the MQTT default port is 1883client.setCallback(callback);3. Set the only ID for the client.
String clientId = "mqttx_0931857d";clientId += String(random(0xffff), HEX);if (client.connect(clientId.c_str()))4. Subscribe to the temperature from the broker. The topic is “/public/TEST/makerfabs-T”.
client.subscribe("/public/TEST/makerfabs-T");5. Subscribe the humidity from the broker. The “topic” is “/public/TEST/makerfabs-H”.
client.subscribe("/public/TEST/makerfabs-H");6. Subscribe to the wind speed from the broker.
client.subscribe("/public/TEST/makerfabs-W");7. Subscribe to the A9G GPS from the broker.
client.subscribe("/public/TEST/makerfabs-G");8. Publish the message to the broker for controlling the buzzer.
client.publish("/public/TEST/makerfabs-B", "buzzerON");9. Get the callback of the subscribed message.
void callback(char *topic, byte *payload, unsigned int length){Serial.print("Message arrived [");Serial.print(topic);Serial.print("] ");String payload_str;for (int i = 0; i < length; i++){Serial.print((char)payload[i]);payload_str = payload_str+(char)payload[i];} /Serial.println();
After the project was complete, I can check the wind speed to suitable the flight of drone at home.
MQTT broker allows multiple clients to publish and subscribe. Devices and applications that run the client library can connect to the broker to subscribe to the wind speed and messages.
The MQTT protocol is powerful and complex and is an important element of successful IoT projects. I hope the information above is helpful for you to build an MQTT project.
Originally published at https://www.makerfabs.cc/article/how-to-monitor-wind-speed-with-mqtt.html.
Code
Credits
Related products


Leave your feedback...