

Voice Recognition At The Edge

Made by knaveen / Artificial intelligence / Displays / Home Automation / Voice
About the project
I have built a device which can detect voice commands and takes action.
Project info
Difficulty: Difficult
Platforms: Cypress, Infineon, Edge Impulse, TensorFlow
Estimated time: 4 days
License: MIT license (MIT)
Items used in this project
Hardware components
Story
Overview
Voice recognition has played an important role in home automation and robotics to control systems. It helps in to create a touch-less, non-mechanical and low-cost controller. Until recently doing voice recognition on a limited resource microcontroller was not possible but after Tensorflow Lite and other similar efforts has made it possible. I could not find any ready to use example application which uses machine learning on a PSoC6 MCU with ModusToolBox. So I decided to port the Tensorflow Lite Micro SDK to the PSoC6 MCU with ModusToolBox using a PSoC6 BLE Pioneer Kit. I have built two applications. First application is used to collect data only and the second application is the main final application which takes voice commands and trigger some action.
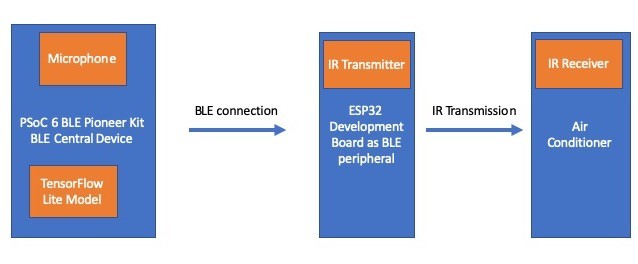
Workflow Diagram
Setup Development Environment
I am using macOS Catalina for the development. First of all we need to download ModusToolBox from this link: https://www.cypress.com/products/modustoolbox-software-environment. Please choose the bundle for your OS and follow the instructions given in the link above to install.
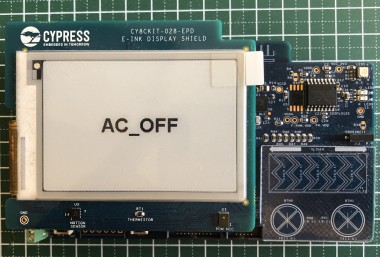
Data Collection
The data collection application uses the PSoC6 BLE Pioneer Kit with the Eink Display which has a PDM microphone on-board. The Eink Display is used to show the audio recording status. The SW2 button is used to initiate recording. Since the development board has 288 KB SRAM we can record at most 7 seconds of PDM/PCM audio with 16KHz sample rate. We can record at most 4 instances of almost 1 second long commands with some gaps. Later we will split the 4 instances into 4 training examples. The code for the audio data collection can be found at the GitHub repository (Please see the link in the Code Section). We have collected 204 examples for each of the following classes:
- AC On
- AC Off
- Temperature Up
- Temperature Down
- Noise (Random background sounds)
- Unknown (Any keywords which are not the four commands above)
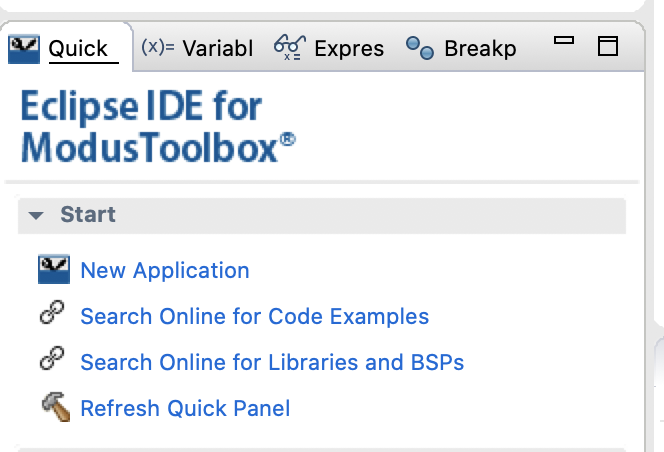
The recorded audio data is sent to Computer over UART serial connection and the PDM/PCM data is converted to the WAV file format. For the data collection PSoC6_Audio_Data_Collection_Project is created using the Hello world example as a starting point. To create a project in the ModusToolBox click on the New Application link as shown below.
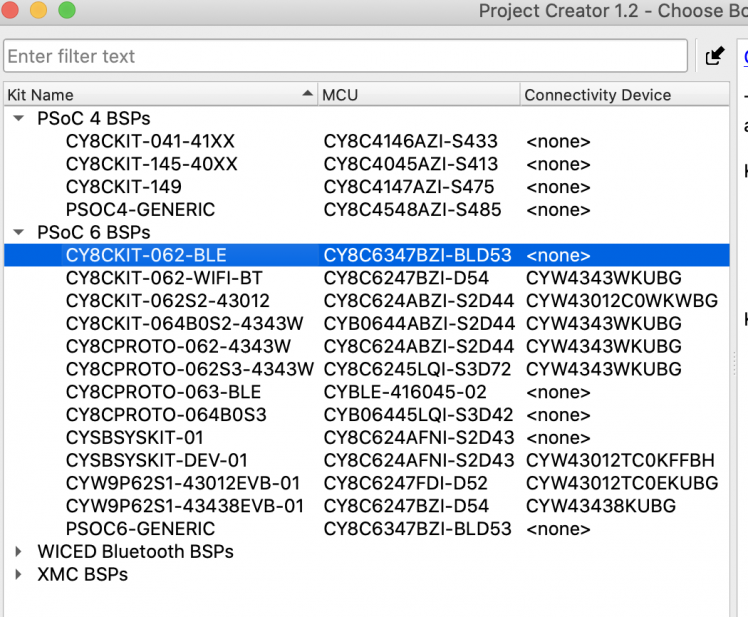
It will open the Project Creator window where we should be able to choose our target device.
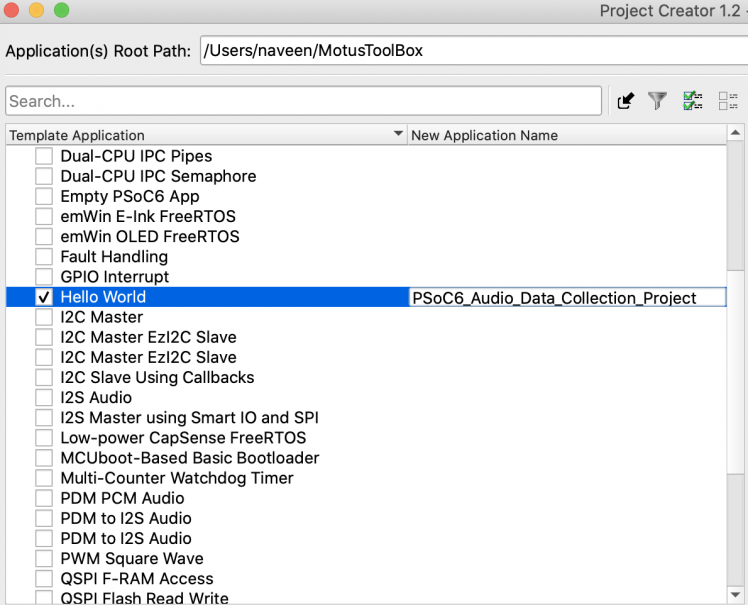
We should click Next button at the bottom and we can choose "Hello World" project as our starting application. Also, we can rename it as shown below and click on the Create button at the bottom.
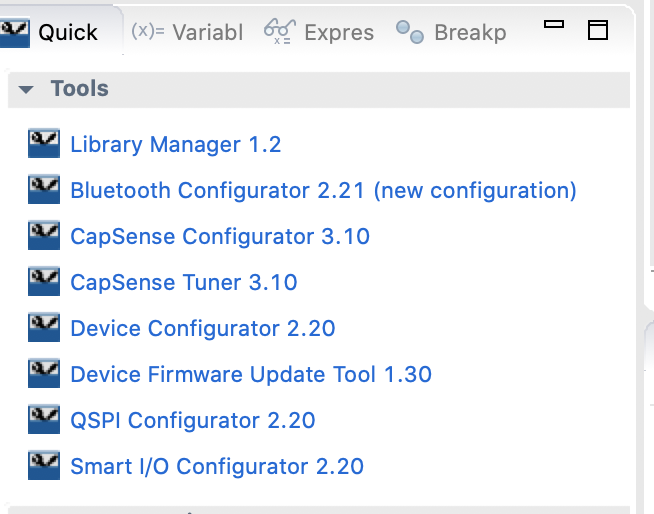
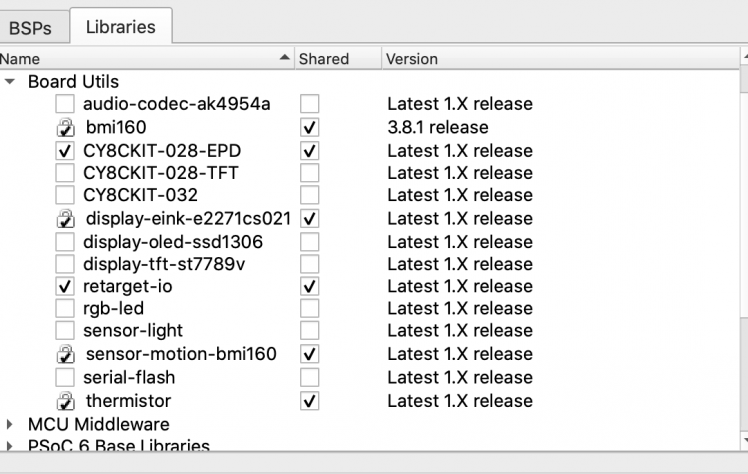
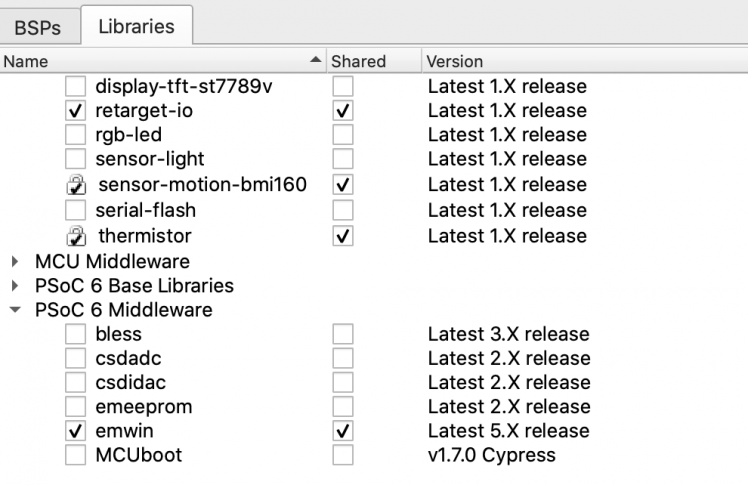
For the data collection process we will be using the Eink display so we need to add the libraries. In the Quick panel click on the Library Manager and select Board Utils > CY8CKIT-028-EPD and PSoC 6 Middleware > emwin (see below) and click on the Update button at the bottom.
After updating the libraries we need to update Makefile and add EMWIN_NOSNTS to the COMPONENTS.
- COMPONENTS=EMWIN_NOSNTS
The complete data collection project PSoC6_Audio_Data_Collection_Project is available at the GitHub repository. We would be able to build and flash the project to the development board connected to the computer by clicking the Launches > <Project Name> Program (KitProg3_MiniProg4) link in the Quick panel.
To receive the recorded PDM/PCM data from the development board we use a Python script as shown below.
- import serial
- import wave
- import sys
- import glob
- if len(sys.argv) != 5:
- print('Usage: {} <serial port> <baud rate> <bytes to read> <label>'.format(sys.argv[0]))
- exit(0)
- port = sys.argv[1]
- baud = sys.argv[2]
- bytes_to_read = int(sys.argv[3])
- label = sys.argv[4]
- # find the maximum counter value to resume file naming
- file_counts = [int(item.split('.')[1]) for item in glob.glob('{}.*.wav'.format(label))]
- count = 0
- if len(file_counts) > 0:
- count = max(file_counts) + 1
- print('Count started from {}'.format(count))
- try :
- with serial.Serial(port, baud) as ser:
- while True:
- try:
- line = ser.readline().strip().decode("utf-8")
- if line == 'START':
- print('Start reading PCM data');
- pcmdata = ser.read(bytes_to_read)
- print('pcmdata bytes = {}'.format(len(pcmdata)))
- filename = '{}.{:03d}.wav'.format(label, count)
- with wave.open(filename, 'wb') as wavfile:
- # params: mono (1) , 16bit (2 bytes), 16kHz sample rate, compression NONE
- wavfile.setparams((1, 2, 16000, 0, 'NONE', 'NONE'))
- wavfile.writeframes(pcmdata)
- count = count + 1
- print('{} created.'.format(filename))
- except UnicodeDecodeError:
- pass
- except KeyboardInterrupt:
- print('bbExited.')
- break
- except serial.serialutil.SerialException:
- print('Serial port: {} could not be opened.'.format(port))
- except ValueError:
- print('Baud rate: "{}" is not valid.'.format(baud))
For example if we are capturing AC On voice the command line should be as below.
- python3 record_audio_serial.py /dev/tty.usbmodem14303 115200 224000 AC_ON
It will capture the data and convert it. to WAV file with label name as AC_ON.001.wav and so on.
Data Collection Demo
Training the model
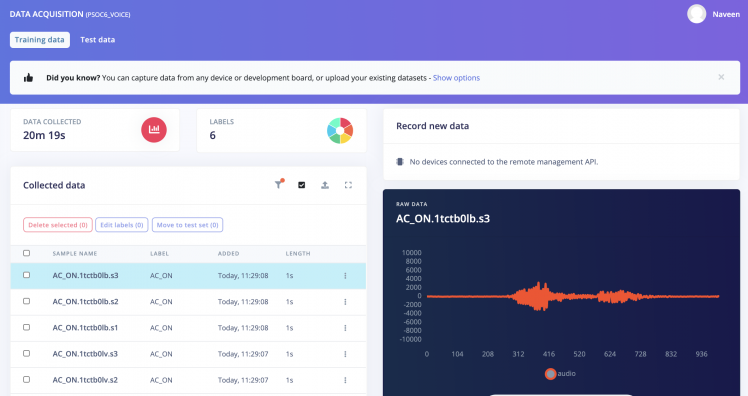
The collected data is uploaded to the Edge Impulse Studio using the Edge Impulse CLI application. After uploading the data, it is split into the segments of 1 second where each segment should cover the keyword. Then we rebalance the data into 80% training and 20% testing datasets. We create Impulse for training the data and choose MFCC block for feature extraction and Neural network block as model. The MFCC block extracts features from audio signals using Mel Frequency Cepstral Coefficients which is good for human voice.
We can see the uploaded data in the Edge Impulse Studio as below.
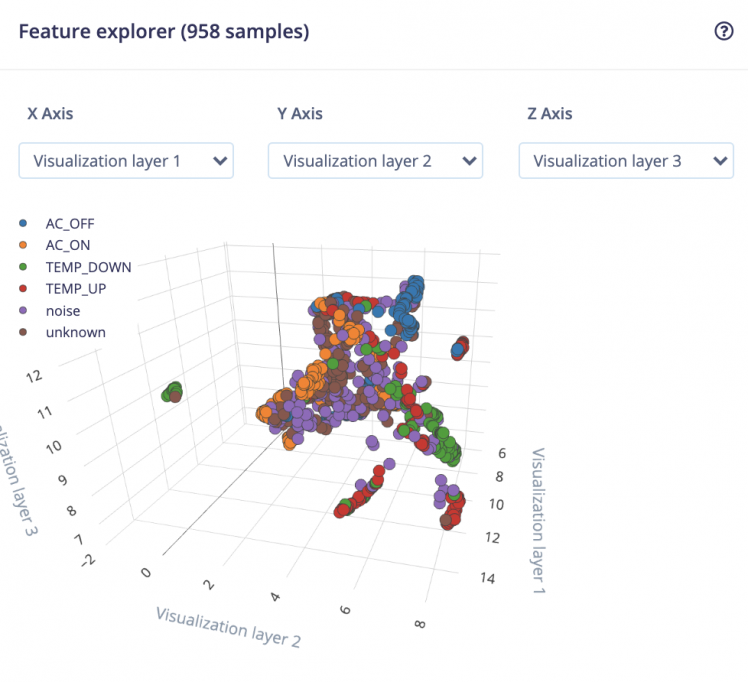
We can see the extracted features visualization in the Edge Impulse Studio' Feature Explorer as below.
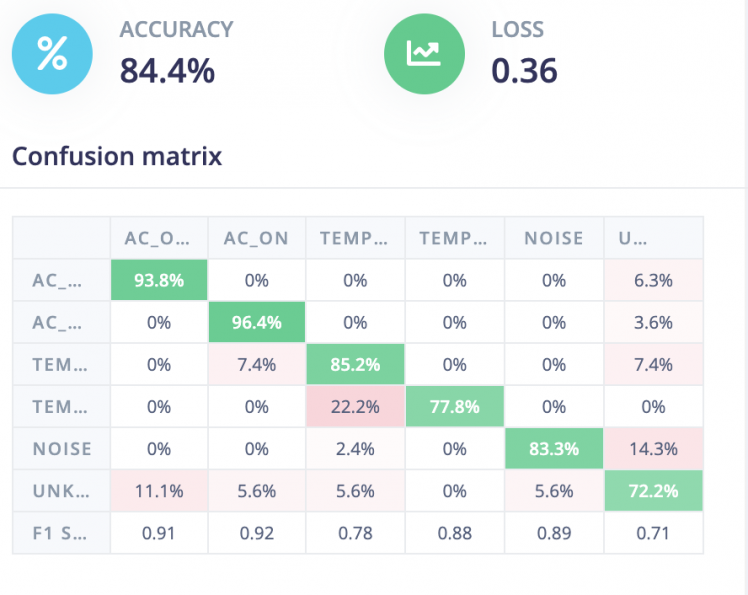
After training we get around 84.4% accuracy. We can do better if we collect more data. The confusion matrix is shown below.
Model Deployment
Currently the Edge Impulse Studio does not support the PSoC6 target. But we can choose an option to build a C++ library using the Edge Impulse Studio deployment page. After the library creation we can download it and use it with ModusToolBox. But there is an issue while using the TensorFlow Lite Micro SDK bundled with the C++ library. The TensorFlow Lite Micro SDK source files has *.cc extension which is not auto-discovered by the ModusToolBox and is not compiled during build process. I have created an issue at the Cypress forum and they may support CC extension in the future release. For now a quick workaround is to rename all *.cc to *.cpp using the following command inside the unzipped downloaded library bundle:
- find ./edge-impulse-sdk/tensorflow -name "*.cc" -exec sh -c 'f="{}"; mv -- "$f" "${f%.cc}.cpp"' ;
Also, we need to write porting code for the target device in our case "CY8CKIT 062 BLE". For example, we need to create a function which can return time in millis and micros since board has started. For that we have utilized the Free Running Multi-Counter Watchdog Timer as shown in the code snippets below
- #include "cyhal.h"
- #include "cybsp.h"
- cyhal_lptimer_t lptimerObj;
- bool timer_initialized = false;
- void timer_init() {
- cy_rslt_t result = cyhal_lptimer_init(&lptimerObj);
- /* LPTIMER initialization failed. Stop program execution */
- if (result == CY_RSLT_SUCCESS)
- {
- timer_initialized = true;
- }
- else
- {
- /* Disable all interrupts */
- __disable_irq();
- /* Turn on LED to indicate error */
- cyhal_gpio_write(CYBSP_USER_LED, CYBSP_LED_STATE_ON);
- /* Halt the CPU */
- CY_ASSERT(0);
- }
- }
- uint64_t ei_read_timer_ms() {
- if (!timer_initialized) {
- timer_init();
- }
- uint32_t cnt = cyhal_lptimer_read(&lptimerObj);
- return (uint64_t)cnt * 1000UL / CY_SYSCLK_WCO_FREQ;
- }
- uint64_t ei_read_timer_us() {
- return ei_read_timer_ms() * 1000UL;
- }
There are other functions which we have to port for the target device. All ported code can be found at the GitHub repository directory mtw/PSoC6_Model_Inferencing_Project/edge-impulse-sdk/porting/cy8ckit-062-ble.
Model inferencing
I have created another project PSoC6_Model_Inferencing_Project which is the main application for the TensorFlow model inferencing and do some actions. For this application the PSoC 6 BLE board is used as a BLE central device which listens to the voice commands and there is another ESP32 development board (M5Stack Atom Lite) which acts as a BLE peripheral and receives the command over BLE connection. This ESP32 development board has an onboard IR transmitter using that we can send commands to the Air Conditioner. To create this project "CapSense Tuning Over BLE - Client" project is used as a starting point. This way we can use the pre-configured design for a BLE central device. The Eink library is added by the same way as described in the data collection application. Also the Makefile is updated as shown below.
- COMPONENTS=BLESS_HOST BLESS_CONTROLLER CUSTOM_DESIGN_MODUS EMWIN_NOSNTS
After building and flashing the application it tries to find a BLE peripheral with local name "REMOTE". Once the peripheral gets connected the PSoC6 development board captures audio from the microphone and classify the keywords into 6 classes with probabilities continuously. If the class with highest probability above 0.6 (confidence level) it is recognized as a command and the BLE peripheral characteristics is written with that command code to do further action.
Conclusion
This project design is very flexible and scalable. In future we can add many BLE peripherals each one for different purposes and can control, for example; TV, Washing machines etc. using the single PSoC 6 BLE board as a BLE central with extra voice commands training. I would like to thank Infineon (Cypress) for providing me a PSoC 6 BLE Pioneer Kit for this project. I would like to thank my wife, Sweta, for helping me in female voice data collection.

Leave your feedback...