
Udoo X86 Powered Enhanced Guitar

Made by electrouser508 / Music / Sensors
About the project
A guitar with FX and MIDI controls powered by UDOO X86.
Project info
Difficulty: Moderate
Platforms: Arduino, Ubuntu, UDOO
Estimated time: 7 hours
License: GNU General Public License, version 3 or later (GPL3+)
Items used in this project
Hardware components

Story
In this tutorial we’re going to see how to build an Enhanced Guitar with UDOO X86.
Using the Arduino 101 embedded in the UDOO X86 is possible to send standard MIDI packets to any audio application that support them.
In this way we can control a Guitar FX software (such as Guitarix or Rakarrack) to add cool effects and change parameters and presets without using any additional pedal.
The guide is divided in 2 different parts:
Step 1 - Software Setup
Step 2 - Hardware Setup
Step 1 - The Software Setup
You can use any Linux Distro for this project, but using a full fledged Audio oriented distro, like Ubuntu Studio, is preferable.
Download the latest Ubuntu Studio ( https://ubuntustudio.org/download/ ) and install it on the UDOO X86. Refer to the UDOO documentation (https://www.udoo.org/docs-x86/Software_&_OS_Distro/Linux.html ) if you’re not experienced on doing this.

Tip: Enabling autologin during installation helps you to setup a headless (no monitor) installation later on.
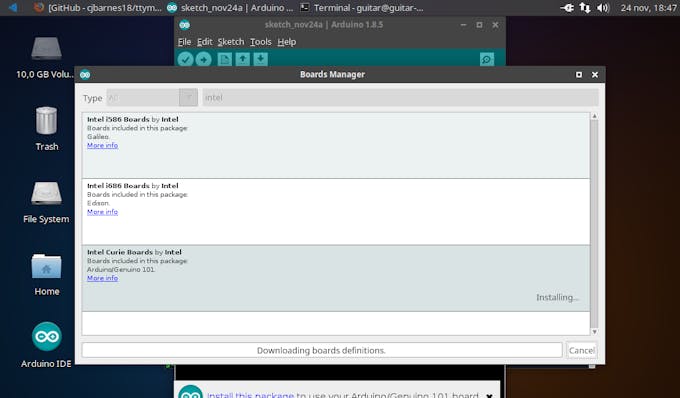
Install the Arduino IDE and configure it referring to the official UDOO docs (https://www.udoo.org/docs-x86/Arduino_101_(Intel_Curie)/Getting_Started_with_Arduino_101.html), expecially the Upload section.
Download the MIDI library from the Arduino IDE Library Manager following the instructions on https://github.com/FortySevenEffects/arduino_midi_library .

Download the MIDIcontrols library from https://github.com/ektor5/MIDIcontrol/archive/master.zip and extract it in the Arduino/libraries directory.

Open the example sketch Arduino/libraries/MIDIcontrol/examples/udooguitar/udooguitar.ino, customize it for your needs (help in README.md) and upload it into the internal Arduino.

Download ttymidi from the official website, install it referring to the docs: http://www.varal.org/ttymidi/ and run it in a terminal.
ttymidi -s /dev/ttyACM0 -v

Open qjackctl and configure it in order to use the external USB Audio Interface (in our case: hw:CODEC,0). Play with the values for setting the best audio performances to limit XRUNS and have lower latencies .
https://wiki.linuxaudio.org/wiki/list_of_jack_frame_period_settings_ideal_for_usb_interface
http://libremusicproduction.com/articles/demystifying-jack-–-beginners-guide-getting-started-jack
Tip: Create the file ~/.pulse/client.conf with the following terminal command in order to disable PulseAudio for best performances:
echo "autospawn = no" > ~/.pulse/client.conf
Tip: To enable RT support (more stable audio), make sure /etc/security/limits.d/audio.conf is not disabled and add your user to audio group. Follow this guide for more detailed info: http://jackaudio.org/faq/linux_rt_config.html

Open a guitar effect software, e.g. Rakarrak or Guitarix (they are already installed in Ubuntu Studio) and configure the MIDI controls.

Edit the JACK Connect patches in order to connect everything correctly and make it persistent using the Patchbay presets.
In Setup Settings tick auto-start option (Misc) and add the applications in the post-start options, if you want them to start at boot:
ttymidi -s /dev/ttyACM0 & guitarix &
and to kill them at shutdown
killall ttymidi guitarix

Remember also to add qjackctl in the startup applications.
Tip: It is useful to bind the power button to shutdown to do so in headless application (do that in the Power Management section in System Settings).

Step 2 - The Hardware Setup
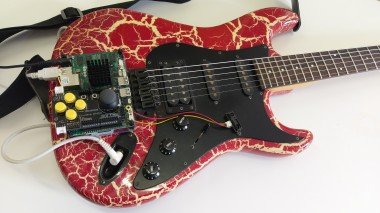
First you need to mount the UDOO on the guitar.
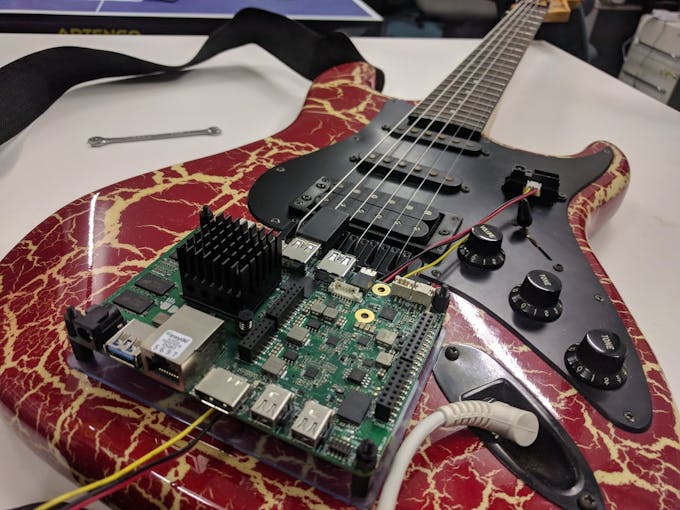
Then mount the shield on top of the UDOO.

Now add additional optional sensors.

Plug the USB Audio Interface to UDOO X86.

Plug the output jack to a guitar amplifier (or even headphones).
Finally, power up the UDOO X86 with a standard 12V power supply.
Play.
Credits
Related products


Leave your feedback...