
The Nvidianator

Made by 314Reactor / 3D Printing / Artificial intelligence / Robotics / Voice
About the project
The sequel to my Raspbinator Terminator Skull project.
Project info
Difficulty: Difficult
Platforms: NVIDIA Jetson, Ubuntu, Pimoroni
Estimated time: 1 day
License: GNU General Public License, version 3 or later (GPL3+)
Items used in this project
Hardware components


View all
Story
Skynet fights back.
In January 2018, I finished a project I had been working on for quite some time – The Raspbinator; I was very happy with it and it got some good attention. But there were some bugs and limitations to it and I already ideas for the next one.
Early in 2019, the Nvidia Jetson Nano was released and it had great capability for running machine learning; I thought this would be perfect for the next version of my project and a great opportunity to get into ML/Neural Nets.
Also, with Terminator: Dark Fate coming out this year – what better time!
So I pre-ordered the Jetson Nano, it was delivered on release and after many months of working and learning; The Nvidianator is finally ready.
Let's dive in to the build and code…
Mission Parameters:
- Improve upon The Raspbinator and fix bugs.
- Use more advanced technology for image recognition and learning.
- Improve the aesthetics.
No problemo:
- Nvidia Jetson Nano
- Skull 3D model – printed using 3DHubs
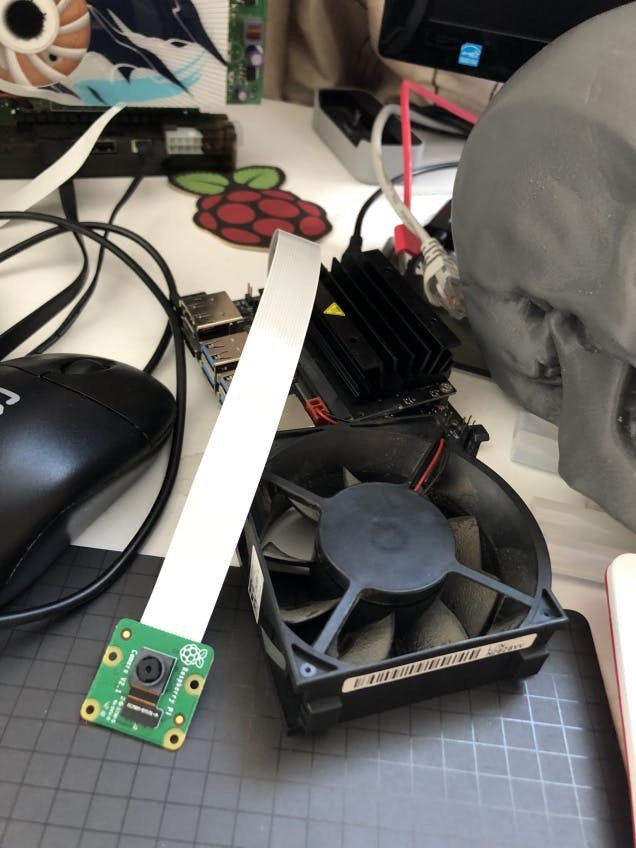
- RPi Camera V2
- 20cm CSI cable
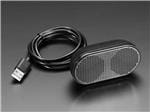
- Mini Portable Speaker
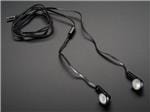
- Generic Microphone
- USB Soundcard
- Veroboard
- LED Kit
- Resistor Grab Bag
- NPN Transistor
- Jumper Jerky
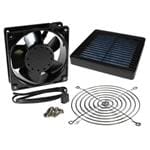
- 80mm Cooling Fan
- Electrical Tape
- Generic Screws
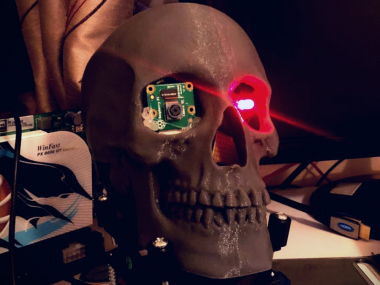
Model 101.
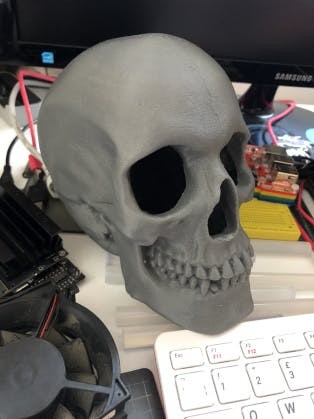
I wanted to go all out this time and really try and make this look good – so I knew I was going to utilise 3D printing (finally). I found this awesome skull by EDOUBLEB on Thingiverse and contacted them asking if I could use the design for my project and they said yes; so a big thank you to them!
3d Printed part (no changes made): https://www.thingiverse.com/thing:2964867
From user: https://www.thingiverse.com/edoubleb/designs
Under the creative commons attribution license: https://creativecommons.org/licenses/by/4.0/
I sent the design off to 3DHubs to be printed and within a week it arrived – so thanks also to them for being so speedy!
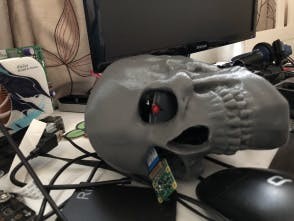
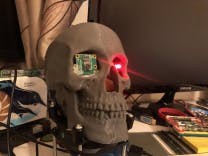
Here is the skull:
 IMG_3666
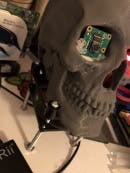
As you can see, it looks incredible and is just big enough to fit the Nvidia Jetson Nano:
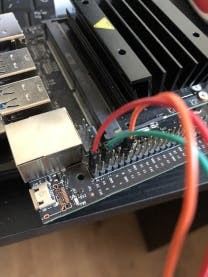
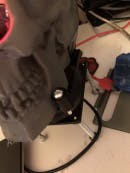
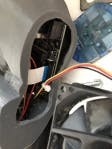
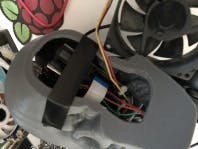
Then I needed to assemble a red eye – as the v2 CSI camera does not have an LED on it – following the instructions here to build the circuit for the LED to connect to the GPIO (the GPIO output on the Nano doesn’t have as much power as a Raspberry Pi’s so it needs some help from the 5v output, hence the circuit requirement):
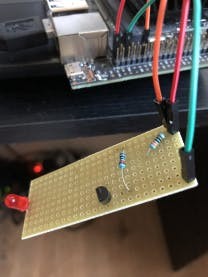 IMG_3670
 IMG_3671
 IMG_3673
This time I decided not to go for the Pan & Tilt kit for the camera this time as the new camera seems to have a wide enough field of view that its not really required.
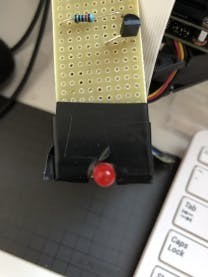
I glued in the circuit for the eye and the camera:
 IMG_3674
 IMG_3676
 IMG_3677
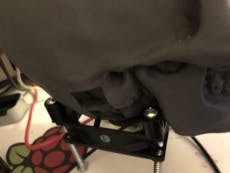
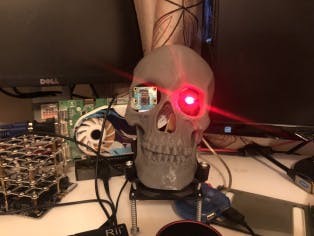
I noted that while working with the Jetson Nano it does tend to get quite hot when doing inference and all the other stuff that’s running on it; so I opted to have a stand with a fan on it to keep the skull cool. This is made with some screws and bits I found laying around and the fan can just be plugged into the standard 3/4 pin connector on the Nano:
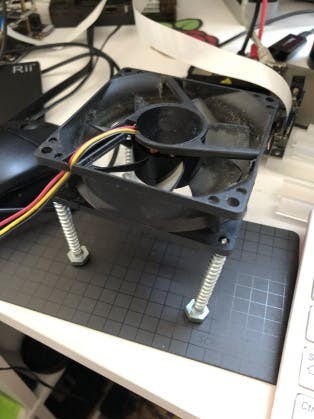 IMG_3668
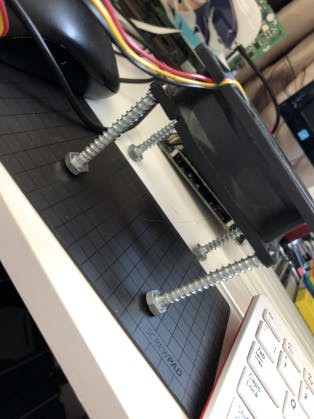 IMG_3669
 IMG_3705
 IMG_3704
 IMG_3703
 IMG_3706
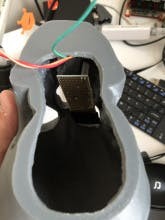
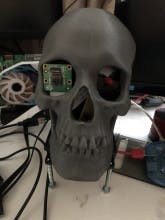
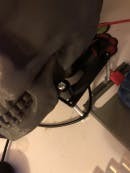
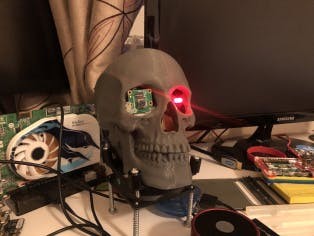
Next up was slotting the Nano into the skull and tape over the bottom to keep it held in and also allow airflow – the hole on the back of the skull is perfect for the cables too:
 IMG_3675
 IMG_3680
 IMG_3678
 IMG_3679
And here it stands:

Now for the coding and software.
I have detailed files.
After putting the Nano into the skull I realised that VNC wasn’t working – I had to ensure that VNC was setup properly which can only be done through the UI; thanks to this handy guide for helping out there.
Pretty much all of the setup from the prior project – The Raspbinator is required here (with the exception of OpenCV).
I used the chatbot from the Raspbinator and some of the basic loop from that to start as a base to work from.
You can grab the code from my GitHub.
Included in the link above is the model that I’ve trained as well as empty folders – I didn’t include the images but the folders need to be there for the program to get the names of the known faces. If you retrain off this network it will lose faces it knows unless you fill the folders with more images.
This time I opted to modularise everything – so each function is in a separate Python file that is imported by the main controller program. This makes it much easier to add/swap out functions as well as unit test them and debug.
Last time I used OpenCV to recognise faces – which worked fine and did the job, but this time with the power of CUDA and the GPU on board the Nano I thought it was time to get on some ML.
Let’s go over the Python modules in the GitHub repo:
object_infer.py
For object recognition I use the built in jetson-inference which I believe uses ImageNet – I think the same dataset used for the NNet in my Scorpion project, this can recognise an insane amount of images and so is perfect for identifying what’s in images.
Now the above is fine for objects but in terms of faces and training – I believe you need a DIGITS server and I don’t think it can be done on the fly on the board… someone correct me if I’m wrong I’m super new to this.
It is designed to return the top result (most confidence) using similar code to what was used in my Scorpion project. The results are returned to the vision analysis module that I’ll go over in a bit.
face_infer.py
For face recognition on top of object recognition I turned to PyTorch and got learning via the handy tutorials, the code I made has 2 modules, 1 for training and 1 for inference. It trains off of images in the ‘images/training’ folder and can also be validated using images in the ‘images/val’ folder.
If the confidence is below a certain threshold it will return as ‘unknown’.
vision_analysis.py
Both of the above are handled by a controller Python module that calls them, gets the results and passes those results back to the main module – the results are the object(s) and confidence level and human id and confidence level.
There is a face detection algorithm active in the code so that if a facial structure is detected it will pass it into the face inference module, if not it will skip it and return that there is no one there.
If the face inference returns a person as ‘unknown’ due to low confidence value then it passes this back to the main control module for handling.
The object info is used later to be passed into the chatbots word database.
led_on.py
The script for turning on the LED is based on the instructions found here. This module has the ability to turn the LED on/off or flash it via different functions.
snaps.py
There is a module for taking photos from the camera, this has the ability to take a single image or snap as many as you want in a row depending on whats passed into the function – the image is then saved and renamed so that only 1 is present in the root folder at all times. This is the image that all the inference ML loads up to pass through their nets.
speech_out.py and speech_in.py
I use the same text to speech technology I used in The Raspbinator – which is espeak – head on over to the project to find out how to install and configure that, as well as the speech to text system wit.ai.
Again I am using wit.ai as local STT systems are pretty inaccurate I’ve found – one day I may switch to a heavy duty hardware solution that can handle pretty much any word/name thrown at it like wit.ai can – any suggestions feel free to let me know.
Both of the above are handle in Python modules that return the results from the microphone as a string or pass a string in to get the TTS to speak.
There was also some configuration required for getting the default audio in/out – which I found from here.
chatbot.py
The chatbot is much the same as it was from the last iteration so you can find the explanation of its workings here. It has been modularised a bit and designed to work with the main loop; it can now get a list of all known names of people the skull knows and use them to make individual classes of the main talk loop.
This is to enable the bot to keep track of multiple conversations with different people – as when it sees a new person it uses the class with their name in order to store their last response and the bots last response.
It also has a new function detached from any talk loop class that can just add new words to its DB passed in from elsewhere (in this case strings from object inference).
face_trainer.py
For this version I also wanted to make sure that the skull could recognise not only existing faces but also give a confidence level back – so that if the confidence of the prediction is below a certain threshold, it will ask the person what their name is and snap pictures of them; storing them into the image training folder ready for re-training the neural net.
At the moment this is set to do 15 epochs; which is essentially passing the images through the net for training 15 times each (someone correct me if that’s inaccurate). I chose this amount as it seemed to be the best, without underfitting or overfitting the model but also not taking too long.
log_new_face.py
If the person already exists it will simply snap photos of their face and store them in the already existing folder. This will ensure that next time it should get a higher confidence on recognising their face after training – more data = more accurate.
Most of the modules above are configured to be able to run individually so that each one can be tested without having to go through too much waiting/creating scenarios.
There is also a colors.py in the repo – this is used to print certain elements out in the CLI in different colours; for readability during debugging. As well as two sh files that run commands for taking photos from the camera and renaming the resulting files.
nvmain.py
The main loop is what imports and calls all of the other modules to make the skull a complete working unit.
First of all it initialises the LED.
Then it sets up all the class names from the known images for the facial recognition as well as the loading the pre-trained model for inference.
It then hits the main loop:
- Clears all variables such as humanid, object, confidences etc.
- It then snaps a picture and runs the vision analysis module and gets back the object, face IDs, and confidences.
- The objects are passed into the chatbots word database.
- If there is no human present then it does not initiate conversation, says out loud the object it’s seen and passes, to restart the loop and snap another picture.
- If there is a human present but they are unknown then it will request for identification via the speech to text module and pass the information into the log new face module. It will then re-train the network with the new photo data available and then move onto opening a conversation with the persons name it just obtained.
- If it has already recognised the human it will call a response from the chatbot module – use the TTS module to say that response out loud. It then gets a response from the microphone from the speech in module – then loops this 10 times for a more immediate conversation.
- Once this conversation has ended it loops around and snaps another photo for analysis.
Every time photos are taken – it flashes the eye LED 6 times, takes the photo(s) then flashes another 2 times to indicate that the photos have been successfully taken, this makes it easier to work with so you know when its grabbing photos without having to look at the logging.
A machine? Like a robot?
The 3D print I used is so awesome – it’s honestly quite creepy having it sat there on my workbench watching me – and as above some of the responses are eerily good.
It’s a vast improvement over the first iteration as you can see:
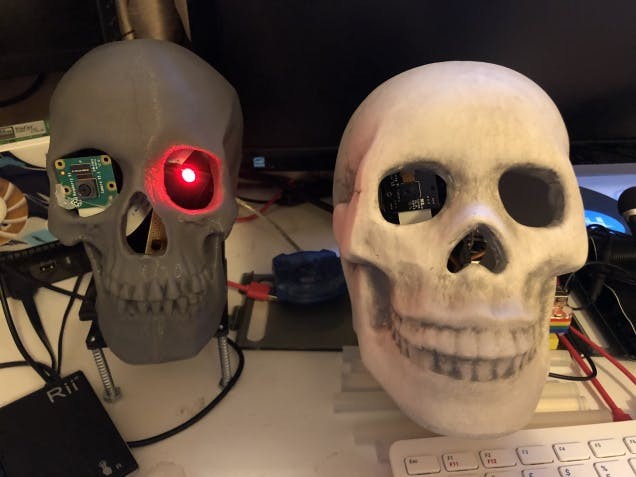 Brothers.
In terms of the object recognition – it’s quite effective, although of course it doesn’t get everything right, but it’s reasonably ok at identifying monitors/laptops/cups etc. Stuff that I’ve usually had nearby it while working and testing on it. However you can see in the video that it tends to be obsessed with the light on my ceiling and constantly keeps identifying it as the main part of a photo as a spotlight. But it got the laptop and a couple of other things.
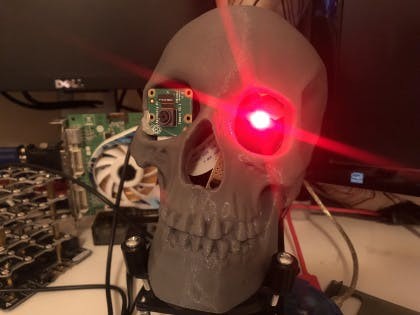
 Always watching.
From testing the face recognition was around 80% correct – this could probably be improved further by optimising the training parameters with more epochs and such; but it’s pretty effective and didn’t have much issue recognising me. Only on occasion confusing me for someone else. This is where optimisations in the face training module could possibly help, perhaps increasing the number of epochs or some other variable.
In terms of recording new faces and re-training it is reasonably successful, being able to say that it is not sure of a face and then taking pictures of the new person and creating a new training folder for them. The only issue here is that the model re-training takes some time (around 11 minutes ). But once that is done it is ready to go with the new face it has learnt – or improved recognition of existing humans it knows.
As can be seen on GitHub – it’s been trained on a number of faces already; mainly Star Trek characters – the images aren’t included however.
One thing I need to look into is being able to retrain a network without the previous training data, essentially adding faces to it. Thus far my attempts have just resulted in the face inferences being reduced to just the newest images; rather than the new data being added to the old in the net.
PyTorch is an excellent tool and with their handy tutorials I learned a lot about neural networks and machine learning; it did not not take too much time at all to get up to speed enough to be recognising faces.
The voice output is pretty solid, but it could do with some improvement; I will probably switch to a more advanced TTS system in future.
It seems that wit.ai have improved their STT system as it seems more accurate than it was before – very happy with that.
 IMG_3752
 1 / 2 • IMG_3754
 IMG_3748
 IMG_3747
The future’s not set.
The main issue with the build is that the overall process of taking and analysing photos is quite time consuming and thus the conversation times can suffer as a result; this is why I implemented the conversation loop from the analysis of 1 photo, currently a back and forth or 10 responses/inputs.
Overall; it works exactly how I wanted – it’s very good at face recognition as well as seeing objects.
The chatbot can talk nonsense at times, but the more it is trained and talked to the better and more coherent it should become as it gathers more human responses. I will definitely rework the bot some day to hopefully make more sense and be able to derive some context from the object inference as well.
This time the responses were far more interested given that it was gathering new words all the time from the object recognition system. Unfortunately this means that it can just throw out even more random stuff because it knows more words, which after a lot of chatting may result in it coming out with more coherent replies that make sense the more it learns.
For the next version I will try to add in some sort of contextual module – so that the program is able to derive context from the objects it is seeing and intermix them with the faces it is recognising in order to get better and more interesting/accurate responses.
The ability to learn new faces and update it’s library of existing faces to make the neural network more accurate if it’s unsure is really cool – I was thinking of possibly threading this out at some point and then triggering a reload of the network. So that the skull can continue operating while the net trains. However even with the power of the Jetson and its CUDA GPU this would be quite intensive on it in terms of memory and processing; having to both train the network and perform the inferences.
I will definitely be keeping an eye out for newer and faster technology for the next version – the technology is improving all the time and I’m very excited to see what Nvidia or another company releases.
Also as mentioned above it would be good to move the speech to text system into the local build – rather than being online. This is something else I will be looking out for, it would be good to have an ASIC or something hooked up to the mainboard providing STT from the incoming recordings and passing the results back in real time.
We’re not gonna make it, are we? People, I mean.
I’m so happy with this project and I hope you enjoyed it too, feel free to give me some advice or point out any bugs; or even make your own!
I’ve learned so much from working on this and the possibilities with machine learning are just endless. I’ve already got many ideas for a 3rd version and the things I’ve learned here are transferable to other projects.
With the technology available to consumers now it’s a very, very exciting time to be a maker.
See you next time…

CAD, enclosures and custom parts
Code
Credits
Related products


Leave your feedback...