
Remote Control An Rgb Led Via Netduino And Xamarin!
Made by Wilderness Labs / Lights / Productivity / Sensors
About the project
Get familiar with Maple, a RESTful web server running on network capable Netduinos and control a rainbow LED remotely with a Xamarin app!
Project info
Difficulty: Easy
Platforms: Microsoft, Xamarin, Netduino
Estimated time: 1 hour
License: Apache License 2.0 (Apache-2.0)
Items used in this project
Hardware components

Story
In this project, you're going to control an RGB LED connected to a network-capable Netduino with a Xamarin.Forms app on your phone, making it blink, pulse or cycle through various colors using the Netduino.Foundation library.
To control the RGB LED through the network, Maple makes it easy to build connected devices with Netduino by exposing control via a Web API. Maple is an open source, ultra-lightweight, JSON enabled, RESTful web server built specifically for Netduino devices with network capabilities.
Netduino.Foundation is a platform for quickly and easily build connected things using the.NET MicroFramework on Netduino. Created by Wilderness Labs, it's completely open source and maintained by the Netduino community.
Step 1 - Assemble the circuit
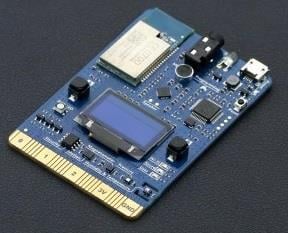
Connect your common anode or common cathode RGB LED to a network capable Netduino board.
Common Cathode RGB LED
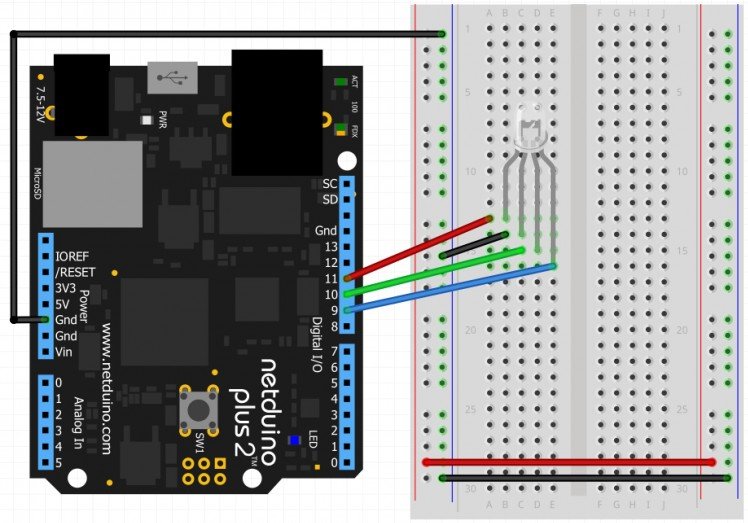 Circuit of common cathode RGB LED
Common Anode RGB LED
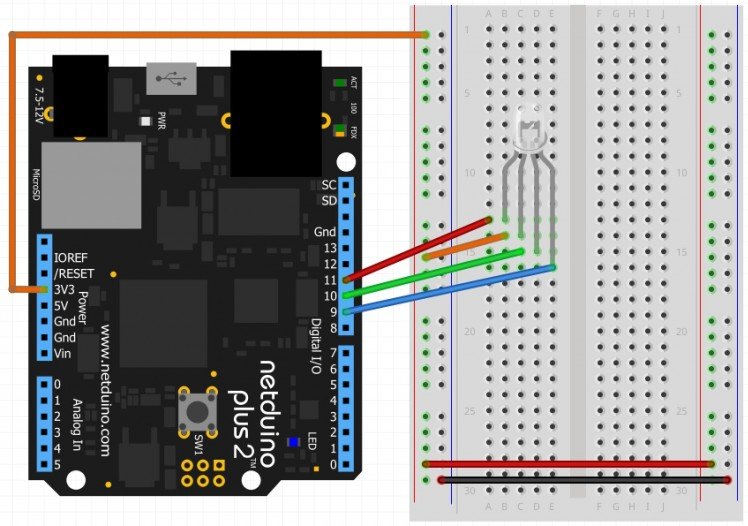 Circuit of a common anode RGB LED
Step 2 - Connect your Netduino to the network
Windows
Download and open the Firmware Updater and Configuration Tool for Windows or MacOS while your Netduino is connected in bootloader mode. Before using the Network Configuration section, make sure your device is selected automatically in the Model picker control to confirm that your device is properly connected.
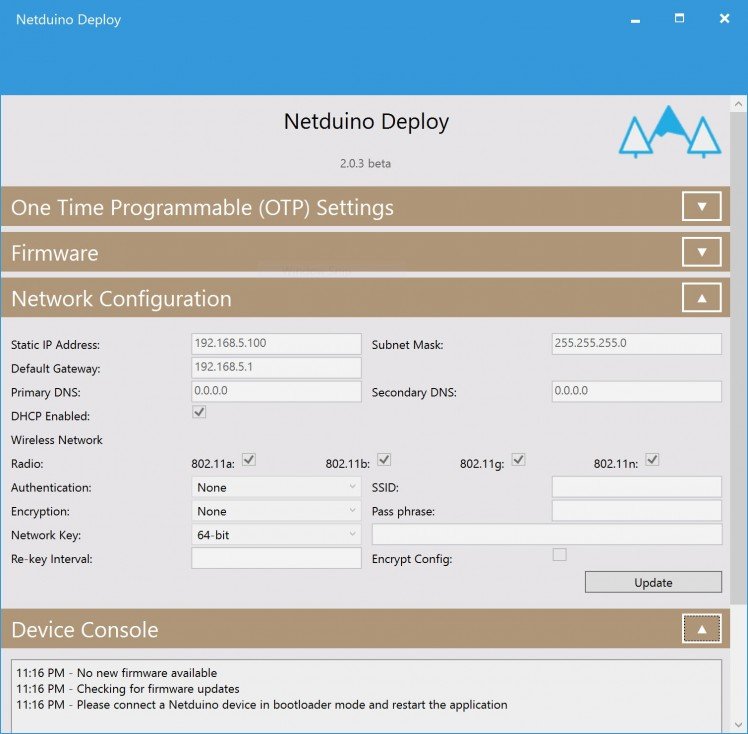 Netduino Deploy Tool's Network Configuration
If you're using a Netduino 3 WiFi, select the proper encryption, authentication, SSID and pass-phrase settings and finally click on Update to save those settings to the Netduino.
Once the network settings are saved to the device, remember to disconnect and reconnect your Netduino back to your computer to leave bootloader mode and its ready to run the project once its completed.
Step 3 - Create a Netduino Project
Create a Netduino project in Visual Studio 2015 for Windows or the latest Visual Studio for Mac; name the project RgbLedHost.
Step 4 - Add the Netduino.Foundation Maple NuGet Packages
Windows
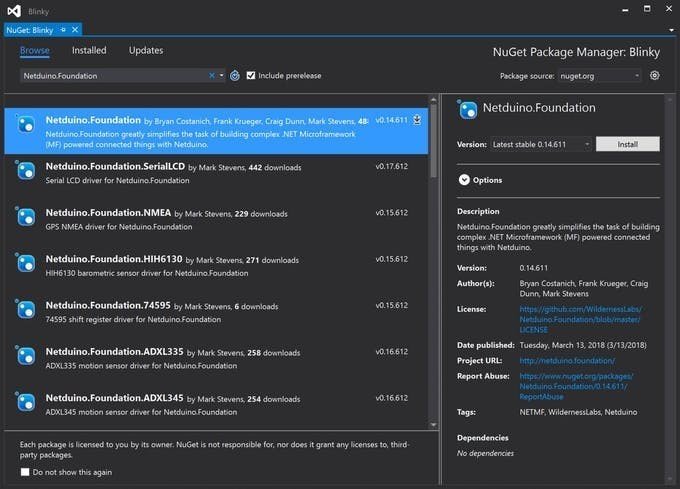
Right-click on your RgbLedHost project and click Manage NuGet Packages. In the Browse tab, search for Netduino.Foundation; it should be the first search result. Click the Install button.
 Adding Netduino.Foundation NuGet package
Now search for Maple and Netduino.Foundation.Network and add them to your project.
MacOS
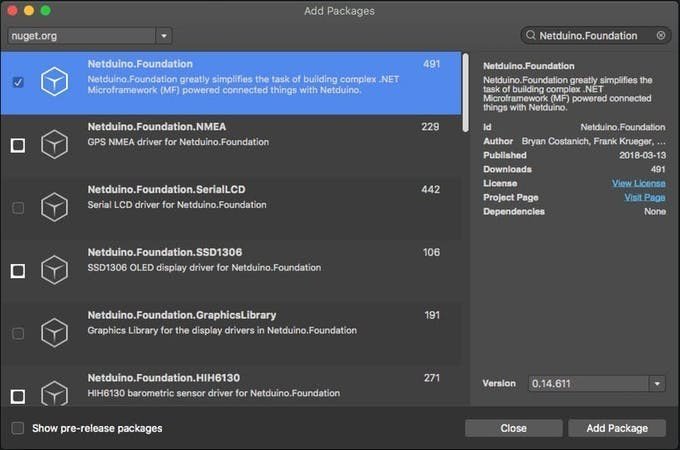
Alt-click on your RgbPwmHost project in the Solution Explorer, and click Add => Add Nuget Package to open the NuGet Package window. Search for the Netduino.Foundation package and click Add Package to add it to your project.
 Adding Netduino.Foundation NuGet package
Now search for Maple and Netduino.Foundation.Network and add them to your project.
Step 5 - Write the code for the RgbLedHost project
Add RequestHandler class
Maple web API endpoints are defined by creating custom classes that inherit from RequestHandlerBase. Maple uses reflection to create URLs based on the method names in those custom classes. It supports both the get and post verbs and method names must be prefixed with either one of those strings in order to be automatically made into an endpoint.
Right click on your project and click Add new => Class, and name it RequestHandler. Here is where you will expose five URL endpoints: /TurnOn, /TurnOff, /StartBlink, /StartPulse and /StartRunningColors. Copy the following implementation of all these methods:
public class RequestHandler : RequestHandlerBase
{
 public event EventHandler TurnOn = delegate { };
 public event EventHandler TurnOff = delegate { };
 public event EventHandler StartBlink = delegate { };
 public event EventHandler StartPulse = delegate { };
 public event EventHandler StartRunningColors = delegate { };
 public RequestHandler() { }
 public void postTurnOn()
 {
 TurnOn(this, EventArgs.Empty);
 StatusResponse();
 }
 public void postTurnOff()
 {
 TurnOff(this, EventArgs.Empty);
 StatusResponse();
 }
 public void postStartBlink()
 {
 StartBlink(this, EventArgs.Empty);
 StatusResponse();
 }
 public void postStartPulse()
 {
 StartPulse(this, EventArgs.Empty);
 StatusResponse();
 }
 public void postStartRunningColors()
 {
 this.StartRunningColors(this, EventArgs.Empty);
 StatusResponse();
 }
 private void StatusResponse()
 {
 Context.Response.ContentType = "application/json";
 Context.Response.StatusCode = 200;
 Send();
 }
}
When those endpoints are invoked, the appropriate method is called. On each method, two things are happening: trigger an event and send a response to confirm the client that the request has been received.
Add RgbLedController class
It is a good practice to create a Controller class for every peripheral involved to make the project more scalable, maintainable and cleaner. These Controller classes abstracts all the peripheral's logic so the main program logic will remain cleaner and easier to understand. Add a RgbLedController class with the following code:
public class RgbLedController
{
 public RgbLedController(RgbPwmLed rgbPwmLed)
 {
 _rgbPwmLed = rgbPwmLed;
 _rgbPwmLed.SetColor(Netduino.Foundation.Color.Red);
 }
 public void TurnOn()
 {
 _rgbPwmLed.Stop();
 _rgbPwmLed.SetColor(GetRandomColor());
 }
 public void TurnOff()
 {
 _rgbPwmLed.Stop();
 _rgbPwmLed.SetColor(Netduino.Foundation.Color.FromHsba(0, 0, 0));
 }
 public void StartBlink()
 {
 _rgbPwmLed.Stop();
 _rgbPwmLed.StartBlink(GetRandomColor());
 }
 public void StartPulse()
 {
 _rgbPwmLed.Stop();
 _rgbPwmLed.StartPulse(GetRandomColor());
 }
 public void StartRunningColors()
 {
 var arrayColors = new ArrayList();
 for (int i = 0; i < 360; i = i + 5)
 {
 var hue = ((double)i / 360F);
 arrayColors.Add(Netduino.Foundation.Color.FromHsba(((double)i / 360F), 1, 1));
 }
 int[] intervals = new int[arrayColors.Count];
 for (int i = 0; i < intervals.Length; i++)
 {
 intervals[i] = 100;
 }
 _rgbPwmLed.Stop();
 _rgbPwmLed.StartRunningColors(arrayColors, intervals);
 }
 public void NetworkConnected()
 {
 _rgbPwmLed.Stop();
 _rgbPwmLed.SetColor(Netduino.Foundation.Color.Green);
 }
 protected Netduino.Foundation.Color GetRandomColor()
 {
 var random = new Random();
 return Netduino.Foundation.Color.FromHsba(random.NextDouble(), 1, 1);
 }
}
Add the App class
For this project, we want to implement a common App software pattern to control all the Network and Controllers make things cleaner and robust. Add a new App class to your project, and paste the following code:
public class App
{
 static int _blinkDuration = 100;
 protected MapleServer _server;
 protected RgbLedController _rgbController;
 public App()
 {
 InitializePeripherals();
 InitializeWebServer();
 }
 protected void InitializePeripherals()
 {
 var rgbPwmLed = new RgbPwmLed
 (
 SecretLabs.NETMF.Hardware.Netduino.PWMChannels.PWM_PIN_D11,
 SecretLabs.NETMF.Hardware.Netduino.PWMChannels.PWM_PIN_D10,
 SecretLabs.NETMF.Hardware.Netduino.PWMChannels.PWM_PIN_D9,
 1.05f,
 1.5f,
 1.5f,
 false
 );
 _rgbController = new RgbLedController(rgbPwmLed);
 }
 protected void InitializeWebServer()
 {
 var handler = new RequestHandler();
 handler.TurnOn += (s, e) =>  {  _rgbController.TurnOn();  };
 handler.TurnOff += (s, e) =>  {  _rgbController.TurnOff();  };
 handler.StartBlink += (s, e) =>  {  _rgbController.StartBlink();  };
 handler.StartPulse += (s, e) =>  {  _rgbController.StartPulse();  };
 handler.StartRunningColors += (s, e) =>  {  _rgbController.StartRunningColors();  };
 _server = new MapleServer();
 _server.AddHandler(handler);
 }
 public void Run()
 {
 Initializer.InitializeNetwork();
 Debug.Print("InitializeNetwork()");
 while (Initializer.CurrentNetworkInterface == null) { }
 _server.Start("RgbLedHost",  Initializer.CurrentNetworkInterface.IPAddress);
 _rgbController.NetworkConnected();
 }
}
First thing that happens in this class is calling InitializePeripherals to instantiate all the Controllers that are connected to the Netduino, which in this project, is the RgbLedController object and make it light up in red color.
After setting up the peripherals, it now calls InitializeWebServer, and here you will use the RequestHandler. After instantiating it, register the event handlers for the four exposed methods explained previously: LightOn, LightOff,StartBlink, StartPulse and StartRunningColors:
- OnLightOn - Turns on the LED.
- OnLightOff - Turns off the LED.
- OnBlink - Makes the RGB LED to blink.
- OnPulse - Makes the RGB LED pulse.
- OnSweepColors - Make the RGB go through all the Hue spectrum, like in the Show Rainbow Colors with an RGB LED and Netduino
After all those event handlers, create a new Maple instance, and assign your RequestHandler object to its Handler property.
In the Run method, the first thing you need to do when starting the project is to use Initializer.InitializeNetwork();. Netduino boards need to initialize their network every time they're powered on, so before starting the Maple server, you need to make sure that the Netduino has connected to the network successfully, and that it has received a valid IP address.
When the Netduino has joined the network, you can now safely start the Maple server by doing server.Start() passing the name of the server and the IpAddress assigned to it, and set the RGB LED color to green to indicate that the program has launched successfully, and its ready to receive client requests.
Implement Main method in the Program class
Lastly, create a new App class object and invoke the Run method. Your code should look like this:
using System.Threading;
namespace RgbLedHost
{
 public class Program
 {
 public static void Main()
 {
 App app = new App();
 app.Run();
 Thread.Sleep(Timeout.Infinite);
 }
 }
}
Run the RgbLedHost project
That is everything that you need to do for the RgbLedHost project. When you run the project, you will see the RGB LED turning Red when finished initializing peripherals and its now waiting to receive an IP Address once its connected to the network. Once it has joined the network the RGB LED will turn to green.
 RgbLedHost project running and indicating when Maple has started successfully
Step 6 - Setting up the Xamarin.Forms RgbLedRemote project
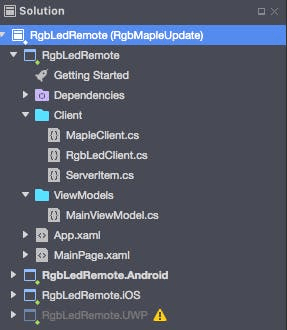
Next part in this project getting the Xamarin.Forms app running on your phone. This project can be found in the Netduino_Samples/Connected_RgbLed repo. The code that runs on the Netduino is in the RgbLedHost app folder. The Xamarin.Forms sample its in the RgbLedRemote folder. Go ahead and download the RgmLedRemote project to your computer/mac, and open it on the latest version of Visual Studio available, and the common code project should look like this:
 Xamarin.Forms RgmLedRemote app sample
The take away for this project is the MapleClient class, which has a simple implementation of a HttpClient to send/receive server requests to/from the Maple server, and a UdpClient to receive UDP broadcast messages coming from one or more Maple servers running, and the app will list them on a Picker so you can select to which Netduino you wish to connect to and send requests.
public class MapleClient
{
 static readonly int LISTEN_PORT = 17756;
 static readonly int LISTEN_TIMEOUT = 5000; //ms
 public async Task<UdpReceiveResult> UdpTimeoutTask()
 {
 await Task.Delay(LISTEN_TIMEOUT);
 return new UdpReceiveResult();
 }
 public async Task<List<ServerItem>> FindMapleServers()
 {
 var hostList = new List<ServerItem>();
 var listener = new UdpClient(LISTEN_PORT);
 var ipEndPoint = new IPEndPoint(IPAddress.Any, LISTEN_PORT);
 var timeoutTask = UdpTimeoutTask();
 try
 {
 while (timeoutTask.IsCompleted == false)
 {
 Console.WriteLine("Waiting for broadcast");
 var tasks = new Task<UdpReceiveResult>[]  {  timeoutTask, listener.ReceiveAsync()  };
 int index = 0;
 await Task.Run(() => index = Task.WaitAny(tasks));
 var results = tasks[index].Result;
 if (results.RemoteEndPoint == null)
 break;
 string host = Encoding.UTF8.GetString(results.Buffer, 0,  results.Buffer.Length);
 string hostIp = host.Split('=')[1];
 Console.WriteLine("Received broadcast from {0} :n {1}n",  hostIp, host);
 var serverItem = new ServerItem()
 {
 Name = host.Split('=')[0]+" ("+host.Split('=')[1]+") ",
 IpAddress = host.Split('=')[1]
 };
 if (!hostList.Any(server => server.IpAddress == hostIp))
 {
 hostList.Add(serverItem);
 }
 }
 }
 catch (Exception e)
 {
 Console.WriteLine(e.Message);
 }
 finally
 {
 listener.Close();
 }
 return hostList;
 }
 protected async Task<bool> SendCommandAsync(string command, string hostAddress)
 {
 var client = new HttpClient();
 client.BaseAddress = new Uri("http://" + hostAddress + "/");
 client.Timeout = TimeSpan.FromSeconds(5);
 try
 {
 var response = await client.PostAsync(command, null);
 return response.IsSuccessStatusCode;
 }
 catch (Exception ex)
 {
 System.Diagnostics.Debug.Print(ex.Message);
 return false;
 }
 }
}
The SendCommandAsync function will return a boolean value to indicate if the request was processed correctly (true) or there was an error in the request or an exception has occurred (false).
Every time a request is sent, the app will display a loading screen, and once the response message returns successful, the loading screen disappears and the buttons are re-enabled, with the highlighted button reflecting which action is currently happening on the RGB LED.
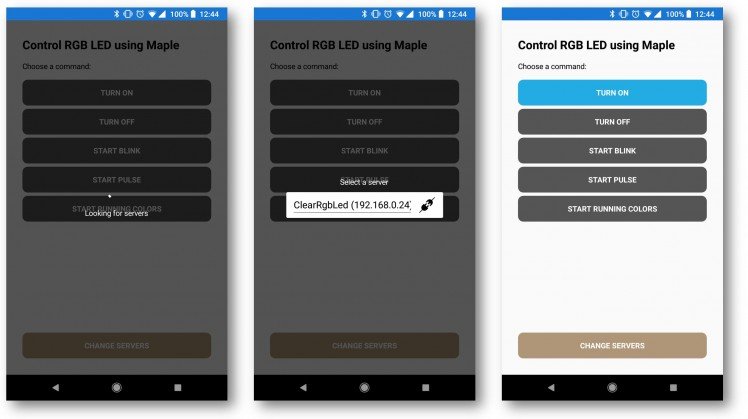 RgbLedRemote project
Step 7 - Running the project samples
Run the RgbLedHost project first, and wait till the RGB LED turns green to indicate that the server is now running and broadcasting the UDP message of its name and IP address.
Now run the RgbLedRemote project to your mobile device, and wait a moment till the app displays a Picker control, where you can choose to which server you wish to connect to. If the connection was successful, the setup dialog screen should disappear, and the RGB LED should change to a different color.
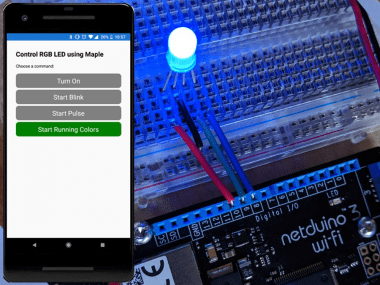
 RGB LED controlled by mobile app using Maple
Check out Netduino.Foundation!
This project is only the tip of the iceberg in terms of the extensive exciting things you can do with Netduino.Foundation.
- It comes with a Huge Peripheral Driver Library with drivers for the most common sensors and peripherals available in the market.
- All the peripheral drivers are simplified with built-in functionality, exposed by a clean, modern API.
- This project is backed by a growing community that is constantly working on building cool connected things and always excited to help new-comers and discuss new projects.
References
Schematics, diagrams and documents
Code
Credits
Related products


Leave your feedback...