Portable Capacitive Touch Piano
About the project
Make your own capacitive touch piano with slide keys. Use "Secret-Keys" demo jingles if your playing is not as good as your coding! :-)
Project info
Difficulty: Easy
Estimated time: 1 hour
License: GNU General Public License, version 3 or later (GPL3+)
Items used in this project
Hardware components
Story
In this project, I explain how to build a portable capacitive touch piano with
- an Arduino,
- a Capacitive Touch Shield for Arduino using the MPR121,
- a piezo buzzer,
- copper foil tape with conductive adhesive (cut in the shape of piano keys),
all enclosed in a clear acrylic enclosure (ProtoStax for Arduino) with the capacitive touch keys stuck on its top surface. This makes it a nice compact little piano that you can carry out and jam with and code up new tunes!
For the capacitive touch sensing, I use Adafruit's 12 x Capacitive Touch Shield for Arduino using the MPR121, coupled with the Adafruit_MPR121 library that makes it easy to detect and respond to touches on up to 12 different conductive surfaces.
Wait a minute! There are 12 semitones in an Octave - C, C#, D, D#, E, E#, F, G, G#, A, A#, B! Perfect! Well, it would have been great if the MPR121 handled 13 inputs - it would have allowed us to go from C to C of the higher octave, but there are still plenty of tunes to be had! (and I also offer suggestions below for how you can take this project further by expanding the octave range)
Moreover, you can also program in your own touch sequences ("Secret Keys" or key combinations) to play any random tunes that can include as many octaves as you like (limited only by the power of your ear to hear the notes, or your piezo/speaker to play it!).
For the output, I use the Arduino's tone library to play the sound through a Piezo buzzer. You can also use a speaker - just remember to use a resistor with it to restrict the current to that which can be provided by the Arduino's pin!
For the piano keys, I use copper foil tape with conductive adhesive. It is important to get it with conductive adhesive as you are going to stick the tape onto the wire that's connected to the shield.
Lastly comes the enclosure. Some of you may be aware that I've created a new stackable, modular enclosure system called ProtoStax. It was a personal itch that I had to scratch - I wanted an enclosure that supported different stages of prototyping, offering protection and open access when starting out, with the ability to add side walls and the top later, but also have the ability to stack multiple units either side-by-side or one on top of the other, thereby having the ability to expand with prototyping needs and the addition of other boards and components.
In this example I use ProtoStax for Arduino, a clear acrylic enclosure for the Arduino -- it fits both the Uno/Leonardo footprint as well as the larger Mega/Due footprint -- that is also stackable and modular and has room comfortably for the two Shields (with some minor modifications, that I will outline). It is clear and sturdy and also has rubber feet to slightly elevate it and protect the surface of your table. The top surface of the enclosure also acts as the keypad for your touch piano - this is where you'll be sticking your conductive copper foil tape! At the end, you'll have a nifty little touch piano that you can easily carry around and display and jam along! ?
Ok, let's get started, shall we? ?
Step 1 - Mount the Arduino to the Enclosure Base Plate
Let us first mount the Arduino (Uno in our example) to the enclosure's base plate. This gives it protection while offering full open access to it to configure and setup the Arduino and play around with it. When you are ready to close it up, It is easy to add the side walls and top plate and secure everything with screws.
Mount the Arduino to the base plate, and add feet and other hardware to prepare the enclosure in Platform Configuration. See steps below in the slideshow - the caption for each image is numbered and gives additional explanation for each step.
1 / 9 • 1. Start with Base Plate
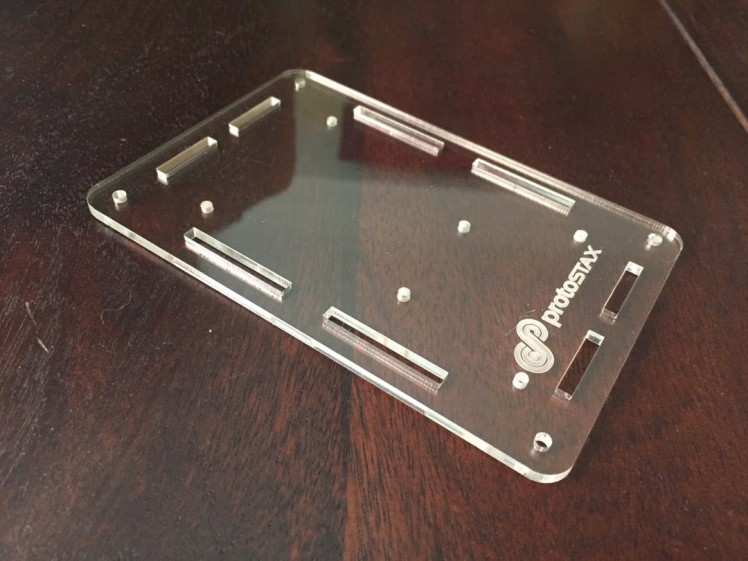
1. Start with Base Plate
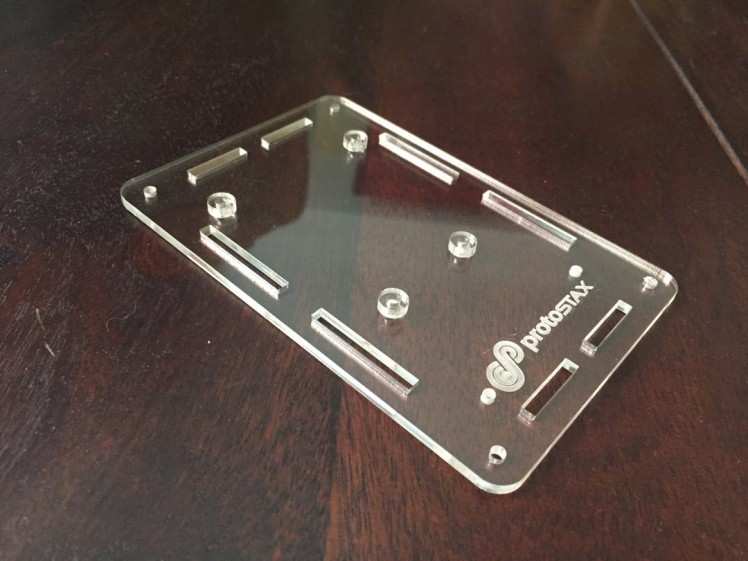
2. Use PCB Mounting Spacers
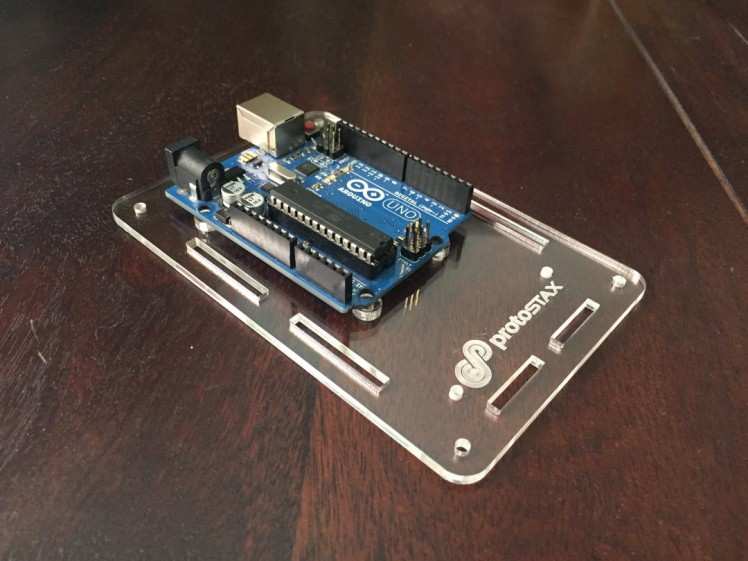
3. Place Arduino on PCB Mounting Spacers

4. Screw in Arduino to Base Plate (Base Plate Mounting Holes are threaded)
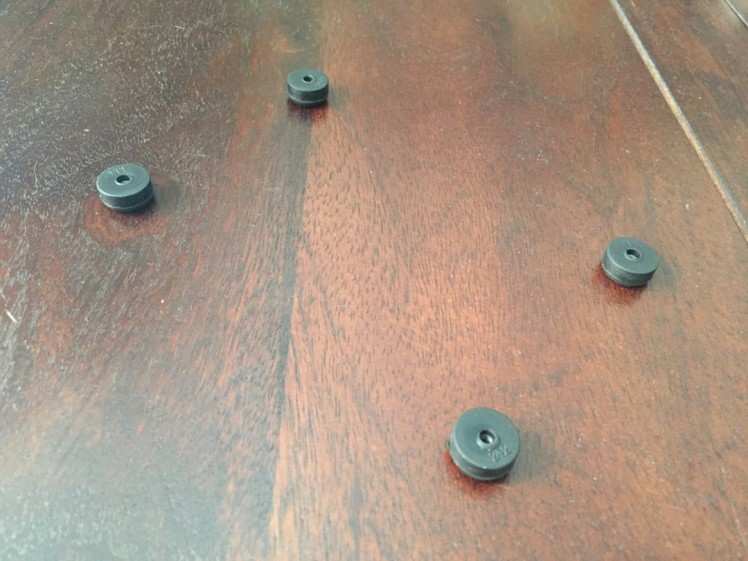
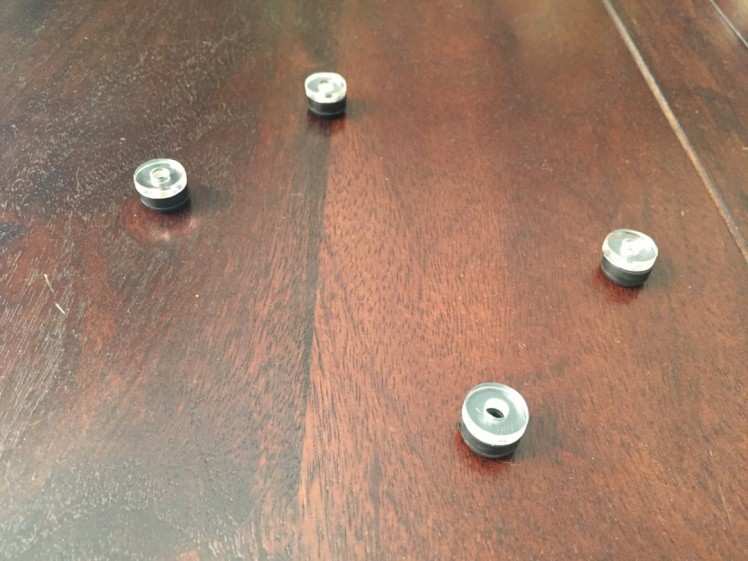
5. Prepare Rubber Feet - insert hex nuts into bottoms of Rubber Feet
6. Place Washers on top of Rubber Feet
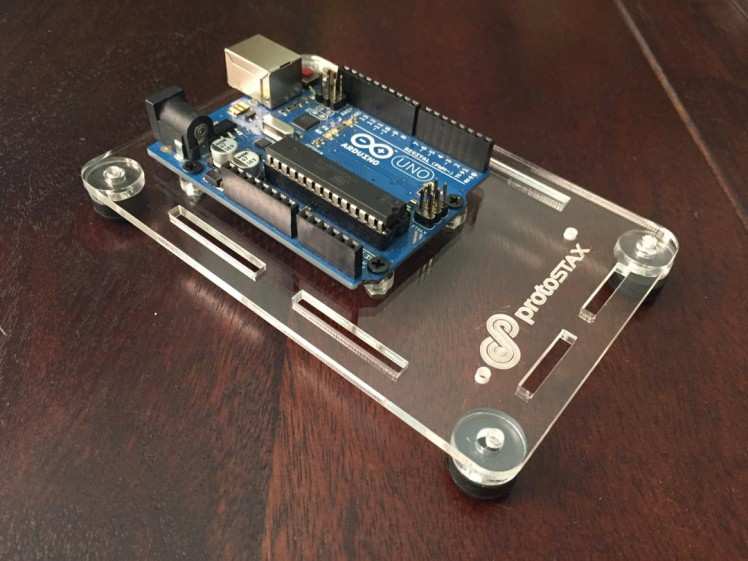
7. Place completed Base Plate with Arduino on top of Washers and Rubber Feet
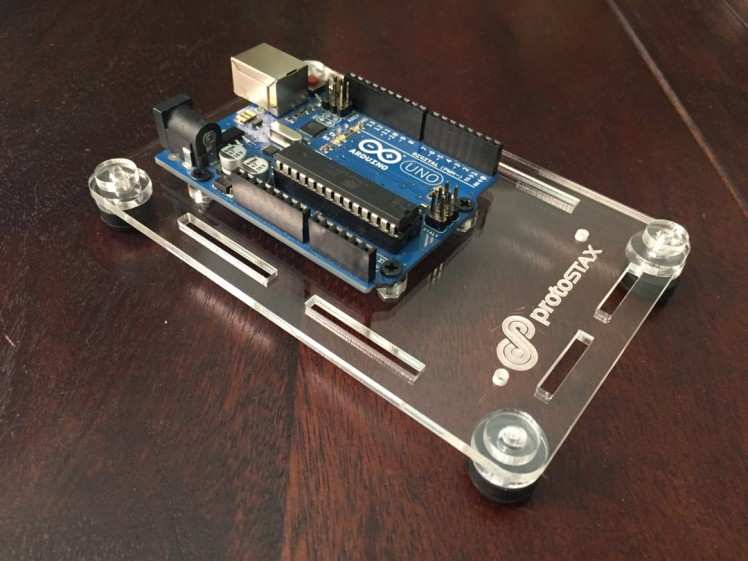
8. Place Spacers on Base Plate over holes aligned with the Feet

9. Screw in Lower Bracing Elements into the Feet to finish Platform Configuration for open access.
Here are all the steps as an animated gif:
All the steps in a single animated gif. See details in the slideshow above
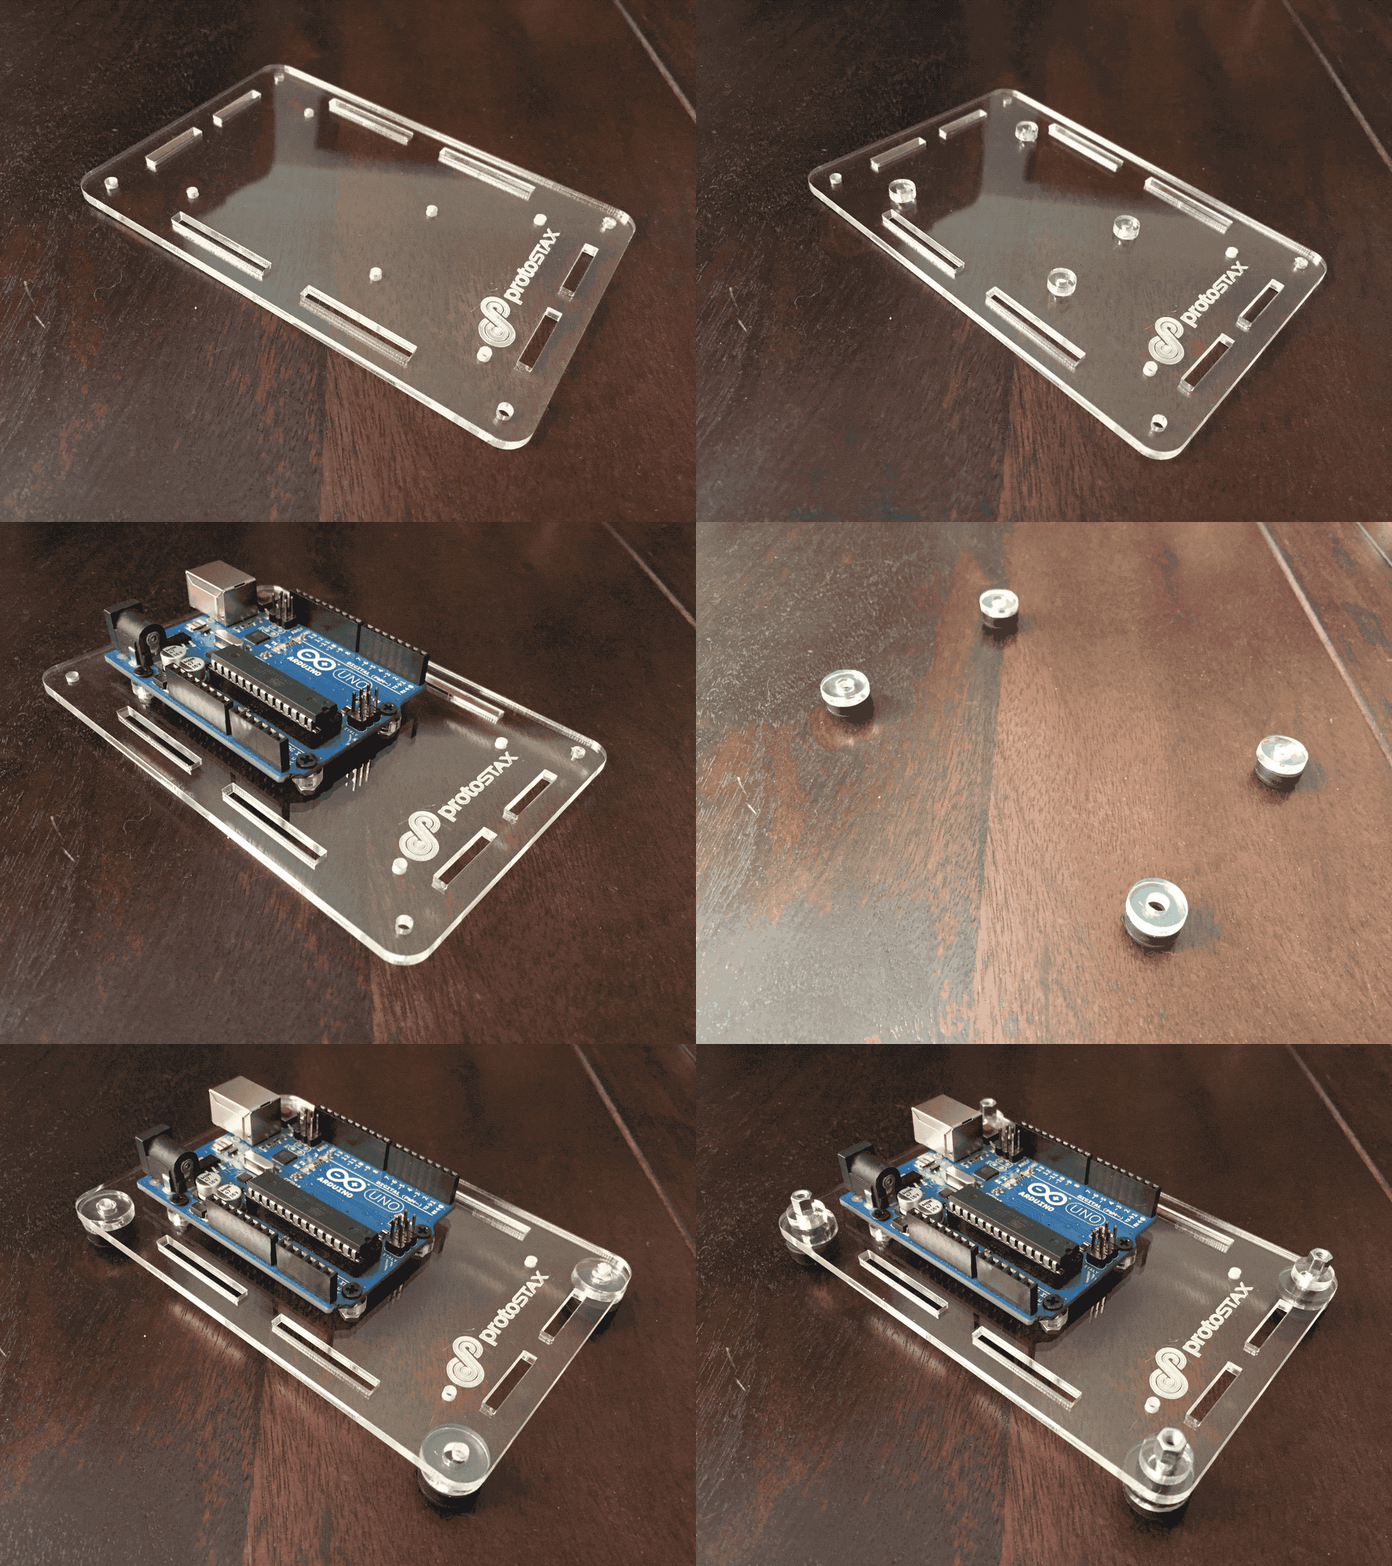
All the steps in a single animated gif. See details in the slideshow above
Step 2 - Prepare the MPR121 Shield for the Arduino
I cut to length 12 pieces of 22 AWG Stranded wire. I then soldered these into the MPR121 Shield. The Adafruit Shield has two large holes for each of the 12 inputs for gripping with alligator clips. In between these two holes is a smaller regular one that will accommodate a 22 AWG wire.
The MPR121 Shield also exposes all the pins via holes next to the headers. I also soldered in a Piezo Buzzer PS1240, with one leg inserted into pin 12 and the other to GND.
I made sure to strip the other (free) end of each of the wires. I used a repeating pattern of 6 different colors for the 12 inputs, to color-code them, so the order could be maintained later when assembling.
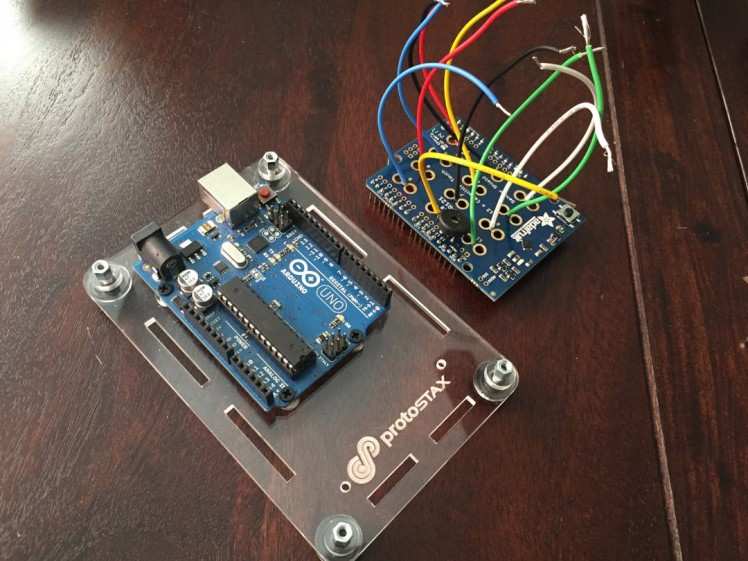
Step 3 - Prepare the Enclosure
Next up, we need to prepare the enclosure. We start by inserting the shield into the Arduino mounted on the Base Plate. We then insert the Upper Bracing Elements, and the Side Walls into the wall slots.
1 / 5 • 1. Plug shield into Arduino
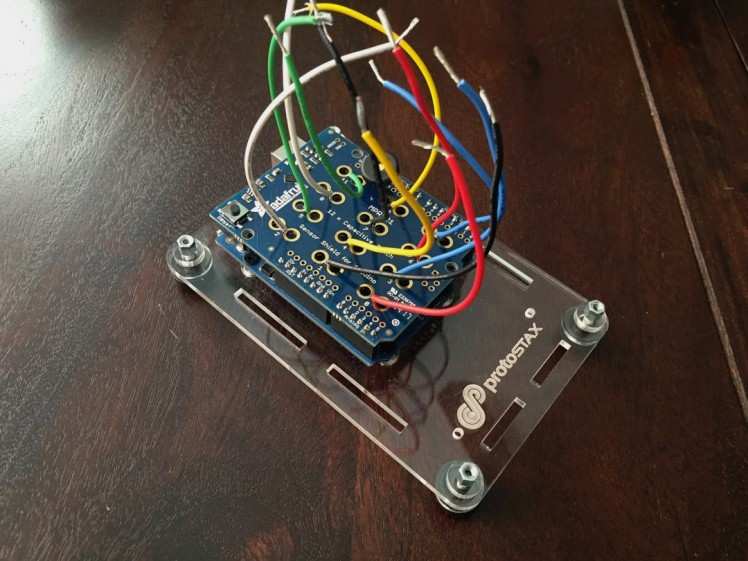
1. Plug shield into Arduino
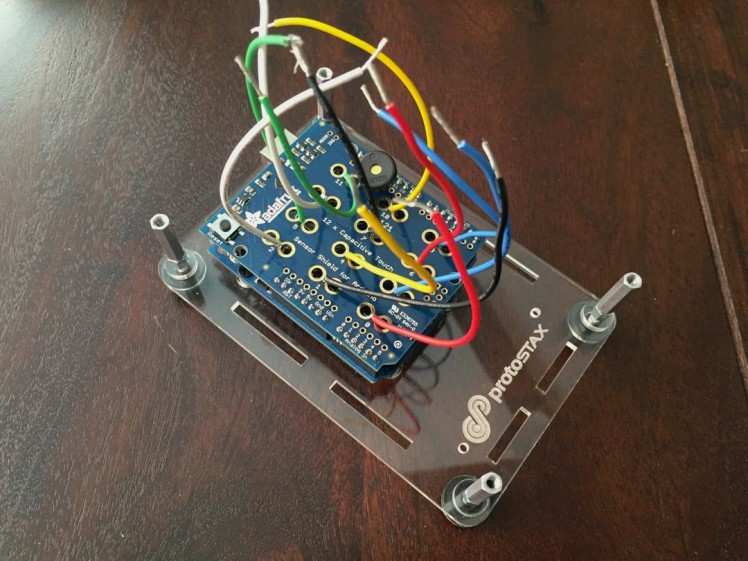
2. Screw in Upper Bracing Elements into Lower Bracing Elements

3. Add Side Walls

4. Turning it around to show the other sides
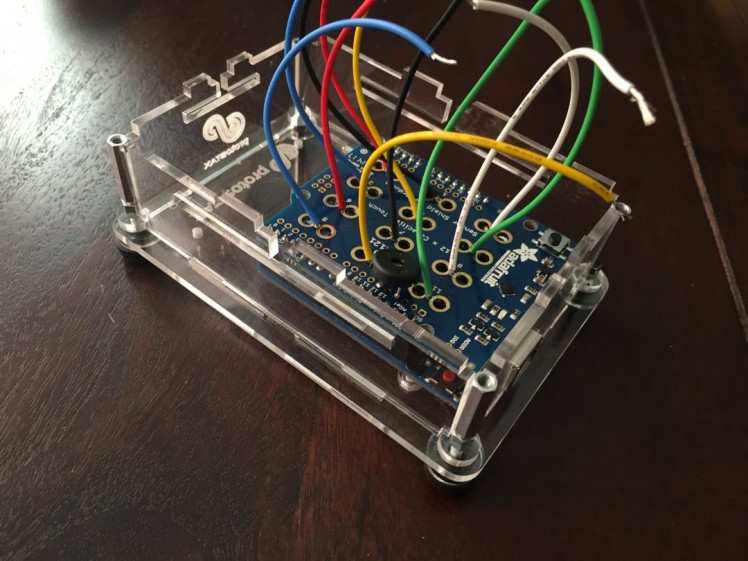
5. Add the remaining 2 Side Walls
I've taken the stock top of the ProtoStax for Arduino enclosure and added 12 holes to it to insert the wires from the shield inputs through. I used a laser cutter to cut the holes matching the piano key template, but you can just as easily use a drill (just make sure to use some masking tape on the acrylic plate before drilling). Small 1/8" hole ought to be enough,.
I then carefully insert the wires from the shield into the holes on the Top Plate - I make sure to insert the wire from hole 0 to the left-most hole, and insert progressively numbered wires (they are numbered on the shield) into the holes from left to right. I then add the top Spacers below the Top Plate, and screw in the screw top complete the enclosure.
Next up, I push back the wires until only the metallic parts are sticking up outside.
I then cut out pieces from a roll of Copper Foil with Conductive Adhesive in the shape of the Piano Keys from the template (see below for template). I then carefully peel the copper foil and stick them at their respective positions on the Top Plate of the enclosure, making sure the copper tape pastes over the corresponding wire protruding out from the hole.
1 / 7 • 1. Modified Top Plate with holes for wires, corresponding to Piano Key Template.
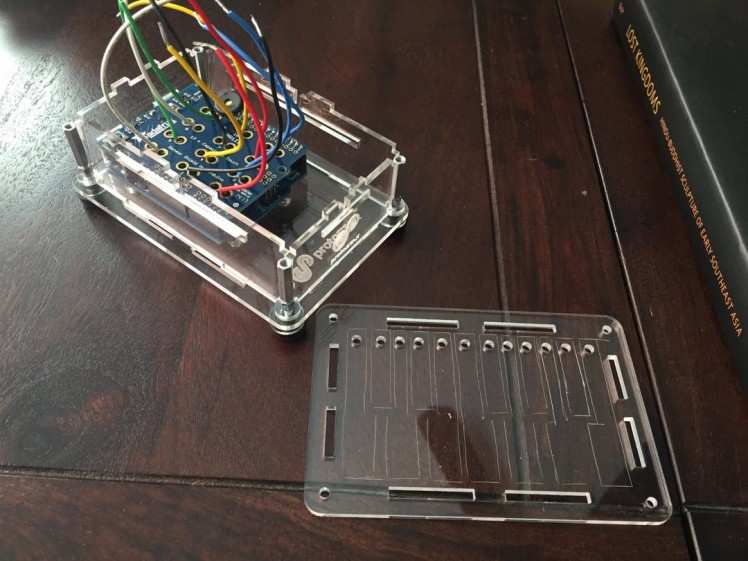
1. Modified Top Plate with holes for wires, corresponding to Piano Key Template.
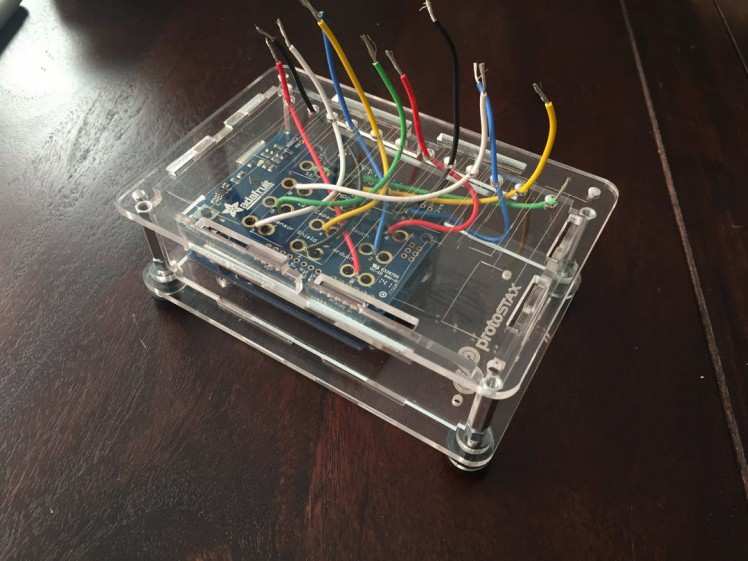
2. Add Top Plate, making sure to thread input wires from shield through correct holes
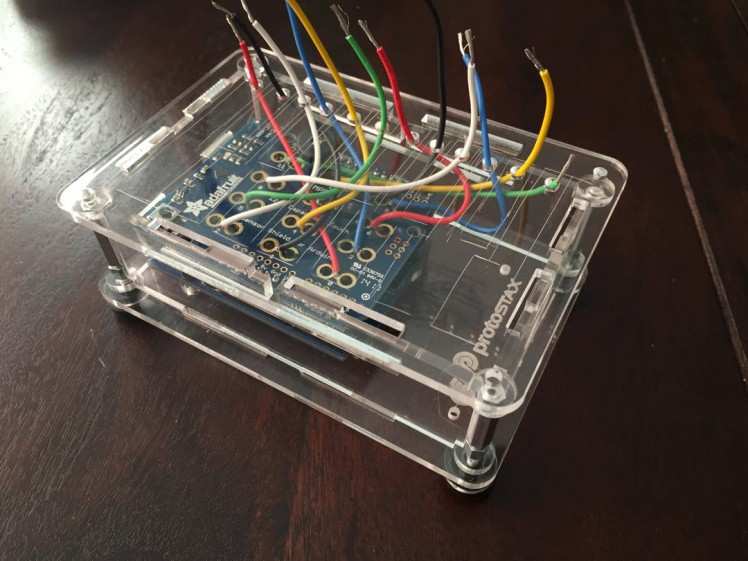
3. Add Top Spacers between Top Plate and Upper Bracing Elements

4. Screw in the Top Plate - the enclosure is now finished (well.... almost!)
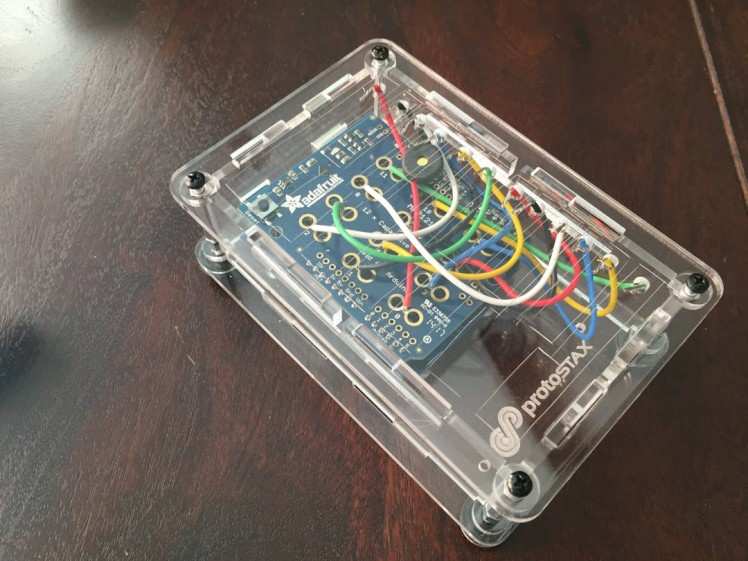
5. Push the wires back down until only the stripped portions are protruding out

6. Cut copper foil tape into the shape of the Piano Keys using Template

7. Carefully peel and stick the Copper Foil Tape to cover stripped wire and Template
Here is the template for the Piano Keys and the holes. You should be able to print this on 8.5x11 Letter paper and have it the correct size (let me know if you are having problems!)
Piano Keys Template
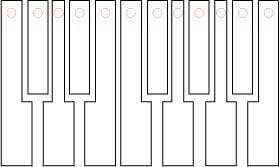
Piano Keys Template
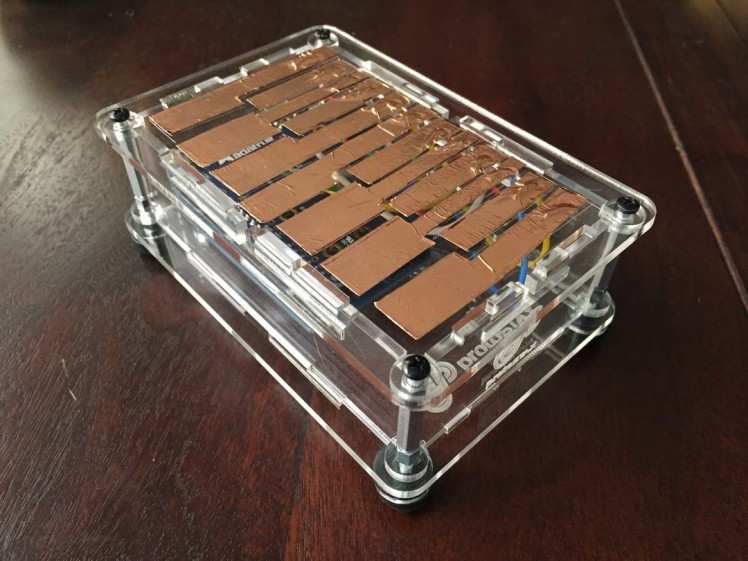
In the end, it looks like this: (I could have done a better job with the copper foil tape, but this was my first time using it, so hopefully I'll get better with handling it in future! ?)
Step 4 - Demo Code
You will first need to install the Adafruit_MPR121 library. After that, you can compile and upload the example sketch, which turns your creation in touch piano, and includes secret key combinations to play some jingles.
- Press C E G B to play "Twinkle Twinkle Little Stars"
- Press C D E F G to play scale up and down
- Press C D A B to play "Oh Susanna!"
- Press C C# A# B to play "Frere Jacques/Brother John"
I've also made it easy for you to transcribe your own tunes(s) of choice from your tune's score.
If you are interested in reading more about the code (and I know you are!), read on!
Let us quickly go through the main parts of the code. You can quickly reference the demo code here - https://github.com/protostax/ProtoStax_CapacitiveTouch_Piano_Demo/blob/master/ProtoStax_CapacitiveTouch_Piano_Demo.ino
The code can be split into 3 parts:
- Getting touch data from MPR121 using the Adafruit_MRP121 library.
- Deciding what to do with the touch data - i.e play the corresponding tone like a piano, or detect multi-touches and then play the secret jingle, both using the built-in tone library.
- Programming tunes, including how to add your own tunes
Here is a quick look at the capacitive touch part of the code. As is typically the case, you declare an object of the Adafruit_MPR121 class. In setup(), you call the begin() method to initialize it, and you can get the currently touched pads in loop() using cap.touched() method. Simple!
Adafruit_MPR121 cap = Adafruit_MPR121();
void setup() {
...
 // Default address is 0x5A, if tied to 3.3V its 0x5B
 // If tied to SDA its 0x5C and if SCL then 0x5D
 if (!cap.begin(0x5A)) {
   Serial.println("MPR121 not found, check wiring?");
   while (1);
 }
...
}
void loop() {
 // Get the currently touched pads
 currtouched = cap.touched();
}
With the touch data, you can respond to a touch by playing the corresponding tone, and stopping the tone when the button is not being pressed:
     // if it *is* touched and *wasnt* touched before, play the corresponding tone!
     if ((currtouched & _BV(i)) && !(lasttouched & _BV(i)) ) {
       // Serial.print("currtouched = "); Serial.print(currtouched); Serial.print(" lasttouched = "); Serial.print(lasttouched); Serial.print(" "); Serial.print(i); Serial.println(" touched");
       tone(TONE_PIN, scale[i]);
     }
     // if it *was* touched and now *isnt*, and additionally, no button is being pressed, then stop the tone
     // This allows for smooth transitions between notes as you slide you finger over the keys
     // This also allows for sustain of a given note, by touching any key and keeping it touched - you can press another key and it will play that key, but won't stop playing it
     // until you let go of your first key - kind of like the sustain pedal of the piano!
     if (!(currtouched & _BV(i)) && (lasttouched & _BV(i)) && !currtouched) {
     //if (!(currtouched & _BV(i)) && (lasttouched & _BV(i))) {
       // Serial.print("currtouched = "); Serial.print(currtouched); Serial.print(" lasttouched = "); Serial.print(lasttouched); Serial.print(" "); Serial.print(i); Serial.println(" released");
       noTone(TONE_PIN);
     }
We handle multi-touches of special keys by playing the corresponding tune:
 // Play tunes if our 'secret' combination of keys is pressed!
 if (currtouched == 2193) { // C E G B
   playTune(melody, MELODY_LENGTH(melody), 2); // Play Twinkle Twinkle Little Star
 } else if (currtouched == 181) { // C D E F G
   playTune(melody2, MELODY_LENGTH(melody2), 48); // Play scale slide up and down
 } else if (currtouched == 2565) { // C D A B
   playTune(melody3, MELODY_LENGTH(melody3), 1); // Play Oh Susanna!
 } else if (currtouched == 3075) { // C C# A# B
   playTune(melody4, MELODY_LENGTH(melody4), 1);  // Play Frere Jacques
 } else {
...
playTune() is used to play a give tune, which is an array of "Note"s
void playTune(Note *m, int mSize, int speedUp) {
 noTone(TONE_PIN); // Start with a clean slate
 for (int thisNote = 0; thisNote < mSize; thisNote++) {
   // to calculate the note duration, take one second multiplies by the note type.
   //e.g. quarter note = 1000.0 * 0.25, eighth note = 1000 * 1/8 (0.125), etc.
   // reduce the duration by the speedup factor to increase the speed of playing
   // by an appropriate amount
   int noteDuration = 1000.0 * m[thisNote].duration / speedUp;
   tone(TONE_PIN, m[thisNote].frequency, noteDuration);
   // to distinguish the notes, set a minimum time between them.
   // the note's duration + 30% seems to work well:
   int pauseBetweenNotes = noteDuration * 1.30;
   delay(pauseBetweenNotes);
   // stop the tone playing:
   noTone(TONE_PIN);
 }
 delay(100);
}
Let us take a look at a melody - it consists of an array of Notes. Each Note has a frequency and a duration. =
typedef struct Note {
 int frequency;
 float duration;
} Note;
// This melody is playing all the notes of the octave from C up to B and back down to C
Note melody2[] = {
 {NOTE_C, NOTE_WHOLE}, {NOTE_CS, NOTE_WHOLE}, {NOTE_D, NOTE_WHOLE}, {NOTE_DS, NOTE_WHOLE}, {NOTE_E, NOTE_WHOLE}, {NOTE_F, NOTE_WHOLE}, {NOTE_FS, NOTE_WHOLE}, {NOTE_G, NOTE_WHOLE}, {NOTE_GS, NOTE_WHOLE}, {NOTE_A, NOTE_WHOLE}, {NOTE_AS, NOTE_WHOLE}, {NOTE_B, NOTE_WHOLE},
 {NOTE_AS, NOTE_WHOLE}, {NOTE_A, NOTE_WHOLE}, {NOTE_GS, NOTE_WHOLE}, {NOTE_G, NOTE_WHOLE}, {NOTE_FS, NOTE_WHOLE}, {NOTE_F, NOTE_WHOLE}, {NOTE_E, NOTE_WHOLE}, {NOTE_DS, NOTE_WHOLE}, {NOTE_D, NOTE_WHOLE}, {NOTE_CS, NOTE_WHOLE}, {NOTE_C, NOTE_WHOLE}
};
This is where the #defines in pitches.h and noteDurations.h come in handy. You can use these instead of the actual frequencies and durations. For example, use NOTE_C to play a C tone, and use NOTE_WHOLE to play it as a whole note (NOTE_HALF, NOTE_QUARTER, NOTE_EIGHTH are some other note durations). You can also use the DOTTED() macro to specify a "dotted" note - such as DOTTED(NOTE_QUARTER).
[Note: A dotted note is a note whose duration is extended by another note of half its duration - for example, a dotted half note is equivalent to 3/4 of a whole note (1/2 note plus 1/2 of 1/2note). ]
These will allow you to take any sheet music and transcribe that to your melody array!
In the demo, I've transcribed "Twinkle Twinkle Little Star", "Frere Jacques/Brother John" and "Oh Susanna!" so you have something to play around with (no pun intended?! ?) - all of these songs fit within one octave, which is the restriction of our keyboard that I tried to stick to. Of course, when playing a secret tune, you are not bound by this limit and can use multiple octaves. "Oh Susanna!" is also a little more complex, using half, quarter and eighth notes and also "dotted" quarter and half notes - hopefully this will help you get a good feel how to transcribe other tunes easily.
Let us see it in action, shall we? ?
ProtoStax Touch Piano in Action!Step 5 - Taking It Further!
Here are some ideas to take the project even further!
1. Create your own jingles/tunes (or transcribe existing ones) and assign your own "Secret Keys" to activate them!
2. Add a second Piezo to get 2 level polyphonic sounds! The tone library uses Timer2 to send a square wave to the piezo buzzer to play a tone. The Arduino Uno has 3 timers, though Timer 0 is special and used for things like millis() and pwm. That still leaves us Timer1 to use. The NewTone library is a more optimized rewrite of the tone library, that uses Timer1. You can thus have two tones at the same time, one using tone and the other using NewTone, for example.
3. Add an extra button or two to add additional functionality - such as using the button press to extend the octave to the higher or lower one. By pressing these buttons in conjunction to your capacitive touch keys, you can have a larger range on your keyboard!
Can you think of any more? Write a comment below to let us know! ? Feel free to also ask any questions you may have! ?
Happy making! ?




Leave your feedback...