
Pi Pico Videoconference Controller

Made by rodrigocmn / Communication / Displays / Music / Productivity
About the project
Build a controller with Pi Pico to manage audio and video of videoconference applications (i.e. Google Meet, MS Teams and Zoom.us).
Project info
Difficulty: Easy
Platforms: Adafruit, Apple, Raspberry Pi
Estimated time: 1 hour
License: GNU General Public License, version 3 or later (GPL3+)
Items used in this project
Hardware components


View all
Hand tools and fabrication machines
Story
Since the lockdown started and videoconference became a standard, I have been thinking to build a simple device that could control camera and audio. After posting my fist prototype on Reddit, I received much positive feedback and guidance that helped me to finish my project (thank you all Reddit friends!).
This project differs from my previous Pi Pico articles, as I had to use a new programming language. Until now, I used MicroPython to interact with Pi Pico. Looking at its libraries, a Human Interface Device (HID) driver is missing. Hopefully, someone will add it soon.
I needed the HID driver as I couldn’t find a way to directly interact with the videoconference applications. Therefore, I used the respective keyboard shortcuts to control audio and camera.
As I didn’t want to deviate from Python, CircuitPython seemed to be the way to go. It had a module for HID and good examples available online.
How does it work?
After trying different configurations, I finally found something that works for me. Although, it doesn’t mean that I will not change it again.
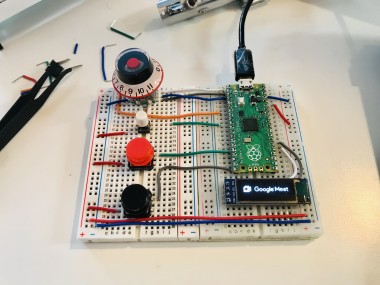
The picture below represents the current configuration for my videoconference controller.

Below is a brief description of each component:
- Volume – the rotary encoder turns the volume up and down. And yes, it goes up to 11!
- Play/Pause – as my rotary encoder also acts as a switch when pressed down, I thought it was a good idea to use it as a multimedia control.
- Config – the white switch changes the configuration for the respective videoconference apps (i.e. Google Meet, MS Teams and Zoom.us).
- Toggle Video – toggle video on and off.
- Toggle Audio – toggle audio on and off.
- Pi Pico – the microcontroller chosen for this solution.
- OLED Display – shows the active application configuration.
Wiring Information
The wiring diagram below shows how we are going to connect the components for this example.

Please note that I connected the wires for the OLED display under it (of course!), but I didn’t know a better way to represent it.
If you have followed the wiring diagram above, your configuration should look something like this.

CircuitPython Installation
This section explains how to CircuitPython on your Pi Pico. If you already have it installed, please go to the next section.
Download CircuitPython
They distribute CircuitPython as a USB Flashing Format file (UF2). We can download it from their website (circuitpython.org). This is the link for Raspberry Pi Pico download page:
https://circuitpython.org/board/raspberry_pi_pico/
Important!
At the time of writing, the latest release available was 6.2.0-beta.3. This version does not contain the ‘rotaryio’ module required for our rotary encoder. In order to implement this solution, use any build from 10/03/2021. You can find the binaries in the following link:
https://adafruit-circuit-python.s3.amazonaws.com/index.html?prefix=bin/raspberry_pi_pico/
Install CircuitPython
Once we have the CircuitPython, it is time to install it on Pi Pico. Before plugging the USB cable, hold the BOOTSEL button on the top of your Pi Pico and then connect the USB cable. After about 3 seconds, release the BOOTSEL button. The picture below shows where the BOOTSEL button is located.

You should see your Pi Pico as a removable USB storage in your computer. As I’m using a Mac, I can see it in Finder.

Just copy the downloaded UF2 file to the RPI-RP2 drive and it will automatically install CircuitPython. Then you should see CIRCUITPY as the drive name.

Drivers for Pi Pico Videoconference Controller
Although the source code presented in the next section contains all the required drivers, I thought it was a good idea to list them here:
- HID – driver to simulate Human Interface Devices, so we can send keyboard shortcuts.
- ImageLoad – decodes an image file into new bitmap and palette objects.
- DisplayIO SSD1306 – driver for the SSD1306 OLED Display.
Pi Pico Videoconference Controller Application
It’s not the intention of this article to go through the source code. Although, I think it’s important to highlight some key points:
- As mentioned in the previous section, I’ve included all the required drivers.
- The default configuration only works if the respective application (Google Meet, MS Teams or Zoom) is active. The next section describes a workaround for MacOS users.
In order to make this process simple, I’ve uploaded the complete package to GitHub. Use the following command to clone it to your machine.
git clone https://github.com/rodrigocmn/pi_pico_videoconf_controller.gitYou should have a folder structure like this:
.
├── AppleScript
├── CircuitPython
│   ├── code.py
│   ├── controller_config.py
│   ├── img
│   │   ├── meet.bmp
│   │   ├── teams.bmp
│   │   └── zoom.bmp
│   └── lib
│       ├── adafruit_displayio_ssd1306.mpy
│       ├── adafruit_hid
│       └── adafruit_imageload
└── README.md
Now copy everything under CircuitPython folder.

Then paste them into the external drive named “CIRCUITPY”.

If you see one of the videoconference applications' logo, then you are good to test it with the respective videoconference app.

Remember that this setup only works if the videoconference application is active. The next session explores a bit more this subject.
Bring back… the conference app!
As mentioned in the previous section, the controller only works if the respective videoconference application is active on screen. Therefore, in this section I will present an approach to solve this problem for Mac users.
The idea is quite simple. I used Automator‘s Quick Action with AppleScript to activate the respective videoconference application and execute the desired command.
Next step was to configure a keyboard shortcut to enable the controller to invoke the respective Automator’s Quick Action.
The implementation was not so simple (at least for me!). I’ve faced few issues with Security & Privacy restrictions. It looks like it became more restricted for AppleScript and AppleEvents since macOS Mojave.
The most annoying problem was a prompt asking me to give access control to whatever app was active when using the controller. After some time, I could see all my most used apps in the Privacy/Accessibility list.
To avoid this situation, I ended up following a slightly different route. Instead of using Quick Action’s “Run AppleScript” functionality, I saved/exported the AppleScript as an application and used Quick Action’s “Launch Application” to execute it.
This workaround added an extra step in my configuration, but avoided the issues with Security & Privacy. The following subsections present the technical implementation details.
Create AppleScript Application
The AppleScript folder of the cloned repository contains all the scripts for the supported videoconference applications.
.
├── AppleScript
│   ├── toggle_meet_audio.scpt
│   ├── toggle_meet_video.scpt
│   ├── toggle_teams_audio.scpt
│   ├── toggle_teams_video.scpt
│   ├── toggle_zoom_audio.scpt
│   └── toggle_zoom_video.scpt
├── CircuitPython
└── README.md
Open a script file with Script Editor.

Now we need to save it as an Application. Click on “File” menu and select “Export”, then select “Application” from the file format options and save it.
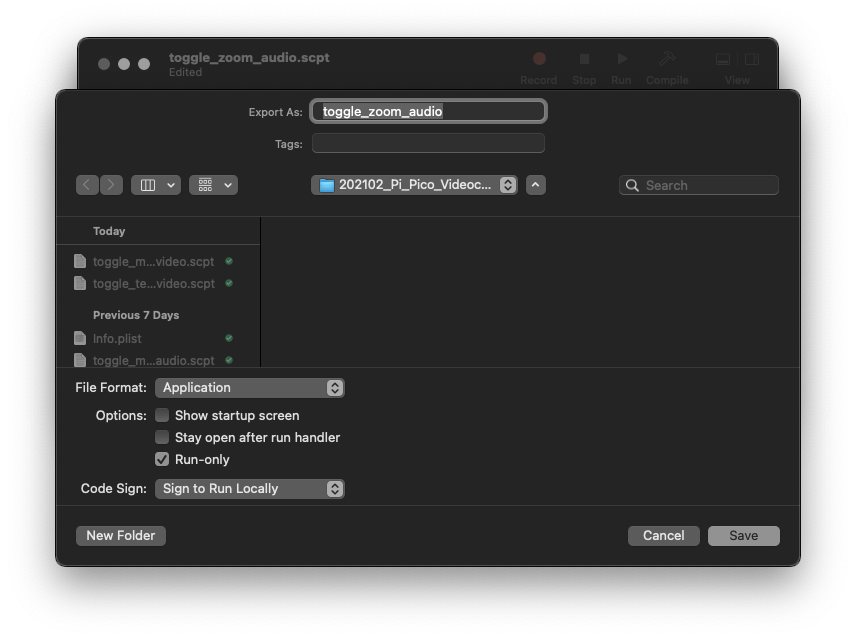
Repeat this process for all the script files.
Automator Quick Action
Launch Automator and click on “New Document”. Select “Quick Action” from the document type and click on “Choose”.

Type “launch” in the search box and double click on “Launch Application”.

Select “Other” from the drop-down list of the “Launch Application” box, then choose the AppleScript application you’ve saved in the last section. The configuration should look like this:

Save the Quick Action and repeat this process for all the other AppleScript apps. Do not forget to give a meaningful name to your quick action (i.e. Toggle Zoom Audio). It will be useful when identifying the automation for the keyboard shortcuts.
Security & Privacy settings
This was probably the trickiest part of this approach’s implementation. It took me some time to get the right configuration to avoid the permission prompt.
I am open to suggestions to improve this configuration. In the meantime, this should do the trick.
First add “Automator” and “AppleScript Utility” apps to the Privacy/Accessibility section of Security & Privacy.

Then add all the AppleScript apps that you have created.

This should give enough permissions to the Quick Actions and respective AppleScript apps to interact with the videoconference applications.
Keyboard Shortcuts
Now we need to create the keyboard shortcuts that our Pi Pico Videoconference Controller will use to invoke the Quick Actions.
Launch the Keyboard configuration in System Preferences.

In the “Shortcuts” tab, select “Services” and add the following shortcuts:

The shortcuts specified above match the configuration defined in the “controller_config.py” file. Any changes to the configuration file or keyboard shortcut definitions must match. Otherwise, the buttons will not work.
Change the Pi Pico Videoconference Controller configuration
The default configuration uses the respective videoconference applications’ shortcuts to control audio and video. That’s why it needs the applications to be active in order to work.
Change the Operating System Identifier setting on line 9 of the “controller_config.py” to macOS as below:
os_identifier = "mac"Code language: JavaScript (javascript)You can change it directly on CIRCUITPY drive using any text editor.
Conclusion
If everything went well, you should now have your custom and extensible videoconference controller. Wish I had a 3D printer to build a proper case for it. Maybe I will buy one soon as the number of my microcontroller projects increase.
I’m planning to add support to more videoconference apps (i.e. Slack, Skype…), so check my GitHub for updates.
It worth saying that this was the first time I’ve used AppleScript and Automator, so any ideas for optimisation are welcome!
Schematics, diagrams and documents
Code
Credits
Related products


Leave your feedback...