


Nabaztag Emotional Intelligence (ei)

Made by bastiaanslee / Home Automation / Voice / IoT
About the project
Want to share your emotions with the world on social media? Nah... Keep it a little bit private, talk to a clever rabbit!
Project info
Difficulty: Moderate
Platforms: Google, Raspberry Pi, Python, Pimoroni
Estimated time: 2 days
License: Apache License 2.0 (Apache-2.0)
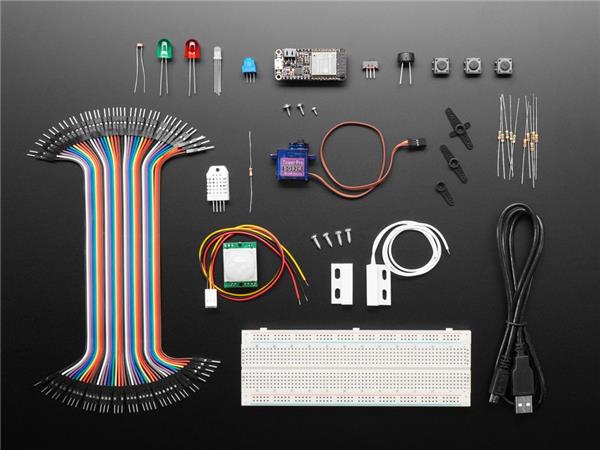
Items used in this project
Hardware components


Story
Long time ago (2006), in a kingdom far away (France), lived a rabbit. It wasn't a normal rabbit, it had very special powers. It could wiggle its ears, had RGB LED lights in his belly, and it could talk! Reading up the weather forecast, new emails, or just chit-chat, it was the most famous rabbit of all. So, it was given a special name: Nabaztag (Armenian for "hare").
But as with many fairy tales, the story took a twist and the rabbit died.
Nabaztag was the very first IoT device available on the market that humans could buy. But ahead of his time, the inventor went bankrupt and had to shut down their servers. The rabbit wasn't open source and heavily relied on the servers from its inventor.
Since then, the rabbit was sitting in a corner of my room, it didn't talk, it didn't wiggle its ears, it didn't bring any joy. Playing with Raspberry Pi's, I always had the idea to bring it alive one day, but it was on the long list of projects.
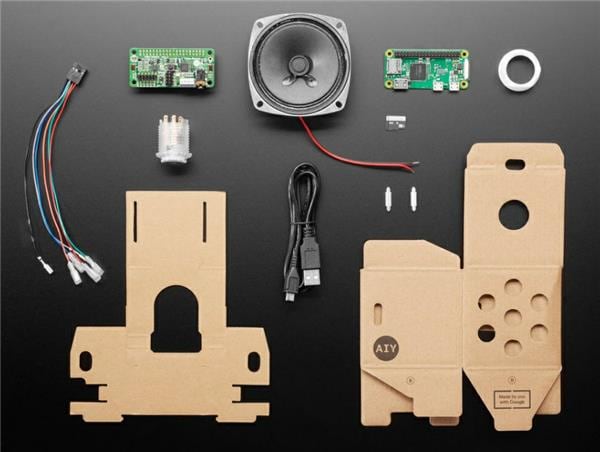
But today, using my Google AIY Voice HAT, I'm going to change that!
And the rabbit happily lived ever after!

Let me introduce you: Nabaztag Emotional Intelligence
Some years ago on the Hacktster.io website I did create a project for giving my Nabaztag a new life as a standard Google Assistant, that listens to you, shows you his colors and wiggles his ears. Oh, and it gives you answers to silly (and smart) questions, all using the Google Assistant framework.
Here at the ElectroMaker website, I'll go some steps further. I'll upgrade my Nabaztag rabbit with EI (Emotional Intelligence). And you know, he seems to be a psychiatrist (or a psychopath?). He knows what is going on with me and has good tips! (suspicious...)
What will the rabbit learn to do this time?
- Ask you questions about how you feel
- Sense what is around you
- Provide you feedback on what was sensed
- Generates a scoring card for you
- Solve all your issues by playing music
That is sorcery you say? Well, if this smart rabbit can do that, I'll believe it this time!
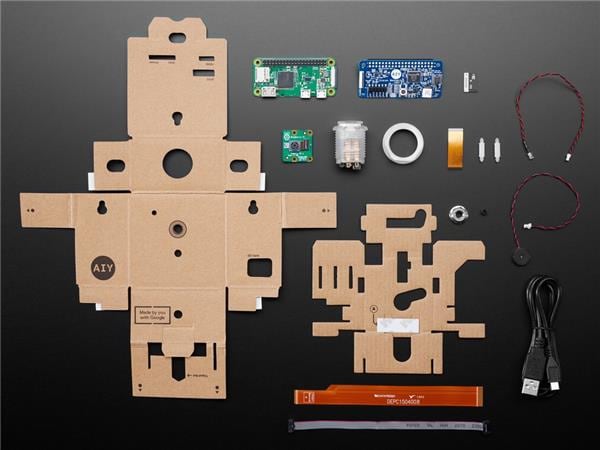
Your own Google Assistant - powered by a Raspberry Pi with a Google AIY Voice HAT.
I have an older version of the AIY Voice HAT. It is actually a beta version, although the final v1 version does look the same. There were no headers soldered onto the board, so I could add a lot of pins in my own formatting using triple 90-degree angled headers. I now have lots of pins for controlling the motors, encoders, volume wheel and a 32bits LED ring.
I did extend the standard Google Assistant library demo file to:
- Fix the depreciated functionality for still working with the Wake Word "Hey Google"
- Communication to a LED ring (instead of the single light in the button) to respond on the Assistant status (ready, listening, thinking)
- Ear movements to respond on the Assistant status (ready, listening/thinking)
- Assistant activation by pressing the button (or add any other sensor!)
- Hardware Volume control, by using the scroll wheel on the back (it's tail?)
As Google did update all libraries and code since then, I have gone through all bits and bytes again, and updated the project on the Hackster.io website to let you build your own talking rabbit. If you want to build this project, read this projectpage first. The project here, starts where that page ended.
Intercepting the Google Assistant
While looking closer at the Google Assistant logic, you can see what the assistant did hear. Once you say "Hey Google, can we talk about my emotions", you will get an EventType ON_RECOGNIZING_SPEECH_FINISHED returned, with the text "can we talk about my emotions".
Can you hack that? YES!
I'm listening for the text TALK, ABOUT, EMOTION. It doesn't matter if I say "please talk about my sad emotion" or "my neighbor is sick, can we talk about his emotions". Any other sentence without these words, just goes off to the Google Assistant. Google can deal with that, as there is no EI needed ;)
In the main() section of the python script, the Assistant is started:
- credentials = auth_helpers.get_assistant_credentials()
- try:
- with Board() as board, Assistant(credentials) as assistant:
- t_AssistantStartConversation = AssistantStartConversation(assistant)
- t_AssistantStartConversation.start()
- for event in assistant.start():
- process_event(assistant, board.led, event)
- except KeyboardInterrupt:
- pass
- except Exception as e:
- logging.warning(
- 'An error occurred: %s',
- e)
- finally:
- LEDring('starting')
Line 3 starts the assistant. Only once that is done, I can start a thread that keeps listening for something that wants to start a conversation (like the button or any other sensor). That is what happens in line 4 and 5. Then in line 6 and 7, for each Event that happens, it triggers the process_event(). So that is where we have to build in our magic. Let's zoom in to that.
- def process_event(assistant, led, event):
- logging.info(event)
- if event.type == EventType.ON_START_FINISHED:
- led.state = Led.BEACON_DARK # Ready.
- logging.info('Say "OK, Google" then speak, or press Ctrl+C to quit...')
- Assistant_can_start_conversation = True
- elif (event.type == EventType.ON_CONVERSATION_TURN_STARTED
- or (event.type == EventType.ON_CONVERSATION_TURN_FINISHED and event.args and event.args['with_follow_on_turn'])):
- led.state = Led.ON # Listening.
- Assistant_can_start_conversation = False
- elif event.type == EventType.ON_RECOGNIZING_SPEECH_FINISHED and event.args:
- text = event.args['text'].lower()
- if (("talk" in text and "about" in text and "emotion" in text)
- or Nabaztag_emotions_converstation == True):
- print('Nabaztag Emotions: you said >>', text, '<<')
- assistant.stop_conversation()
- emotions_conversation(text)
- time.sleep(0.1)
- if(Nabaztag_emotions_continue_conv == True or Nabaztag_emotions_text_query != ''):
- assistant.set_mic_mute(False)
- assistant.start_conversation()
- if(Nabaztag_emotions_text_query != ''):
- assistant.send_text_query(Nabaztag_emotions_text_query)
- print("Nabaztag emotions: sending >>", Nabaztag_emotions_text_query , "<<")
- Nabaztag_emotions_text_query = ''
What are we doing here?
- Line 14-21: Once I see these words being recognized by Google Assistant, I tell the Assistant to stop the conversation (assistant.stop_conversation()), and start my own logic. My own logic runs local code to find out what you talk about and ask you questions. These questions are returned by using the Google TTS (Text To Speech) library.
- Line 24-26: Then I turn back on the Google Assistant to wait for an answer (assistant.set_mic_mute(false); assistant.start_converstation()). The first bit is important; officially the microphone is said to be OFF, in reality it is of course ON but only listens for "Hey Google". Without turning it ON, Google doesn't record your talking, so don't forget this line!
- Line 28-31: And you can even inject text to Google Assistant (assistant.send_text_query("don't forget the milk")) for sending silent commands to Google Assistant.
In the first step, we jump to our own code where the Emotional Intelligence happens:
- def emotions_conversation(text):
- Nabaztag_emotions_new_question = True
- if (Nabaztag_emotions_converstation == False):
- tts.say("I'm all ears.", volume=7)
- tts.say("Let me help you with some free advice!", volume=7)
- Nabaztag_emotions_converstation = True
- Nabaztag_emotions_continue_conv = True
- Nabaztag_emotions_number = ''
- Nabaztag_emotions_fruit = ''
- Nabaztag_emotions_color = ''
- random.shuffle(Nabaztag_emotions_array) # shuffle the order of tasks
- Nabaztag_emotions_array_pos = 0
- time.sleep(0.5)
- while Nabaztag_emotions_new_question == True:
- if (Nabaztag_emotions_array_pos < len(Nabaztag_emotions_array) and text != "no"):
- array_task = Nabaztag_emotions_array[Nabaztag_emotions_array_pos]
- print("Nabaztag emotions: task >>", array_task)
Little breakdown of the magic:
- Line 4: First we check if this is a new conversation, or continued conversation
- Line 5-11: As it is a new conversation, we return a welcome message and we do (re)set a series of variables for next steps.
- Line 12-13: To keep a bit of surprise, I want to go through the tasks in a random order each time you start a new conversation.
- Line 16: Now we can go through each task to record a scoring for your emotions.
Conversational questions: number, color and fruit
To bring some fun and joy into the conversation, your Nabaztag will ask you for your lucky number, favorite color and what fruit you would like to be. To be honest, not a single bit of science does say this is really EI ;)
This is the example for the colors:
- elif (array_task == 'color'):
- if (Nabaztag_emotions_color == ''):
- tts.say("What is your favorite color?", volume=7)
- Nabaztag_emotions_color = 'x'
- Nabaztag_emotions_new_question = False
- print("Nabaztag emotions: question >> Nabaztag_emotions_color")
- elif (Nabaztag_emotions_color == 'x'):
- if text in Nabaztag_emotions_color_map:
- Nabaztag_emotions_color = text
- tts.say("Your favorite is " + Nabaztag_emotions_color + "? That is a nice color.", volume=7)
- else:
- for key, value in Nabaztag_emotions_color_map.items():
- if value == str(Nabaztag_emotions_random):
- Nabaztag_emotions_color = key
- tts.say("I think you said " + Nabaztag_emotions_color + "? That is a nice color.", volume=7)
- print("Nabaztag emotions: input value >> Nabaztag_emotions_color = ", Nabaztag_emotions_color)
- time.sleep(0.5)
- Nabaztag_emotions_new_question = True
- Nabaztag_emotions_array_pos = Nabaztag_emotions_array_pos + 1
Again, the breakdown of this code:
- Line 2-6: First step is checking if the question was asked or not (empty is not started, x is waiting for answer). When empty, the question will be asked. It will do that by triggering the Google Assistant TTS (Text To Speech) engine to give vocal feedback. The voice is different from the standard Google Assistant. Play a bit by applying parameters like: volume=7, pitch=180, speed=130 to find the best voice for your project.
- Line 8-17: There was an answer given by the user and processed to written words by the Google Assistant. We will compare that with the list of pre-defined words we do understand (the mapping dictionary). If the answer doesn't match any of our options, you could turn back to the user and ask for a new answer, but I think it is more fun to randomly pick one of the available options.
- Line 20-21: go back to the top to pick a new task, until all tasks are served.
You extended your Google Assistant!
Congratulations! At this point, you have extended your Google Assistant with your own logic. You can now further enhance this with all your fun and seriousness.
And that is what we will do in the next steps: add local sensors!
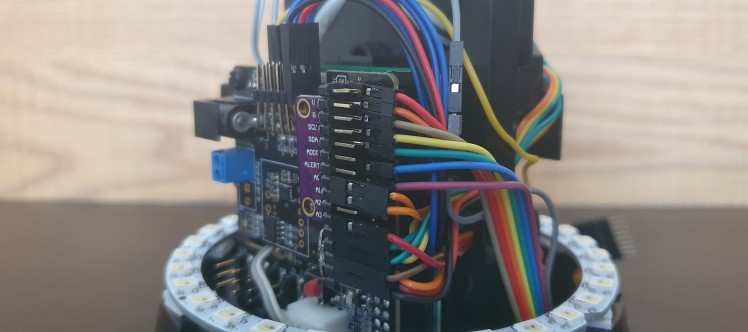
As if I could look into the future, back then in the old project, I did also add several pins for I2C and the TXD/RXD. And that is exactly what I will use today for adding sensors that will register temperature, air pressure, humidity, light intensity, CO2 gas and gas resistance!
The rainbow ribbon cable is for the added sensors. Going down through the bottom plate to bring them outside:
Wait, the Google Assistant server doesn't have access to my local sensors!
Completely true! You could build code that has access to your sensors, that then uploads this data to Google Firebase. Then you could create Google Actions with treats that can send commands back to your device. For sure the best way if you are building something you are going to sell.
But this is my own device on my own desk. So, I'll build this in my way :)
Sensors: Digital Luminosity Sensor
Let's start with the "easiest" sensor: the TSL2561. This sensor communicates through the I2C protocol and has a dedicated Python library. I have a sensor from Adafruit, so I'll be using their library and guide as well.
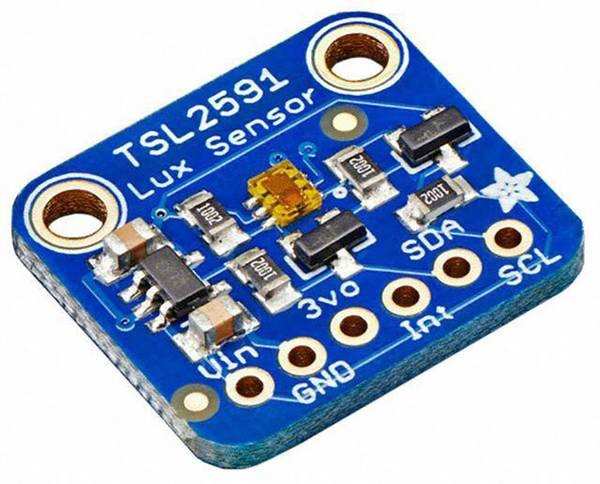
First we have to wire the sensor to the Raspberry Pi. There are just 4 cables needed: VIN (3.3V), GND, SCL and SDA.

Connect to your Raspberry Pi terminal, either on-screen, or through SSH. Now install the library:
- sudo pip3 install adafruit-circuitpython-tsl2561
The simplified way of running this sensor stand-alone is as following (redacted code from learn.adafruit.com):
- import time
- import board
- import busio
- import adafruit_tsl2561
- # Create the I2C bus
- i2c = busio.I2C(board.SCL, board.SDA)
- # Create the TSL2561 instance, passing in the I2C bus
- tsl = adafruit_tsl2561.TSL2561(i2c)
- # Enable the light sensor and wait a little for it to activate
- tsl.enabled = True
- time.sleep(1)
- # Set gain 0=1x, 1=16x
- tsl.gain = 0
- # Set integration time (0=13.7ms, 1=101ms, 2=402ms, or 3=manual)
- tsl.integration_time = 1
- print("Getting readings...")
- # Get raw (luminosity) readings individually
- broadband = tsl.broadband
- infrared = tsl.infrared
- # Get computed lux value (tsl.lux can return None or a float)
- lux = tsl.lux
- # Print results
- print("Broadband = {}".format(broadband))
- print("Infrared = {}".format(infrared))
- if lux is not None:
- print("Lux = {}".format(lux))
- else:
- print("Lux value is None. Possible sensor underrange or overrange.")
- # Disble the light sensor (to save power)
- tsl.enabled = False
If this works in a separate script, it's time to add this to your Google Assistant.
As the time it takes to read the sensor is relatively long, I've created a thread "ReadOtherSensors" that does continually read the sensor value and store that in a global variable. That means the setup of the sensor is done in the header of my script already. The code to get the sensor data is as such very simple:
- tsl2561_lux = tsl2561_sensor.lux
- tsl2561_broadband = tsl2561_sensor.broadband
- tsl2561_infrared = tsl2561_sensor.infrared
Sensors: Environmental Sensor
We will use a BME680 for sensing environmental things like temperature. That one is "easy" as well, I hear you saying? Well, yes and no; this sensor is also communicating through the I2C protocol and has dedicated Python libraries (created by Adafruit and Pimoroni for example).

But these libraries only support Temperature, Humidity, Pressure and Gas readings (that is the easy=yes option). If you go one level deeper to directly talk to the sensor, there is a C library written by Bosch Sensortec that supports Temperature, Humidity, Pressure, Gas, IAQ, bVOCe and eCO2 (that is the easy=no option).
And the IAQ part is what I am really interested in. Bosch did all the legwork already in calculating the IAQ by taking the inputs together and then applying some formula to that. I want to take the advantage to get that implemented!
So here we go the not-so-easy method. But hey, that is all the fun!
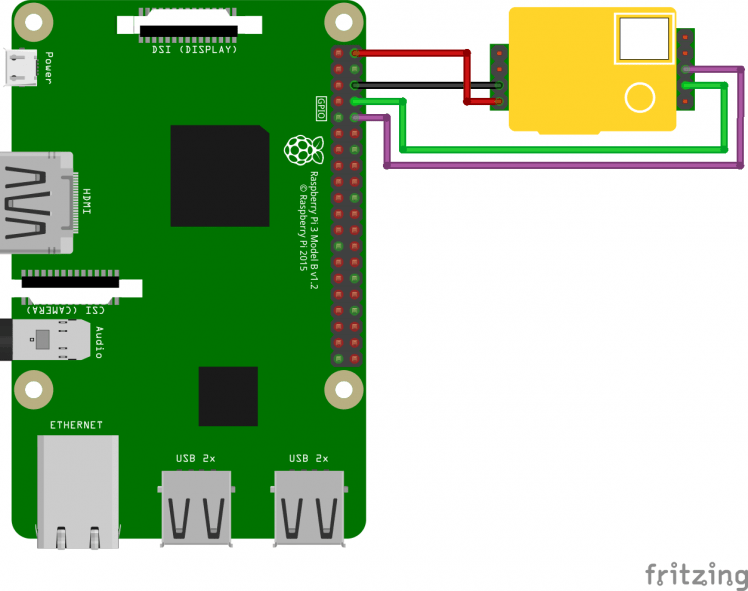
First, we have to wire the sensor to the Raspberry Pi. There are just 4 cables needed: VIN/VCC (3.3V), GND, SCL/SCK and SDA/SDI.

To talk to the sensor, we must know the "I2C address" There are 2 options for this type of sensor: 0x76 and 0x77. You can switch the address by connecting the CS pin to either GND or VIN/VCC. Some manufacturers already did this on the board, so the address can vary. To check your address, run this in the terminal:
- i2cdetect -y 1
The result will look like (numbers can vary of course):
- pi@raspberrypi:~ $ i2cdetect -y 1
- 0 1 2 3 4 5 6 7 8 9 a b c d e f
- 00: -- -- -- -- -- -- -- -- -- -- -- -- --
- 10: -- -- -- -- -- -- -- -- -- -- -- -- -- -- -- --
- 20: -- -- -- -- -- -- -- -- -- -- -- -- -- -- -- --
- 30: -- -- -- -- -- -- -- -- -- 39 -- -- -- -- -- --
- 40: -- -- -- -- -- -- -- -- 48 -- -- -- -- -- -- --
- 50: -- -- -- -- -- -- -- -- -- -- -- -- -- -- -- --
- 60: -- -- -- -- -- -- -- -- -- -- -- -- -- -- -- --
- 70: -- -- -- -- -- -- -- 77
Look at the last line for a value of 76 or 77. This means my sensor is on address 0x77. Remember that!
Install the library
This blogpost did help me with next steps. But as the version of the BSEC library is updated since that post, I'll use the steps that worked for me here.
Download the BSEC to your Raspberry Pi, set the access rights and create a new folder. Open your terminal and do the following steps:
- git clone https://github.com/alexh-name/bsec_bme680_linux.git
- cd /bsec_bme680_linux
- chmod 777 make.sh
- mkdir ./src
Open the folder bsec_bme680_linux that was created, open the file make.config in your text editor. Change line 5 accordingly with the Raspberry Pi model you use:
- Raspberry Pi Zero: ARCH="${VERSION}/RaspberryPI/PiZero_ArmV6-32bits"
- Raspberry Pi 3: ARCH="${VERSION}/RaspberryPI/PiThree_ArmV8-a-64bits"
Open the filebsec_bme680.c. Change line 5 according to the I2C address you found earlier:
- 0x76: int i2c_address = BME680_I2C_ADDR_PRIMARY;
- 0x77: int i2c_address = BME680_I2C_ADDR_SECONDARY;
Keep the file open. Next step is to adjust the data we will get back from the sensor. Default library gives a fixed width output, but we want something easier readable for our program. A return in JSON format is ideal for that. Scroll down to line 201. Remove the lines from 201-212. Replace the lines by these 6 lines:
- printf("{"IAQ_Accuracy": "%d","IAQ":"%.2f"", iaq_accuracy, iaq);
- printf(","Temperature": "%.2f","Humidity": "%.2f","Pressure": "%.2f"", temperature, humidity,pressure / 100);
- printf(","Gas": "%.0f"", gas);
- printf(","eCO2": "%.15f"", co2_equivalent);
- printf(","bVOCe": "%.25f"", breath_voc_equivalent);
- printf(","Status": "%d"}", bsec_status);
Save the file.
Now go to the Bosch website and request their BSEC-library by filling in the form. You will get an email with the download link. I received a link to version 1.4.7.4. Download the ZIP file on your Raspberry Pi and extract the contents in SRC folder you just created. Filepath should now look like: "/home/pi/bsec_bme680_linux/src/BSEC_1.4.7.4_Generic_Release/"
When that is all done, open the terminal again and follow these steps to compile your own code to read the BME680 sensor:
- cd /bsec_bme680_linux
- ./make.sh
That's it, now you can use the sensor and see if it works. Again, in the terminal, run this command:
- /home/pi/bsec_bme680_linux/bsec_bme680
You will get data back, a new line every several seconds:
- {"IAQ_Accuracy": "0","IAQ":"25.00","Temperature": "26.20","Humidity": "68.50","Pressure": "1009.49","Gas": "10119","eCO2": "500.000000000000000","bVOCe": "0.4999999403953552246093750","Status": "0"}
- {"IAQ_Accuracy": "0","IAQ":"25.00","Temperature": "26.13","Humidity": "68.49","Pressure": "1009.47","Gas": "6598","eCO2": "500.000000000000000","bVOCe": "0.4999999403953552246093750","Status": "0"}
- {"IAQ_Accuracy": "0","IAQ":"25.00","Temperature": "26.19","Humidity": "68.01","Pressure": "1009.51","Gas": "8361","eCO2": "500.000000000000000","bVOCe": "0.4999999403953552246093750","Status": "0"}
- {"IAQ_Accuracy": "0","IAQ":"25.00","Temperature": "26.24","Humidity": "67.65","Pressure": "1009.49","Gas": "10298","eCO2": "500.000000000000000","bVOCe": "0.4999999403953552246093750","Status": "0"}
That means you have finished the setup of your BME680 sensor!
Use the library
You see that the data can be received by running a local command right on the terminal. But how to get that into your Python script? That is done with the SUBPROCESS library. This runs a command line program and returns the data (stdout).
In our program, we will dedicate a thread "ReadBME680Sensor" to this as the output will keep coming and we want to store the latest data all the time.
- while self._run_task == True:
- process = subprocess.Popen("/home/pi/bsec_bme680_linux/bsec_bme680", stdout=subprocess.PIPE)
- for line in process.stdout:
- try:
- bme680_raw = line
- bme680_temperature = float((json.loads(bme680_raw))["Temperature"])
- bme680_humidity = float((json.loads(bme680_raw))["Humidity"])
- bme680_pressure = float((json.loads(bme680_raw))["Pressure"])
- bme680_gas = float((json.loads(bme680_raw))["Gas"])
- bme680_iaq = float((json.loads(bme680_raw))["IAQ"])
- bme680_iaq_accuracy = float((json.loads(bme680_raw))["IAQ_Accuracy"])
- bme680_eco2 = float((json.loads(bme680_raw))["eCO2"])
- bme680_bvoce = float((json.loads(bme680_raw))["bVOCe"])
- except:
- bme680_temperature = 0.0
- bme680_humidity = 0.0
- bme680_pressure = 0.0
- bme680_gas = 0.0
- bme680_iaq = 0.0
- bme680_iaq_accuracy = 0.0
- bme680_eco2 = 0.0
- bme680_bvoce = 0.0
- if self._run_task == False:
- process.kill()
Specific with like 26: when our program ends or is terminated, we need a nice way to step out the subprocess, so we take care of that as well by sending a kill() command to the process.
Sensors: Carbon Dioxide Sensor
The MH-Z19B is a sensor that communicates through a serial RX/TX communication protocol. Luckily there is again a Python library available.

First we have to wire the sensor to the Raspberry Pi. There are just 4 cables needed: VIN/VCC (5V), GND, TX (to your RPi RX) and RX (to your RPi TX).
Connect to your Raspberry Pi terminal, either on-screen, or through SSH. Now install the library:
Test if this works by running the following from the terminal:
- sudo python3 -m mh_z19 --all
It will give you an output that looks like:
- {"co2": 400, "temperature": 33, "TT": 73, "SS": 0, "UhUl": 0}
As you see in the command you used for the terminal, you had to run this with the SUDO user. So we will apply the same kind of tricks as for the BME680 sensor; we will use SUBPROCESS to run this from the command line. But this program doesn't give continues feedback, it just gives 1 result each time. Meaning we just have to return the value and continue with the next step.
- try:
- mhz19_raw = subprocess.check_output("sudo python3 -m mh_z19", shell=True)
- mhz19_co2 = (json.loads(mhz19_raw))["co2"]
- except:
- mhz19_co2 = 0
Readings from the sensor seem do fail from time to time. So I had to wrap this in an Try/Except loop.
Scoring the results
All tasks are completed, all data is gathered. It's time to calculate the emotions of the user!
As said, the scores linked to the color, fruit and lucky number are not science, they are fun.
For the sensor values, there is some science involved. You can calculate IAQ (Indoor Air Quality) based on a scoring model from the IAQ UK. Question is if it does define your emotions, but for sure it can have an effect. Sitting in a dark room with 35 degree and 70% humidity does make you feel bad, at least that is what it does with me.
So here goes the model I've used for Temperature, Carbon Dioxide (CO2) and Humidity:
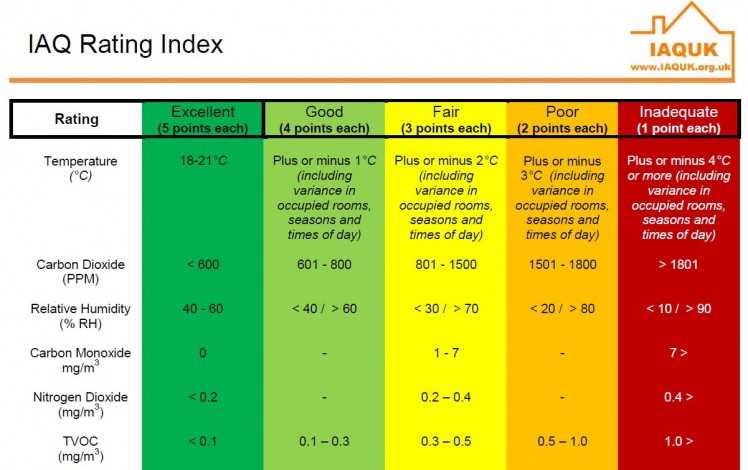
For example for the temperature, I do assign 2 /4 / 6 / 8 / 10 score, based on the IAQ UK scoring:
- if (bme680_temperature < 15):
- Nabaztag_emotions_score_temperature = 2
- elif (15 <= bme680_temperature < 16):
- Nabaztag_emotions_score_temperature = 4
- elif (16 <= bme680_temperature < 17):
- Nabaztag_emotions_score_temperature = 6
- elif (17 <= bme680_temperature < 18):
- Nabaztag_emotions_score_temperature = 8
- elif (18 <= bme680_temperature
Schematics, diagrams and documents
Code
Credits
bastiaanslee
Tinkerer in the field of Home Automation, with the main goal: fun! Playing with Raspberry Pi, Python, EmonCMS, meter reading, OpenTherm, Weather Station, IoT, cloud-server, Pebble Time, LoRaWAN, WeMos, InfluxDB, Grafana,NodeRed, Google Assistant, 3D Printing (Snapmaker2)
Related products

Leave your feedback...