
Mqtt On Wio Terminal

Made by salmanfarisvp / Displays / Notifications / Productivity / Sensors / IoT
About the project
MQTT Pub/Sub on Wio Terminal.
Project info
Difficulty: Easy
Estimated time: 1 hour
License: GNU General Public License, version 3 or later (GPL3+)
Items used in this project

Story
TL;DR: We are going to look at the MQTT Protocol on the Seeed Wio Terminal, Publish and Subscribe Topic over the MQTTon the Wio Terminal, and I'll show how to transfer data between Wio terminal and Mobile Phone or any device* using MQTT.
MQTT on Wio TerminalLet's Start
Introduction to MQTTMQTT is an OASIS standard messaging protocol for the Internet of Things (IoT). It is designed as an extremely lightweight publish/subscribe messaging transport that is ideal for connecting remote devices with a small code footprint and minimal network bandwidth.
MQTT today is used in a wide variety of industries, such as automotive, manufacturing, telecommunications, oil and gas, etc.
The protocol was invented in 1999 by Andy Stanford-Clark (IBM) and Arlen Nipper (Arcom, now Cirrus Link). They needed a protocol for minimal battery loss and minimal bandwidth to connect with oil pipelines via satellite. The “MQ” refers to the MQ Series, a product IBM developed to support MQ telemetry transport. When Andy and Arlen created their protocol in 1999, they named it after the IBM product.
Why MQTT?
- Lightweight and Efficient
- Bi-directional Communications
- Scale to Millions of Things
- Reliable Message Delivery
- Support for Unreliable Networks
- Security Enabled
The publish/subscribe pattern
The publish/subscribe pattern (also known as pub/sub) provides an alternative to a traditional client-server architecture. In the client-server model, a client communicates directly with an endpoint.
MQTT Publish / Subscribe Architecture(? mqtt.org)
")
MQTT Publish / Subscribe Architecture(? mqtt.org)
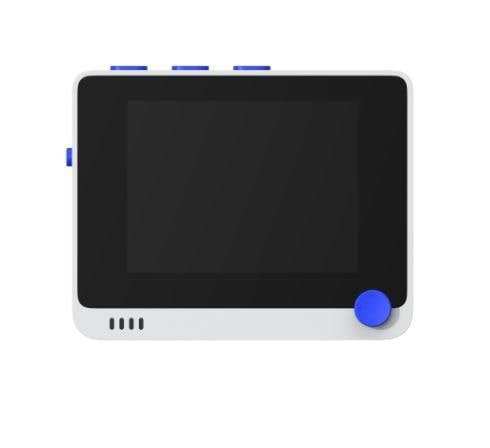
Seeed Wio TerminalThe Wio Terminal based ATSAMD51-based microcontroller with wireless connectivity supported by Realtek RTL8720DN and is equipped with a 2.4” LCD Screen, onboard IMU(LIS3DHTR), Microphone, Buzzer, microSD card slot, Light sensor, and Infrared Emitter(IR 940nm). Realtek RTL8720DN chip supports both Bluetooth and Wi-Fi providing the backbone for IoT projects.
Wio Terminal (? SeeedStudio.com)
")
Wio Terminal (? SeeedStudio.com)
Key Features
- Powerful MCU: Microchip ATSAMD51P19 with ARM Cortex-M4F core running at 120MHz
- Reliable Wireless Connectivity: Equipped with Realtek RTL8720DN, dual-band 2.4Ghz / 5Ghz Wi-Fi
- Highly Integrated Design: 2.4” LCD Screen, IMU and more practical add-ons housed in a compact enclosure with built-in magnets & mounting holes
- Raspberry Pi 40-pin Compatible GPIO
- Compatible with over 300 plug&play Grove modules to explore with IoT
- USB OTG Support
- Support Arduino, CircuitPython, Micropython, ArduPy(What is ArduPy?), AT Firmware, Visual Studio Code
- TELEC certificated
For more information go to https://www.seeedstudio.com/Wio-Terminal-p-4509.html.
Setup Wio TerminalFor Setup, you can follow this wonderful guide provide by SeeedStudio. Get Started with Wio Terminal, anyway I'll go through quickly.
Step 1: Download and Install the Arduino IDE: We are using Arduino IDE to programme the Wio Terminal, so we need to install it on our computer first. Click here to download Arduino IDE
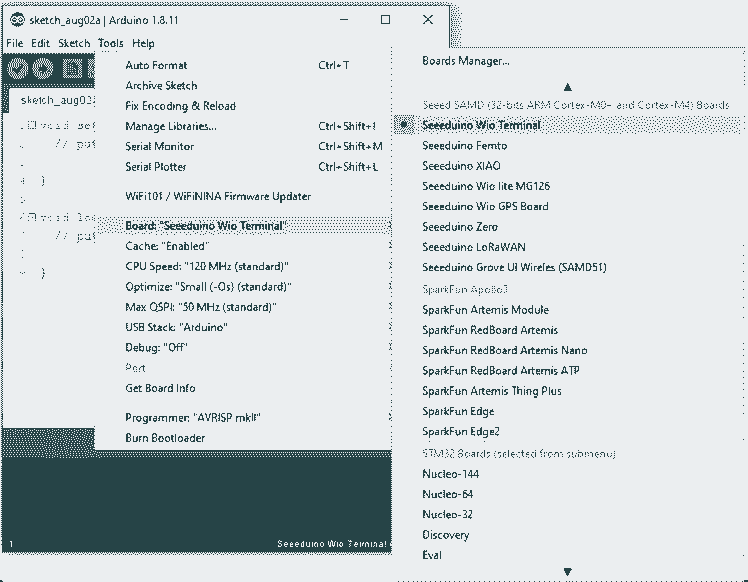
Step 2: Install Wio Terminal: Arduino IDE comes with official boards loaded from the Arduinio.cc so In order to program Wio Terminal we need to install the Wio Terminal Board packages and definition on the Arduino IDE.
2.2: Add Additional Boards Manager URL: For that Open your Arduino IDE, click on File > Preferences, and copy below URL to Additional Boards Manager URLs
https://files.seeedstudio.com/arduino/package_seeeduino_boards_index.json
Additional Boards Manager URL

Additional Boards Manager URL
Note: If you have more additional boards manager URL's like me, make it separate with commas.
2.3: Install Wio Terminal Board Manager: For that Click on Tools > Board > Board Manager and Search Wio Terminal in the Boards Manager.
Installing Wio Terminal Board Manager

Installing Wio Terminal Board Manager
2.4: Select your board and port: For that, you'll need to select the entry in the Tools > Board menu that corresponds to your Arduino. Selecting the Wio Terminal.
Select the serial device of the Wio Terminal board from the Tools -> Port menu. This is likely to be COM3 or higher (COM1 and COM2 are usually reserved for hardware serial ports). To find out, you can disconnect your Wio Terminal board and re-open the menu; the entry that disappears should be the Arduino board. Reconnect the board and select that serial port.
Setup Arduino MQTT ClientWe are using pubsubclient library by knolleary, it's a simple publish/subscribe messaging with a server that supports MQTT.The library comes with a number of example sketches.
Step 3: Install PubSubClient Library on Arduino IDE: Open the library manager from Sketch -> Include Library -> Manage Library. (make sure that you have internet connection on your computer)
Open the library manager

Open the library manager
3.1: Search for the "PubSub" in the Library manager from the result select PubSubClient by Nick O'Leary's library
PubSubClient lib

PubSubClient lib
Click install, That's all.
HIVE MQ Public MQTT Broker.You can install the broker on your computer or the servers, right now we are using Free MQTT Broker provide by the HIVE MQ. Public HiveMQ MQTT broker is open for anyone to use.You can use any MQTT client or library to publish to the broker.
HIVE MQ Public MQTT Broker

HIVE MQ Public MQTT Broker
Testing and usage is for free but please do not use it for sensitive information because everybody is allowed to subscribe to every topic, including wildcard. Feel free to play with MQTT and the HiveMQ broker. Please consider to add a reconnect logic to your client because we may update the underlaying HiveMQ instance at any time, so HIVEMQ cannot promise 100% uptime. more info : http://www.mqtt-dashboard.com MQTT Hello WorldWe successfully installed the Wio Terminal and the PubSubClient Lib, next we try to run a First MQTT Programme.
In the hello world example program, we are going demonstrate MQTT Subscribe and MQTT Publish on WIO Terminal.
Arduino Sketch
/*
MQTT Exmple for SeeedStudio Wio Terminal
Author: Salman Faris
Date: 31/07/2020
Last Updates: 02/08/2020
MQTT Broker broker.mqtt-dashboard.com
Subscribe Topic Name: WTIn
Publish Topic Name: WTout
- publishes "hello world" to the topic "WTout"
- subscribes to the topic "WTin", printing out any messages
*/
#include <AtWiFi.h>
#include"TFT_eSPI.h"
#include <PubSubClient.h>
// Update these with values suitable for your network.
const char* ssid = "***"; // WiFi Name
const char* password = "***"; // WiFi Password
const char* mqtt_server = "broker.mqtt-dashboard.com"; // MQTT Broker URL
TFT_eSPI tft;
WiFiClient wioClient;
PubSubClient client(wioClient);
long lastMsg = 0;
char msg[50];
int value = 0;
void setup_wifi() {
delay(10);
tft.setTextSize(2);
tft.setCursor((320 - tft.textWidth("Connecting to Wi-Fi..")) / 2, 120);
tft.print("Connecting to Wi-Fi..");
Serial.println();
Serial.print("Connecting to ");
Serial.println(ssid);
WiFi.begin(ssid, password); // Connecting WiFi
while (WiFi.status() != WL_CONNECTED) {
delay(500);
Serial.print(".");
}
Serial.println("");
Serial.println("WiFi connected");
tft.fillScreen(TFT_BLACK);
tft.setCursor((320 - tft.textWidth("Connected!")) / 2, 120);
tft.print("Connected!");
Serial.println("IP address: ");
Serial.println(WiFi.localIP()); // Display Local IP Address
}
void callback(char* topic, byte* payload, unsigned int length) {
//tft.fillScreen(TFT_BLACK);
Serial.print("Message arrived [");
Serial.print(topic);
Serial.print("] ");
char buff_p[length];
for (int i = 0; i < length; i++) {
Serial.print((char)payload[i]);
buff_p[i] = (char)payload[i];
}
Serial.println();
buff_p[length] = '�';
String msg_p = String(buff_p);
tft.fillScreen(TFT_BLACK);
tft.setCursor((320 - tft.textWidth("MQTT Message")) / 2, 90);
tft.print("MQTT Message: " );
tft.setCursor((320 - tft.textWidth(msg_p)) / 2, 120);
tft.print(msg_p); // Print receved payload
}
void reconnect() {
// Loop until we're reconnected
while (!client.connected()) {
Serial.print("Attempting MQTT connection...");
// Create a random client ID
String clientId = "WioTerminal-";
clientId += String(random(0xffff), HEX);
// Attempt to connect
if (client.connect(clientId.c_str())) {
Serial.println("connected");
// Once connected, publish an announcement...
client.publish("WTout", "hello world");
// ... and resubscribe
client.subscribe("WTin");
} else {
Serial.print("failed, rc=");
Serial.print(client.state());
Serial.println(" try again in 5 seconds");
// Wait 5 seconds before retrying
delay(5000);
}
}
}
void setup() {
tft.begin();
tft.fillScreen(TFT_BLACK);
tft.setRotation(3);
Serial.println();
Serial.begin(115200);
setup_wifi();
client.setServer(mqtt_server, 1883); // Connect the MQTT Server
client.setCallback(callback);
}
void loop() {
if (!client.connected()) {
reconnect();
}
client.loop();
long now = millis();
if (now - lastMsg > 2000) {
lastMsg = now;
++value;
snprintf (msg, 50, "Wio Terminal #%ld", value);
Serial.print("Publish message: ");
Serial.println(msg);
client.publish("WTout", msg);
}
}
Upload the code to your Wio Terminal, before that.
// Update these with values suitable for your network.const char* ssid = "***"; // WiFi Nameconst char* password = "***"; // WiFi Passwordconst char* mqtt_server = "broker.mqtt-dashboard.com"; // MQTT Broker URLReplace the SSID and Password from the code, with your WiFi name and password.
void reconnect() { // Loop until we're reconnected while (!client.connected()) { Serial.print("Attempting MQTT connection..."); // Create a random client ID String clientId = "WioTerminal-"; clientId += String(random(0xffff), HEX); // Attempt to connect if (client.connect(clientId.c_str())) { Serial.println("connected"); client.subscribe("WTin"); //Subscribe topic } else { Serial.print("failed, rc="); Serial.print(client.state()); Serial.println(" try again in 5 seconds"); // Wait 5 seconds before retrying delay(5000); } }}Here we are Subscribing "WTin" Topic.
void callback(char* topic, byte* payload, unsigned int length) { //tft.fillScreen(TFT_BLACK); Serial.print("Message arrived ["); Serial.print(topic); Serial.print("] "); char buff_p[length]; for (int i = 0; i < length; i++) { Serial.print((char)payload[i]); buff_p[i] = (char)payload[i]; } Serial.println(); buff_p[length] = '�'; String msg_p = String(buff_p); tft.fillScreen(TFT_BLACK); tft.setCursor((320 - tft.textWidth("MQTT Message")) / 2, 90); tft.print("MQTT Message: " ); tft.setCursor((320 - tft.textWidth(msg_p)) / 2, 120); tft.print(msg_p); // Print receved payload}Here we are getting data from the subscribed topic WTin and Displaying it on the Wio Terminal Display.
long now = millis(); if (now - lastMsg > 2000) { lastMsg = now; ++value; snprintf (msg, 50, "Wio Terminal #%ld", value); Serial.print("Publish message: "); Serial.println(msg); client.publish("WTout", msg); }Here we are Publishing data from the Wio terminal to WTout topic.
That's all. Upload the code to your Wio Terminal.
InstallandSetup MQTT Mobile App
In order to send and receive MQTT message via topic, we need an MQTT dashboard, there is plenty of MQTT Brokers out there, but we are going to use an Android Mobile App called IoT MQTT Panel
IoT MQTT Panel Application

IoT MQTT Panel Application
4:1 Configure MQTT Connection
Setup MQTT Connection

Setup MQTT Connection
Click SETUP A CONNECTION
Setup MQTT

Setup MQTT
Enter MQTT Broker Connection Paramters
Connection Name: Public MQTT Broker
Client ID: Wio Terminal MQTT
Broker Web/IP address: broker.mqtt-dashboard.com
Port number: 1883
Network Protocol: TCP
Then Create a dashboard by clicking the ➕ icon
1 / 2
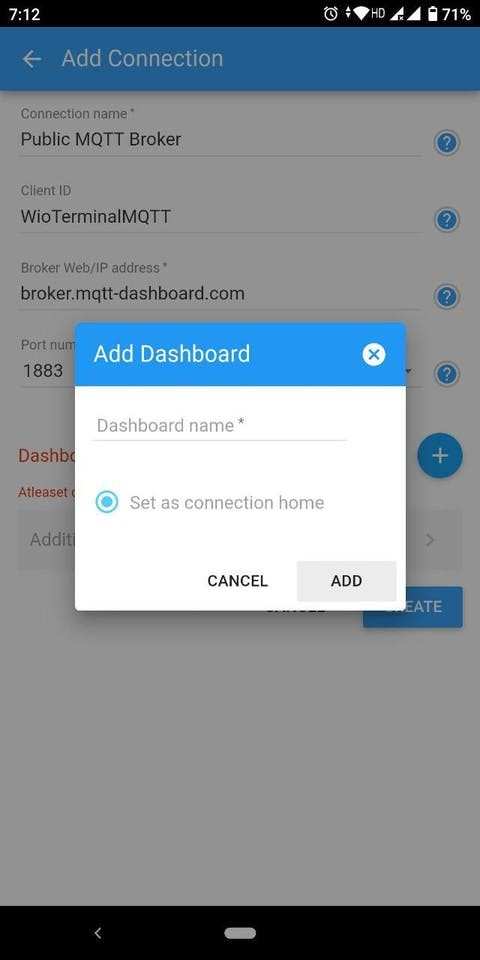

Creating dashboard
Now you completed the Broker (Server) Setup, next you need setup the Widgets/Panels for the topics.
Panel Setup

Panel Setup
Click ADD PANEL.
1 / 2


Text Log Panel
First I selected the Text Log Panel to display messages from the Wio terminal to the mobile app, After selecting the panel we need to give a name and Topic name, In our case topic name is "WTout"
1 / 2 • Text Input panel

Text Input panel
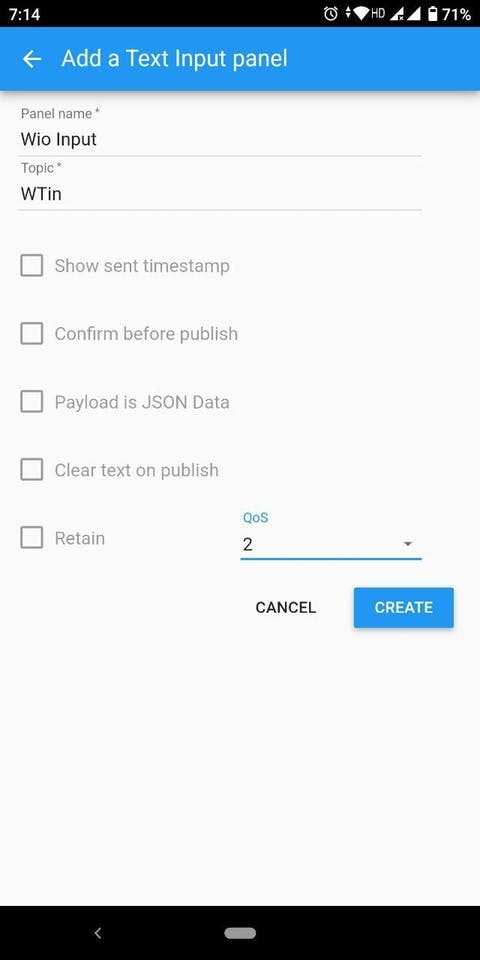
Second I added the Text Input panel to send messages to Wio Terminal, Then the messages will print on the Wio Terminal display for that we are using topic "WTin"
All set. next, we can try out.
MQTT on Wio TerminalHope you understood the MQTT and how to use with Wio Terminal. Thank You.
Schematics, diagrams and documents
Code
Credits
Related products


Leave your feedback...