
Measuring Distance With Sound

About the project
Using ultrasonic sensors to measure distance of obstacles, taking into account temperature and humidity that affect the speed of sound.
Project info
Difficulty: Easy
Platforms: Arduino
Estimated time: 1 hour
License: Creative Commons Attribution CC BY version 4.0 or later (CC BY 4+)
Items used in this project
Hardware components


Story
The ultrasound travels from the transmitter and when an obstacle comes in its way it bounces back and returns to the receiver The ultrasound travels from the transmitter and when an obstacle comes in its way it bounces back and returns to the receiver Measuring distances from our robot to other objects is one of the most common data we want to obtain. For example, if we are building an autonomous vehicle, we want to check its distance from obstacles to help it make the right decision about its course. There are also many more examples of robots that we want them to activate mechanisms when something or someone gets close to them.
One of the simplest, cheapest, and most accurate ways to measure distances is by using ultrasonic sensors. Their working principle is based on the fact that sound is reflected upon most objects and materials. These sensors have a transmitter that sends a short ultrasonic burst and a receiver that senses the ultrasound upon it’s return. Knowing the speed of the sound in the air (approximately 343 m/sec), we can calculate the distance it traveled, if we measure the time passed for the ultrasound to return to the sensor.
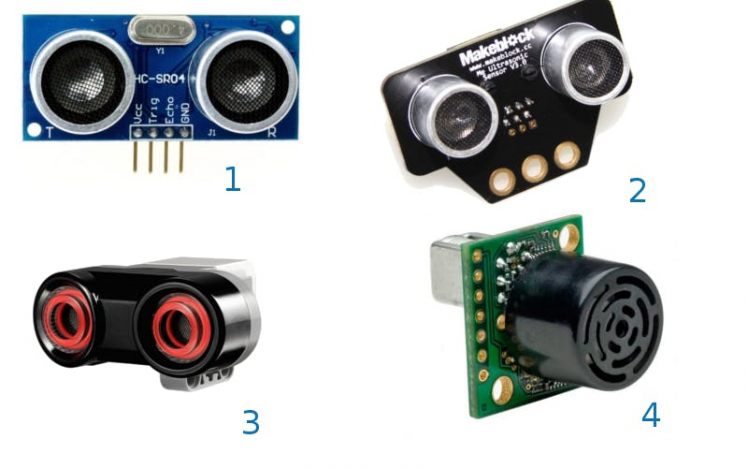 Various ultrasonic sensors – 1: Sensor suitable for Arduino and Raspberry pi, 2: Sensor for MakeBlock, 3: Sensor for Lego EV3, 4: Sensor with transmitter and receiver in the same housing.
Working Principle
All ultrasonic sensors operate in a similar way. They send a short (a few microseconds long) ultrasonic burst from the transmitter and measure the time it takes for the sound to return to the receiver.
 Let’s say that it took 10 milliseconds for the ultrasound to return to the sensor. That means:
- That the time in seconds is 0, 01.
- Knowing that sound travels in the air 343 meters for every second, we can calculate the distance in meters by simply multiplying seconds by 343. in our case 0, 01 x 343 = 3, 43 meters.
- This is the distance that the ultrasound traveled to the obstacle and back to the sensor, so the obstacle is 3, 43/2 = 1, 715 meters away from the sensor.
Pros and Cons
The main advantages of using ultrasonic sensors to measure distance are:
- They are cheap and there is a plethora of choices in the market,
- They are not affected by the color or the transparency of obstacles,
- They are not affected by lighting conditions,
- They are pretty accurate on their measurements.
Their drawbacks are:
- They don’t work well enough on obstacles with small surfaces.
- The angle of the surface of the obstacle is crucial for the sensor.
- Obstacles made from sound absorbing materials (for example sponges) are hard to be traced by the sensor, since the absorb sound.
Choosing a Sensor
There is a wide variety of ultrasonic sensors on the market, for most robotics platforms. For those who prefer working with the Lego platform, EV3 and the older NXT, include ultrasonic sensors. Some examples of using them in the classroom are:
If you are an Arduino or Raspberry Pi fan and want to dive more into how these sensors work, there are several options that you can find online. The most common and affordable choice is the HC-SR04, which costs less than a euro on ebay (August 2018). For more details and comparative tests with various ultrasonic sensors, I advise you to watch two detailed videos (here and here) from Andreas Spiess channel on Youtube.
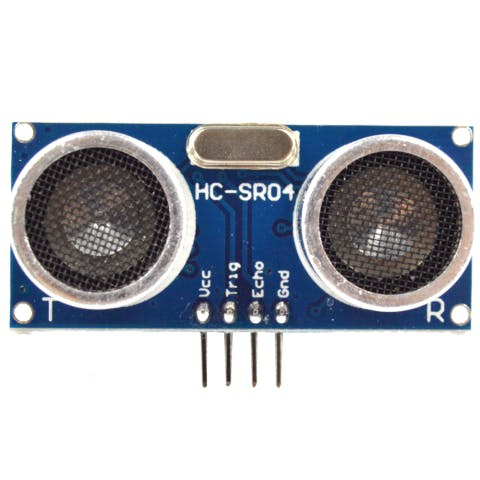 The HC-SR04 ultrasonic sensor. The transmitter is on the left and the receiver on the right.
Connecting the Sensor to Arduino and Programming
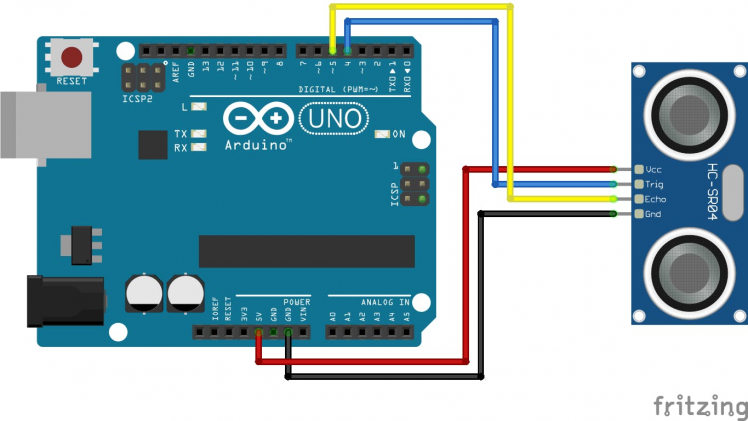
The HC-SR04 sensor has 4 pins:
- VCC, that is connected to 5V,
- GND, that is connected to Ground,
- TRIG (Trigger), that is connected to the transmitter to send the ultrasonic burst,
- ECHO, that is connected to the receiver.
There are two ways to connect the sensor to Arduino:
- Connect TRIG and ECHO to different digital pins and make all the hard work and calculations in our program,
- Connect TRIG and ECHO to the same digital pin and use a library to make all the calculations.
I am going to start from the second way (easy) and then stay longer on the first, which gives the programmer more control and as an educator I find it more interesting.
One Pin Connection and the NewPing Library
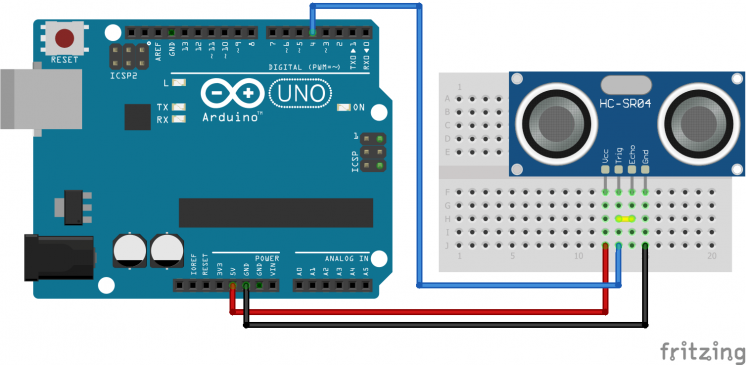 The easy way. Connect TRIG and ECHO to the same digital pin, in this example pin 4.
For my program to work I will need to install the NewPing library to my Arduino IDE, using the library manager.
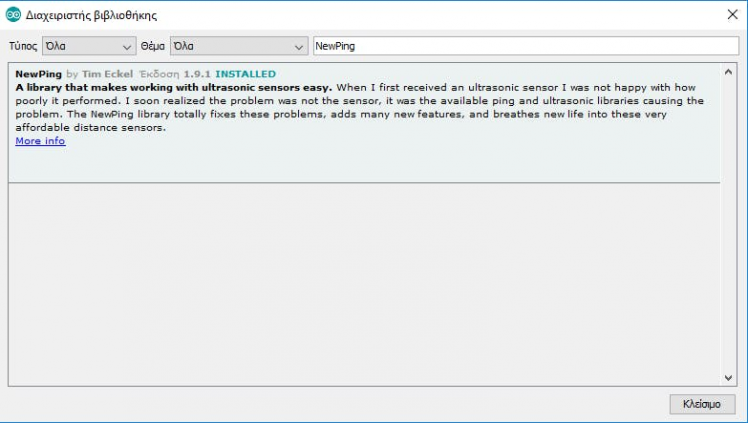 Just installed the NewPing library to Arduino IDE.
Now I can write a simple program to print the distance obtained by the sensor to the Serial monitor.
#include <NewPing.h>                //Include the NewPing library
#define PING_PIN 4                  //The Digital pin i use for connecting the sensor
NewPing sonar(PING_PIN, PING_PIN ); //Create a NewPing object
void setup() {
 Serial.begin(9600);               //Start serial communication
}
void loop() {
 unsigned int uS = sonar.ping();
 int cm = uS / US_ROUNDTRIP_CM;    //Get the distance in cm using the library
 Serial.println(cm);               //Print the distance on the serial monitor
 delay(50);                        //Delay 50 milliseconds for the next distance mesurement
}
I uploaded the program to the board and started testing.
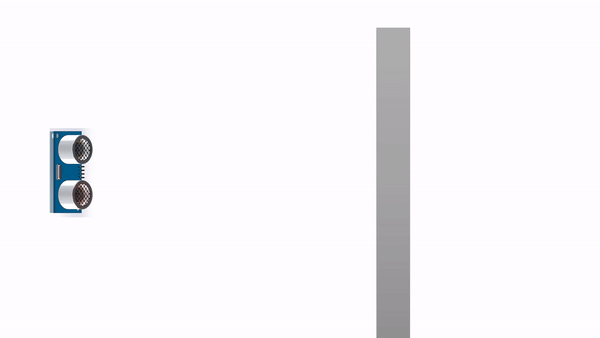
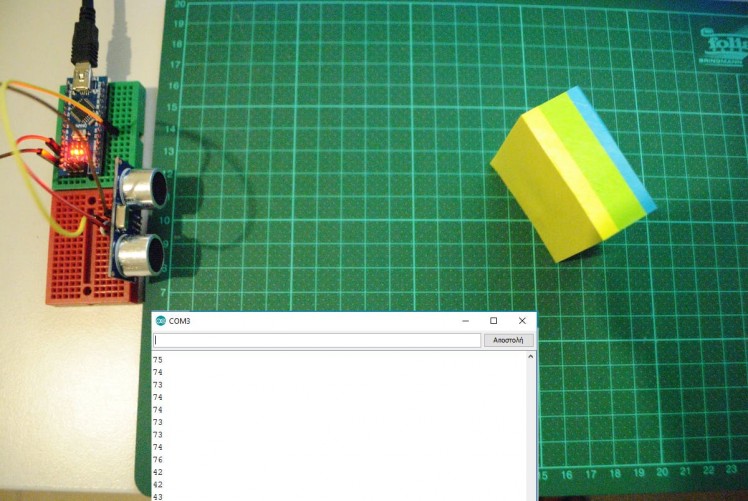
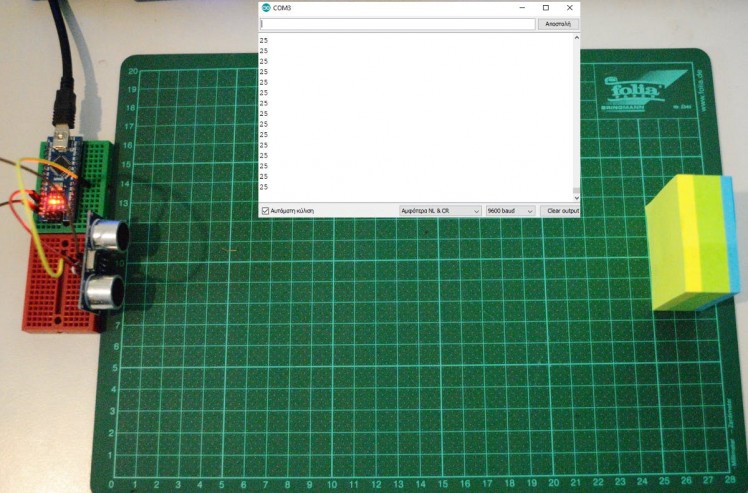 Test 1: Successful obstacle recognition at 25cm.
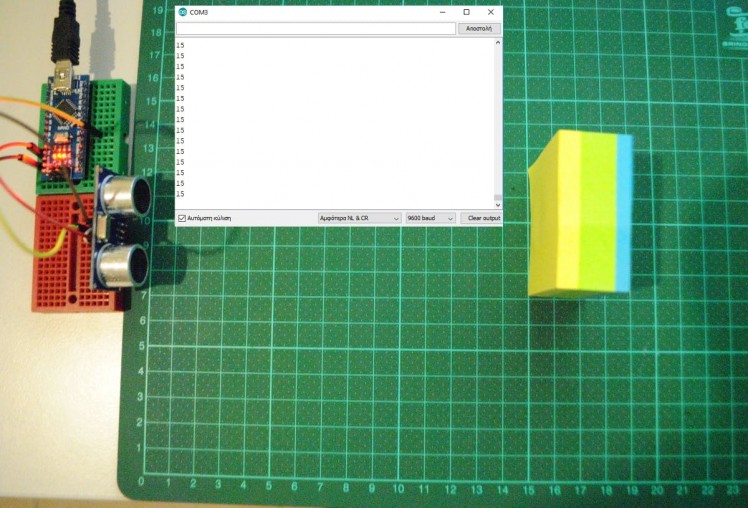 Test 2: Successful obstacle recognition at 15cm.
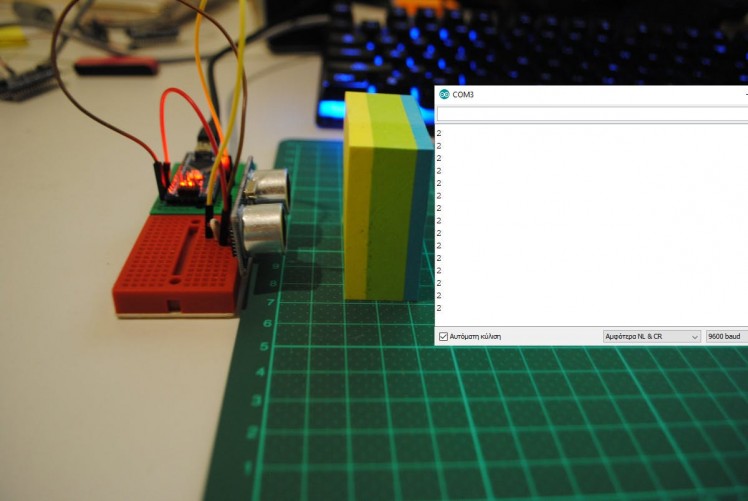 Test 3: Successful obstacle recognition at 2cm.
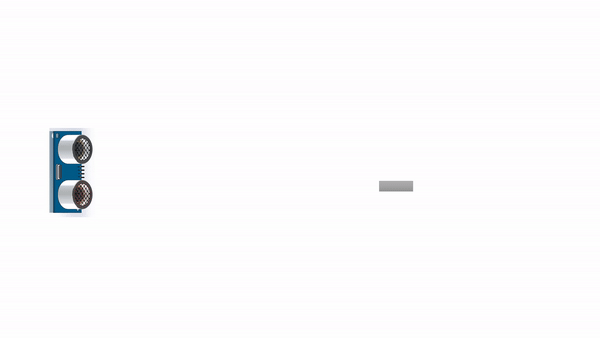
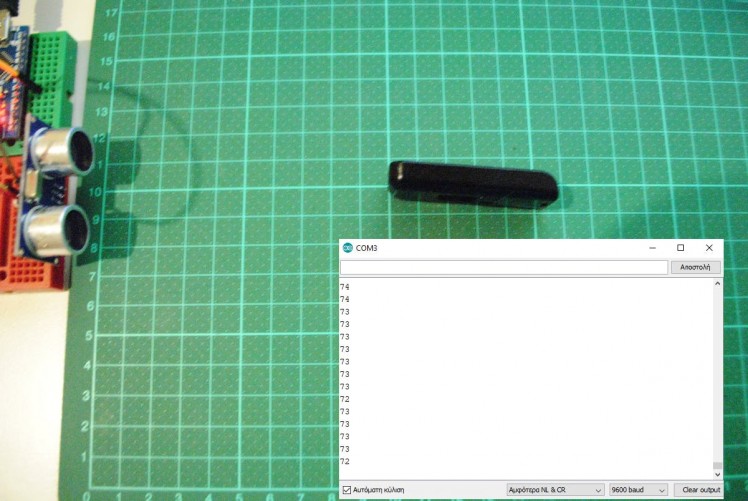 Test 4: Sensor fails to recognize object with small surface facing it at 10 cm and returns the distance from the wall.
 Test 5: Sensor fails to recognize obstacle that is not faced perpendicular to sound waves and returns the distance from the wall.
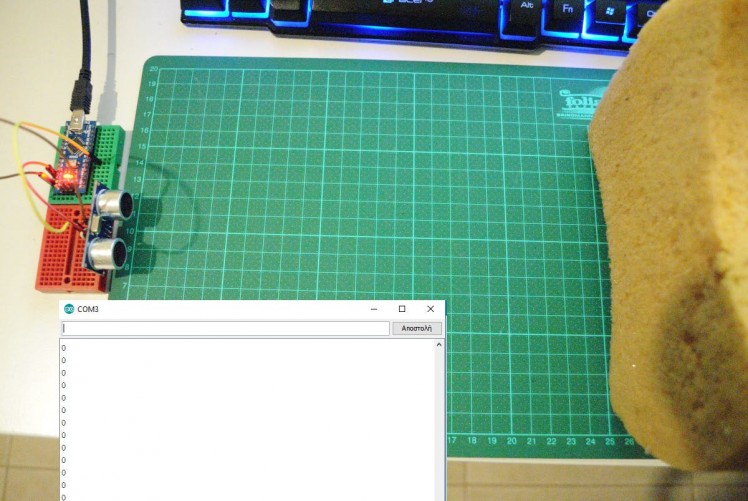 Test 6: Sensor fails to recognize sponge at 25 cm. it returns a zero value, since the ultrasound is absorbed by the obstacle and nothing returns back.
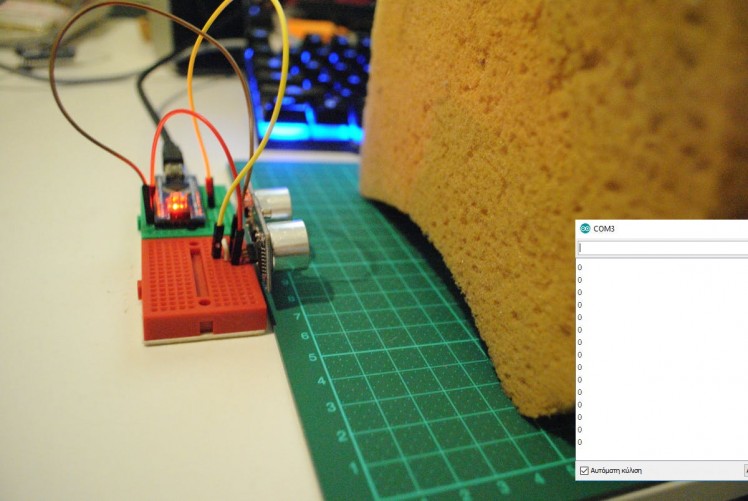 Test 7: Even at 5 cm the sponge absorbs the ultrasound.
Two Pin Connection – Calculating Distance From Time
As an educator, I find it more interesting to dig in the working principal of things, even if that means more work for my students. In order to do so in this example we will have to forget the luxury of the NewPing library and make all the calculations ourselves. First of all I changed the schematic by connecting the TRIG and ECHO to different digital pins.
 Connecting TRIG to digital pin 4 and ECHO to digital pin 5.
Before I can start coding there are some things I need to clarify:
- TRIG (Trigger) has a default LOW state and when we change it to HIGH it starts sending ultrasonic burst.
- When ECHO receives the bouncing sound it returns a HIGH pulse to the Arduino.
- I will use the pusleIn function to measure the time the ECHO pin stays in HIGH state. This functions returns time in microseconds.
Now I can start my algorithm:
- Set TRIG pin to HIGH.
- Wait for a short period of time (10 microseconds).
- Set TRIG pin to LOW. Now I have sent a short ultrasonic burst.
- Get the time from ECHO pin in microseconds.
- Convert microseconds to seconds (division by 1.000.000).
- Calculate the distance the sound traveled in meters. Multiply seconds by 343 m/sec.
- Now I have the distance I meters. I will convert it to centimeters by multiplying by 100.
- This is the distance the sound traveled to the obstacle and back. So the distance of the obstacle from the sensor is half of that. So I divide distance by 2.
#define TRIG_PIN 4            //Connect TRIG pin to digital pin 4
#define ECHO_PIN 5            //Connect ECHO pin to digital pin 5
void setup() {
 pinMode(TRIG_PIN, OUTPUT);  //Set the TRIG pin to OUTPUT mode
 pinMode(ECHO_PIN, INPUT);   //Set the ECHO pin to INPUT mode
 Serial.begin(9600);         //Begin serial communication
}
void loop() {
 //Send a short (10 microseconds) ultrasonic burst
 digitalWrite(TRIG_PIN, HIGH);
 delayMicroseconds(10);
 digitalWrite(TRIG_PIN, LOW);
 float microseconds = pulseIn(ECHO_PIN, HIGH, 100000); //Mesure the duration of a HIGH pulse in echo pin in microseconds. Timeout in 0,1 seconds
 float seconds = microseconds / 1000000;               //Convert microseconds to seconds
 float meters = seconds * 343;                         //Get the distance in meters using the speed of sound (343m/s)
 float cm = meters * 100;                              //Convert meters to cm
 cm = cm/2;                                            //We only want the distance to the obstacle and not the roundtrip
 Serial.println(cm);                                   //Print distance in cm to the serial monitor
 delay(50);                                            //Delay 50 milliseconds until the next mesurement
}
I upload the program to my board and the sensor works as with the NewPing library, returning decimal values since all my variables are float.
Digging Even Further – Finding the Actual Speed of Sound Based on Temperature and Humidity
So far I used the speed of sound to calculate distance from time, assuming that this is a constant value of 343 m/sec. That is not actually true. Speed of sound depends on the “density” of the mean it travels through. In solid materials the speed of sound is greater than liquids and in liquids sound travels faster than through gases.
The ultrasonic sensor sends sound through air which is a gas. In gases the speed of sound is affected mostly by the gas temperature, less by the gas humidity and even less by the gas pressure. For example in air with pressure of 1 Atm and
- Temperature of 0 degrees Celsius (32 F) and 50% humidity, the speed of sound is 331.61 m/sec,
- Temperature of 20 degrees Celsius (68 F) and 50% humidity, the speed of sound is 343.99 m/sec,
- Temperature of 30 degrees Celsius (86 F) and 50% humidity, the speed of sounds is 350, 31 m/sec και
- Temperature of 30 degrees Celsius (86 F) and 90% humidity, the speed of sound is 351, 24 m/sec.
There are many online calculators for the speed of sound. I used the one on http://www.sengpielaudio.com/calculator-airpressure.htm to get the above results.
Since I had a cheap temperature – humidity sensor lying around (DHT11 Temperature and Humidity Sensor), I decided to improve the calculations in my code, using these two values to estimate a more accurate speed of sound value.
First of all I embedded the new sensor in my schematic. Typical DHT11 sensors have either 3 pins (5V, GND and Signal) or 4 pins (5V, GND, Signal and NULL). The connections are as follows:
- 5V DHT11 –> 5V Arduino
- GND DHT11 –> GND Arduino
- SIGNAL DHT11 –> A0 pin Arduino
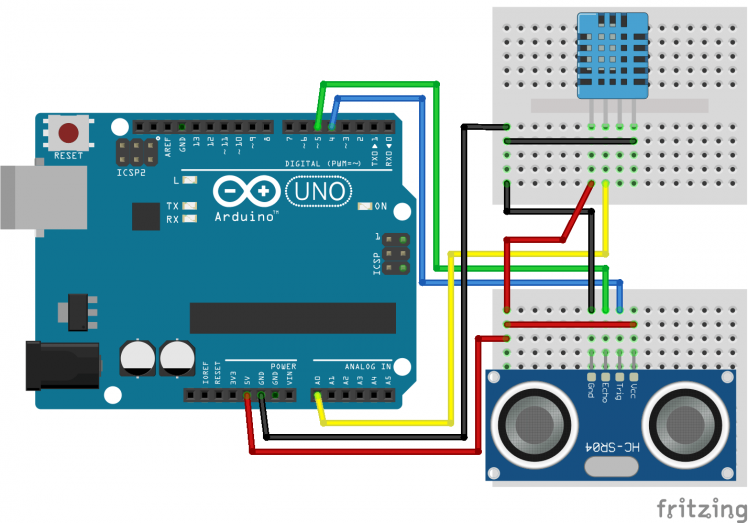 Adding the DHT11 to the schematic.
The next step was to add the measurement of temperature and humidity in my code using the dht.h library, which you can download from here. I followed the step by step tutorial from Brainy Bits and now the only thing I needed was to calculate the actual speed of sound.
After a long search, I found that the formula needed was originally published in 1993 by Owen Cramer in his work “The variation of the specific heat ratio and the speed of sound in air with temperature, pressure, humidity, and CO2 concentration.”. I was also happy to find a JAVA implementation by a research team from the Univeristy of Sao Paolo Brazil. With a few tweaks to adjust it to my code the full program is as follows:
#include <dht.h>    //Include the DHT library for the temperature - humidity sensor
#define TRIG_PIN 4  //Connect TRIG pin to digital pin 4
#define ECHO_PIN 5  //Connect ECHO pin to digital pin 5
#define dht_apin A0 //Connect Signal pin from DHT11 sensor to analog pin A0
dht DHT;            //Create a DHT object
void setup() {
 pinMode(TRIG_PIN, OUTPUT);                        //Set the TRIG pin to OUTPUT mode
 pinMode(ECHO_PIN, INPUT);                         //Set the ECHO pin to INPUT mode
 Serial.begin(9600);                               //Begin serial communication
 delay(500);                                       //Delay to let system boot
 Serial.println("Accurate distance sensingnn");  //Write a welcoming message to serial monitor
 delay(1000);                                      //Wait before accessing the DHT11 Sensor
}
void loop() {
 DHT.read11(dht_apin);           //Read the data from the DHT sensor
 float p = 101000;               //Set atmospheric pressure to 101.000 kPa
 float temp = DHT.temperature;   //Get temperature from sensor
 float humidity = DHT.humidity;  //Get humidity from sensor
 //Use the fromula from http://gsd.ime.usp.br/~yili/SpeedOfSound/Speed.html to evaluate speed of sound
 float a0 = 331.5024;
 float a1 = 0.603055;
 float a2 = -0.000528;
 float a3 = 51.471935;
 float a4 = 0.1495874;
 float a5 = -0.000782;
 float a6 = -1.82e-7;
 float a7 = 3.73e-8;
 float a8 = -2.93e-10;
 float a9 = -85.20931;
 float a10 = -0.228525;
 float a11 = 5.91e-5;
 float a12 = -2.835149;
 float a13 = -2.15e-13;
 float a14 = 29.179762;
 float a15 = 0.000486;
 float T = temp + 273.15;
 float h = humidity /100.0;
 float f = 1.00062 + 0.0000000314 * p + 0.00000056 * temp * temp;
 float Psv = exp(0.000012811805 * T * T - 0.019509874 * T + 34.04926034 - 6353.6311 / T);
 float Xw = h * f * Psv / p;
 float c = 331.45 - a0 - p * a6 - a13 * p * p;
 c = sqrt(a9 * a9 + 4 * a14 * c);
 float Xc = ((-1) * a9 - c) / ( 2 * a14);
 float speedOfSound = a0 + a1 * temp + a2 * temp * temp + (a3 + a4 * temp + a5 * temp * temp) * Xw + (a6 + a7 * temp + a8 * temp * temp) * p + (a9 + a10 * temp + a11 * temp * temp) * Xc + a12 * Xw * Xw + a13 * p * p + a14 * Xc * Xc + a15 * Xw * p * Xc;
 //Send a short (10 microseconds) ultrasonic burst
 digitalWrite(TRIG_PIN, HIGH);
 delayMicroseconds(10);
 digitalWrite(TRIG_PIN, LOW);
 float microseconds = pulseIn(ECHO_PIN, HIGH, 100000); //Mesure the duration of a HIGH pulse in echo pin in microseconds. Timeout in 0,1 seconds
 float seconds = microseconds / 1000000;               //Convert microseconds to seconds
 float meters = seconds * speedOfSound;                //Get the distance in meters using the speed of sound calculated earlier
 float cm = meters * 100;                              //Convert meters to cm
 cm = cm/2;                                            //We only want the distance to the obstacle and not the roundtrip
 //Write results to serial monitor
 Serial.print("Obstacle distance = ");
 Serial.print(cm);
 Serial.print("cm  ");
 Serial.print("Current humidity = ");
 Serial.print(humidity);
 Serial.print("%  ");
 Serial.print("temperature = ");
 Serial.print(temp);
 Serial.print("C  ");
 Serial.print("Speed of Sound = ");
 Serial.print(speedOfSound);
 Serial.println("m/sec   ");
 //Wait 2 seconds before accessing sensor again.
 delay(2000);
}
I uploaded the program to my board and starting testing. I was happy to have more accurate measurements, even if that does not play a significant role in small distances of few cm.
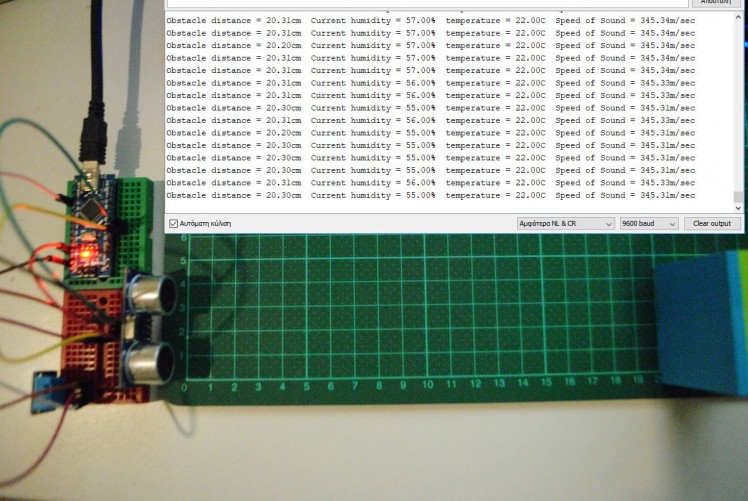 Every 2 seconds the program calculates the obstacle distance using temperature and humidity to calculate an accurate speed of sound.
Using the Ultrasonic Sensor in Class
The use of ultrasonic sensors in educational robotics is very common and there are hundreds of examples over the internet, either using the Lego platform or Arduino and Raspberry pi. Recently tinkercad added a new command block for getting the distance from an ultrasonic sensor.
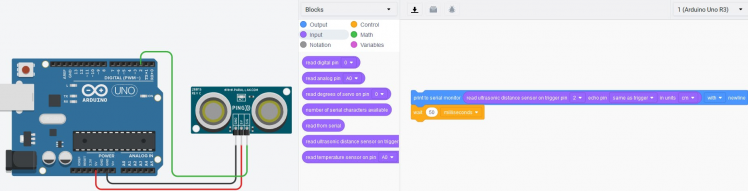 Our program in Tinkercad with just 3 blocks.
I find particularly interesting, for educational purposes, the analytical way of calculating the distance, from the time the sound takes to travel to the obstacle and back.
In a previous project (smart trash can), that we implemented with my students from the evening club Young Hackers, we spent a lot of time to fully understand the algorithm that calculates distance from time using an analytical worksheet (in greek). We implemented the algorithm using a block style language (Ardublockly) that helped students a lot to understand every step of the way.
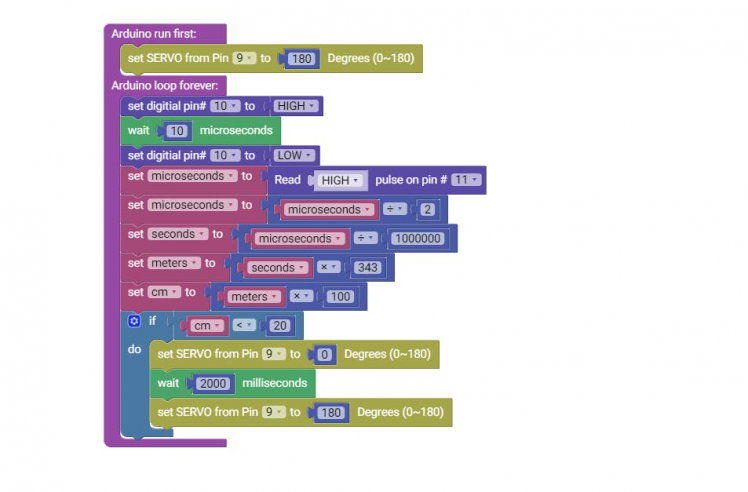 Using Ardublockly to implement the algorithm.
Schematics, diagrams and documents
Code
Credits
Related products


Leave your feedback...