
Led Control With Esp Webserver

Made by CETECH11 / Home Automation / Lights / IoT
About the project
Will guide you to build a simple web control LED unit.
Project info
Difficulty: Easy
Platforms: Espressif
Estimated time: 1 hour
License: GNU General Public License, version 3 or later (GPL3+)
Items used in this project

Story
In this tutorial, you will learn how to create a web server with ESP32 that can control an LED from any device connected to the same WiFi network. You will use the Arduino IDE to program the ESP32 and the web browser to access the web server.
What You NeedTo follow this tutorial, you need the following components:
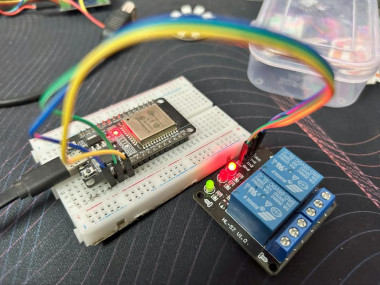
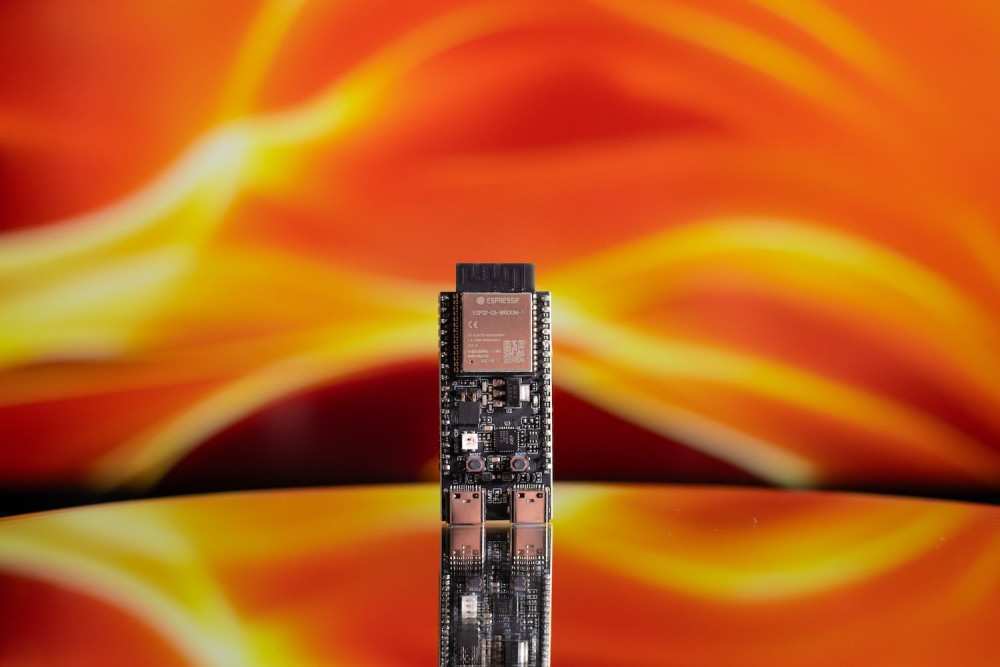
- An ESP32 development board
- A USB cable to connect the ESP32 to the computer
- The Arduino IDE installed on your computer
- The ESP32 add-on for the Arduino IDE
You must check out PCBWAY for ordering PCBs online for cheap!
You get 10 good-quality PCBs manufactured and shipped to your doorstep for cheap. You will also get a discount on shipping on your first order. Upload your Gerber files onto PCBWAY to get them manufactured with good quality and quick turnaround time. PCBWay now could provide a complete product solution, from design to enclosure production. Check out their online Gerber viewer function. With reward points, you can get free stuff from their gift shop. Also, check out this useful blog on PCBWay Plugin for KiCad from here. Using this plugin, you can directly order PCBs in just one click after completing your design in KiCad.
How It WorksThe ESP32 will act as a web server that can serve HTML and CSS files to web clients (such as web browsers or smartphones). The web page will have a button that can send an HTTP request to the ESP32 to turn the LED on or off.
The ESP32 will also handle the HTTP requests from the web clients and respond accordingly. For example, if the ESP32 receives a request to turn the LED on, it will set the GPIO pin connected to the LED to HIGH and send back a confirmation message.
ESP32 CodeThe code for the ESP32 is also straightforward. You need to include the WiFi.h and ESPAsyncWebServer.h libraries, which are used to connect the ESP32 to the WiFi network and to create the web server.
You also need to define the WiFi credentials, the GPIO pin for the LED, and the web server object. Then, you need to create a function to generate the HTML and CSS code for the web page, which will have a button to toggle the LED state.
Next, you need to create a function to connect the ESP32 to the WiFi network and print the IP address to the serial monitor. You also need to create a function to handle the HTTP requests from the web clients and change the LED state accordingly.
Finally, you need to initialize the LED pin, the WiFi connection, and the web server in the setup() function, and keep the web server running in the loop() function.
The complete code is shown below:
#include <WiFi.h>
#include <ESPAsyncWebServer.h>
// WiFi credentials
#define WIFI_SSID "Your WiFi SSID"
#define WIFI_PASSWORD "Your WiFi Password"
// LED pin
#define LED_PIN
// Web server object
AsyncWebServer server(80);
// LED state
int LED_state = LOW;
// Function to generate the HTML and CSS code for the web page
String getHTML() {
String html = "<!DOCTYPE HTML>";
html += "<html>";
html += "<head>";
html += "<style>";
html += "body {background-color: #F0F0F0; font-family: Arial, Helvetica, sans-serif;}";
html += "h1 {color: #333333; text-align: center;}";
html += "button {width: 150px; height: 50px; font-size: 20px; margin: 10px;}";
html += "</style>";
html += "</head>";
html += "<body>";
html += "<h1>ESP32 Web Server</h1>";
html += "<p>LED state: <span >";
if (LED_state == LOW) html += "OFF";
else html += "ON";
html += "</span></p>";
html += "<button onclick="window.location.href='/led/on'">Turn ON</button>";
html += "<button onclick="window.location.href='/led/off'">Turn OFF</button>";
html += "</body>";
html += "</html>";
return html;
}
// Function to connect to WiFi network
void connectWiFi() {
Serial.print("Connecting to WiFi...");
WiFi.begin(WIFI_SSID, WIFI_PASSWORD);
while (WiFi.status() != WL_CONNECTED) {
delay(500);
Serial.print(".");
}
Serial.println();
Serial.println("WiFi connected");
Serial.println("IP address: ");
Serial.println(WiFi.localIP());
}
// Function to handle HTTP requests
void handleRequest(AsyncWebServerRequest *request) {
// Get the request path
String path = request->url();
// Check if the request is to turn the LED on
if (path == "/led/on") {
// Set the LED pin to HIGH
digitalWrite(LED_PIN, HIGH);
// Update the LED state
LED_state = HIGH;
// Send a confirmation message
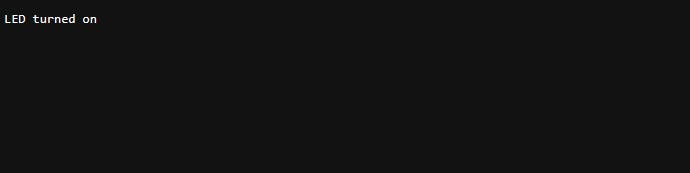
request->send(200, "text/plain", "LED turned on");
}
// Check if the request is to turn the LED off
else if (path == "/led/off") {
// Set the LED pin to LOW
digitalWrite(LED_PIN, LOW);
// Update the LED state
LED_state = LOW;
// Send a confirmation message
request->send(200, "text/plain", "LED turned off");
}
// Otherwise, send the web page
else {
// Get the HTML and CSS code
String html = getHTML();
// Send the web page
request->send(200, "text/html", html);
}
}
void setup() {
// Initialize the serial monitor
Serial.begin(115200);
// Initialize the LED pin
pinMode(LED_PIN, OUTPUT);
digitalWrite(LED_PIN, LED_state);
// Connect to WiFi network
connectWiFi();
// Start the web server
server.onNotFound(handleRequest);
server.begin();
}
void loop() {
// Nothing to do here
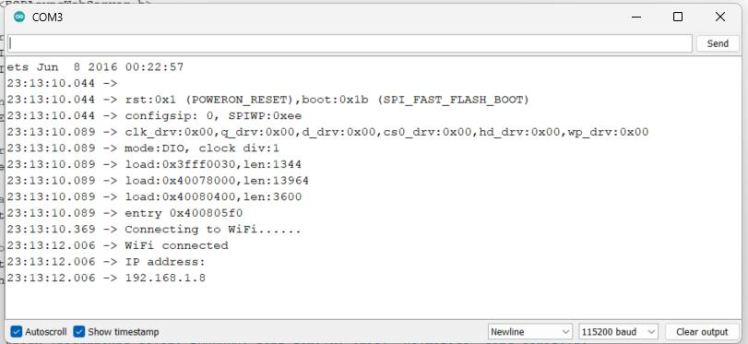
}To test the web server, you need to upload the code to the ESP32 board and open the serial monitor. You should see the IP address of the ESP32, which is something like 192.168.1.8
Then, you need to open a web browser on your computer or smartphone and enter the IP address of the ESP32. You should see the web page with the button to control the LED.
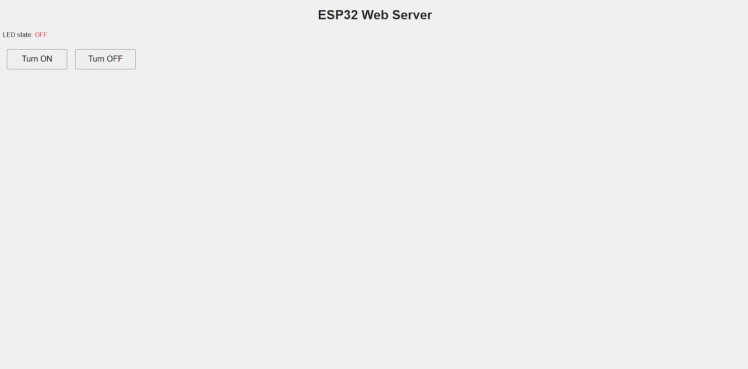
You can click the button to toggle the LED state and see the confirmation message on the web browser.

In this tutorial, you learned how to create a web server with ESP32 that can control an LED from any device connected to the same WiFi network. You learned how to use the WiFi.h and ESPAsyncWebServer.h libraries to connect the ESP32 to the WiFi network and to create the web server. You also learned how to generate the HTML and CSS code for the web page and how to handle the HTTP requests from the web clients.
You can use this tutorial as a basis for your own projects that involve controlling GPIO pins or other devices with the ESP32 web server. You can also customize the web page design and functionality to suit your needs.
I hope you enjoyed this tutorial and found it useful. If you have any questions or feedback, please let me know. ?
Credits
Related products


Leave your feedback...