
Indoor Monitoring System Using Wioterminal And Node-red

About the project
A monitoring system that monitors the atmospheric temperature, humidity, VOC, and CO₂ and is visualized in node-red dashboard
Project info
Difficulty: Easy
Platforms: Seeed Studio, MQTT, Node-RED
Estimated time: 4 hours
License: MIT license (MIT)
Items used in this project
Hardware components

Story
This project aims to provide comprehensive instructions on visualizing data in Node-RED dashboards using the MQTT protocol and Mosquitto broker. We will use Wio-Terminal's SHT-40 and SPG-30 sensors and visualize the collected data on the Node-RED dashboard.
Working Flow

Working Flow
What is Node-red?Node-RED is a programming tool for wiring together hardware devices, APIs and online services in new and interesting ways.
It provides a browser-based editor that makes it easy to wire together flows using the wide range of nodes in the palette that can be deployed to its runtime in a single click.
(From the website:https://nodered.org)
Installation of Node-red in WindowsFirst, open the terminal and type
node --version;npm --versionand it shows the version below
v16.15.1
8.11.0
From this, it is clear that we need a higher version of node js and npm. For that use https://nodejs.org/en to download the newer version.
While downloading choose the LTS version below
Choosing of node.js version

Choosing of node.js version
After this follow the normal installation procedure and in Tools for native modules check that box
Check this box

Check this box
After this click install and finally, it will show like below
PowerShell after installaion

PowerShell after installaion
Now again check the version of node and npm, if everything is done properly like above it will show the result like below in the terminal.
v18.16.0
9.5.1
Both are get updated.
Now the laptop is ready for Node-red installation, For that type the comment below in the terminal.
npm install -g --unsafe-perm node-redAfter proper installation, we can see the terminal below
After Node-red installation

After Node-red installation
Then open your comment prompt and type
node-redIt will show the initialization of the Node-red in the terminal
Initialization of Node-red

Initialization of Node-red
From here copy the Server link and paste it into your browser
Link pasted in browser

Link pasted in browser
After this click enter, this will take you to node-red workspace
Workspace

Workspace
What is MQTT?MQTT is an OASIS standard messaging protocol for the Internet of Things (IoT). It is designed as an extremely lightweight publish/subscribe messaging transport that is ideal for connecting remote devices with a small code footprint and minimal network bandwidth. MQTT today is used in a wide variety of industries, such as automotive, manufacturing, telecommunications, oil and gas, etc.
(From Website:https://mqtt.org/)
MQTT ProtocolFor more details and working of MQTT Protocol refer to this video
What is Mosquitto Broker?Eclipse Mosquitto is an open-source (EPL/EDL licensed) message broker that implements the MQTT protocol versions 5.0, 3.1.1, and 3.1. Mosquitto is lightweight and is suitable for use on all devices from low-power single-board computers to full servers.
The MQTT protocol provides a lightweight method of carrying out messaging using a publish/subscribe model. This makes it suitable for Internet of Things messaging such as with low-power sensors or mobile devices such as phones, embedded computers, or microcontrollers.
The Mosquitto project also provides a C library for implementing MQTT clients and the very popular mosquitto_pub and mosquitto_sub command line MQTT clients.
(From Website:https://mosquitto.org/)
Installation of Mosquitto Brocker
For installation go to https://mosquitto.org/download/
Select this exe file

Select this exe file
Our laptop is 64-bit and click on the highlighted portion to download the exe file. Follow the installation instruction and install the mosquito on your laptop.
net start mosquittoNow type the above comment in the comment prompt (Run as administrator) to start the Mosquitto service and it will show like below.
Mosquitto Service started

Mosquitto Service started
To check the working of Mosquitto broker you can type the command like below in the command prompt
PubSub

PubSub
The Pub Sub is clearly explained on this website.
Now it's time for hardware setupInitially, we want to update the RTL8720DN firmware to enable the wifi connectivity. For this, there are two best documentation
Next, we want to install the board manager of Wio Terminal. For that goto
File > Preferences, and copy the below URL to Additional Boards Manager URLs
https://files.seeedstudio.com/arduino/package_seeeduino_boards_index.jsonAfter pasting the above URL click ok. Then Tools>Board>Boards Manager and type wio terminal then click install on Seeed SAMD Boards.After installing click on Tools>Board>Seeed SAMD>Seeedstudio Wio Terminal.
ArduinoPubSubClient Setup
For installing the PubSubClient library go to Sketch>Include Library>Manage Library.
Library installation

Library installation
Go through the highlighted parts and do accordingly.
After installation, we can write a simple pub-sub program and display the message in MQTT client APP
#include <PubSubClient.h>
#include "rpcWiFi.h"
const char *ssid = "*******";      // your network SSID
const char *password = "*****"; // your network password
const char *ID = "node1";  // Name of our device, must be unique
const char *server = "test.mosquitto.org"; // Server URL
WiFiClient wifiClient;
PubSubClient client(wifiClient);
unsigned long lastMsg = 0;
#define MSG_BUFFER_SIZE  (50)
char msg[MSG_BUFFER_SIZE];
int value = 0;


void callback(char* topic, byte* payload, unsigned int length) {
  Serial.print("Message arrived [");
  Serial.print(topic);
  Serial.print("] ");
  for (int i = 0; i < length; i++) {
    Serial.print((char)payload[i]);
  }
  Serial.println();
}
void reconnect() {
  // Loop until we're reconnected
  while (!client.connected())
  {
    Serial.print("Attempting MQTT connection...");
    // Attempt to connect
    if (client.connect(ID)) {
      Serial.println("connected");
    }
    else {
      Serial.print("failed, rc=");
      Serial.print(client.state());
      Serial.println(" try again in 5 seconds");
      // Wait 5 seconds before retrying
      delay(5000);
    }
  }
}

void setup() {
  Serial.begin(115200);
delay(100);
  while (!Serial)
    ; // Wait for Serial to be ready
  Serial.print("Attempting to connect to SSID: ");
  Serial.println(ssid);
  WiFi.begin(ssid, password);

  // attempt to connect to Wifi network:
  while (WiFi.status() != WL_CONNECTED)
  {
    Serial.print(".");
    WiFi.begin(ssid, password);
    // wait 1 second for re-trying
    delay(1000);
  }

  Serial.print("Connected to ");
  Serial.println(ssid);
  delay(500);
  client.setServer(server, 1883);
  client.setCallback(callback);

}

void loop() {
  if (!client.connected()) {
    reconnect();
  }
  client.loop();
  unsigned long now = millis();
  if (now - lastMsg > 2000) {
    lastMsg = now;
    client.publish("aTopic", "Hello world");
  }
}
This program is written with the help of Seeedstudio Wiki, And there is a similar program in their official documentation.
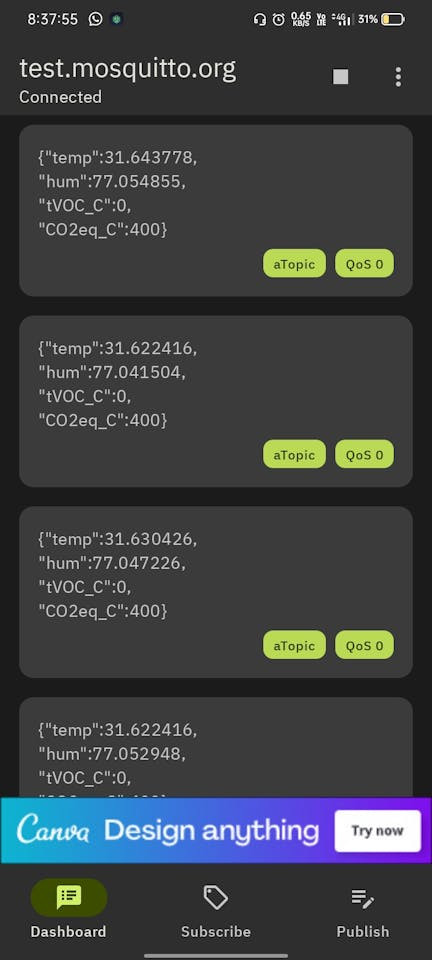
In the above program, we are publishing the data into a topic name called aTopic and we are subscribing to that particular topic using an MQTT Client APP.
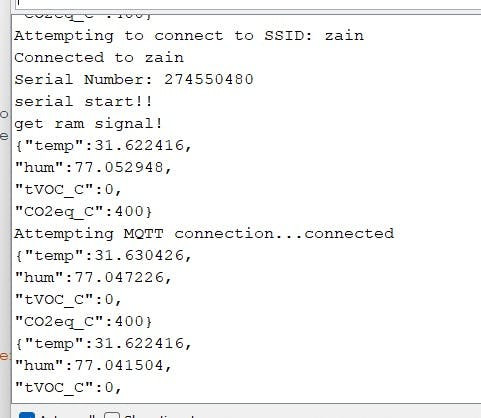
Subscribing the data into the MQTT ClientNow it's ready to integrate the sensors with WioTerminal. For now, we are integrating SPG30 and SHT40. Also, we are converting the data into JSON format for data transmission.
#include <SensirionI2CSht4x.h>
#include <Wire.h>
#include "sensirion_common.h"
#include "sgp30.h"
SensirionI2CSht4x sht4x;

void setup() {
  Serial.begin(115200);
    delay(100);
  Wire.begin();
  uint16_t error;
  char errorMessage[256];
  sht4x.begin(Wire);
  uint32_t serialNumber;
  error = sht4x.serialNumber(serialNumber);
  if (error) {
    Serial.print("Error trying to execute serialNumber(): ");
    errorToString(error, errorMessage, 256);
    Serial.println(errorMessage);
  } else {
    Serial.print("Serial Number: ");
    Serial.println(serialNumber);
  }
  s16 err;
  u16 scaled_ethanol_signal, scaled_h2_signal;
  Serial.println("serial start!!");
  while (sgp_probe() != STATUS_OK) {
    Serial.println("SGP failed");
    while (1);
  }
  err = sgp_measure_signals_blocking_read(&scaled_ethanol_signal, &scaled_h2_signal);
  if (err == STATUS_OK) {
    Serial.println("get ram signal!");
  } else {
    Serial.println("error reading signals");
  }
  err = sgp_iaq_init();
}
void loop() {
  s16 err = 0;
  u16 tvoc_ppb, co2_eq_ppm;
  err = sgp_measure_iaq_blocking_read(&tvoc_ppb, &co2_eq_ppm);
  if (err == STATUS_OK) {
  } else {
    Serial.println("error reading IAQ valuesn");
  }
  uint16_t error;
  char errorMessage[256];
  float temperature;
  float humidity;
  error = sht4x.measureHighPrecision(temperature, humidity);
  if (error) {
    Serial.print("Error trying to execute measureHighPrecision(): ");
    errorToString(error, errorMessage, 256);
    Serial.println(errorMessage);
  }
  else {
  }
  char envDataBuf[1000];
  sprintf(envDataBuf, "{"temp":%f,n"hum":%f,n"tVOC_C":%d,n"CO2eq_C":%d}", temperature, humidity, tvoc_ppb, co2_eq_ppm);
  Serial.println(envDataBuf);
  delay(4000);
}
The above program will result in all data from the sensor in a JSON format, which will be built by using
char envDataBuf[1000];
sprintf(envDataBuf, "{"temp":%f,n"hum":%f,n"tVOC_C":%d,n"CO2eq_C":%d}", temperature, humidity, tvoc_ppb, co2_eq_ppm);
Serial.println(envDataBuf);
In this first, we are creating a character array with a size of 1000, the we make use of sprintf which stands for “String print”. Instead of printing on the console, it stores output on a char buffer which is specified in sprintf. [Source] and finally print data using Serial.println.
Output of the above program

Output of the above program
Now we can integrate both the two programs to get the final result to the node-red.
#include <PubSubClient.h>
#include "rpcWiFi.h"
#include <SensirionI2CSht4x.h>
#include <Wire.h>
#include "sensirion_common.h"
#include "sgp30.h"
SensirionI2CSht4x sht4x;

const char *ssid = "zain";      // your network SSID
const char *password = "12345678"; // your network password
const char *ID = "node1";  // Name of our device, must be unique
const char *server = "test.mosquitto.org"; // Server URL
WiFiClient wifiClient;
PubSubClient client(wifiClient);
unsigned long lastMsg = 0;
#define MSG_BUFFER_SIZE  (50)
char msg[MSG_BUFFER_SIZE];
int value = 0;


void callback(char* topic, byte* payload, unsigned int length) {
  Serial.print("Message arrived [");
  Serial.print(topic);
  Serial.print("] ");
  for (int i = 0; i < length; i++) {
    Serial.print((char)payload[i]);
  }
  Serial.println();
}
void reconnect() {
  // Loop until we're reconnected
  while (!client.connected())
  {
    Serial.print("Attempting MQTT connection...");
    // Attempt to connect
    if (client.connect(ID)) {
      Serial.println("connected");
    }
    else {
      Serial.print("failed, rc=");
      Serial.print(client.state());
      Serial.println(" try again in 5 seconds");
      // Wait 5 seconds before retrying
      delay(5000);
    }
  }
}

void setup() {
  Serial.begin(115200);
    delay(100);
  while (!Serial)
    ; // Wait for Serial to be ready
  Serial.print("Attempting to connect to SSID: ");
  Serial.println(ssid);
  WiFi.begin(ssid, password);

  // attempt to connect to Wifi network:
  while (WiFi.status() != WL_CONNECTED)
  {
    Serial.print(".");
    WiFi.begin(ssid, password);
    // wait 1 second for re-trying
    delay(1000);
  }

  Serial.print("Connected to ");
  Serial.println(ssid);
  delay(500);
  client.setServer(server, 1883);
  client.setCallback(callback);
  Wire.begin();
  uint16_t error;
  char errorMessage[256];
  sht4x.begin(Wire);
  uint32_t serialNumber;
  error = sht4x.serialNumber(serialNumber);
  if (error) {
    Serial.print("Error trying to execute serialNumber(): ");
    errorToString(error, errorMessage, 256);
    Serial.println(errorMessage);
  } else {
    Serial.print("Serial Number: ");
    Serial.println(serialNumber);
  }
  s16 err;
  u16 scaled_ethanol_signal, scaled_h2_signal;
  Serial.println("serial start!!");
  while (sgp_probe() != STATUS_OK) {
    Serial.println("SGP failed");
    while (1);
  }
  err = sgp_measure_signals_blocking_read(&scaled_ethanol_signal, &scaled_h2_signal);
  if (err == STATUS_OK) {
    Serial.println("get ram signal!");
  } else {
    Serial.println("error reading signals");
  }
  err = sgp_iaq_init();
}
void loop() {
  s16 err = 0;
  u16 tvoc_ppb, co2_eq_ppm;
  err = sgp_measure_iaq_blocking_read(&tvoc_ppb, &co2_eq_ppm);
  if (err == STATUS_OK) {
  } else {
    Serial.println("error reading IAQ valuesn");
  }
  uint16_t error;
  char errorMessage[256];
  float temperature;
  float humidity;
  error = sht4x.measureHighPrecision(temperature, humidity);
  if (error) {
    Serial.print("Error trying to execute measureHighPrecision(): ");
    errorToString(error, errorMessage, 256);
    Serial.println(errorMessage);
  }
  else {
  }
  char envDataBuf[1000];
  sprintf(envDataBuf, "{"temp":%f,n"hum":%f,n"tVOC_C":%d,n"CO2eq_C":%d}", temperature, humidity, tvoc_ppb, co2_eq_ppm);
  Serial.println(envDataBuf);
  delay(4000);
  if (!client.connected()) {
    reconnect();
  }
  client.loop();
  unsigned long now = millis();
  if (now - lastMsg > 2000) {
    lastMsg = now;
    client.publish("aTopic", envDataBuf);
  }
}
From this, we can get a result like below in the app, comment prompt Serial monitor.
1 / 3
For to see the result in the comment prompt
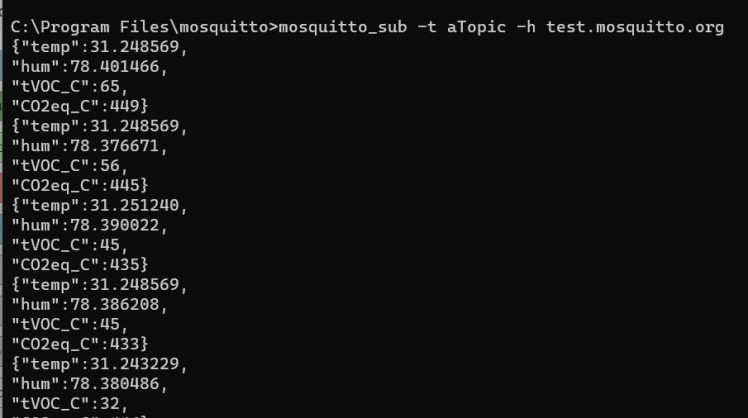
mosquitto_sub -t aTopic -h test.mosquitto.orgaTopic - Topic name
test.mosquitto.org - Server URL
Now run the Node-red by typing
node-redThen use the Server URL and paste it into your browser.
http://<ip>:1880/Now install node-red-dashboard for that click on the rightmost widget in the header then go to manage palette and finally search for node-red-dashboard.
1 / 2 • For Downloading the dashboard

For Downloading the dashboard

Downloading the dashboard
1- mqtt in (from network)
2-change (from function)
3-debug (from common)
4- gauge/chart (from dashboard)
Node-red wiring

Node-red wiring
Then Wire the nodes like below and configure all the nodes as shown in the video, In the below video we are splitting that JSON file and giving it to all output nodes like gauge and charts for the dashboard.
Wiring and dashboard setting upAfter completing the wiring and all
http://<ip>:1880/uiDashboard

Dashboard
After following all these steps clearly you will be getting a dashboard like this. If anyone has any doubt feel free to comment below also open to your suggestion too. and a big thanks to Seeedstudio for this wonderful hardware.
Schematics, diagrams and documents
Code
Credits
Related products


Leave your feedback...