

Home Automation Using Raspberry Pi Matrix Voice And Snips

Made by Ruchir / Home Automation / Lights / IoT
About the project
Controlling lights, door and light intensity using Raspberry Pi, Matrix Voice and Snips.
Project info
Difficulty: Expert
Platforms: Raspberry Pi
Estimated time: 7 hours
License: GNU General Public License, version 3 or later (GPL3+)
Items used in this project
Hardware components


Story
The story
Home automation allows us to control household electrical appliances like light, door, fan, and so on. Home automation not only refers to reduce human efforts but also energy efficiency and time saving.
Features
- Offline (No internet connection needed)
- Controlling brightness of lights using voice
- Display data on web
- Display intensity value in gauge
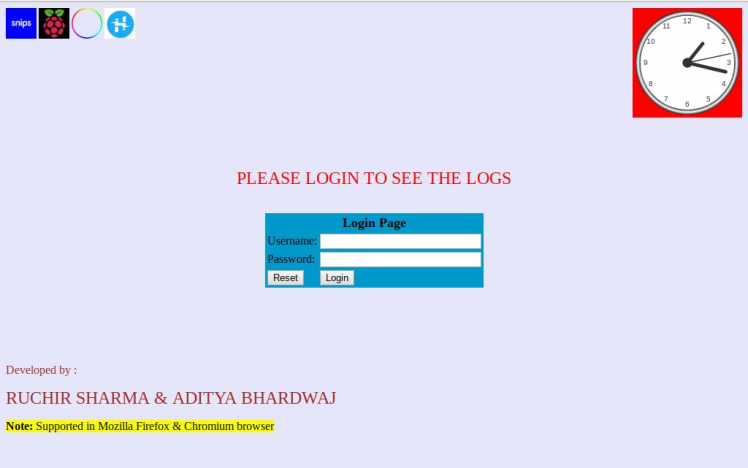
- Login Page with security (Not able to access main page without login )
- Send data on email and clear the logs (For sending the data internet is required)
- Email notification after login (Internet needed)
In this project, Raspberry Pi is connected with Matrix Voice via GPIO pins and all the six lights (such as bedroom, kitchen light) and a door which we are controlling through voice command are interfaced with expansion GPIO pins of Matrix Voice. We are providing input(voice command) through Matrix voice mic and taking output (response) as light on/off or change in light intensity or door open/close from GPIO of Matrix Voice.
I also made a webpage with security to see the logs and the last intensity value in gauge.
Component Needed
- Matrix Voice ==> $55
- Raspberry Pi 3 B+ ==> $35
- 5V 2.5A Power Supply Adapter ==> $4.78
- 5V Relay single channel ==> $10
- 16 GB SD card ==> $7.68
- Micro Servo Motor ==> $2
Total cost of project is around $ 115
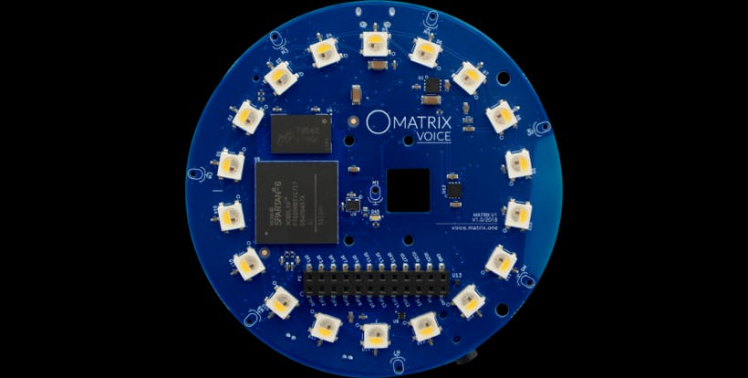
Matrix Voice
The Matrix Voice is a development board for building sound driven behaviors and interfaces. It is an user-friendly tool for simple to complex Internet of Things (IoT) voice app creation. It comes under two versions (Matrix Voice & Matrix Voice ESP32 version).
Both versions of these boards run the same on a Raspberry Pi, however, the Matrix Voice ESP32 version has the option to run standalone by programming the ESP32 module.
In this project I am using Matrix voice
 1 / 2
1 / 2
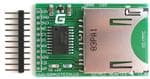
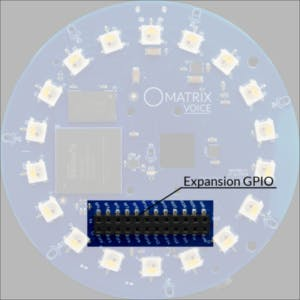
Matrix Voice expansion GPIO
 1 / 2
1 / 2
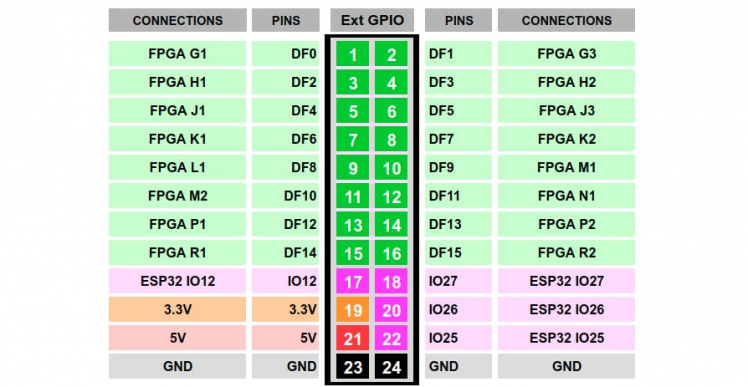
DF## pins are equivalent to GPIO## pins.
Raspberry Pi GPIO
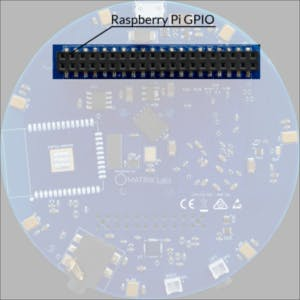
Note:- The expansion GPIOs on the Matrix Voice are not connected to the RPi GPIOs. The expansion GPIOs mostly come from the FPGA.
Raspberry Pi
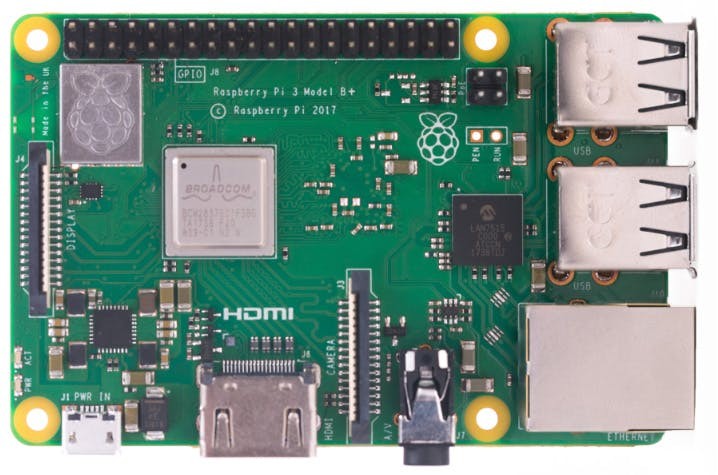
Specifications
- Broadcom BCM2837B0, Cortex-A53 (ARMv8) 64-bit SoC @ 1.4GHz
- 1GB LPDDR2 SDRAM
- 2.4GHz and 5GHz IEEE 802.11.b/g/n/ac wireless LAN, Bluetooth 4.2, BLE
- Gigabit Ethernet over USB 2.0 (maximum throughput 300 Mbps)
- Extended 40-pin GPIO header
- Full-size HDMI
- 4 USB 2.0 ports
- CSI camera port for connecting a Raspberry Pi camera
- DSI display port for connecting a Raspberry Pi touchscreen display
- 4-pole stereo output and composite video port
- Micro SD port for loading your operating system and storing data
- 5V/2.5A DC power input
- Power-over-Ethernet (PoE) support (requires separate PoE HAT)
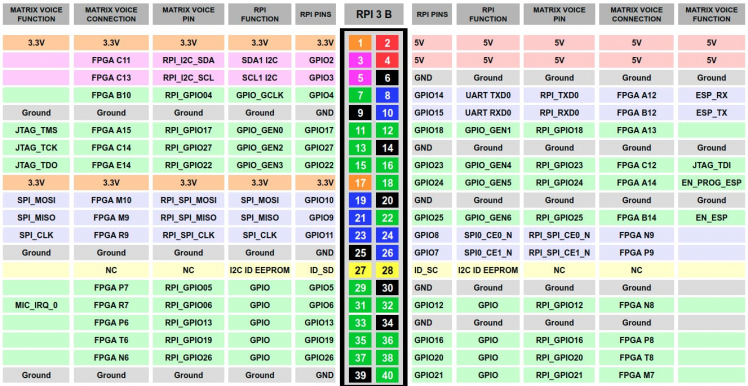
GPIO pins
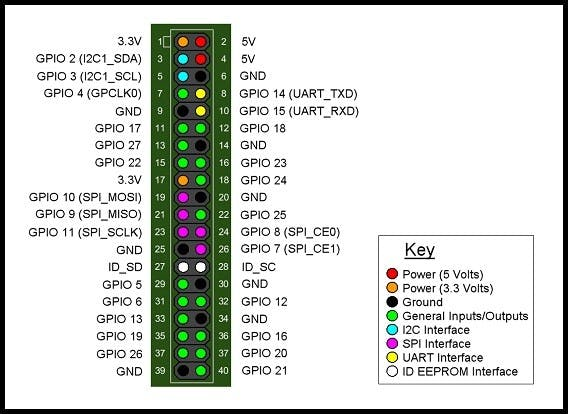
How to connect Matrix Voice with RPi 3
Before installing Matrix Core make sure you have setup Matrix voice. For that you need
- Raspberry Pi 3 Model B+
- 5V 2.5A Micro USB Power Supply
- Matrix Voice
1. Insert flashed microSD card into Raspberry Pi
2. Attach Matrix Voice onto Raspberry Pi GPIO pins
3. Power Raspberry Pi with micro USB power supply
You will see Creamish light glowing with increasing brightness.
Once done next step is installing Matrix Core in your RPi.
Matrix core installation on RPi
1. Add the Matrix repository and key.
curl https://apt.matrix.one/doc/apt-key.gpg | sudo apt-key add -
echo "deb https://apt.matrix.one/raspbian $(lsb_release -sc) main" | sudo tee /etc/apt/sources.list.d/matrixlabs.list
Matrix repository for Matrix HAL
curl https://apt.matrix.one/doc/apt-key.gpg | sudo apt-key add -echo "deb https://apt.matrix.one/raspbian $(lsb_release -sc) main" | sudo tee /etc/apt/sources.list.d/matrixlabs.list

sudo apt-get update
sudo apt-get upgrade
2. Install the the Matrix Core packages.
sudo apt-get install matrixio-malos
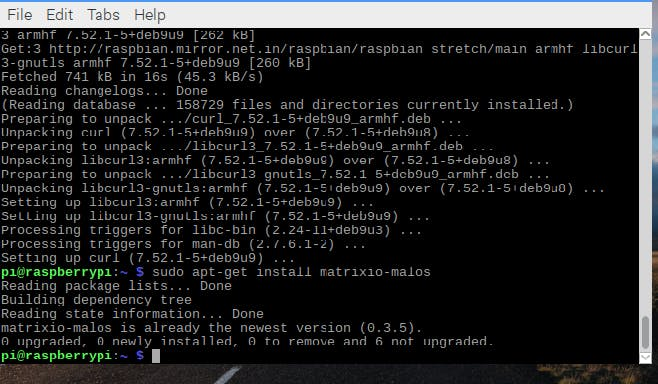
sudo reboot
Install the the MATRIX HAL packages.
sudo apt-get install matrixio-creator-init libmatrixio-creator-hal libmatrixio-creator-hal-dev
Reboot your device.
sudo reboot
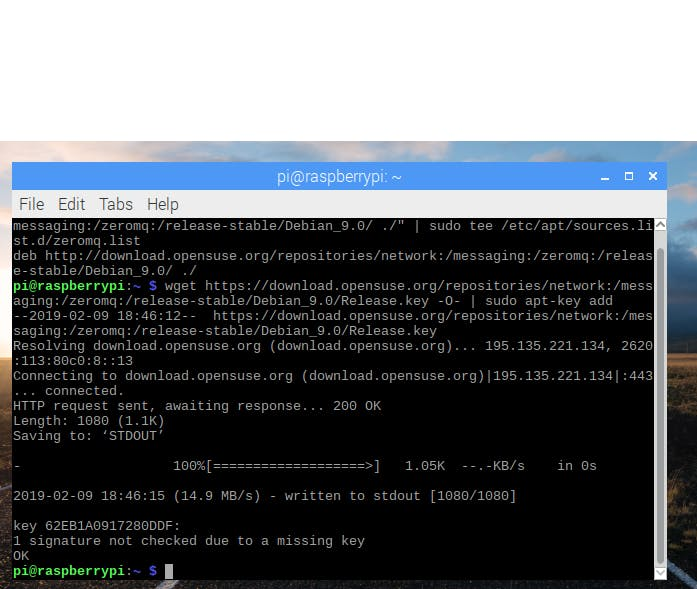
3. To install ZeroMQ
echo "deb http://download.opensuse.org/repositories/network:/messaging:/zeromq:/release-stable/Debian_9.0/ ./" | sudo tee /etc/apt/sources.list.d/zeromq.list
wget https://download.opensuse.org/repositories/network:/messaging:/zeromq:/release-stable/Debian_9.0/Release.key -O- | sudo apt-key add
4. JavaScript setup
Create a node project folder in the home directory of RPi
cd ~/
mkdir js-matrix-core-app (whatever name you want)
cd js-matrix-core-app
npm init
5. Installing npm Packages for ZMQ and Protocol Buffers
To install the ZMQ and MATRIX Protocol Buffers npm packages. Make sure you are in directory which you created above (name you give). Here I gave it js-matrix-core-app. This allows you to interact with Matrix Core through Node.js.
npm install zeromq --save
npm install matrix-protos --save


Now you are done with Matrix core and Matrix HAL.
As I am using JavaScript, so to use PWM for external LEDs I am using Matrix lite library. To install it use command shown below make sure you are in same directory which we created while installing Matrix core.
cd js-matrix-core-app
npm init -y
npm install @matrix-io/matrix-lite --save
What is snips
Snips is an AI voice platform for connected devices. It is an end-to-end solution with Speech Recognition and Natural Language Understanding, enabling anyone to add a customizable voice assistant to their product. Snips is the only deep-learning based voice platform that runs fully on-device. It can run without the need for a server or the cloud. It offers Privacy by Design.
How to install the Snips using SAM CLI tool
For this make sure all the steps mentioned above are working
I. Raspberry Pi
1. To Install the matrix Kernel Modules. Run the following commands in your Raspberry Pi's terminal to add the matrix repository & key and update your repository packages.
curl https://apt.matrix.one/doc/apt-key.gpg | sudo apt-key add -
echo "deb https://apt.matrix.one/raspbian $(lsb_release -sc) main" | sudo tee /etc/apt/sources.list.d/matrixlabs.list
sudo apt-get update
sudo apt-get upgrade
sudo reboot
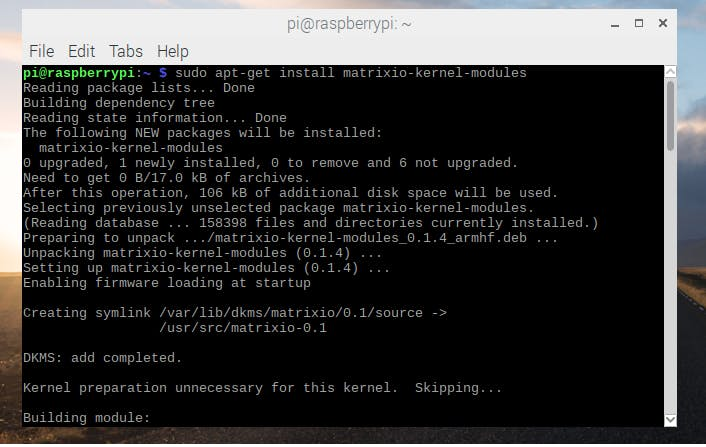
2. To Install the Matrix Kernel modules. Use the command below
sudo apt install matrixio-kernel-modules
 1 / 2
1 / 2
This allows the microphones on your matrix device to register as an ALSA microphone on your Raspberry Pi.
sudo reboot
3. Next command will test your microphones by raising your output volume, creating a 5 second long audio recording, and then playing that recording.
Make sure you have select audio jack as output for that
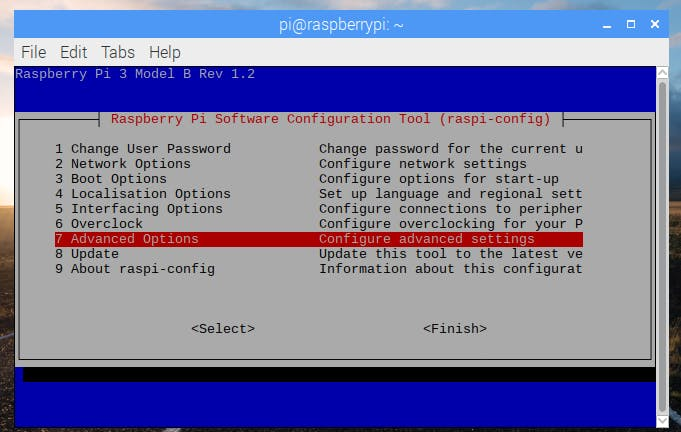
sudo raspi-config
then blue screen appears, go to advanced option then go to audio and select analog jack.
 1 / 3
1 / 3
amixer set PCM 100% && arecord recording.wav -f S16_LE -r 16000 -d 5 && aplay recording.wav
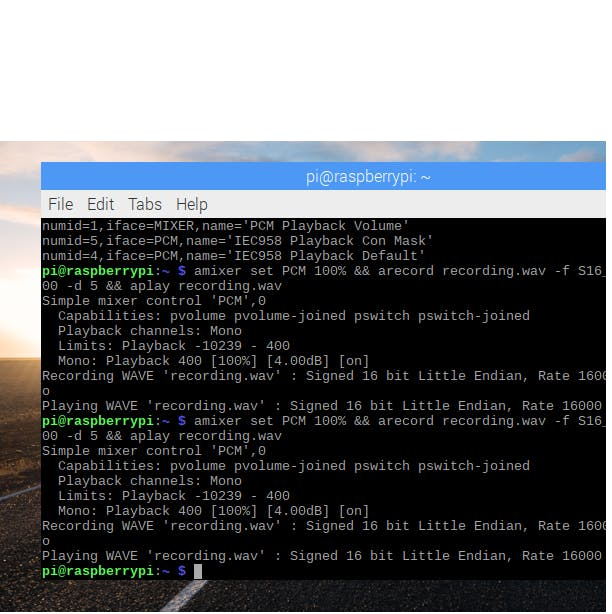
If you are able to hear the audio then you are done.
Next we are going to install the SAM tool on desktop
II.Installing the SAM CLI tool on personal computer(Ubuntu)
We are using the SAM CLI tool to create, manage and deploy our Snips assistants, to configure hardware, to view the logs of assistants on the Raspberry Pi, as well as to run your application locally for quick prototyping.
1. Install SAM into your computer with the following command.
sudo npm install -g snips-sam
2. Installing Snips.ai through SAM
We are going to install Snips.ai on our Raspberry Pi, Snips will be installed through the SAM CLI tool from our personal computer.
sam devices
This command should log all of the Raspberry Pis on your network with their IP address and host name.
Note:- sam devices not required if you already know your RPi IP address
Connect to your Raspberry Pi using command
sam connect ip address of Pi
eg :- sam connect 192.168.1.68
you'll then be prompted to insert a username and password of RPi.

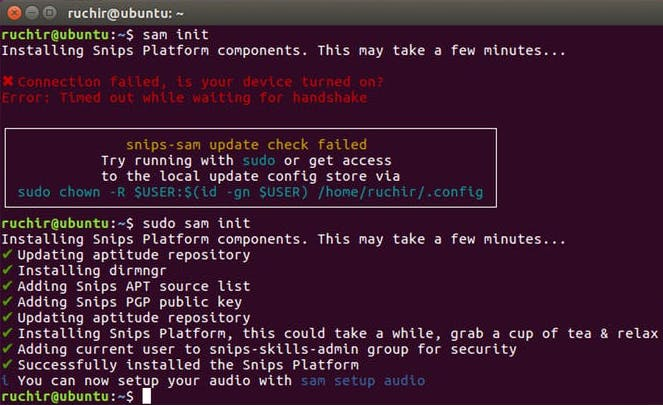
Once you connected use the sudo init command, from your personal computer, to install Snips onto your Raspberry Pi.
sudo sam init
III. Configuring Snips.ai on Raspberry Pi
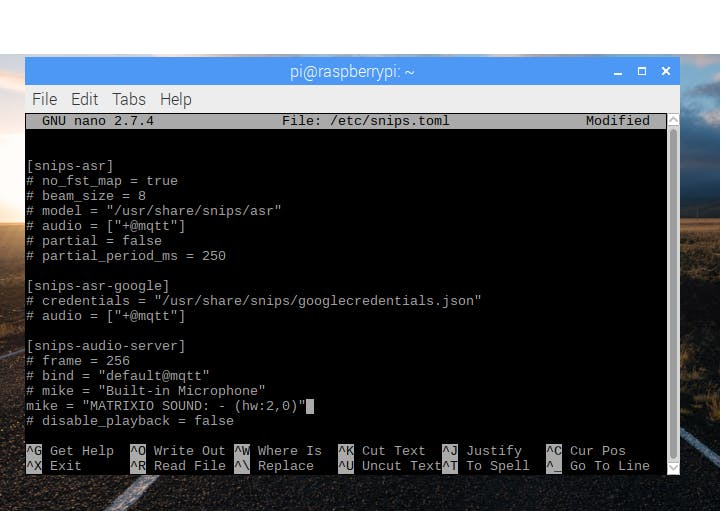
Now, edit the snips.toml file for configuring the mics on RPi.
Open terminal and use command to open the snips.toml file
sudo nano /etc/snips.toml
You can use any editor to do changes.
Scroll down to where you see [snips-audio-server] and replace
# mike = "Built-in Microphone"
with the following:
mike = "MATRIXIO SOUND: - (hw:2,0)"
IV.Testing Snips.ai onpersonal Computer(Ubuntu)
Through your personal computer's terminal, you can use SAM to test the speaker and microphone of your Raspberry Pi.
1. To Test Raspberry Pi's speaker
sam test speaker

2. To Test the microphones on your Matrix device
sam test microphone
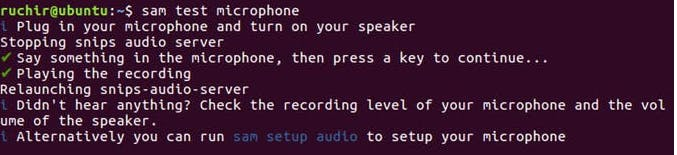
If both commands seem to work, you've properly configured Snips.ai on your Raspberry Pi.
If there is some problem use this command
sam setup audio
Then it will ask whether you are using snips kit or not (I choose no)
Then it will ask you to select the microphone. Here I am using Matrix Voice microphone
Then it will ask you to select the speaker. Here I am using RPi audio jack as speaker.
To test Snips.ai is properly working by installing a demo assistant for the weather or not.
sam install demo
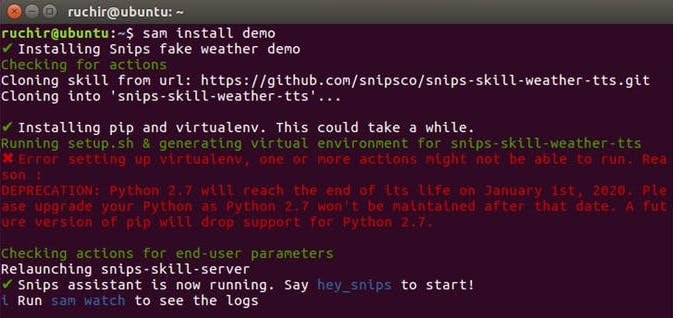
After installing as you see snips assistant is running.
Now, test the assistant by saying
"Hey Snips!"
"What will the weather be like in Madagascar in two days?"
The response from Snips should be:
"You asked for the weather in Madagascar in two days."
Congratulations we have successfully installed Snips on RPi.
Control lights with Snips.ai
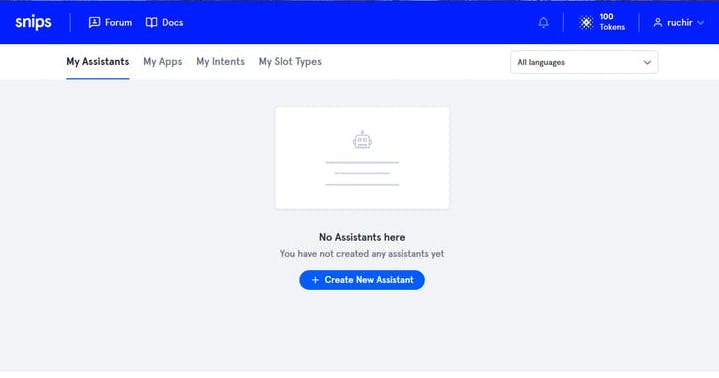
1. Creating a Snips assistant & app
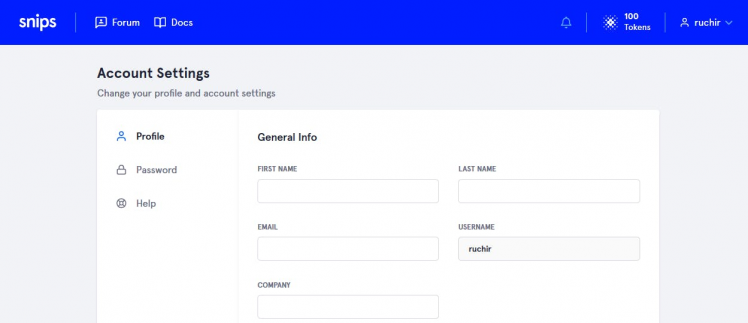
Sign into your Snips.ai and create an assistant. After sign in you page will like this
2. Create a new assistant
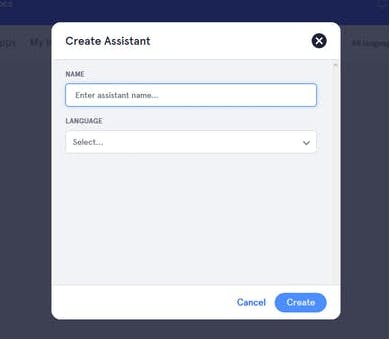
3. Give name to an assistant, select language and then create it.Once created you will see page like this
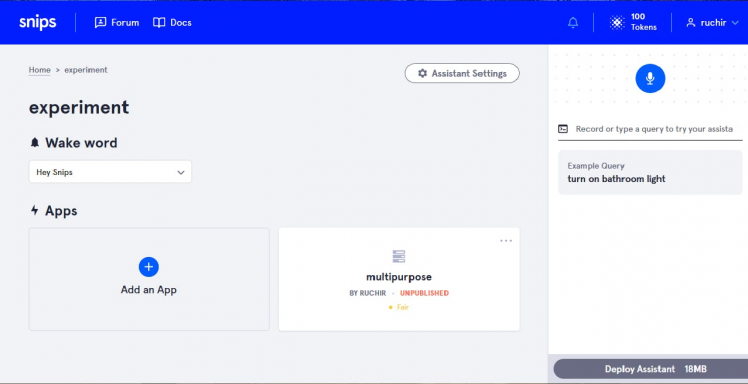
4. Then click on add an app and you will see page like this
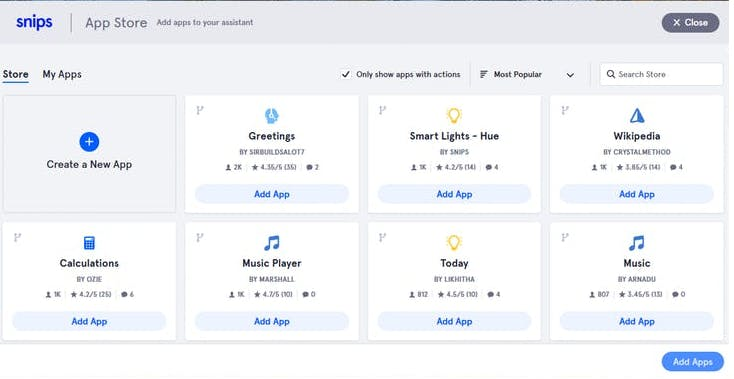
5. Select create a new app and give it a name whatever you want and create it
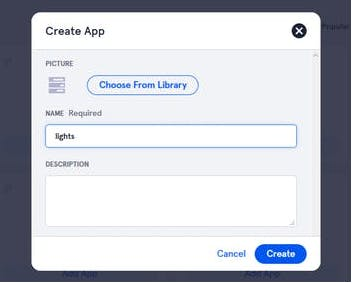
Once created you will see page like this
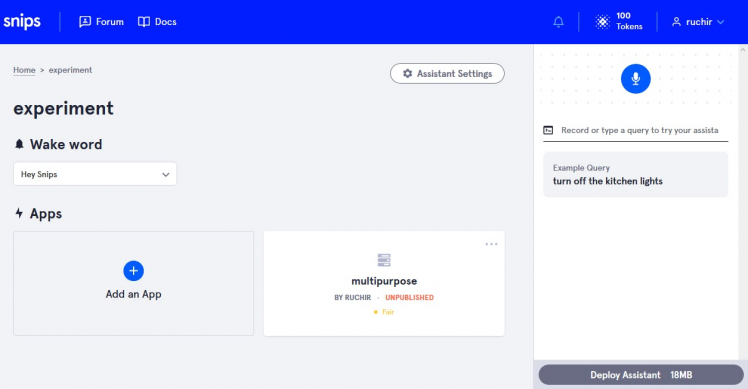
After that open the app and you will see page like this
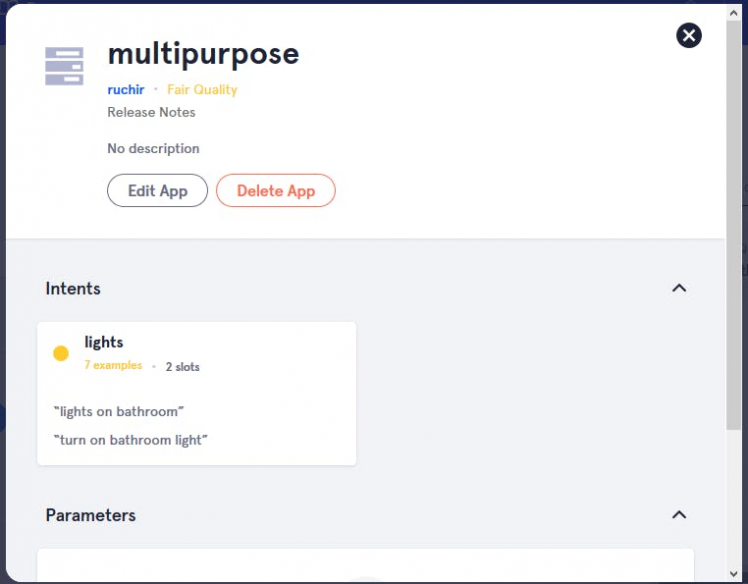
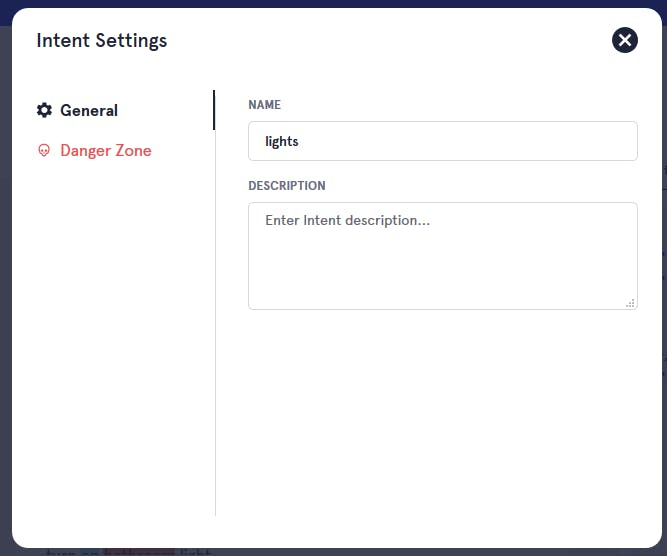
6. Click on edit app. As you see I already created intent (lights). You will see no intent on your page.

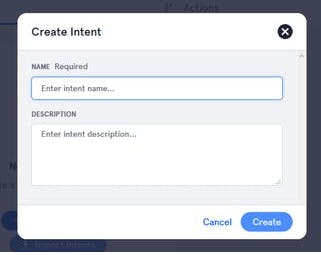
7. Create a new intent
 1 / 2
1 / 2
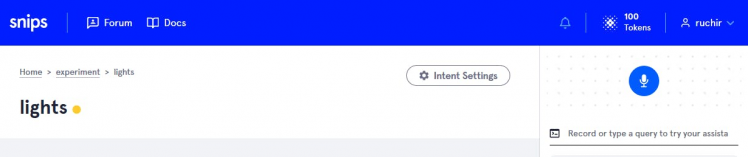
After creating you will see page like this. My intent name is lights
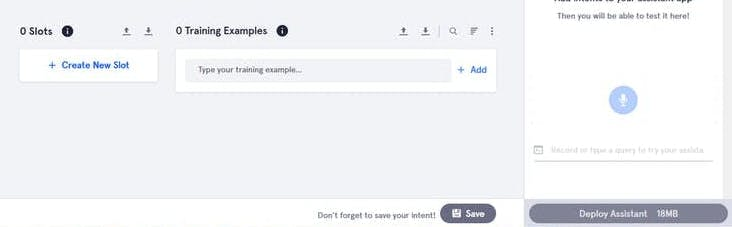
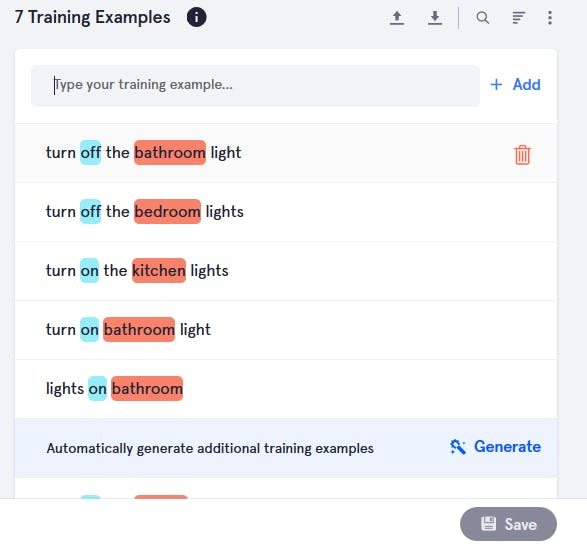
8. Give training examples (you can give training examples after creating slots also). Training examples are given at the end.
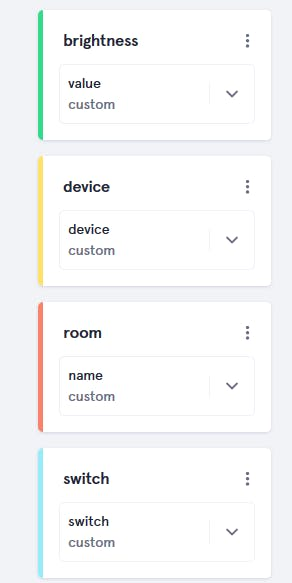
9. Then create a new slots and give it name whatever you want. Here I am using four slots
- switch for on, off, open, and close state
- room for different rooms such as bedroom, bathroom etc
- device for devices such as light, fan, door etc
- brightness for setting brightness of light in different rooms.
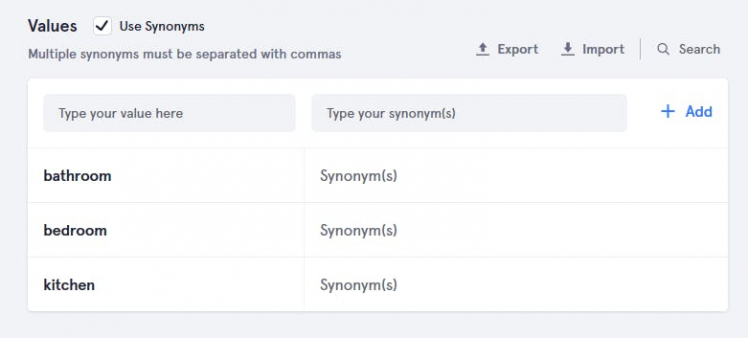
10. Then give slot type name. Here I am building custom slot type.
- For room slot
Give any name whatever you want.
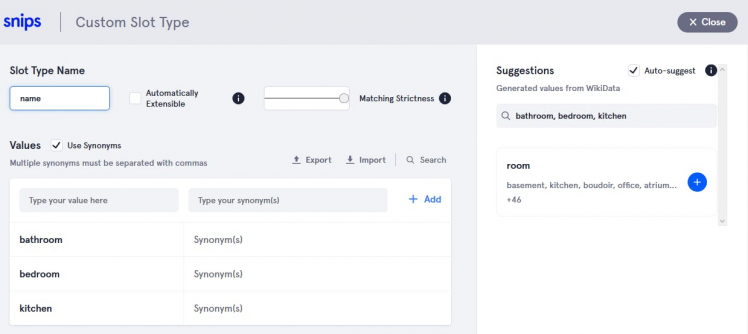
After that add slot values "bathroom", "bedroom", "kitchen", and "main hall" etc.
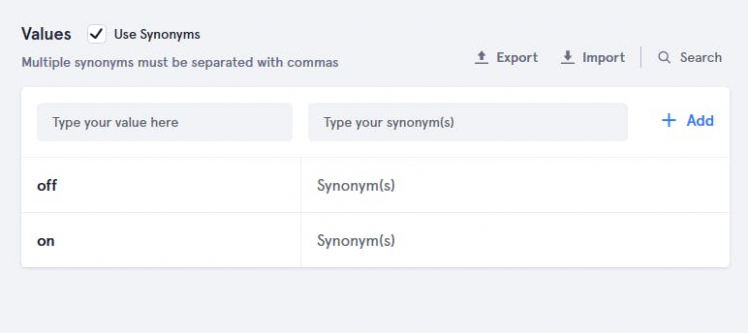
- For switch slot
Give any name whatever you want.
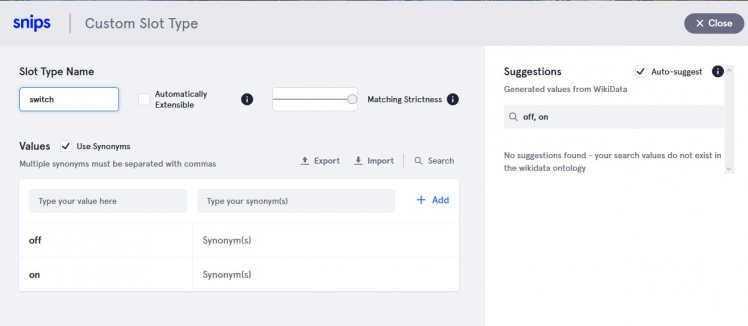
After that add slot values "on", "off", "open", and "close"
- Device slot
Give any name whatever you want.

After that add slot values "light", "fan", and "door".

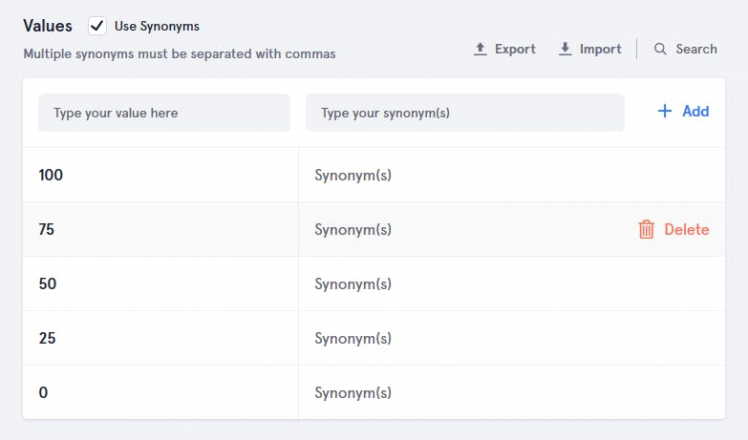
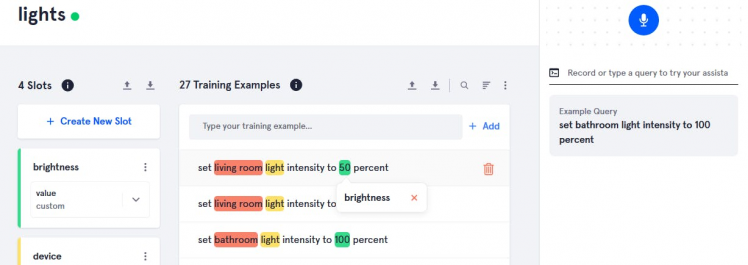
- For brightness slot
Give any name whatever you want.

After that add slot values 75, 50, 25, 0
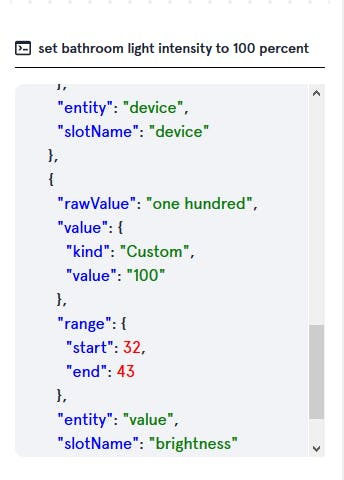
11. Close the app, in order to tell the training example which slot is used, double click on Off and On and select slot name(switch).
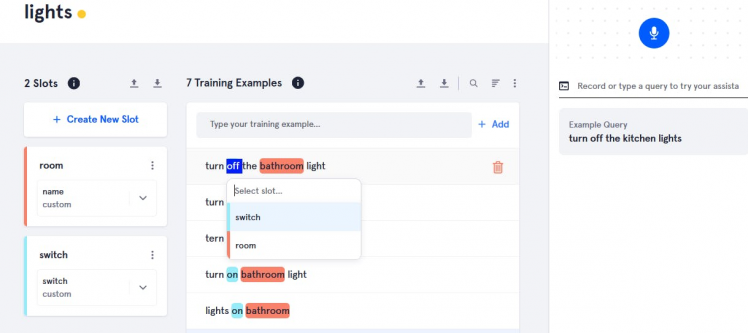
Double click on room name and select slot name(room).
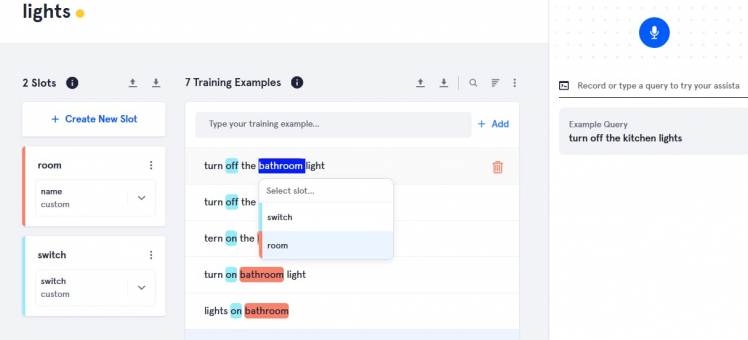
Double click on light, fan and select slot name(device).
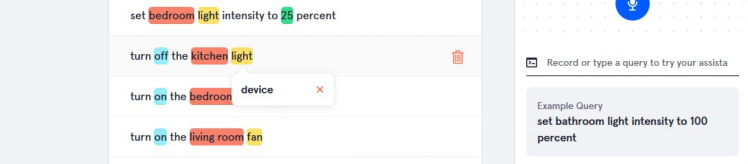
Double click on values(0, 25, 50) and select slot name(brightness).
Then save it and you can test it in window provided right hand side of the page.
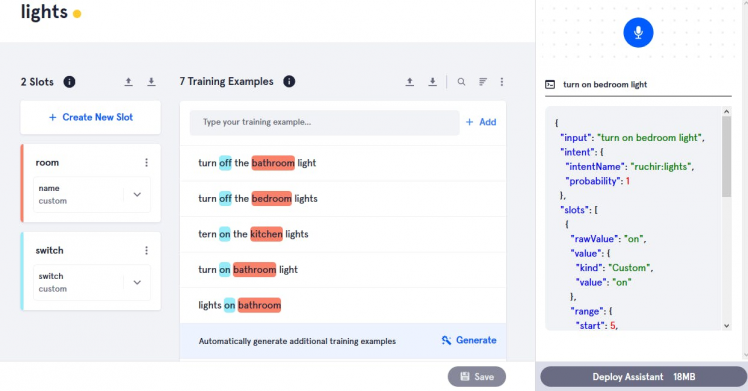
Then deploy it
Connect SAM to Raspberry Pi on personal computer
1. From your computer's terminal, sign in through the Sam CLI Tool
sam login
Login using your snips account
2. Connect to your Raspberry Pi. When prompted for a username & password, insert the Raspberry Pi credentials.
sam connect YOUR.PI.IP.HERE
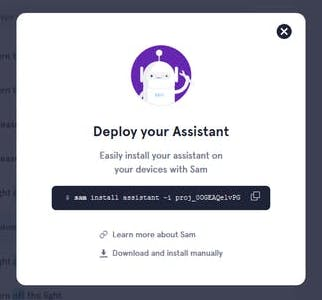
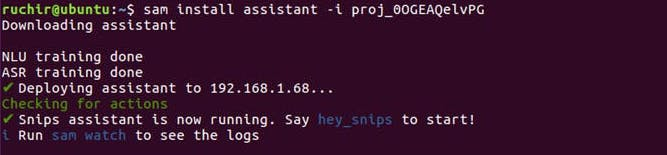
3. Copy the command and paste on your local computer.

After deploying on your Pi you will see like this
Creating an assistant on Raspberry Pi
Assistant will be used to listen and respond to events from your Snips assistant
1. go to the directory which we made during JavaScript setup in Matrix core and create 4 new JavaScript files.
cd ~/js-matrix-core-app
touch assistant.js pwm.js everloop.js func.js
2. Install MQTT to listen in on events from Snips.
npm install mqtt --save
3. Open everloop.js using any editor and paste the code given in program. Code is used to control the LED's on the Matrix Voice.
4. Open pwm.js using any editor and paste the code given in program. It is used to turn the lights on/off, set lights brightness and open/close door.
5. Open assistant.js using any editor and paste the code given in program. It combines all the code from everloop.js & pwm.js to control the everloop and relay switch through voice.
var snipsUserName = 'ruchir'; // username of snips account
var lightState = 'hermes/intent/'+snipsUserName+':lightState'; // name of intent you give while creating an intent
Username
Intent name
Once done now it is time to check
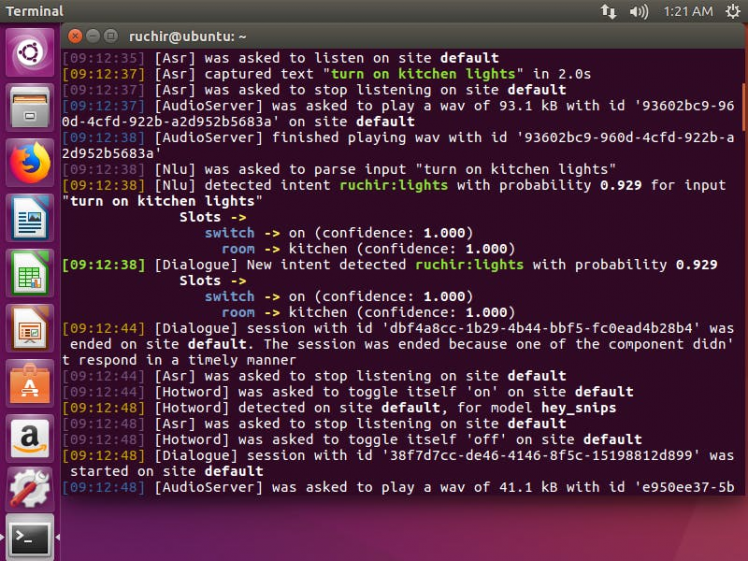
Open your personal computer (Ubuntu) terminal and run
sam watch
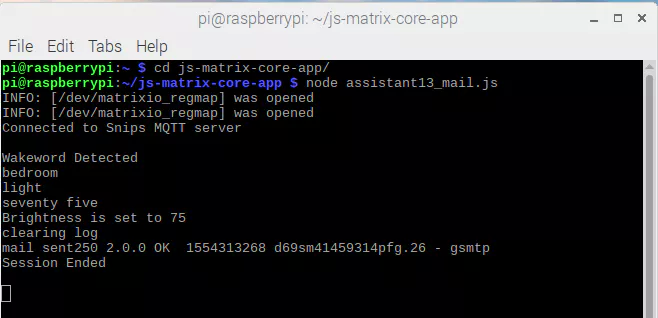
On the other hand, open RPi terminal and go to the directory
cd js-matrix-core-app/
node assistant.js  // run it
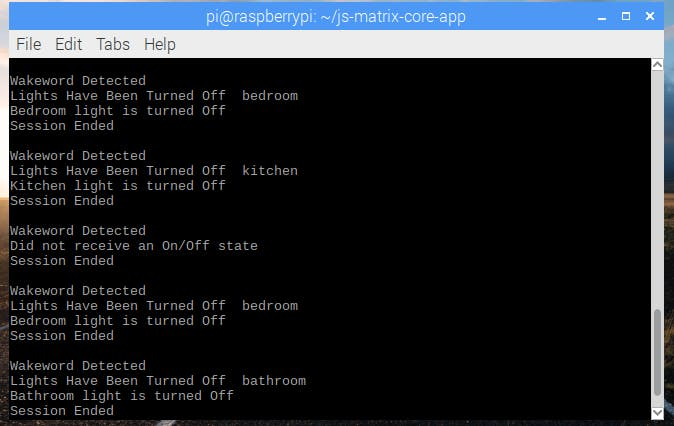
Now say "Hey snips!"
then say "turn on light" you will see light will be on and vice versa
- turn on the bedroom light
- turn on the kitchen light
- turn off the bathroom light
Relay
A relay is an electromagnetic device which is used to isolate two circuits electrically and connect them magnetically. They are very useful devices and allow one circuit to switch another one while they are completely separate. They are often used to interface an electronic circuit (working at a low voltage) to an electrical circuit which works at very high voltage. For example, a relay can make a 5V DC battery circuit to switch a 230V AC mains circuit.

How it works
A relay switch can be divided into two parts: input and output. The input section has a coil which generates magnetic field when a small voltage from an electronic circuit is applied to it. This voltage is called the operating voltage. Commonly used relays are available in different configuration of operating voltages like 6V, 9V, 12V, 24V etc. The output section consists of contactors which connect or disconnect mechanically. In a basic relay there are three contactors: normally open (NO), normally closed (NC) and common (COM). At no input state, the COM is connected to NC. When the operating voltage is applied the relay coil gets energized and the COM changes contact to NO. By using proper combination of contactors, the electrical circuit can be switched on and off.
The COM terminal is the common terminal. If the COIL terminals are energized with the rated voltage, the COM and the NO terminals have continuity. If the COIL terminals are not energized, then the COM and the NO terminals have no continuity.
The NC terminal is the Normally Closed terminal. It is the terminal that can be powered on even if the relay doesn't receive any or sufficient voltage to operate.
The NO terminal is the Normally Open terminal. It is the terminal where you place the output that you want on when the relay receives its rated voltage. If there is no voltage to the COIL terminals or insufficient voltage, the output is open and receives no voltage. When the COIL terminals receive the rated voltage or a little under, the NO terminal receives sufficient voltage and can turn on the device on the output.
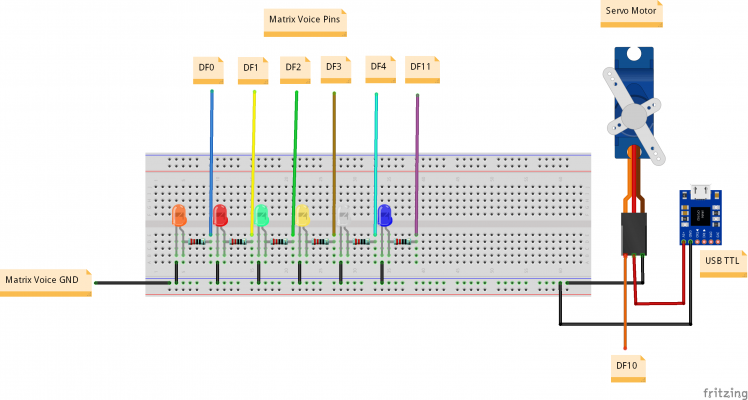
Connections

Relay ==> Matrix Voice
5V ==> 5V
GND ==>GND
Signal1 ==> GPIO0 (DF0)
Signal2 ==> GPIO1 (DF1)
Signal3 ==> GPIO2 (DF2)
Signal4 ==> GPIO3 (DF3)
Signal5 ==> GPIO5 (DF5)
signal6 ==> GPIO11 (DF11)
Servo Motor ==> Matrix Voice
5V ==> 5V
GND ==>GND
Signal ==> GPIO10(DF10)
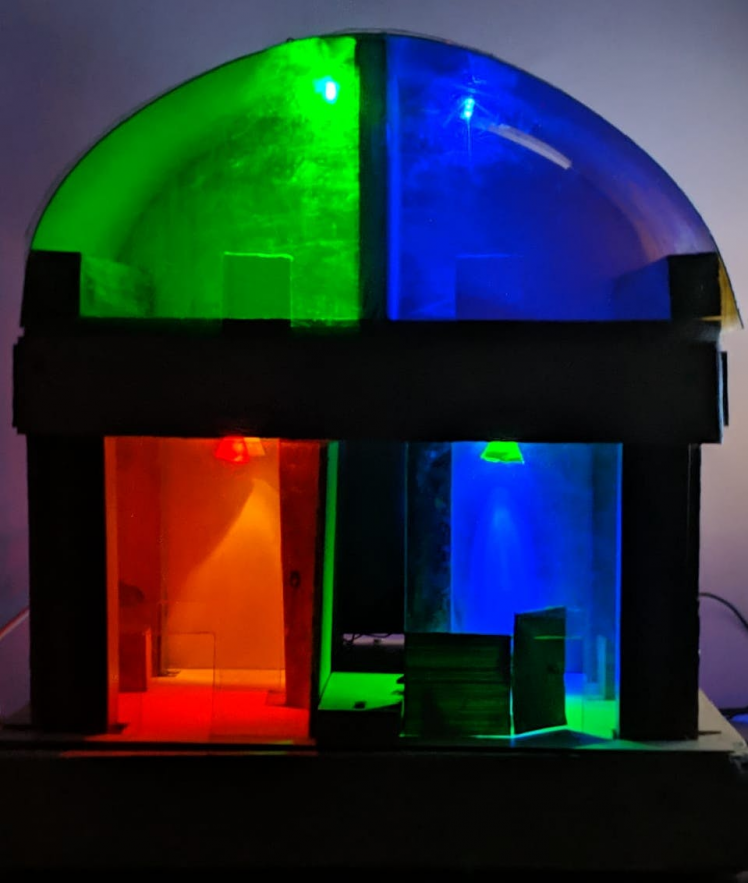
Result
 1 / 8
1 / 8
 1 / 20
Video
Training examples
turn on bathroom light
turn on the kitchen lights
turn off the bedroom lights
turn on all the light
set bathroom light intensity to 25 percent
set kitchen light intensity to 75 percent
set bedroom light intensity to 50 percent
set bedroom light intensity to 0 percent
open the main hall door
close the main hall door
Webpage
I made a page for showing the logs (room, devices, device state, intensity value and date) and gauge showing current intensity value so that I can know which command I used while talking to the snips. Follow the steps giving below for making a webpage.
Note - You can use either Node server or Apache server.
In this project I am using node server as Apache server is slow and it was not able to update data correctly.
Note - If you use code given in this project make sure your all the data is in cd /var/www/html directory or you can change location in the program.
First, to install Apache server using command (Not required)
sudo apt-get install apache2
Apache server is not required if you have node server
or
Node server
Make an empty file name server.js, add program given below and save it.
To run server use command
node server.js
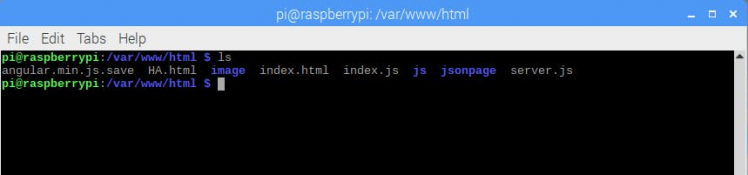
Next, go to the directory cd /var/www/html and make two folders
1. Make a folder name js using command
mkdir js
cd js // go to the directory
In /var/www/html/js directory make a file name angular.min.js and paste data from the link given below
In same directory make another file name gauge.min.js and paste data from the link given below
2. Make a folder name jsonpage using command
mkdir jsonpage
cd jsonpage
In jsonpage directory make a file name info.js. Make it empty
Note:- Json file will be cleared after 50 voice commands
Login page
For making login page go to the directory cd /var/www/html and make an empty file name index.html. Add program given below
Main page
For making main page go to the directory cd /var/www/html and make an empty file name HA.html(any). Add program given below
For making gauge make a empty file name index.js in cd /var/www/html directory. Program is given below.
 1 / 3
1 / 3
For sending mail install node package
npm install nodemailer
Npm package for bidirectional event-based communication
npm install socket.io
Npm package for express
npm install express
If you want to hear the words. You can download this node package.
npm install say
Add these lines in program (example)
const say = require('say')

say.speak('Brightness is set to 75');
In short required folder and files
1. For login page make a file index.html in cd /var/www/html
2. In /var/www/html/js folder there are 10 files angular.min.js , gauge.min.js and some more. You can download the files given below
3. For making gauge make a file name index.js in cd /var/www/html
4. In var/www/html/jsonpage folder we have info.json file in which we receive data from voice commands
5. For showing logs and gauge on page make a file name HA.html in cd /var/www/html.
6. Make a file server.js in cd /var/www/html directory.
Now, we are done with all the setup.
Next, Open shell and run
cd js-matrix-core-app
node assistant.js
Open another shell and run
cd /var/www/html
node server.js
Open browser
localhost:8080/index.html
Output
 1 / 4
1 / 4
Note:- Supported browser Firefox and Chromium browser
Email notification after login
If you want to test the program without webpage. You can download the code
Special thanks to Aditya Bhardwaj
Schematics, diagrams and documents
Code
Credits
Related products


Leave your feedback...