
Hello World With Azure Sphere Mt3620 Starter Kit

Made by anas / Communication / IoT
About the project
A tutorial for Azure Sphere MT3620 starter kit in ubuntu platform. Will cover how to set up environment.How to flash a high level app etc
Project info
Difficulty: Moderate
Estimated time: 7 hours
License: GNU Lesser General Public License version 3 or later (LGPL3+)
Items used in this project
Hardware components

Story
[There are couple of changes and updates for this Azure spheres sdk CLI etc . SO PLEASE CHECK MICROSOFT DOCUMENTATION INCASE OF ANY DIFFICULTY QUCKSTART LINK ]
installation of SDKBefore starting installation you need to update your linux packages. I Am using Ubuntu 19.10.
use commands in your terminal
sudo apt-get updatesudo apt-get install -y net-tools curlthen follow the steps
Download the install script from herehttps://aka.ms/AzureSphereSDKInstall/Linux
- enable execution of installation script using
chmod +x install_azure_sphere_sdk.sh- in that directory now run the installation script using
sudo ./install_azure_sphere_sdk.sh- after this you will get some primary key fingerprint.make sure that the key is same as key shown here
- then reboot your pc
In this tutorial iam using CLI to build apps for azure sphere, you can use visual studio code also. For building apps we need to install CMake and Ninja
use the command for the installation
sudo apt install cmake ninja-build
- Connect your device to pc using usb
- open CLI
- add new user using command
azsphere login --newuser <email-address>- then login
azsphere login- Now we have to create a new tenant
azsphere tenant create --name <my-tenant>tenant name can not rename after, so make sure you need that name
- now we can enable app development on the device
azsphere device enable-development- then claim your device
azsphere device claim- if you want to connect your device to a wifi network then add ssid and password using
azsphere device wifi add --ssid <yourSSID> --psk <yourNetworkKey>then to check the connection status, use command
azsphere device wifi show-statusit will show as
SSID : xxxxConfiguration state : enabledConnection state : connectedSecurity state : pskFrequency : 2442Mode : stationKey management : WPA2-PSKWPA State : COMPLETEDIP Address : 192.168.1.xxxMAC Address : 00:02:c5:03:72:cc- download and clone https://github.com/Azure/azure-sphere-samples.git
- type the below command
azsphere device enable-developmentTo create the build and.imagepackage files for the HelloWorld_HighLevelApp sample application:
- create a new directory and enter into it using
mkdir build cd buildnow we have created a new directory named build
- now in /azure-sphere-samples-master/Samples/HelloWorld/HelloWorld_HighLevelApp open main.c file include
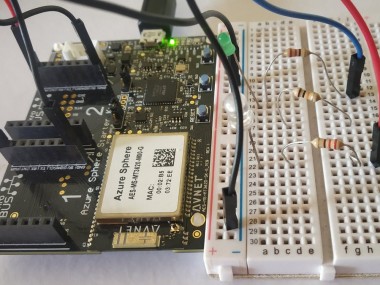
/* Copyright (c) Microsoft Corporation. All rights reserved.Licensed under the MIT License. */// This minimal Azure Sphere app repeatedly toggles GPIO 8, which is the red channel of RGB// LED 1 on the MT3620 RDB. Use this app to test that device and SDK installation succeeded// that you can build, deploy, and debug a CMake app with Visual Studio.//// It uses the API for the following Azure Sphere application libraries:// - gpio (digital input for button)// - log (messages shown in Visual Studio's Device Output window during debugging)#include <stdbool.h>#include <errno.h>#include <string.h>#include <time.h>#include <applibs/log.h>#include <applibs/gpio.h>// By default, this sample's CMake build targets hardware that follows the MT3620// Reference Development Board (RDB) specification, such as the MT3620 Dev Kit from// Seeed Studios.//// To target different hardware, you'll need to update the CMake build. The necessary// steps to do this vary depending on if you are building in Visual Studio, in Visual// Studio Code or via the command line.//// See https://github.com/Azure/azure-sphere-samples/tree/master/Hardware for more details.//// This #include imports the sample_hardware abstraction from that hardware definition.//#include <hw/sample_hardware.h>//anas#include <hw/mt3620_rdb.h>//anas/// <summary>/// Exit codes for this application. These are used for the/// application exit code. They they must all be between zero and 255,/// where zero is reserved for successful termination./// </summary>typedef enum {ExitCode_Success = 0,ExitCode_Main_Led = 1} ExitCode;int main(void){Log_Debug("Starting CMake Hello World application...n");int fd = GPIO_OpenAsOutput(MT3620_RDB_HEADER1_PIN6_GPIO, GPIO_OutputMode_PushPull, GPIO_Value_High);int fd1= GPIO_OpenAsOutput(MT3620_RDB_HEADER1_PIN4_GPIO, GPIO_OutputMode_PushPull, GPIO_Value_High);if (fd < 0) {Log_Debug("Error opening GPIO: %s (%d). Check that app_manifest.json includes the GPIO used.n",strerror(errno), errno);return ExitCode_Main_Led;}const struct timespec sleepTime = {.tv_sec = 0, .tv_nsec = 500000000};while (true) {GPIO_SetValue(fd, GPIO_Value_Low);nanosleep(&sleepTime, NULL);GPIO_SetValue(fd1, GPIO_Value_High);nanosleep(&sleepTime, NULL);GPIO_SetValue(fd, GPIO_Value_High);nanosleep(&sleepTime, NULL);GPIO_SetValue(fd1, GPIO_Value_Low);nanosleep(&sleepTime, NULL);}}just copy above code and save and replace main.c(i have included #include <hw/mt3620_rdb.h> and changed pinsetup I am using external LEDs in PWM pins in socket 1 and 2 you can use build in led also)
- now open app_manifest.json file in azure-sphere-samples-master/Samples/HelloWorld/HelloWorld_HighLevelApp
- replace the data in app_manifest.json as below and save it.
{"SchemaVersion": 1,"Name": "HelloWorld_HighLevelApp","ComponentId": "1689d8b2-c835-2e27-27ad-e894d6d15fa9","EntryPoint": "/bin/app","CmdArgs": [],"Capabilities": {"Gpio": [ "$MT3620_RDB_HEADER1_PIN6_GPIO","$MT3620_RDB_HEADER1_PIN4_GPIO"]},"ApplicationType": "Default"}you need to use correct pin numbers which can be found in mt3620_rdb.json
I refer this for pinouts
- now run cmake in command line
cmake -G "Ninja" -DCMAKE_TOOLCHAIN_FILE="/opt/azurespheresdk/CMakeFiles/AzureSphereToolchain.cmake" -DAZURE_SPHERE_TARGET_API_SET="4" -DAZURE_SPHERE_TARGET_HARDWARE_DEFINITION_DIRECTORY="/home/bagmo/Desktop/azure-sphere-samples-master/Hardware/mt3620_rdb" -DAZURE_SPHERE_TARGET_HARDWARE_DEFINITION="mt3620_rdb.json" --no-warn-unused-cli -DCMAKE_BUILD_TYPE="Debug" -DCMAKE_MAKE_PROGRAM="ninja" "/home/bagmo/Desktop/azure-sphere-samples-master/Samples/HelloWorld"make sure that path are correct for DAZURE_SPHERE_TARGET_HARDWARE_DEFINITION_DIRECTORY=
and the last parameter should be path for HelloWorld_HighLevelApp sample.
- run below command to build the application and create the imagepackage file.
ninjait will return like
[5/5] Generating HelloWorld_HighLevelApp.imagepackageAzure Sphere Utility version 20.1.6.56107Copyright (C) Microsoft Corporation. All rights reserved.Start time (UTC): Monday, 30 March 2020 06:46:43verbose: Creating image package.verbose: Azure Sphere application image package written.verbose: Appending metadata.verbose: Wrote metadata:Section: IdentityImage Type: ApplicationComponent ID: 1689d8b2-c835-2e27-27ad-e894d6d15fa9Image ID: dfccede2-fde7-489d-8056-5013e314556eSection: SignatureSigning Type: ECDsa256Cert: a8d5cc6958f48710140d7a26160fc1cfc31f5df0Section: DebugImage Name: HelloWorld_HighLevelAppBuilt On (UTC): 30/03/20 6:46:44 amBuilt On (Local): 30/03/20 12:16:44 pmSection: Temporary ImageRemove image at boot: FalseUnder development: TrueSection: ABI DependsDepends on: ApplicationRuntime, version 4verbose: Packaging completed successfully.verbose: Output file is at: /home/bagmo/Desktop/build/HelloWorld_HighLevelApp.imagepackageCommand completed in 00:00:01.5862753.now we can flash builded app to azure sphere using
azsphere device sideload deploy --imagepackage HelloWorld_HighLevelApp.imagepackagenow the device will be flashing and rebooting.
Troubleshooting- if there is already an app is running in your device which is using same gpio then you will not able to flash the app.
error: Could not deploy application to device: Application manifest requests a GPIO that is already in use by another application.in this case delete other apps running in device using
azsphere device sideload delete- if the below error is showing
ERROR: Could not establish SLIP connection.disconnect your device usb and reconnect then enter the below command
sudo /opt/azurespheresdk/Tools/azsphere_connect.sh- to check running status of applications use command
azsphere device app show-statusAfter couple of months in jan 2021 i checked the azure sphere and platform again,some of updates were there.New SDK version and new CLI was introduces.so i thought to update this tutorial with those data.
If any of you have trouble to build a highlevelapp follow this tutorial in microsoft document.
Code
Credits
Leave your feedback...