
Handwriting Recognition

Made by knaveen / Artificial intelligence
About the project
This IMU-equipped pen is trained to recognize handwritten numbers
Project info
Difficulty: Difficult
Platforms: Seeed Studio, SparkFun, NVIDIA, TensorFlow
Estimated time: 2 days
License: Apache License 2.0 (Apache-2.0)
Items used in this project
Hardware components

Story
Overview
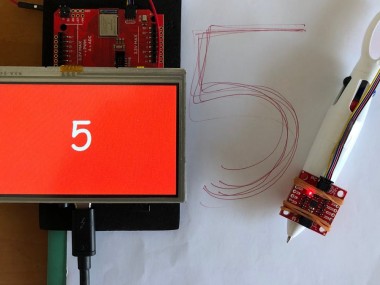
In this project, I build a pen device which can be used to recognize handwritten numerals. As its input, it takes multidimensional accelerometer and gyroscope sensor data. Its output will be a simple classification that notifies us if one of several classes of movements, in this case 0 to 9 digit, has recently occurred.
Data collection for training
The first and the most important step in a machine learning project is to collect the training data in such a way that it should cover most of the representative cases for a given classification task. To capture accelerometer and gyroscope data in a discrete real-time steps is a time consuming and error-prone task. I spent most of the time to collect data and look at it if it was captured correctly. To overcome this tedious and repetitive task I developed a user interface. I wanted to make the user interface portable and easy to use. I used Artemis ATP development board with a Gameduino 3 touchscreen (an Arduino shield) to present a user interface which allows to select numeral (0 to 9) and also the last readings can be deleted if there was some error while data capturing. A SparkFun 9DoF IMU Breakout - ICM-20948 (Qwiic) is used to capture the accelerometer and gyroscope data. The IMU Breakout is attached to a pen close to the tip and it is connected to the Artemis ATP using a long (50cm) Qwiic cable.
To capture time-series data from the IMU during the pen movement should be quick otherwise there can be unwanted noise at the beginning and the end. Using the touchscreen to start and stop the capturing was a bit slow since the screen needs right amount of pressure to response. To circumvent this issue I used a mechanical switch which is very sensitive to the clicks and did the right job. Since Gameduino 3 shield covers all the power pins of Artemis ATP, I had to use secondary rail of plated through-holes on the Artemis ATP to solder wires to connect to the mechanical switch. Thanks to the ATP (All the pins)!
The captured data is saved to the files on a micro SD card attached to the Gameduino 3. Each pen movement data was captured as a separate file. The file contains no header line, only the multiple lines of the comma separated accelerometer (3-axis) and gyroscope (3-axis) data in a format as accel_X, accel_Y, accel_Z, gyro_X, gyro_Y, gyroZ. An example is given below.
- 56.93,-9.77,436.04,1.69,-0.96,1.02
- 830.57,-15.62,400.88,2.83,-5.11,2.28
- 840.82,0.98,410.16,3.54,-9.80,2.43
- 1095.21,135.25,597.17,-3.38,10.05,-0.53
- 905.76,80.57,494.63,0.64,3.32,3.08
- 815.92,76.66,312.01,4.11,-2.31,-24.53
- 883.30,-146.97,377.93,-7.86,-8.02,-41.08
- 762.21,455.57,-89.84,-33.56,-16.83,-38.64
- 1678.22,-438.48,902.83,-53.85,-31.02,-27.72
- 854.98,-66.41,-165.53,-8.04,-38.45,-9.77
- 525.88,-919.92,-665.53,-13.15,-23.86,29.62
- 784.67,-277.34,109.38,51.34,0.95,20.39
- 770.51,58.59,465.82,82.08,5.46,24.25
- 593.26,450.20,364.75,41.70,4.74,22.73
- 893.07,733.89,628.42,-1.11,9.95,-0.65
- 909.18,884.28,-214.84,-20.43,-2.78,-1.00
- 258.79,346.68,-165.53,-59.22,-26.60,-61.02
- 1044.43,103.03,220.70,-64.72,-48.25,-27.08
- 1064.45,-128.42,0.49,-42.33,-47.78,-8.86
- 1058.59,-824.22,243.65,12.24,-18.89,23.78
- 167.97,-919.43,-253.42,39.95,1.59,35.47
- 1750.00,435.55,1214.84,72.06,16.15,17.66
- 756.84,228.52,714.36,24.96,10.07,21.86
- 918.95,260.74,319.34,-15.21,-11.07,5.79
- 939.94,94.24,257.32,-41.25,-27.76,30.35
- 964.36,-84.96,237.30,-31.05,-16.29,19.87
- 965.82,-70.31,276.86,21.82,8.47,-17.51
An Arduino sketch (data_collection.ino) is available at the Github repository mentioned in the code section.
Data collection session video
Data splits and augmentation
A little over 100 samples for each digits (0-9) were captured. The collected data has been split into training (60%), validation (20%), and testing (20%) datasets. Since the data was collected from the IMU sensor using scaled (16 bit) and digital low pass filter (DLPF) setting and they are already within a specified range of the accelerometer and gyroscope readings so we can use the raw data as is for training and inferencing. The captured training dataset is still small for a deep learning model so each sequence of readings were modified slightly from the original. The modifications include shifting and time warping the samples, adding random noise, and increasing the amount of acceleration. This augmented data is used alongside the original data to train the model, helping make the most of our small dataset. The training data was padded to keep only 36 sequences of the readings.
Model Architecture
Each input data has 36 sequences of 6 readings (3-axis accelerometer, 3-axis gyroscope). We can think of the input data as an image of 36x6 pixels. A convolutional neural network is one of the best options suited for recognizing patterns in images and time-series sequence data. In our case it is time-series motion data. The first few layers are 2D convolution neural networks with few other regularization layers. The last layer is a fully connected dense layer with softmax activation which outputs a probability of all 10 classes. The summary of the model is given below.
- _________________________________________________________________
- Layer (type) Output Shape Param #
- =================================================================
- conv2d (Conv2D) (None, 36, 6, 8) 80
- _________________________________________________________________
- conv2d_1 (Conv2D) (None, 36, 6, 8) 584
- _________________________________________________________________
- max_pooling2d (MaxPooling2D) (None, 18, 3, 8) 0
- _________________________________________________________________
- dropout (Dropout) (None, 18, 3, 8) 0
- _________________________________________________________________
- conv2d_2 (Conv2D) (None, 18, 3, 8) 584
- _________________________________________________________________
- max_pooling2d_1 (MaxPooling2 (None, 9, 2, 8) 0
- _________________________________________________________________
- dropout_1 (Dropout) (None, 9, 2, 8) 0
- _________________________________________________________________
- conv2d_3 (Conv2D) (None, 9, 2, 16) 1168
- _________________________________________________________________
- max_pooling2d_2 (MaxPooling2 (None, 5, 1, 16) 0
- _________________________________________________________________
- dropout_2 (Dropout) (None, 5, 1, 16) 0
- _________________________________________________________________
- conv2d_4 (Conv2D) (None, 5, 1, 16) 2320
- _________________________________________________________________
- flatten (Flatten) (None, 80) 0
- _________________________________________________________________
- dense (Dense) (None, 64) 5184
- _________________________________________________________________
- dropout_3 (Dropout) (None, 64) 0
- _________________________________________________________________
- dense_1 (Dense) (None, 32) 2080
- _________________________________________________________________
- dropout_4 (Dropout) (None, 32) 0
- _________________________________________________________________
- dense_2 (Dense) (None, 10) 330
- =================================================================
- Total params: 12,330
- Trainable params: 12,330
- Non-trainable params: 0
Model Training and Evaluation
The training of the model was done on an Intel NUC with Linux and an eGPU (NVIDIA GTX 1080Ti). Although it just takes couples of minutes to train on a CPU but the development process becomes pretty slow while testing out different architectures and hyper-parameters. The TensorFlow 2.1 with Keras API is used for model creation and training process. I created a Jupyter notebook for data processing, training and the final model conversion. All code are available at Github repository which is mentioned in the code section. The training accuracy is 94.8% and evaluation accuracy on test data is 93.3% which can be further improved with more training datasets and model hyper-parameters tuning.
Inferencing on the device
The created model is converted to the TensorFlow Lite model and the converted model is transformed into a C array file for deploying with the inferencing code. The TensorFlow Lite Micro SDK is used to run inference on the device. I have created an Arduino sketch (handwriting_recognizer.ino available at Github repository) for inferencing and displaying the result. The setup is the same as the training setup except we do not use mechanical switch. The Artemis ATP receives the samples continuously from the IMU sensor and outputs the highest probability class on the Gameduino 3 shield display. The inferencing rate depends on the device and the model size. In our case model is a bit large due to many layers and the inferencing rate is 3 to 4 inferences per second. Since the microcontroller is busy during inference and we do not want to lose any IMU samples during that period. To overcome this issue FIFO is used in IMU module. When I started using SparkFun 9DoF IMU Breakout - ICM-20948 (Qwiic) there was no FIFO implementation in the library. I forked the Sparkfun library Github repository and implemented the FIFO. The forked can be found here: https://github.com/metanav/SparkFun_ICM-20948_ArduinoLibrary.
Inferencing demo
The live demo is below. It is not perfect but it works.
The use cases for common benefit
It is an easy to use low-powered device which can run on a coin cell battery for weeks (without display). It can be used safely for kids who are learning to write alphabets (needs training data) and numbers with the help of LEDs for result output.
Scope for improvement
The inferencing rate can be improved if 8-bit quantized model is used. Right now there are some ops missing in the TensorFlow Lite Micro SDK which do not allow conversion of Conv 2D to a quantized version. Also, collecting the data while pen is not moving (at rest in different orientations) can reduce false positives.
All the instructions can be found at the Github repository mentioned in the code section.
Schematics, diagrams and documents
Code
Credits
Related products


Leave your feedback...