
Gesture-based Remote Control Device

Made by alex-miller / Artificial intelligence / Home Automation / Sensors / Wearables / IoT
About the project
Learn how to enhance the control of consumer electronics devices with hand gestures and how to create similar solution by yourself.
Project info
Difficulty: Easy
Platforms: Silicon Labs, Neuton Tiny ML
Estimated time: 1 hour
License: GNU Lesser General Public License version 3 or later (LGPL3+)
Items used in this project

Story
This project demonstrates a gesture based remote control device using Silabs xG24 Dev Kit. The xG24 development kit could be connected to the PC via Bluetooth as a HID device and using gestures the user can control media stream or slides of the presentation. Based on accelerometer and gyroscope data the Neuton.AI model could recognize 8 classes of gestures: Swipe Right, Swipe Left, Double Tap, Double Thumb, Rotation Clockwise and Counter clockwise, No Gestures(IDLE) and Unknown Gesture.
Register for the tinyML Talks, organized by tinyML Foundation, to get a step-by-step tutorial from Neuton.AI and Silicon Labs, about how to create a gesture-based remote control device with an incredibly small total footprint, using the Silicon LabsxG24-DK and Neuton'sUltra-tiny Neural Networks.
To learn more about gestures and how to reproduce them, check out our demo video!
Model specificationsThe Neuton.AI Gesture Recognition solution memory footprint:
Version 1.1.2

Version 1.1.2
Model Performance:
- 8 classes.
- 58 neurons.
- Holdout Balanced Accuracy: 98.2 %.
- Inference time ( including Signal processing ): 2.3 ms.
Estimated on Cortex-M33, 39MHz, compiled with -Os ARM GNU toolchain.
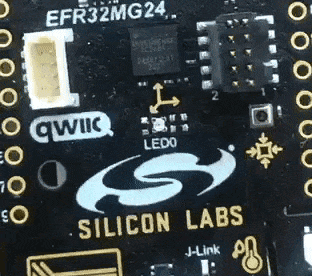
Hardware overview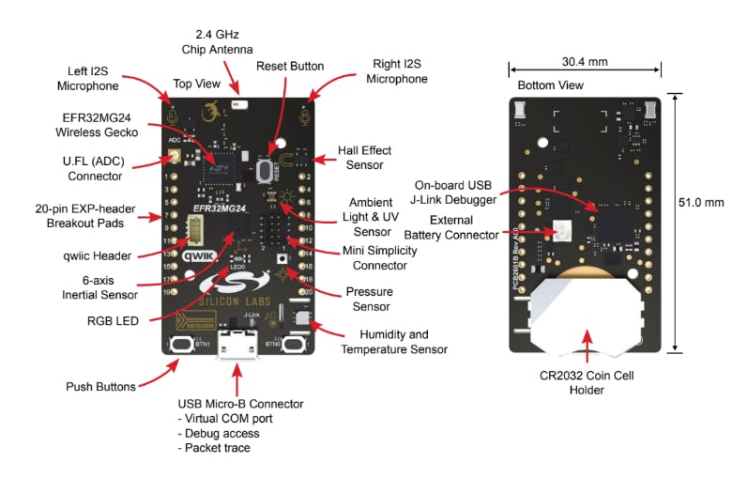
The xG24 Dev Kit is a compact, feature-packed development platform. The development platform supports up to +10dBm output power and includes support for the 20-bit ADC as well as other key features such as the xG24’s AI/ML hardware accelerator. You can find more information on the Silicon Labs xG24 Dev Kit at https://www.silabs.com/development-tools/wireless/efr32xg24-dev-kit
Setup software environmentTo set this project up, you will need to install the following software:
Setup firmware project1. Clone this repository: https://github.com/Neuton-tinyML/neuton-silabs-xg24-ble-remotecontrol
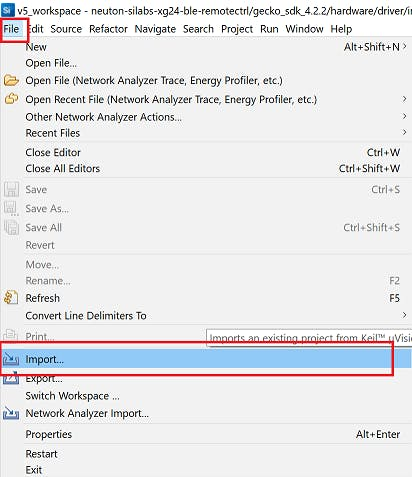
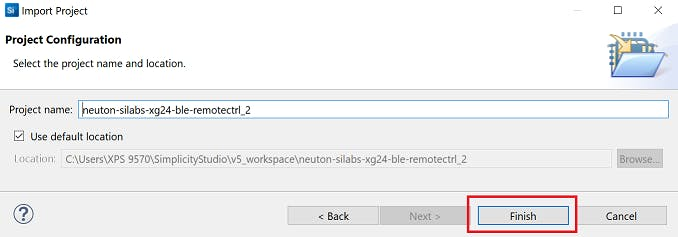
2. In the Simplicity Studio, choose File -> Import
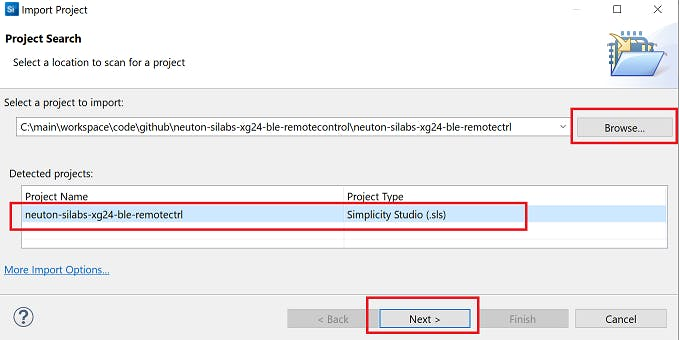
3. Browse to the directory ./neuton-silabs-xg24-ble-remotectrl in the cloned repository and select neuton-silabs-xg24-ble-remotectrl project, and click Next
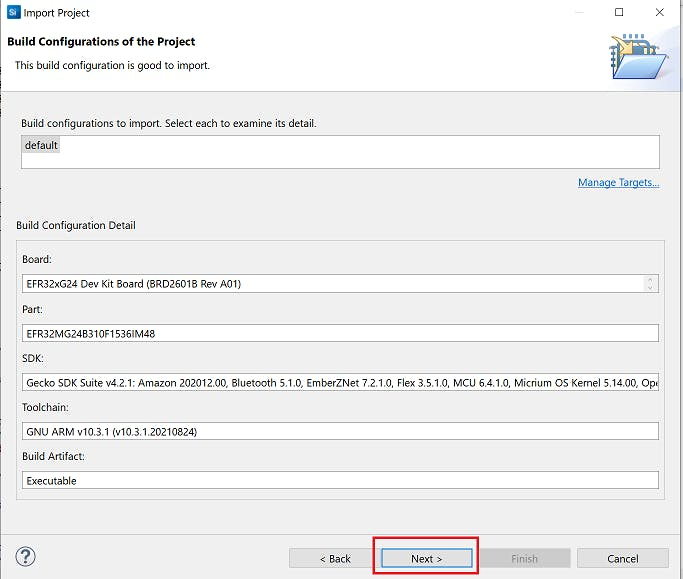
4. On the next page the Build configuration should be automatically detected, just click Next.
5. Finish importing at the next page, click Finish.
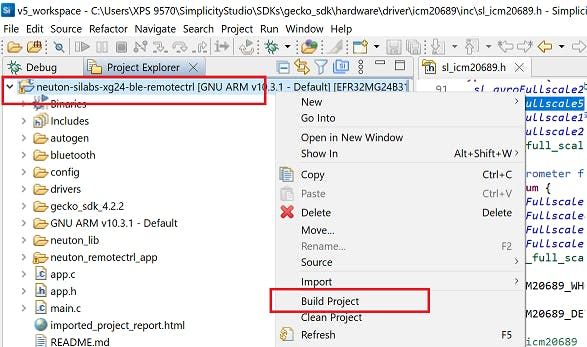
6. Build the project in the Simplicity Studio, right-click on project folder in Project Explorer and choose Build Project option.
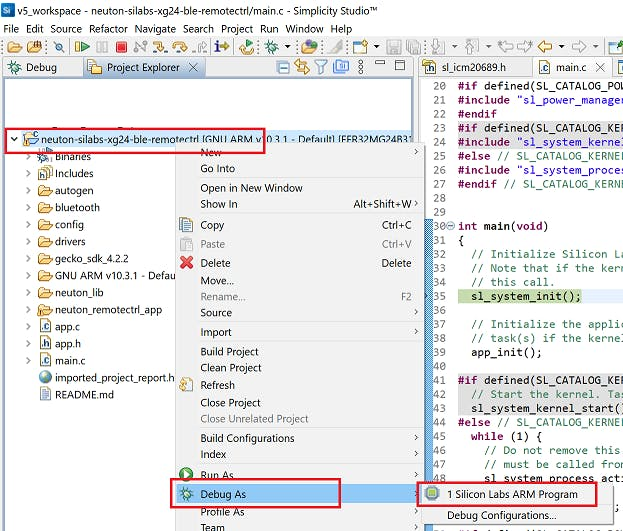
7. Connect xG24 Dev Kit to the PC via Micro-USB cable.
8. Wait for the end of the compilation process and flash the device, right-click on project folder in Project Explorer and choose Debug As -> Silicon Labs ARM Program.
9. Explore the project and Neuton.AI model capabilities!
How the project worksThe project has device logs and you can open the Serial Port to see them. The Serial Port(USART) has the following configuration:
Baudrate:       115200
Data:           8-bit
Parity:         none
Stop bits:      1-bit
Flow control:   none
Once the device is up and running, Bluetooth advertising starts as a HID device and waits for connection request from the PC. In the device logs you should see similar messages:
[I] Bluetooth stack booted: v5.1.0-b144

[I] Bluetooth public device address: E0:79:8D:C6:A2:B9

[I] Started advertising
You can connect devices in the same way as, for example, a regular Bluetooth keyboard.
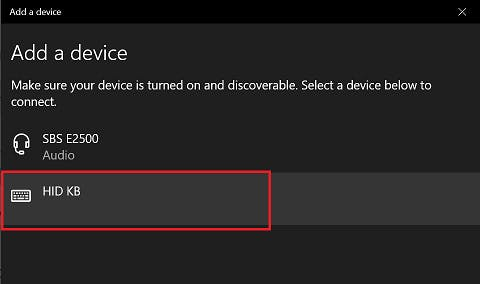
1. For Windows 10 PC you can go to Settings -> Bluetooth & other devices -> Add Bluetooth or other device.
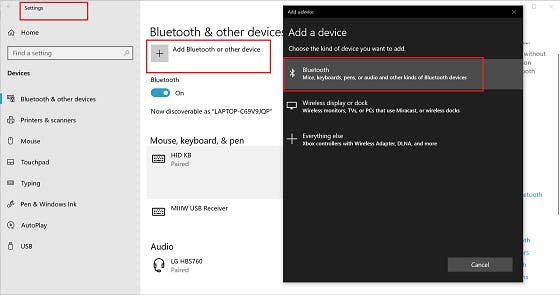
2. The device should appear in Add a device window, choose the device for pairing.
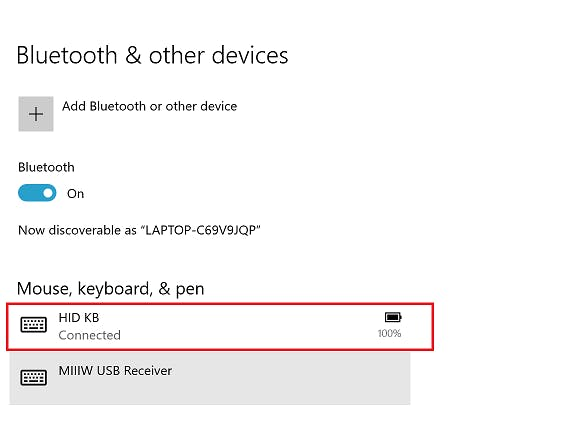
3. After Bluetooth pairing the device should appear in your Mouse, keyboard, & pen section.
When device is successfully paired via Bluetooth, you should see the following device logs in the Serial port:
[I] Connection opened.

0x020600A0

0x040600A0

[I] Characteristic was attempted changed: 3

[I] Characteristic was attempted changed: 18

[I] Notification enabled.
And the will change the LED indication. The LED0 starts blinking ~5 times per second (5 Hz) instead 1 time per second (1 Hz).
The main functionality of the project is to collect inertial sensor data from the 6-axis IMU sensor and recognize gestures on the device using Neuton.AI model and SDK. The IMU sensor data is collected with 100 Hz of sampling frequency.
The recognized gestures will be printed to the Serial port and sent via Bluetooth as a specific keyboard key.
[I] Predicted class: SWIPE RIGHT, with probability 0.998
[I] BLE Key report was sent
The project has two Keyboard control modes: Presentation Control and Music Control. Depending on the control mode, recognized gestures will be mapped to different keyboard keys:
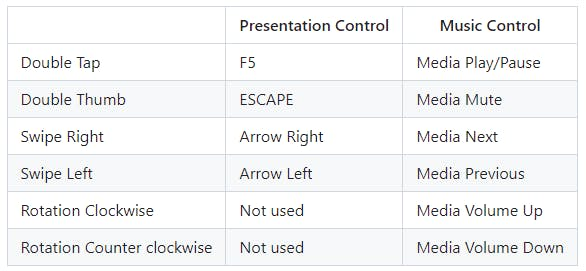
You can switch between control modes by pushing user button BTN0, for different control modes there is a different LED indication. If the device in Presentation Control mode the LED0 will blink RED color, if the device in Music Control mode the LED0 will blink GREEN color.
Enjoy exploring the project!
Code
Credits
Related products


Leave your feedback...