
Fragment: Opengl Benchmark For Pc & Pi

Made by 314Reactor / Art / Games & Gaming
About the project
Fragment is a 3D OpenGL benchmark tool that stress-tests PC & Raspberry Pi systems with multiple graphical effects and performance stats.
Project info
Difficulty: Difficult
Platforms: Raspberry Pi
Estimated time: 4 hours
License: GNU General Public License, version 3 or later (GPL3+)
Items used in this project

Story
Project Overview
Last year I made a number of videos on the Benchmarking software 3DMark:
The older 3DMarks inspired me with their abstract nature and sometimes odd ambience to create my own benchmarking software, that would also work on Raspberry Pi. It had just a few requirements:
- Should work across PC/Raspberry Pi
- Must have abstract shapes and benchmark scenarios
- Must have a sleek GUI
- And a cool name...
And so once I had the idea and after nearly a year of work; Fragment was born...
Built primarily with 'vibe coding' techniques using ChatGPT and other AI/ML tools for code assistance and asset generation.
Fragment is a 3D rendering benchmark tool inspired by 3DMark, built for both PCs and Raspberry Pi (tested on Bookworm/Bullseye) that uses OpenGL (via PyOpenGL and Pygame) to stress-test hardware performance. It features a clean graphical interface with multiple benchmark modes that measure graphics performance in real time by tracking FPS, CPU, and GPU usage. Designed as a modular benchmarking tool, Fragment demonstrates various rendering techniques—including environmental bump mapping, parallax effects, particle systems, and ambient audio—through an architecture that features an abstract renderer managing shaders, textures, camera controls, and lighting, while a CustomTkinter-based GUI lets users easily select benchmarks, configure settings, and view interactive performance charts.
The name Fragment comes from the OpenGL rendering term.
Requirements
- Hardware: A PC (with Windows 11 + OpenGL 3.3+ compatible NVIDIA/AMD GPU) or Raspberry Pi 4/5 and above (with Bookworm/Bullseye RPi OS + adequate cooling)
- Software:• Python 3.10+• Dependencies: PyOpenGL, Pygame, Matplotlib, NumPy, Pillow, psutil, GPUtil, CustomTkinter - full list found under
requirements.txt
Environment Setup
- Clone the repository and setup a Python Virtual Environment:
git clone https://github.com/LordofBone/fragment.git
cd fragment
virtualenv venvsource venv/bin/activate - Install dependencies with:
pip install -r requirements.txt - For running tests locally also install:
pip install -r requirements-dev.txt - For Raspberry Pi users, run the provided scripts to install libosmesa6 and set the necessary environment variables:
chmod +x setup/rpi_setup.sh && ./setup/rpi_setup.shchmod +x setup/rpi_bashrc_setup.sh && ./setup/rpi_bashrc_setup.sh
On Windows for some dependencies, you may need to install the Microsoft Visual C++ Redistributable:
Running the Benchmark
- To launch via the command line, simply run:
pythonmain.py
Caution:
Fragment can be quite heavy on systems (especially Raspberry Pi) and may cause excessive heat buildup,
especially on the GPU.
Ensure adequate cooling is in place before running, and use at your own risk.
This is still very much in development so there may also be memory leaks and other such bugs, so please be aware of this when running the software.
Graphical User Interface (GUI)
The GUI is a core part of Fragment, providing a user-friendly environment for configuring and running benchmarks. The interface is built with CustomTkinter and offers the following features:
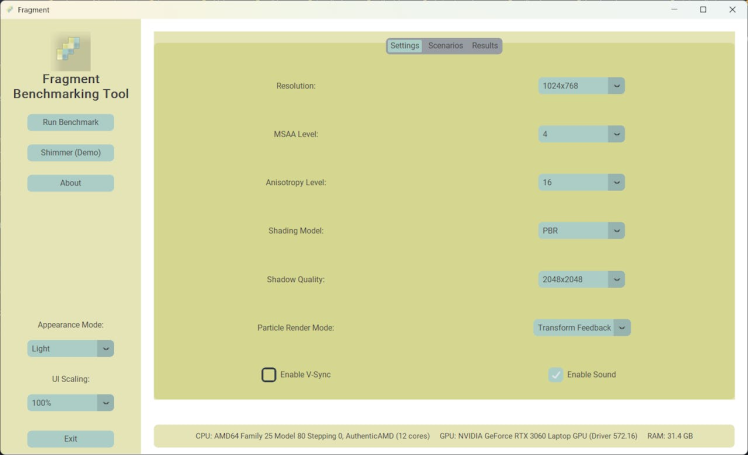
- Main Screen:Two main themes are provided—one in dark mode and one in light mode, Fragment should be able to detect your operating systems theme and choose dark/light automatically.
1 / 2

Check out the 314Reactor theme... nice
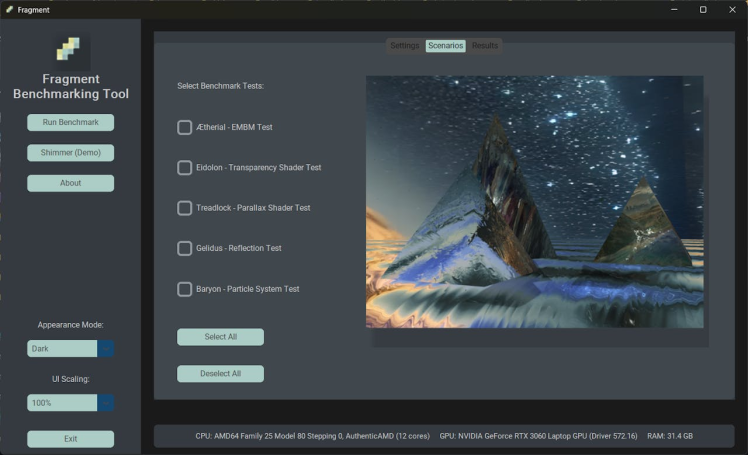
- Configuration & Preview:Users can select benchmarks, configure settings, and preview scenarios directly from the GUI.Graphical settings such as MSAA, anisotropy, shading models, and resolution can be customized easily.
- Live Performance Data:The application displays real-time performance results, including FPS, CPU, and GPU usage.These metrics are shown both in Matplotlib charts rendered to an image and in the window title bar during benchmark runs in real-time.
This intuitive GUI ensures that even users without extensive technical expertise can run benchmarks and understand their system’s performance at a glance.
I chose CustomTkinter for the GUI because it combines the simplicity and ease of use of Tkinter with a modern, sleek design while retaining all of Tkinter’s functionality. It provides a smooth and visually appealing interface without sacrificing flexibility or performance.
How It Works
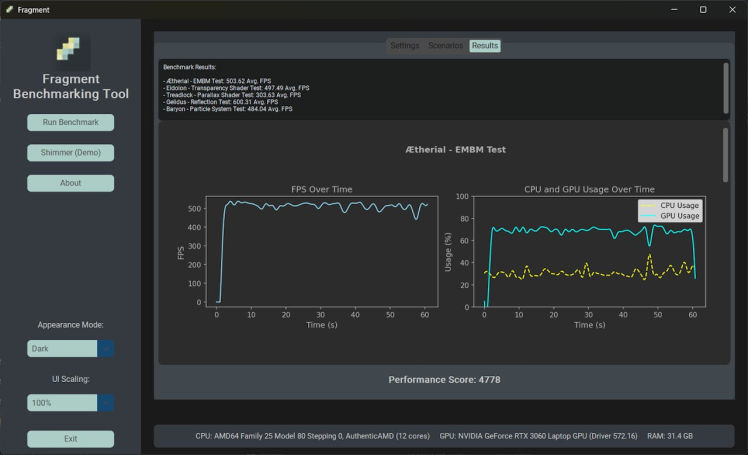
Rendering Pipeline & ArchitectureFragment’s core is its abstract renderer, which initializes shader programs, loads textures (including cubemaps), manages camera and lighting setups, and applies functions for sub-renderers that enable advanced effects like parallax mapping and shadow mapping. The Benchmark Manager runs selected benchmarks in separate processes and uses the Stats Collector module to monitor FPS, CPU, and (on PC's with Nvidia GPU's) GPU usage. This data is then aggregated to compute an overall performance score on the matplotlib charts, which I've tried to make as smooth and neat as possible.
Benchmark ModesEach benchmark mode highlights a unique rendering feature. For example:
- Ætherial: An EMBM shader test using a pyramid model.
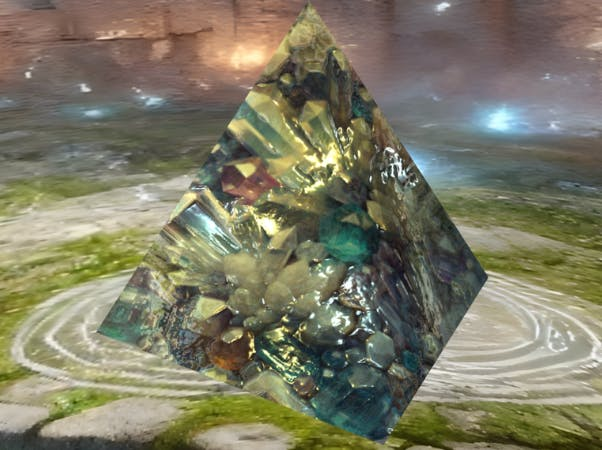
This scenario was based on the first model and texture I made for Fragment in its earliest phases, it has evolved into a really nice magical style; with influence from Age of Wonders. It uses EMBM (environment map bump mapping) to give depth to the crystal surface as well as a shiny look. The pyramid rotates to show off the effect.
- Eidolon: Demonstrates transparency and planar camera effects on spherical models.

This was inspired by the stealth camouflage effect in Halo, there's a planar camera slightly behind the model that moves relative to the main camera and then from that planar a screen texture is captured; which is then rendered over the surface of the model with refraction. The camera moves around the object to show the transparency effect off, as you can see the skybox behind it.
- Treadlock: Focuses on parallax mapping with a detailed tire model.
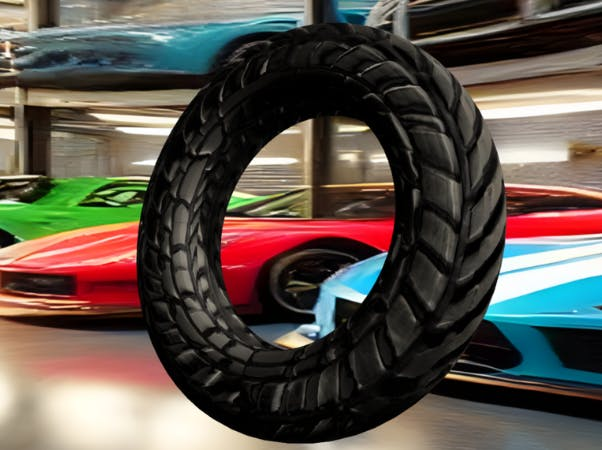
This was somewhat inspired by the tyre models in Gran Turismo 7 and they way they rotate with really nice rubber shaders and depth in the treads etc. This was the perfect opportunity for parallax mapping; to simulate all of the grooves on the tread, without having to actually have the treads as part of the model. It took a long while to get right, but I think it looks great, especially with the shadow that moves around it. The tyre rotates on the x and z axis to make it rotate while also turning; showing off the parallax effect as much as possible.
- Gelidus: A reflection test using cubemap-reflective water surfaces.
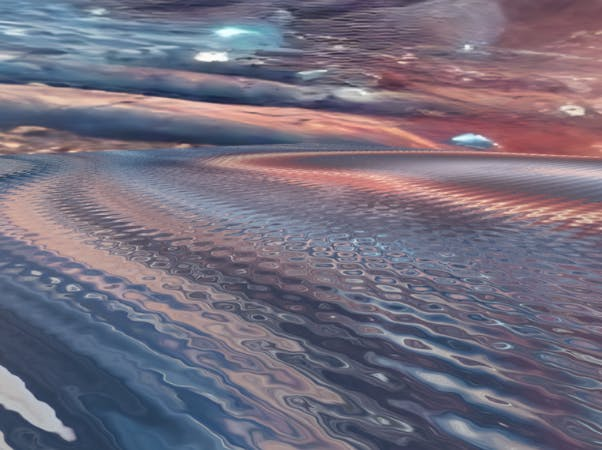
I love water effects in games so I wanted a benchmark that would render a nice water surface with an environment map for reflections, it turned out really well and the water shader has a lot of configurable parameters to affect the wave size and frequency etc. The shader dynamically generates surface normals to affect the waves; giving the illusion of depth. There is also a parallax mapped version of this which is used in the demo mode. The camera has slight lens rotations as the benchmark runs, to give it a bit more of a dynamic, floaty feel.
- Baryon: A particle system benchmark with support for CPU, Transform Feedback, or Compute Shader modes.
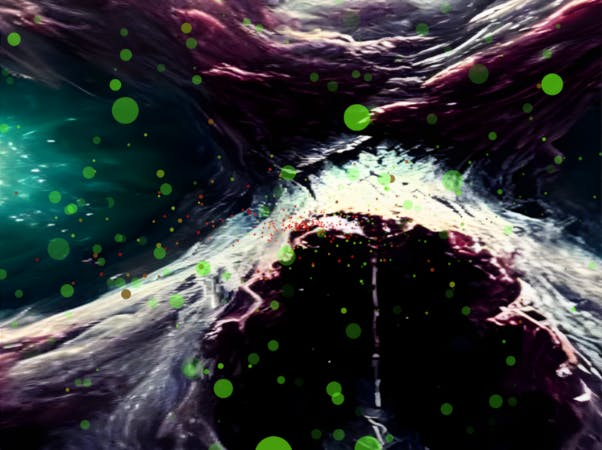
Another thing I really enjoy about games and computer graphics is particle effects, so I wanted to have a benchmark that would show off some cool effects and also be able to test across the CPU+GPU (more details below).
This benchmark simulates particles flying through space and bouncing off of a spaceships window, the particles change colour over time and eventually fade away.
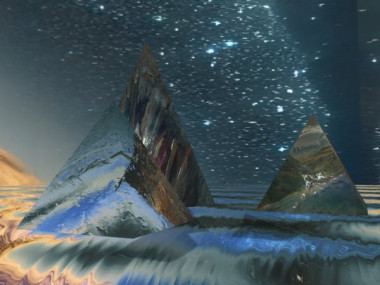
- Shimmer: A comprehensive demo that combines multiple features including particle effects and ambient audio.
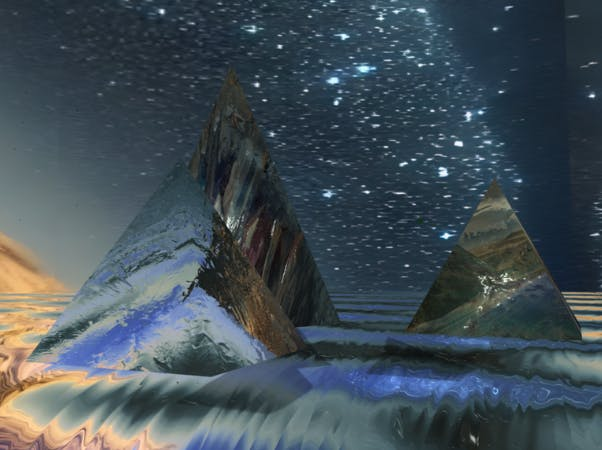
This is the demo mode, it shows off parallax mapping on objects and water surfaces, EMBM, reflections using a back-facing camera on the right pyramid and transparency simulation using a forward-facing camera on the left pyramid. It also features rain effects using the particle system. The camera moves around the environment to show everything off. It does not contribute towards a performance score. It also has an ambient soundtrack designed to give an abstract, rain like feel.
Due to the limitations of CPU particles you will barely see any rain particles in CPU mode as otherwise the FPS drops too low. Transform Feedback you will see more, but for the best experience it's best to switch to Compute mode if you can, as this will generate millions of rain particles.
All of the benchmark scenarios last 60 seconds, the demo lasts about 82.
I wanted the scenarios to be quite abstract and strange, but also have a semblance of being things that could be in video games; much like 3DMark2000.
Code Walkthrough
- Abstract Renderer: Manages shader initialization, texture and cubemap loading, and applies transformations. Serves as the base for all renderers, encapsulating common methods such as shader initialization, buffer creation, and uniform setup. This design ensures that specialized renderers share a consistent interface and core functionality, making the overall architecture modular and extensible. This is also where additional cameras can be setup to do planar reflections and transparency etc.
- Benchmark Manager & Stats Collector: These components coordinate the execution of benchmarks and collect performance metrics across the running time of the benchmark.
- GUI & Audio Integration: The custom Tkinter-based GUI provides a user-friendly way to configure tests, view results, and even play background audio during demo runs. I've tried to optimise the GUI as much as possible for performance and scaling, so you can shrink the window up/down and it will scale the items as best as possible. It will also render the matplotlib charts to a series of images on the result tab, to allow smoother scrolling than if using matplotlib direct. The charts will also adhere to the GUI dark/light modes as well as the font scaling.
- ParticleRendererInherits from Abstract Renderer and manages particle simulations using various techniques (CPU, transform feedback, or compute shader). It sets up the necessary buffers, handles particle generation and updates, and configures shaders based on the selected rendering mode to achieve high-performance particle effects. I spent a long time with ChatGPT building a configurable particle system that allows for parameters such as gravity, speed, spawn positions, bounce factor etc. that allow for total control of a particle system renderer. It can operate in CPU mode using pure Python to calculate physics, a transform feedback mode that uses a vertex shader that operates within the graphics pipeline using ping-pong buffers to read and write to calculate particle physics and finally a compute mode that uses a compute shader; which uses general purpose parallel processing to hold the state in general GPU memory and process the calculations. In terms of performance the CPU can handle a few thousand particles before the framerate drops too low (on my Ryzen 5000 Laptop CPU), transform feedback can go to hundreds of thousands of particles and finally, the computer shader can handle millions, (the latter 2 having been tested on an RTX 3060).
- ModelRendererExtends Abstract Renderer to load and render 3D models from.obj files while processing associated material data. It parses extra PBR extensions from.mtl files, creates buffers for each material, and applies proper material uniforms, ensuring realistic lighting and shading effects for complex models.
- SkyboxRendererA specialized renderer derived from Abstract Renderer, focused on drawing the skybox that surrounds the scene. It uses a simple cube geometry, modifies the view matrix to remove translation (thus simulating an infinitely distant environment), and maintains a minimal yet effective approach to environment rendering.
- SurfaceRendererInherits from Abstract Renderer to render flat surfaces such as planes. It generates vertex data that includes positions, normals, tangents, and bitangents, sets up the corresponding buffers and attribute pointers, and leverages common rendering routines for efficient shading and potential parallax effects.
- ShadowMapManagerThough not a renderer itself, it is crucial to the rendering pipeline by managing the depth framebuffer and texture used for shadow mapping. It computes the light-space transformation matrix based on light parameters, ensuring that shadows are correctly rendered across various scene objects.
- TextureManagerA singleton class that handles texture unit assignment and management for renderers. It maps unique identifiers to texture units and provides a dummy texture fallback, ensuring consistency and reliability when valid textures are not available or when a test not requiring a real texture file is needed.
- ShaderEngineManages the compilation, linking, and overall lifecycle of shader programs used throughout the rendering system. By processing GLSL code (including handling #include directives), it provides robust shader programs that Abstract Renderer subclasses utilize to perform their rendering tasks. It loads up the
glsl_utilities.glslfile for shared functions that other shader files can use; keeping code as DRY as possible. - RendererConfigActs as a central configuration repository for all rendering-related parameters, including window settings, camera parameters, lighting, and material options. Renderers use this configuration to initialize their state, ensuring consistency and ease of customization across the entire rendering pipeline.
- RenderingInstanceCoordinates the overall rendering process by setting up the window, initializing renderers, and managing the main rendering loop along with framebuffers and audio. It integrates all components—renderers, shadow mapping, and system monitoring—into a cohesive runtime experience.
- RendererWindowResponsible for creating and managing the OpenGL window using Pygame, handling user events, and updating the display. It also monitors system performance (CPU/GPU usage) and facilitates smooth integration with the main rendering loop in Rendering Instance.
- SceneConstructorManages a collection of renderers within the scene, organizing their render order and applying transformations like translation, rotation, and scaling. This class ensures that each renderer is properly integrated into the overall scene, promoting coordinated and consistent rendering across different elements.
- GLSL ShadersThere is a
/shadersfolder in the root of the project - all of the vertex, fragment, compute and common shaders are kept here. The utilities shader file (glsl_utilities.glsl) contains all of the common functions that are shared through all other shaders. This is also where the PBR/Phong/Diffuse lighting modes are kept. The simple diffuse model computes ambient light and then adds light contributions by taking the dot product of the surface normal with the light direction, with particle lighting additionally factoring in distance attenuation to simulate light falloff. In the Phong model, this diffuse calculation is enhanced by a specular component that uses the halfway vector between the light and the viewer, raised to a power (reflecting the material’s roughness) to create shiny highlights. The PBR approach goes further by implementing a microfacet model using the GGX distribution, Smith’s geometry term, and Schlick’s Fresnel approximation, which together yield a more physically accurate and energy-conserving representation of light reflection. This model also supports additional effects like clearcoat, sheen, and transmission to simulate complex material interactions under various lighting conditions.
I have tried to make the code as modular as possible, so adding new benchmarks is relatively easy - you can find instructions here on the readme.
Tools Used
Creating Fragment required a range of tools for programming, asset creation, and optimization. From AI-assisted development to texture and audio generation, these tools greatly accelerated the project and improved the final output.
AI-Assisted Development
AI tools played a crucial role in developing both the Python and GLSL codebases. ChatGPT was invaluable in accelerating code creation, expanding features, and identifying and fixing bugs—particularly in GLSL shader development. Additionally, I used GitHub Copilot and JetBrains AI Assistant, which significantly streamlined coding, debugging, and even automating commit messages and pull request descriptions.
AI also played a major role in texture and 3D asset generation. Using DALL·E and specialized GPT models such as Seamless Texture Generator and Texture Generator, I was able to create high-quality, seamless textures. For 3D models, GPTs like 3D Model Maker and 3D Model Generator were used to generate .obj files, which I then refined and UV-mapped in Blender. While these AI tools are still evolving, they proved useful for quickly generating base assets that I could modify and enhance.
Texture & Map Generation
- Material-Map-GeneratorThis tool was essential for creating normal, roughness, and height maps for textures. These maps were crucial for Environment-Mapped Bump Mapping (EMBM) and parallax mapping, adding depth and realism to surfaces. (Note: Roughness maps are not currently used by shaders but may be implemented in future updates.)
Audio Generation
- AudioLDM2This is an excellent prompt-to-music generator that utilizes GPU acceleration to create AI-generated music. I used this to generate ambient music for the demo mode, adding a more immersive experience.
Cubemap Creation & Upscaling
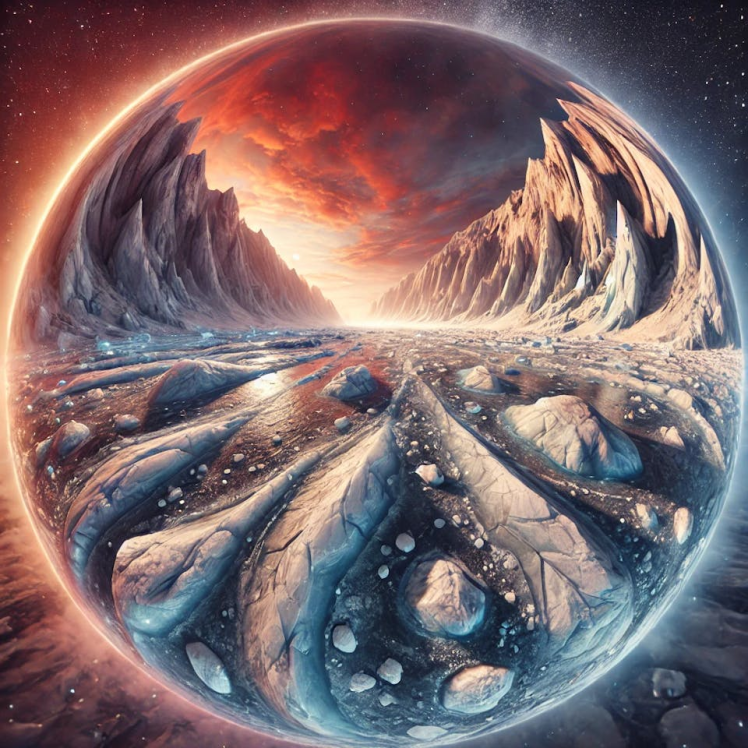
- sphere2cubeI used DALL·E to generate skybox textures in spherical format, which were then converted into cubemaps (consistent of separate.png files for front, back, left, right, top and bottom) using sphere2cube. This method ensured (mostly) seamless skyboxes suitable for Fragment’s rendering engine. See an example below:
- Real-ESRGANWhen converting textures into cubemaps, image quality can degrade due to stretching and sampling issues. To counteract this, I used Real-ESRGAN to upscale and clean the images, ensuring high-quality skyboxes without visible artifacts.
These tools were essential in bringing Fragment to life. Without them, it would have been significantly harder to create the textures, 3D models, cubemaps, and music needed for the benchmark. As these tools continue to improve, they will enable even higher-quality assets in future updates.
Results and Performance
Fragment displays live performance data such as FPS, CPU, and GPU usage (on supported systems) in the window title bar and through interactive charts. Screenshots of the main screen (in both dark and light modes), benchmark run, and results screen are provided above.
Challenges and Lessons Learned- Raspberry Pi Compatibility: One challenge thus far unable to be overcome is obtaining GPU usage metrics across multiple systems. While GPUtil works on PC's with Nvidia GPU's, it doesn’t support the ARM VideoCore GPU or AMD GPU's. In future I may use alternative methods (like using vcgencmd) can provide temperature, clock, and memory usage data instead, or hopefully someone will release some handy tools for GPU ID/Usage on a more broad range of systems. I also had to do a couple of tweaks to get Fragment to run on RPi 4/5 and Bookworm/Bullseye, contained in the.sh files under /setup; one part is to install libosmesa6, which is needed to prevent an error on launch and the other.sh file sets up the mesa platform:
export PYOPENGL_PLATFORM=osmesawhich oddly I believe corresponds with offscreen rendering, but prevents the 'NotImplementedError: Platform does not define a GLUT font retrieval function' error. The other setting isexport MESA_GL_VERSION_OVERRIDE=3.3which sets the OpenGL version to be 3.3, otherwise errors about the system not being able to handle this version will throw - I tried setting this higher (to 4+) but it seems 3.3 is as far as it will go. - TheComplexities of Shader Coding: Even using ChatGPT (o1) to help with the glsl shader code it still took a long time to develop and figure out bugs, especially the parallax shader; which I at first assumed would be a simple modification to the fragment shader turned into a huge rework of the Model Renderer module to account for Tangent, Bitangent and Normal vectors which also was used to enhance the existing EMBM shaders.
- Object Materials and PBR Rendering: At first I was using some oldschool OpenGL methods to assign materials from the associated.mtl file, then I realised that I had to actually load them into the shaders and create PBR code that would use roughness, metallic, refraction etc. This took quite a long time, also PyWavefront (used for loading models) doesn't handle all of the materials given from Blender, so I had to make some code that manually reads the.mtl file and loads them to the shader code for the materials that aren't compatible. In future I may replace PyWavefront with something more modern.
- Graphics Development and Basic Game Engine Principles: While working on Fragment I learnt about the difficulty of coding not only glsl but also how the CPU is utilised in preparing information for the GPU, giving me more intuition on how the CPU/GPU balance works and why even in mostly graphically intensive games updating the CPU can improve performance. I also learnt about how shadow mapping works, the intricacies of bump mapping, environment mapping, parallax mapping and how data is uploaded to the GPU to facilitate shader code parameters and configuration.
- Blender and Basic Modelling: I learnt quite a bit about how to use Blender to modify 3D assets as well as how to UV map different shapes, such as toruses, pyramids and spheres and how different approaches need to be taken for each. Thanks to this YT Channel for teaching me about UV mapping a torus. There may still be a couple of issues with the UV mapping - as the pyramid object has odd warping when parallax mapping is applied (although this may be to do with the texturing/depth map); I will hopefully fix this in future.
- Creating Skyboxes: You may notice that some of the skyboxes have seams in them, this is due to the way they are created and unpacked; as mentioned and detailed above they are created as a sphere within a square texture and then sphere2cube used to unpack to a set of skybox textures, this works seamlessly until the very edges of that sphere need to connect (or perhaps the edges of the square image itself) and the seamlessness is lost - causing a seam. Over time I will try to enhance this, by either finding a specific cubemap generator or finding a better method of generating the initial skybox spheres.
Conclusion and Future Improvements
Fragment showcases a fun, cross-platform approach to 3D benchmarking. It currently offers a suite of benchmarks and performance metrics, but there's plenty of room for future enhancements. Planned improvements include GPU usage monitoring and identification on ARM/AMD systems, additional benchmark modes, and further refinements to the GUI. The project is open for contributions, and user feedback is highly encouraged to help shape its evolution.
You can see from the video above how nicely the GUI loads up and offers ease of use (the layout inspired by the latest 3DMark). And how awesome the benchmarks look when running. I'm really happy with the look of the GUI and how well the performance charts render and how they can be scrolled through.
Looking ahead, several exciting features are on the roadmap. One idea is an immersive FPS-style benchmark; an aliens-themed scenario inspired by classic sci-fi shooters (with the placeholder bay12.py under /benchmarks hinting at this concept). Another potential addition is a PS3 theme style dust simulation, where particles drift through beams of light, creating a visually striking effect using the particle system.
The particle system itself could also be significantly upgraded by leveraging geometry shaders, allowing particles to be rendered as true 3D geometry rather than simple 2D sprites. This would enhance shading, lighting, and depth, making the visuals far more dynamic and realistic.
In future I may look into implementing Vulkan compatibility especially on RPi, but I will need to investigate the feasibility and complexity of that.
Finally, improvements in error handling are also planned. Currently, if a shader is configured with a non-existent name under /shaders, the error message is vague and unhelpful. Future updates may introduce better debugging messages in both the GUI and Python output, making it easier to identify missing or incorrectly named shaders. I also need to add in proper Python logging at some point instead of using print statements.
With all these ideas in mind, Fragment is continuously evolving, and there’s plenty of opportunity for expansion. Contributions, suggestions, and feedback from the community will play a big role in shaping its future!
As mentioned in the Challenges/Lessons Learned section I expanded my knowledge of graphics, coding and art assets greatly while making this and I'm sure there's things I've forgotten to mention and so much more to learn upon a revisit of this project. So it's been fantastic in terms of getting practical knowledge and gaining intuition for graphics and rendering.
Known Issues
There are a number of known issues with Fragment that I intend to look into fixing in future, you can find them here.
Contributions and GitHub Workflows
Fragment employs two key GitHub workflows to ensure that every contribution maintains high code quality and that releases are versioned automatically. These workflows work together seamlessly with pull requests and merges.
1. Lint, Format, and Test on Pull Request
Whenever a pull request is opened, this workflow is triggered to automatically check the new code. Here’s what it does:
- Repository Checkout & Git Config:The workflow checks out the latest code and sets Git configuration so that any automated commits are attributed to the GitHub actions bot.
- Python Setup & Dependency Installation:It sets up Python (version 3.10) and installs development dependencies from the
requirements-dev.txtfile. - Linting and Formatting:The tool Ruff is used to scan and automatically fix and commit any linting or formatting issues.
- Running Unit Tests:Finally, the workflow runs the Python unit tests using pytest and generates an HTML report (currently not available, but in future will setup GH pages to display the latest). This ensures that the pull request passes all tests before it is merged.
This automated process helps maintain a consistent code style and prevents issues from being introduced into the main codebase.
2. Create Tag and Bump Version on Merge to Main
After a pull request is merged into the main (or master) branch, this workflow kicks in to manage the project’s versioning and tagging. Its steps include:
- Repository Checkout & Git Config:The workflow checks out the repository with full history (essential for accurate diff calculations) and configures Git with the GitHub actions bot’s credentials.
- Python Setup & Dependency Installation:It installs Python (version 3.10) along with bump2version, a tool used for automated semantic versioning.
- Determining the Bump Level:The workflow calculates the number of code changes by running a
git diff --shortstat HEAD^. Based on two thresholds (a PATCH_THRESHOLD of 250 lines and a MINOR_THRESHOLD of 2000 lines), it determines whether the changes merit a patch, minor, or major version bump. - Bumping the Version & Creating a Tag:Using bump2version with the appropriate level, the version is updated automatically. The changes are auto-committed, and a new Git tag (e.g., v1.2.3) is created that corresponds to the new version.
- Pushing the Tag:Finally, the tag is pushed to the repository, officially marking the new release.
This workflow automates the semantic versioning process so that every merge into the main branch results in an updated version and tag, keeping the project history organized and making it easier to track changes over time.
How They Work Together
- Pull Requests:The linting, formatting, and testing workflow runs on every pull request, ensuring that any incoming code adheres to the project’s standards before merging.
- Merges:Once a pull request is merged, the version bump and tagging workflow automatically updates the version number based on the magnitude of the changes and creates a corresponding Git tag. This means that the project is only versioned and released after successful code review and merging, streamlining the release process.
Together, these automated workflows create a smooth and reliable contribution process, ensuring high code quality and a consistent versioning system with minimal manual intervention.
AcknowledgementsFragment is inspired by benchmarks like 3DMark and Unigine and is built using:PyOpenGL, Pygame, Matplotlib, and other PIP libraries as found in requirements.txt and requirements-dev.txt.
- ChatGPT – Assisted with the Python/GLSL codebase and texture generation.
- Material-Map-Generator– Used to generate normal, roughness, and height maps for textures.
- AudioLDM2– Used for generating ambient music in demo mode.
- sphere2cube– Converted ChatGPT-generated images into cubemaps.
- Real-ESRGAN– Used for upscaling images to higher quality.
Code
Credits
Related products


Leave your feedback...