

Doom Revenant Inspired cyber-skeleton

Made by 314Reactor / Artificial intelligence / Games & Gaming / Photos & Video / Robotics
About the project
It's Halloween so the perfect time to cybernetically enhance a store-bought skeleton prop!
Project info
Difficulty: Moderate
Platforms: DFRobot, Raspberry Pi, Pimoroni
Estimated time: 6 hours
License: GNU General Public License, version 3 or later (GPL3+)
Items used in this project
Hardware components

View all
Story
I went to a store the other week and found a cool Skeleton in their Halloween section, I immediately thought; that’s got enough room in it for some hardware… images of a spooky cool Raspberry Pi/Arduino powered Revenant inspired Cyber-Skeleton came to my mind through a UAC-like portal.
I thought it would be awesome to have a skeleton that could move its mouth, light up an LED eyeball and even take some pictures (with some ML on top) as a cool geeky and DOOM inspired Halloween prop.
Revenants in DOOM are basically cybernetically enhanced demon skeletons – you can find out more about these awesome things from here.
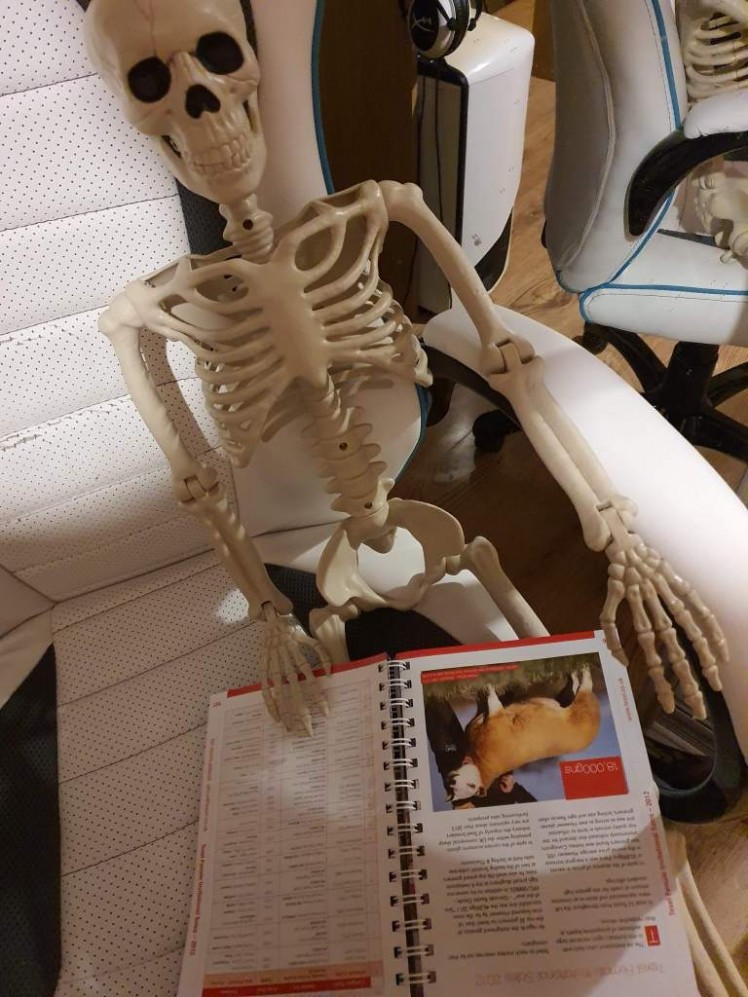
Here it is reading up on some Texel sheep (prior cybernetic augmentation).
So depending on your preference, put on some music from Bobby Prince, Aubrey Hodges, Mick Gordon or Andrew Hulshult and David Levy and let’s dive into The Revenant!
Not that one.

Not that one.
The Shores of HardwareI decided to make this project similar to my upcoming HK-Tank project; where it uses a combination of Raspberry Pi + Arduino – the Pi for handling higher level stuff like controls, photos, ML and the Arduino for handling servos, WS2812 LEDs etc.
The both connected up via a USB cable that allows them to talk via serial communications. Allowing the Pi to send commands to the Arduino.
I want this Skeleton to be able to move its jaw, turn on an eye-ball LED and take pictures – all controlled remotely. Then it will serve as a good platform for adding features in future.
Here is all the stuff I used:
- Skeleton
- Raspberry Pi Zero W
- Heatsink
- SD Card
- Raspberry Pi Zero Camera
- Arduino Uno
- Gravity I/O board
- Jumpers
- Battery Box
- USB Power Bank
- AA batteries x4
- USB A to B Cable
- USB A to Micro Cable
- USB Micro Cable
- Neopixel LED Ring
- Red/Blue LED
- Resistors
- Servo
- Screws/Standoffs
- Tie Wraps
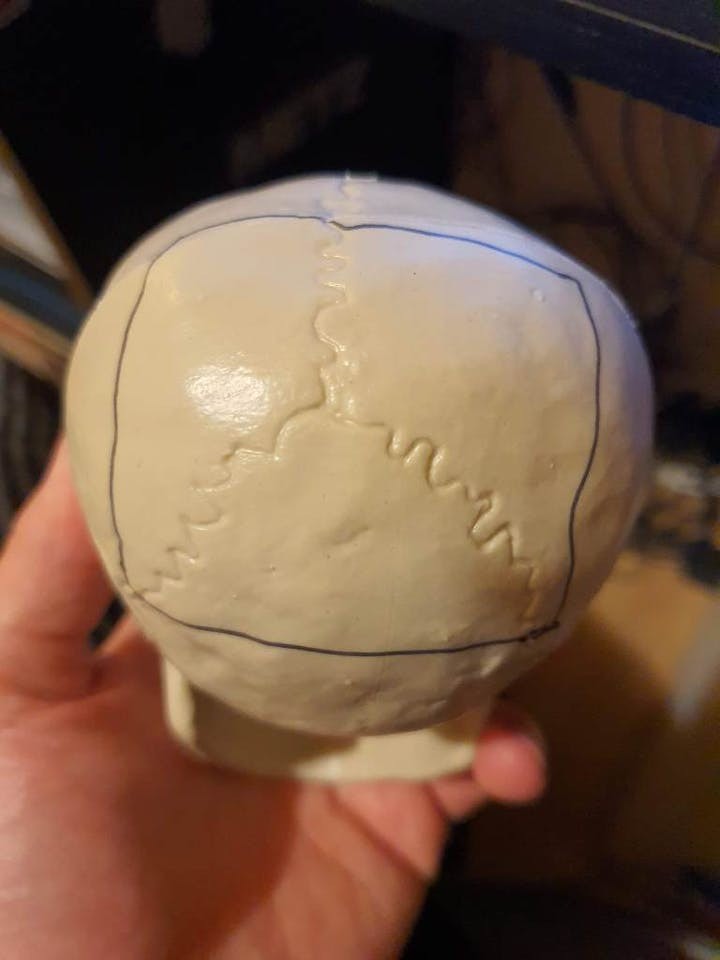
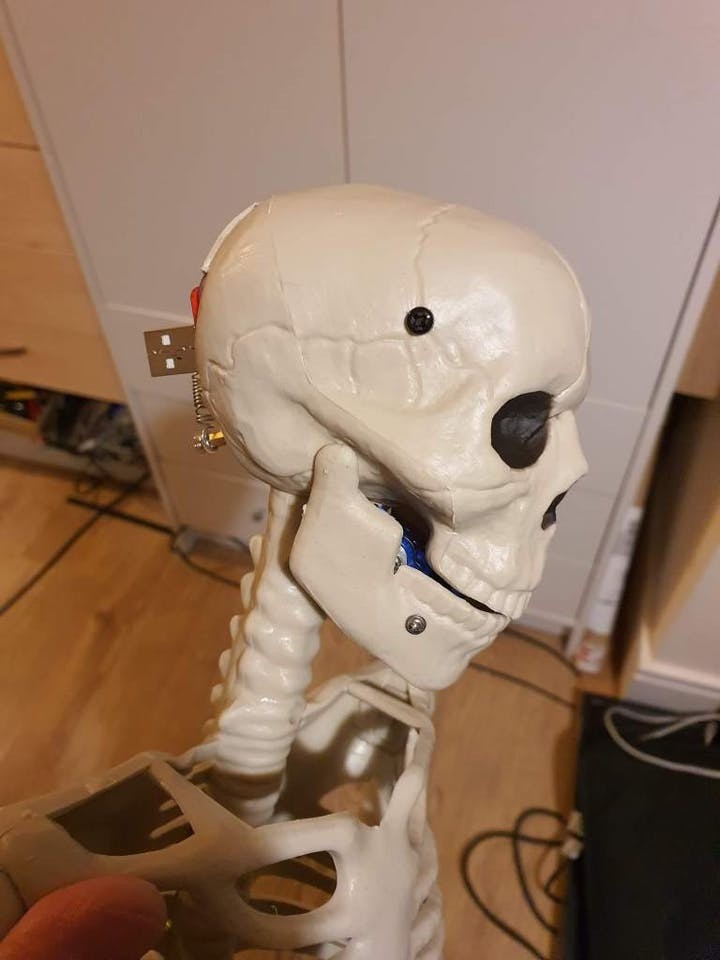
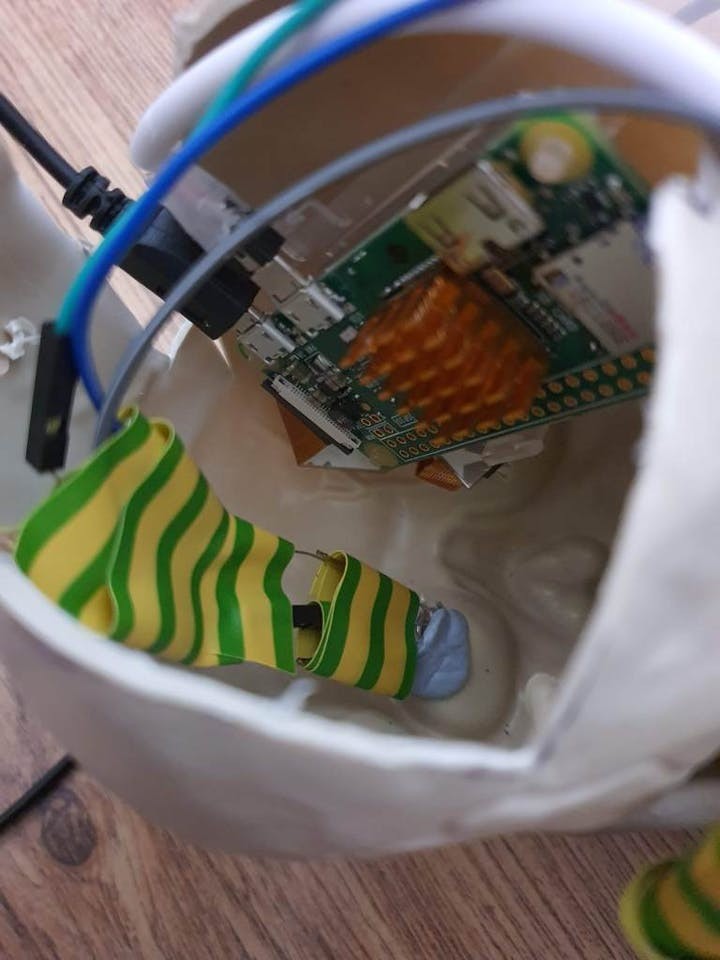
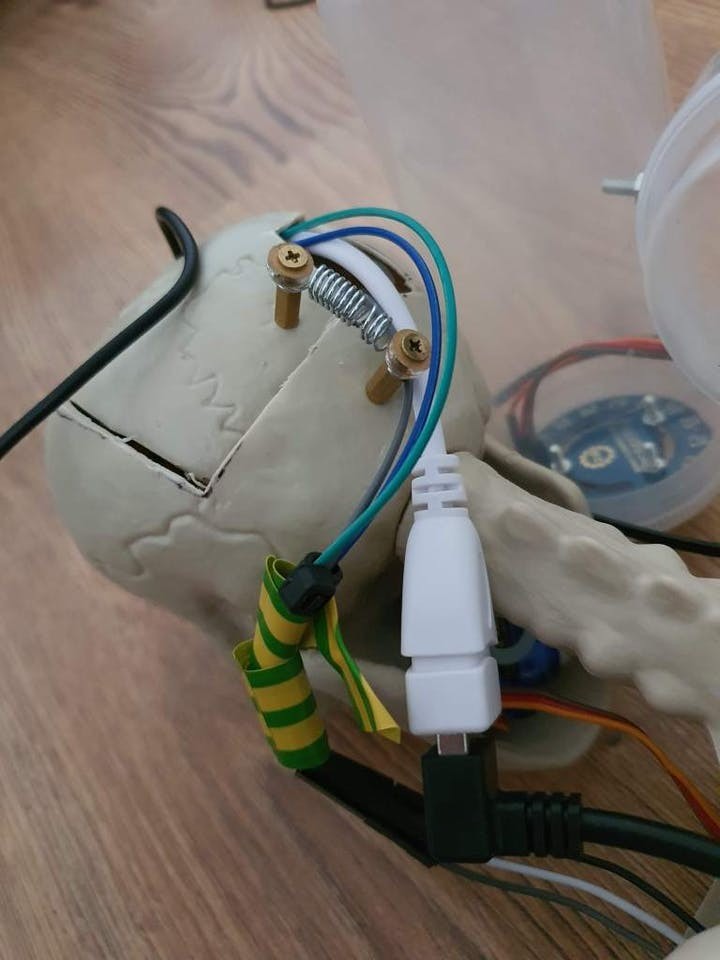
First was taking the Skeletons head off and marking a square to cut to match an access-hatch, this is where the Pi Zero is going to sit along with the LED and the Camera in each eye respectively.
I added on a couple of standoffs with some screws to hold the hatch down when not under maintenance.
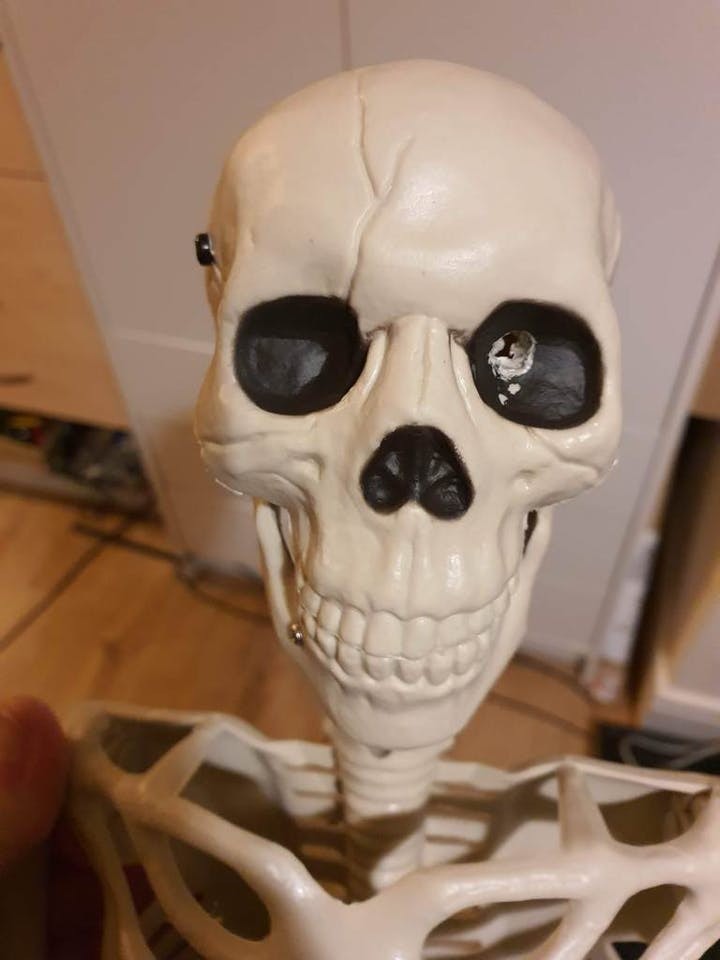
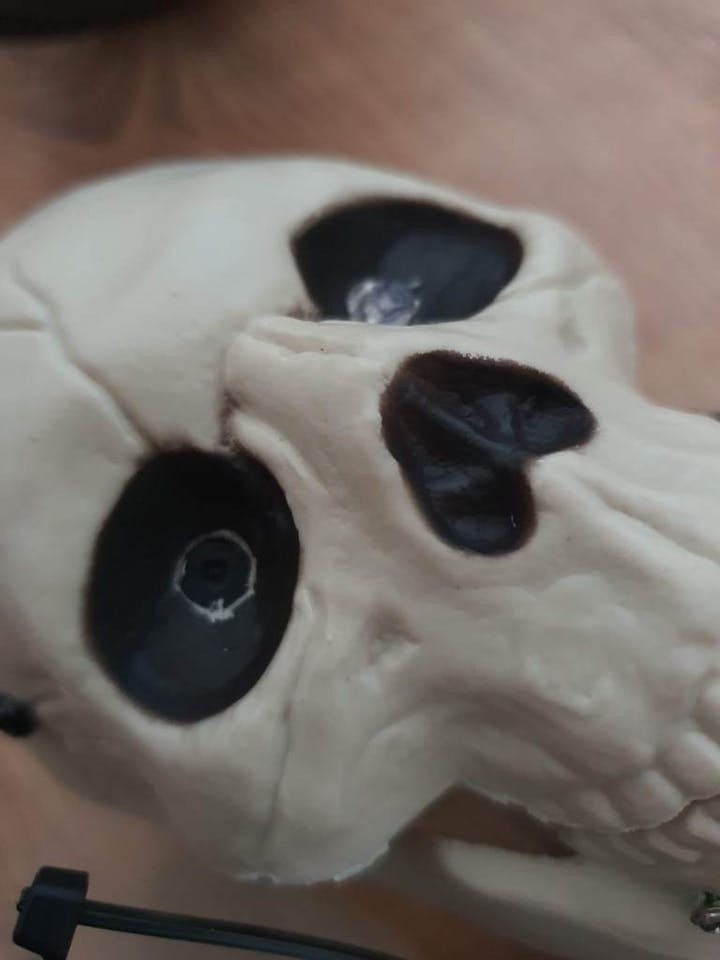
I also drilled the eye sockets ready for placement of the camera and LED.
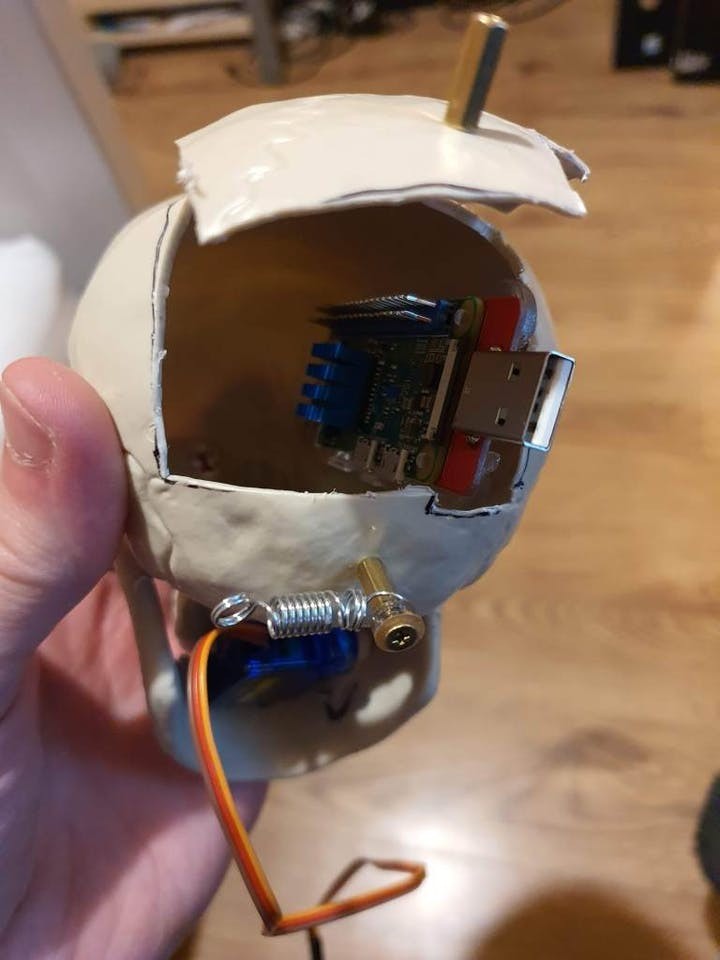
And a hole in the side of the head and jaw, the head one for holding the Pi in place and the jaw for the servo to control the mouth.
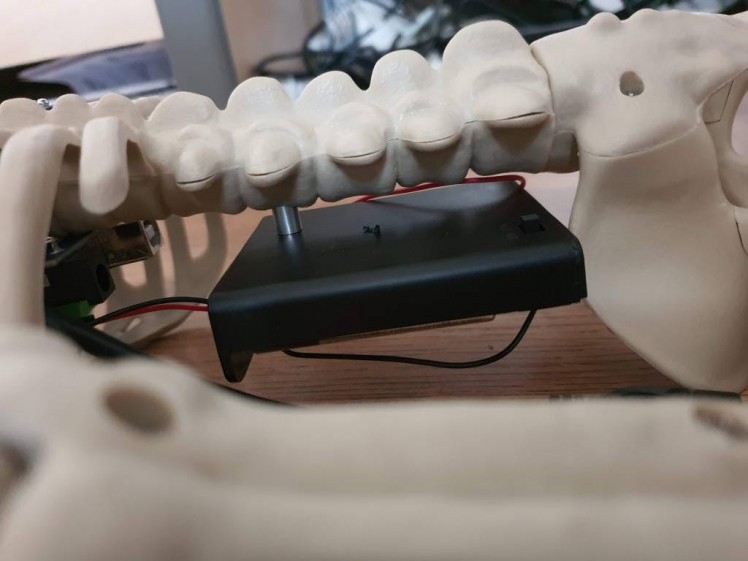
Next up was adding in the Arduino with the IO board on and battery box – I’ve gone with this solution as I can add on more/bigger servos over time and have a good power supply to the Arduino rather than power servos direct from the Pi.

The battery box is held on with a screw directly into the spine of the skeleton. The two wires from the battery box wire into the ext power on the Arduino Gravity IO board.
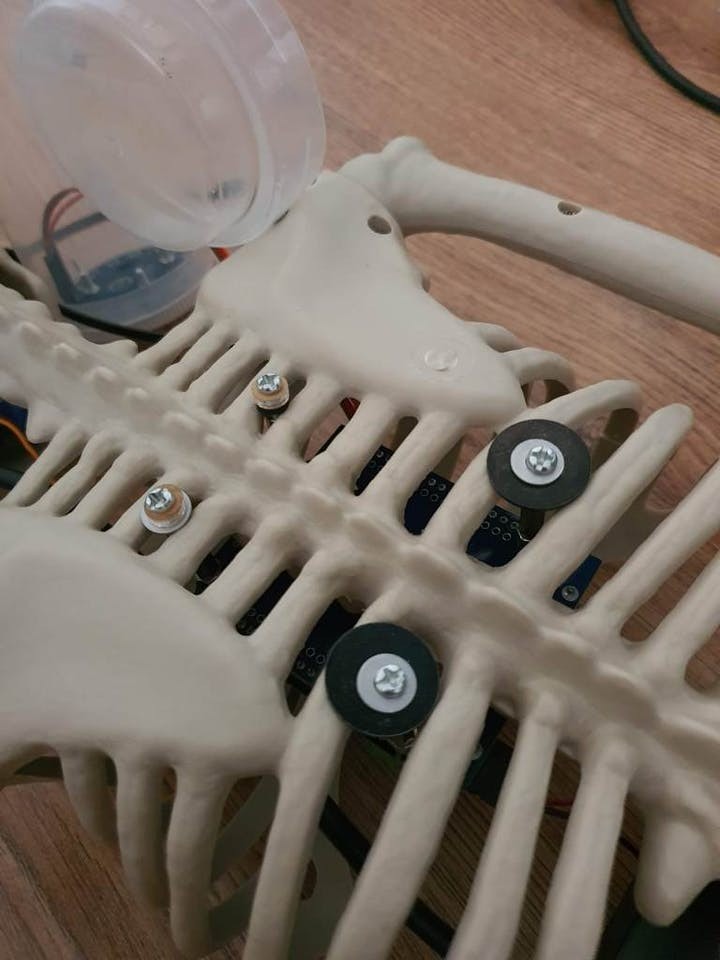
I used standoffs screws and some washers to hold the Arduino in place.
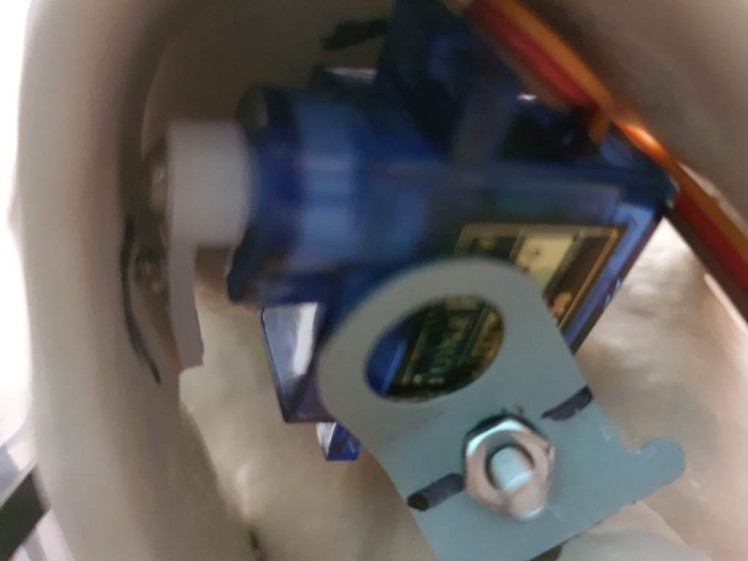
The jaw-servo is attached in with a small screw and another screw with a piece of metal I had laying around holding it onto the underside of the skull; I had to get the right position along with some coding trial and error to get it just right so that the jaw would open and close in the way I wanted.
I also made a nice shoulder-rocket for the skeleton out of an RGB LED ring and some old bits of plastic from sort of seasoning product and a plastic bit from a coffee jar or something (I have lots of random bits of plastic laying around waiting to be recycled for exactly this kind of occasion).
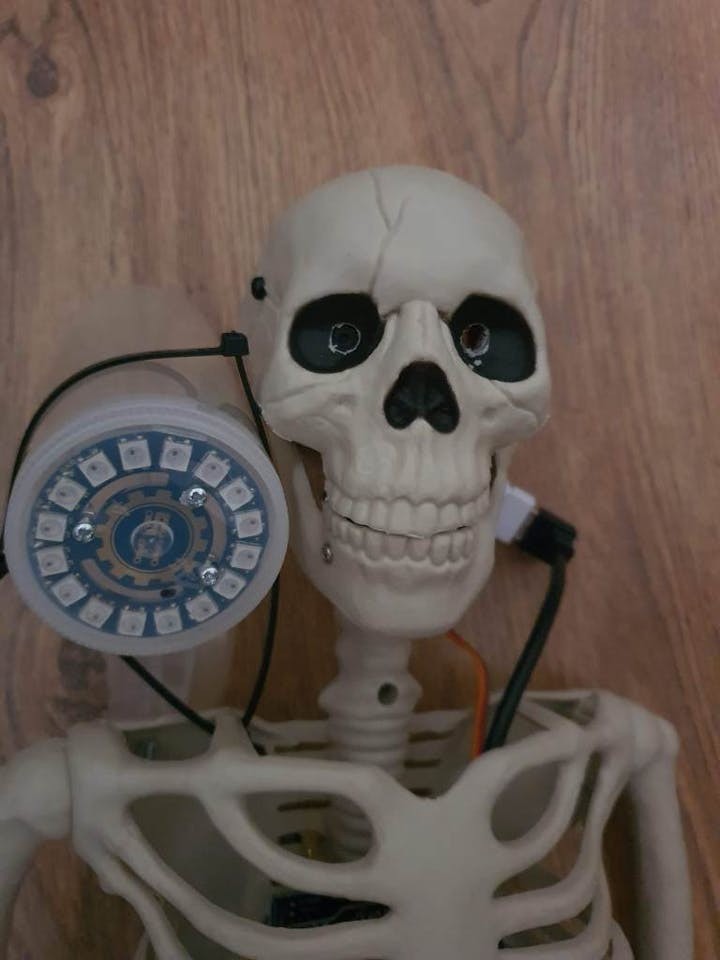
The LED ring is screwed in nicely with some wires soldered in ready to connect to the UNO.
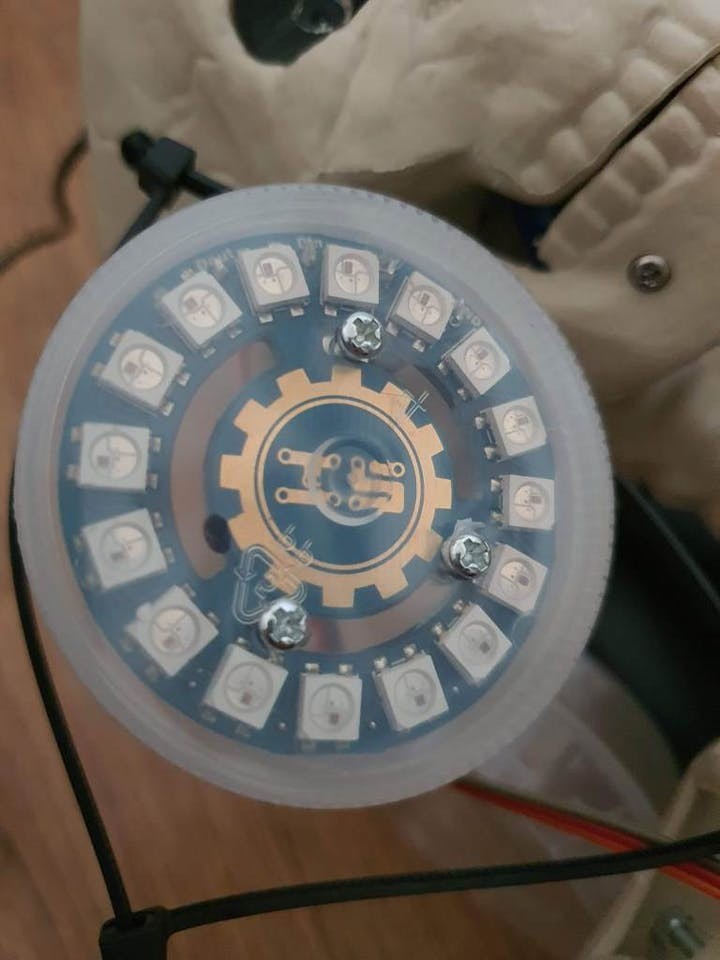
I also added a tie wrap to help hold the rocket launcher up.
By this point you can also see the camera has been attached in the eye-socket, I had to expand the hatch a bit for access but the hole drilled was just right for a Pi Zero camera.
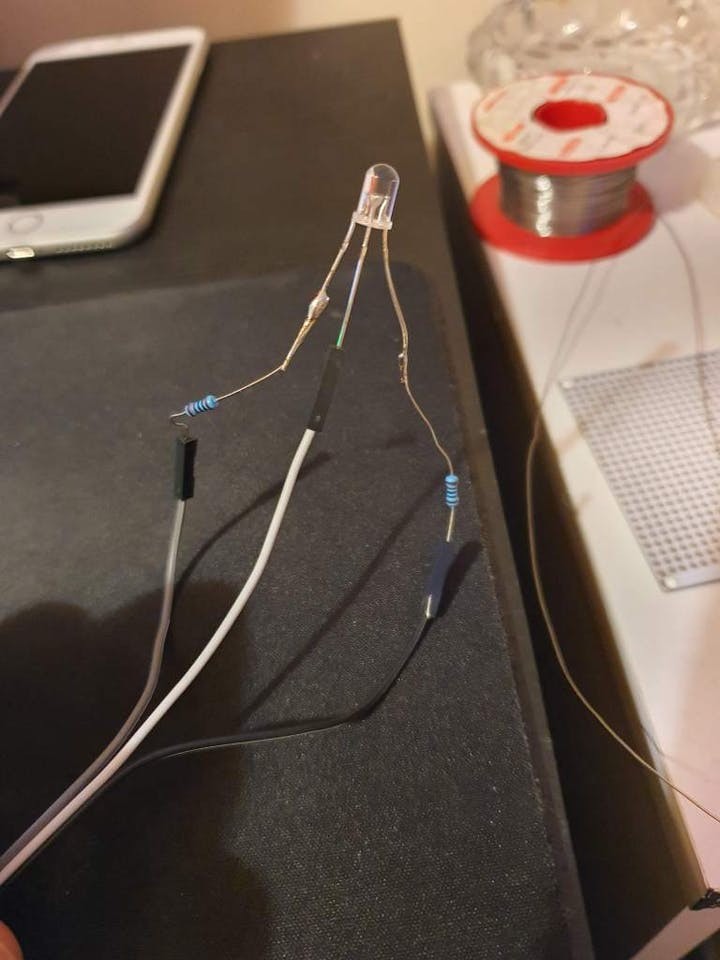
This is also showing the Red/Blue LED in place, this was soldered to some jumper wires with some 1k ohm resistors ready to connect to the UNO.
1 / 2
I got the USB cables hooked up, one to the Pi’s data USB which connects to the USB port on the Arduino and the micro USB out from the power USB on the Pi. I originally wanted to power the Pi Zero from the Arduino – but unfortunately it doesn’t crank out enough amps it seems from the USB to fully boot the Pi. So I will be adding an extra battery pack for the Pi separately.
The cables all nicely come out of a hole in the head.
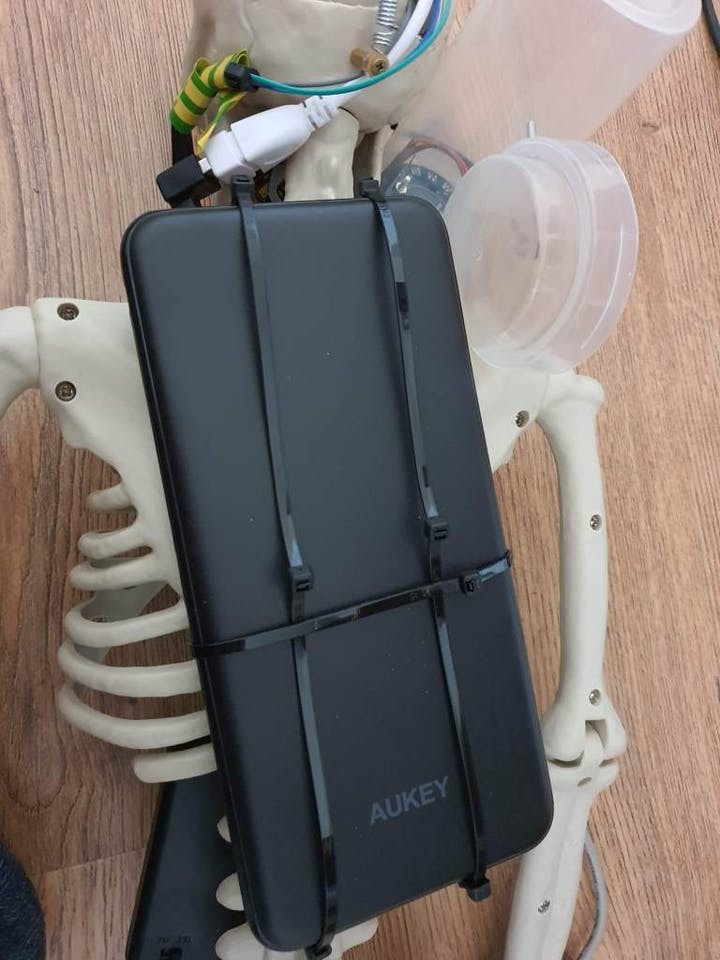
For powering the Pi I added a power bank backpack, held on with tie wraps.
Things are basically done at this point, in future I’d like to add a smaller battery supply for the Pi with a PowerBoost 500c or something. But that can be for Halloween 2021; along with some other upgrades.

At this point the hardware is done and we are ready to move on to the software.
ArduinoYou can grab the code from my GitHub.
I used the latest Raspbian version from the Raspberry Pi site. I was using a 16GB SD Card and found that to get OpenCV installed I had to free up some space so here is what I used:
“sudo apt-get remove –purge python-minecraftpirm -rf ~/python_gamessudo apt-get remove –purge libreoffice*sudo apt-get purge wolfram-enginesudo rm /usr/share/raspi-ui-overrides/applications/wolfram-language.desktop /usr/share/raspi-ui-overrides/applications/wolfram-mathematica.desktopsudo apt-get remove sonic-pisudo apt-get remove python-sense-emu python3-sense-emu sense-emu-toolssudo apt-get cleansudo apt-get autoremove”
This freed up a decent amount of space and I could now install OpenCV 4 according to these instructions. When compiling for a Pi Zero on a Pi 3+ or above (which I recommend as it’s much faster than compiling on a Zero) I had to ensure the cmake settings were as follows:
cmake -D CMAKE_BUILD_TYPE=RELEASE -D CMAKE_INSTALL_PREFIX=/usr/local -D OPENCV_EXTRA_MODULES_PATH=~/opencv_contrib/modules -D WITH_GTK=ON -D ENABLE_NEON=OFF -D ENABLE_VFPV3=OFF -D BUILD_TESTS=OFF -D INSTALL_PYTHON_EXAMPLES=OFF -D OPENCV_ENABLE_NONFREE=ON -D CMAKE_SHARED_LINKER_FLAGS=-latomic -D BUILD_EXAMPLES=OFF..
Basically ensuring ENABLE_NEON and ENABLE VFPV3 are OFF.
I also had to install pillow with: “pip install Pillow==2.2.1”
And scikit-learn with: pip3 install scikit-learn
As well as: “sudo apt-get install libatlas-base-dev”
To get around the “ImportError: libf77blas.so.3: cannot open shared object file: No such file or directory” issue I was having.
I also had to enable the Pi Camera and VNC Server with: “sudo raspi-config”
There are two main elements; the Arduino code (.ino) and the python files for the Raspberry Pi.
Some of this code is take from my upcoming HK Tank project – so keep an eye out for that!
First up is the revenant_lowlevel.ino file:
Thanks to this guide here for the Neopixels code. Nothing to crazy in here, in the loop it waits for serial inputs and parses them out to run different commands which lead to different functions such as mouth, open mouth close, fire rockets etc. The Raspberry Pi, when connected will write serial commands to this and it will carry out servo and LED functions.
This is also what has the positions for the jaw-servo, I had to go through a lot of trial and error to get the right positions but in the end I got there and got the mouth to open and close nicely.
The Python code is where things get a bit more groovy.
One of those images you can hear.

One of those images you can hear.
rev_console_logger.py
When writing programs I usually end up putting in loads of print functions to try and debug and understand what’s going on when its running. Then I have to remove/comment them out when the program is finished, this time I decided to make a logger where the console printing can be turned on/off and all the print statements can be left in – then when the –debug argument is passed in with the main program it will print everything.
It uses a class that is instantiated within the module so that there is one instance of the class where the console on/off is set; so if another module needs to write it can easily be imported and worked with for debugging.
This can also be run independently to test that the console will write successfully when console writing is enabled.
rev_serial_interfacing.py
This has an importable class that runs reads and writes from the serial interface; it uses a loop on the reads that get passed into a list – this is functionality that will be used in the HK Tank but in the Revenant there is no need to read from the Arduino (yet).
Writes are also handled here, with a simple function that sends serial commands to the serial port as configured in serial_config.yaml.
If no serial is found (the Arduino is not responding or that its switched off) it will continue to attempt reconnects – based on the serial reconnect timer set in the serial_config.yaml.
When called on its own this will write some test commands to the Arduino and wait to read the responses – to confirm that the serial connection is working both ways.
hk_yaml_importer.py
This module imports all of the YAML data into a nice data class that can be imported/accessed into other modules – making it really easy to grab all the data required from the various YAML files. Will go over these files and what they contain later on (in the case of The Revenant there is just one file; serial_config.yaml).
Running this module by itself it will load up and print all of the parsed YAML contents as a test.
rev_movements.py
This module contains all of the functions required for the moving parts on the Revenant – it has all of the general movements that can be called to the serial interfacing module to fire off requests to the Arduino.
From here the mouth can be moved and the LED eye can be switched on/off. It is also where other movements in future versions will be added.
This also has a lockout Boolean where if movement has been called within a few seconds or if the Arduino has sent a “moving” serial output it will ignore movement actions (unless the override has been set) – hopefully preventing conflicts in movement.
hk_actions.py
This is where the camera actions are stored – such as snapping a picture and showing it to the user and another function for grabbing a picture and performing some adjustments to it and returning it to be processed by the ml_systems; which we will go over later.
rev_ui.py
This is the main file that is called to run the Revenant, it loads up all the necessary modules and loads up a menu using qprompt.
From here the user can run training from ml_systems, take a picture for analysis, take a picture and show the captured image, open/close the Revenants mouth, adjust the LED, toggle storing of captured pics, ‘firing’ the rockets and toggling the debug console.
rev_ml_systems.py
I wanted to get some ML running the Skeleton so I had a look around for something simple it could do – I found this rather cool project that should be able to run nicely on a Pi Zero: Finger counting – image recognition.
This is basically an ML project which is designed to recognise the amount of fingers someone is holding up based on a decent amount of training data.
I managed to get the training code to run but it will just take forever on a Pi Zero – the function is there anyway however, just in case this gets run on something more powerful. I did find that even on a Pi 4 I had to process the images down to 64×64 to be able to work, otherwise it would throw an error about tensor max size (at 128×128).
Luckily there is a pre-trained model from this project; which I am using on the Revenant – this can be grabbed from the projects GitHub.
The inference function here grabs an image from rev_actions and then analysis it on the trained model. It works fairly fast on a 128×128 image from the Pi Camera.
I found that to get inference to work on a Pi Zero Armv6 processor I had to ensure that ‘use_bias=False’ was present under any conv2d layers, such as:
model.add(Conv2D(128, (6, 6), activation='relu', use_bias=False))The odd thing here is, that even following the project as linked above the inference does not always seem correct – I’ve managed it to recognise certain hand shapes, such as 2 fingers with decent accuracy but anything else and it seems to just be random.
I may be doing something wrong with the code, I’d like to get this fixed and have the Revenant be able to respond with certain actions to certain hand shapes but I want this project out for Halloween and I don’t have time – (it may be related to the above ‘use_bias=False’ setting on some layers). This will be something I will look into expanding/fixing in the next iteration.
I will possibly be adding some kind of facial recognition in here too in future so keep an eye our for Halloween 2021 when I return to this project.
serial_config.yaml
This is where the config for the serial connection is stored, what port, speed etc. This saves from having to hard-code anything.
With the code gone over let’s have a look at how it works!
Thy Code CompiledOverall I am pretty happy with this you can see that it successfully takes photos and can analyse hand shapes with TensorFlow (even if not fully successfully at the moment). The mouth also moves pretty nicely – I think in future I will add some TTS audio capabilities to it – and make it so the mouth moves somewhat in time with the speech.
At the moment it is fully remote controlled through logging in via Putty or via VNC (to be able to show captured images). It’s a pretty cool Halloween prop I think – I’d like to add in some bigger servos on the arms and legs to enable it to be a bit more animated (although I doubt it could ever walk, or fly like an actual Revenant… but maybe).
Also in future I may swap out the Pi Zero for something more beefy like a full sized Pi – or may augment the eyeball with an ML dedicated piece of hardware such as a Husky Lens. Which will enable lots of further vision abilities and I can program it with automatic responses to things like human faces.
As I say this is just a phase 1 kind of project – I hope to add to this and get it doing more things with machine learning and overall movements in future to make it an even cooler prop and bring us all closer to the UAC’s vision.
Happy Halloween!
Awesome.

Awesome.
Code
Credits
Related products


Leave your feedback...