
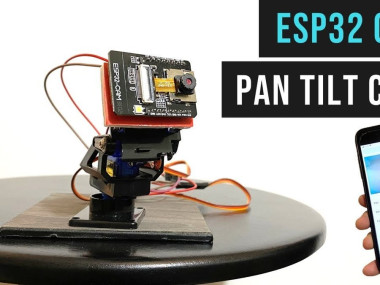
Diy Pan Tilt Control Using Servos For Esp32 Cam !

Made by raushan-kumar / Security / Sensors
About the project
Tilt Control Using Servos for ESP32 Cam ! WiFi Security Camera
Project info
Difficulty: Moderate
Estimated time: 1 hour
Items used in this project
Hardware components

Story
This guide will show you how to use two servos to create a pan-tilt control for the ESP32-CAM. The ESP32 Cam is a small camera that can be used to take pictures and videos.
The servo is used to pan and tilt the camera. This can be used to create a security camera, a robotic eye, or anything else you can think of. We will also show you how to use a web interface to control the camera.
Step 1: Required Material- ESP32 Cam module https://amzn.to/38aEtl
- Pan Tilt Servo assembly https://amzn.to/38IWAPC
- SG90 servo motors https://amzn.to/3wD1RBw
- 5V AC DC Adapter https://amzn.to/3wD1RB
- Breadboard https://amzn.to/3wD1RBw
- Jumper wires https://amzn.to/3wD1RBw
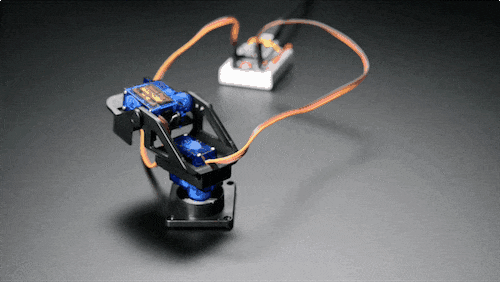
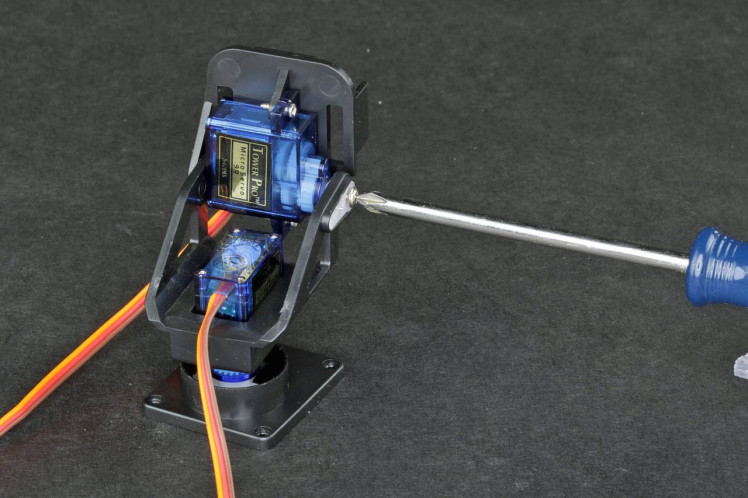
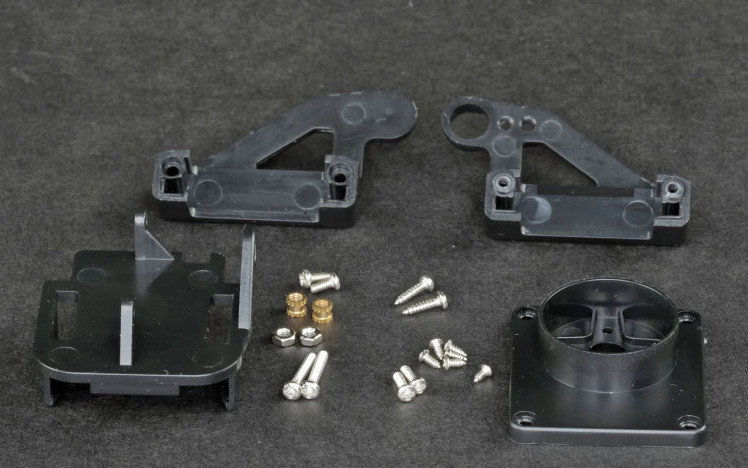
This fully-assembled pan-tilt kit is an excellent way to give your project the greatest range of motion with two servos.
The pan-tilt can rotate around 180° from side to side and can tilt up and downwards near 150°. It also comes fully assembled with two Micro Servos (SG-90 type) included and a 38mm x 36mm space to mount a camera.
You can use any microcontroller. They are suitable for beginners who want to make things move and the pan-tilt is an effortless way to give whatever you are making both left, right, and up-down motions.
Servo motors have three wires with different colors:
Step 3: ESP32 Cam ModuleThe ESP32-CAM is a development board with a built-in camera. It is based on the ESP32 chip and can be used to take high-quality still images and video. The ESP32-CAM can be interfaced with a variety of sensors and peripherals to create a powerful camera system.
We ESP32-CAM development board to control two servos that act as a pan-tilt mechanism for a camera. We’ll first write the code to control the servos using the Arduino IDE,
For this project, we’ll be using the SG90 servos, which have a minimum pulse width of 500 microseconds and a maximum pulse width of 2500 microseconds, we’ll be using a range of 0 degrees to 180 degrees for each servo.
The servo motor is a type of electric motor that can be used to control the position of an object. Servo motors are often used in robotics applications to control the movement of a robotic arm or leg. Servo motors are also used in radio-controlled airplanes and cars to control the movement of the control surfaces.
Step 4: Wiring Diagram
The wiring diagram is very clear. You have to connect the servo motor pins with ESP32 pins as per the schematic diagram. The schematic diagram is shown above.
Connect all parts using the schematic. Use a piece of double-sided tape to attach the ESP32-CAM to the Pan/Tilt.
Step 5: Setting Up ESP32 Development Board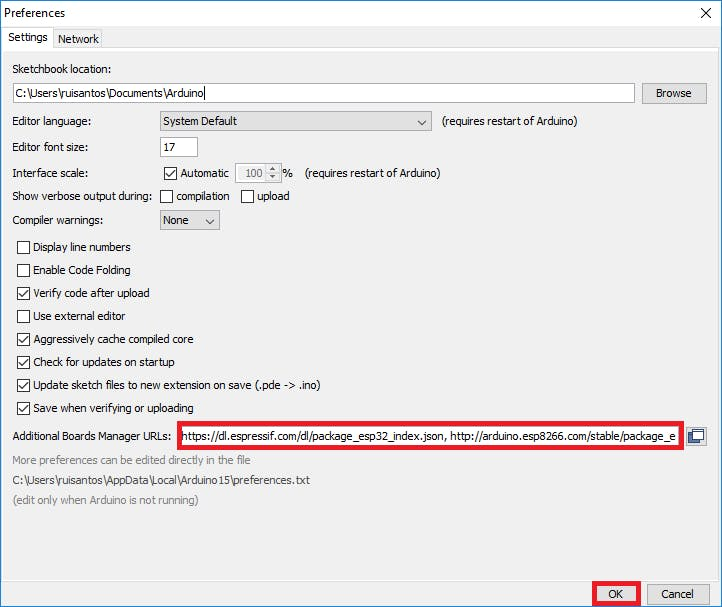
You can program the camera module using the Arduino IDE. After you have installed the development environment, you can open it to prepare you for using the camera module.
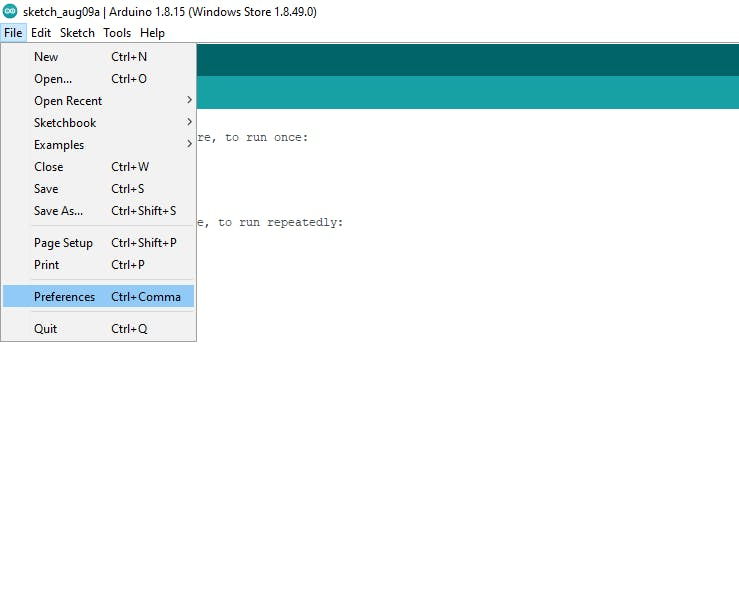
1. Start Arduino IDE and open the Preferences window.
2. Enter https://dl.espressif.com/dl/package_esp32_index. into the File>Preferences>Additional Boards Manager URLs field of the Arduino IDE. You can add multiple URLs, separating them with commas.
3. Close this window with the OK Button. Open Boards Manager from Tools > Board menu and select the correct ESP32 Cam board.
Step 6: Upload the CodeDownload the code from here
#define DUMMY_SERVO1_PIN 12 //We need to create 2 dummy servos.
#define DUMMY_SERVO2_PIN 13 //So that ESP32Servo library does not interfere with pwm channel and timer used by esp32 camera.
#define PAN_PIN 14
#define TILT_PIN 15
Servo dummyServo1;
Servo dummyServo2;
Servo panServo;
Servo tiltServo;
//Camera related constants
#define PWDN_GPIO_NUM 32
#define RESET_GPIO_NUM -1
#define XCLK_GPIO_NUM 0
#define SIOD_GPIO_NUM 26
#define SIOC_GPIO_NUM 27
#define Y9_GPIO_NUM 35
#define Y8_GPIO_NUM 34
#define Y7_GPIO_NUM 39
#define Y6_GPIO_NUM 36
#define Y5_GPIO_NUM 21
#define Y4_GPIO_NUM 19
#define Y3_GPIO_NUM 18
#define Y2_GPIO_NUM 5
#define VSYNC_GPIO_NUM 25
#define HREF_GPIO_NUM 23
#define PCLK_GPIO_NUM 22
const char* ssid = "NowISeeYou";
const char* password = "12345678";
AsyncWebServer server(80);
AsyncWebSocket wsCamera("/Camera");
AsyncWebSocket wsServoInput("/ServoInput");
uint32_t cameraClientId = 0;
#define LIGHT_PIN 4
const int PWMLightChannel = 4;
const char* htmlHomePage PROGMEM = R"HTMLHOMEPAGE(
<!DOCTYPE html>
<html>
<head>
<meta name="viewport" content="width=device-width, initial-scale=1, maximum-scale=1, user-scalable=no">
<style>
.noselect {
-webkit-touch-callout: none; /* iOS Safari */
-webkit-user-select: none; /* Safari */
-khtml-user-select: none; /* Konqueror HTML */
-moz-user-select: none; /* Firefox */
-ms-user-select: none; /* Internet Explorer/Edge */
user-select: none; /* Non-prefixed version, currently
supported by Chrome and Opera */
}
.slidecontainer {
width: 100%;
}
.slider {
-webkit-appearance: none;
width: 100%;
height: 20px;
border-radius: 5px;
background: #d3d3d3;
outline: none;
opacity: 0.7;
-webkit-transition: .2s;
transition: opacity .2s;
}
.slider:hover {
opacity: 1;
}
.slider::-webkit-slider-thumb {
-webkit-appearance: none;
appearance: none;
width: 40px;
height: 40px;
border-radius: 50%;
background: red;
cursor: pointer;
}
.slider::-moz-range-thumb {
width: 40px;
height: 40px;
border-radius: 50%;
background: red;
cursor: pointer;
}
</style>
</head>
<body align="center" >
<!--h2 >Wi-Fi Camera 🚗 Control</h2-->
<table id="mainTable" CELLSPACING=10>
<tr>
<img id="cameraImage" src="" ></td>
</tr>
<tr/><tr/>
<tr>
<td ><b>Pan:</b></td>
<td colspan=2>
<div >
<input type="range" min="0" max="180" value="90" id="Pan" oninput='sendButtonInput("Pan",value)'>
</div>
</td>
</tr>
<tr/><tr/>
<tr>
<td ><b>Tilt:</b></td>
<td colspan=2>
<div >
<input type="range" min="0" max="180" value="90" id="Tilt" oninput='sendButtonInput("Tilt",value)'>
</div>
</td>
</tr>
<tr/><tr/>
<tr>
<td ><b>Light:</b></td>
<td colspan=2>
<div >
<input type="range" min="0" max="255" value="0" id="Light" oninput='sendButtonInput("Light",value)'>
</div>
</td>
</tr>
</table>
<script>
var webSocketCameraUrl = "ws://" + window.location.hostname + "/Camera";
var webSocketServoInputUrl = "ws://" + window.location.hostname + "/ServoInput";
var websocketCamera;
var websocketServoInput;
function initCameraWebSocket()
{
websocketCamera = new WebSocket(webSocketCameraUrl);
websocketCamera.binaryType = 'blob';
websocketCamera.onopen = function(event){};
websocketCamera.onclose = function(event){setTimeout(initCameraWebSocket, 2000);};
websocketCamera.onmessage = function(event)
{
var imageId = document.getElementById("cameraImage");
imageId.src = URL.createObjectURL(event.data);
};
}
function initServoInputWebSocket()
{
websocketServoInput = new WebSocket(webSocketServoInputUrl);
websocketServoInput.onopen = function(event)
{
var panButton = document.getElementById("Pan");
sendButtonInput("Pan", panButton.value);
var tiltButton = document.getElementById("Tilt");
sendButtonInput("Tilt", tiltButton.value);
var lightButton = document.getElementById("Light");
sendButtonInput("Light", lightButton.value);
};
websocketServoInput.onclose = function(event){setTimeout(initServoInputWebSocket, 2000);};
websocketServoInput.onmessage = function(event){};
}
function initWebSocket()
{
initCameraWebSocket ();
initServoInputWebSocket();
}
function sendButtonInput(key, value)
{
var data = key + "," + value;
websocketServoInput.send(data);
}
window.onload = initWebSocket;
document.getElementById("mainTable").addEventListener("touchend", function(event){
event.preventDefault()
});
</script>
</body>
</html>
)HTMLHOMEPAGE";
void handleRoot(AsyncWebServerRequest *request)
{
request->send_P(200, "text/html", htmlHomePage);
}
void handleNotFound(AsyncWebServerRequest *request)
{
request->send(404, "text/plain", "File Not Found");
}
void onServoInputWebSocketEvent(AsyncWebSocket *server,
AsyncWebSocketClient *client,
AwsEventType type,
void *arg,
uint8_t *data,
size_t len)
{
switch (type)
{
case WS_EVT_CONNECT:
Serial.printf("WebSocket client #%u connected from %sn", client->id(), client->remoteIP().toString().c_str());
break;
case WS_EVT_DISCONNECT:
Serial.printf("WebSocket client #%u disconnectedn", client->id());
panServo.write(90);
tiltServo.write(90);
ledcWrite(PWMLightChannel, 0);
break;
case WS_EVT_DATA:
AwsFrameInfo *info;
info = (AwsFrameInfo*)arg;
if (info->final && info->index == 0 && info->len == len && info->opcode == WS_TEXT)
{
std::string myData = "";
myData.assign((char *)data, len);
Serial.printf("Key,Value = [%s]n", myData.c_str());
std::istringstream ss(myData);
std::string key, value;
std::getline(ss, key, ',');
std::getline(ss, value, ',');
if ( value != "" )
{
int valueInt = atoi(value.c_str());
if (key == "Pan")
{
panServo.write(valueInt);
}
else if (key == "Tilt")
{
tiltServo.write(valueInt);
}
else if (key == "Light")
{
ledcWrite(PWMLightChannel, valueInt);
}
}
}
break;
case WS_EVT_PONG:
case WS_EVT_ERROR:
break;
default:
break;
}
}
void onCameraWebSocketEvent(AsyncWebSocket *server,
AsyncWebSocketClient *client,
AwsEventType type,
void *arg,
uint8_t *data,
size_t len)
{
switch (type)
{
case WS_EVT_CONNECT:
Serial.printf("WebSocket client #%u connected from %sn", client->id(), client->remoteIP().toString().c_str());
cameraClientId = client->id();
break;
case WS_EVT_DISCONNECT:
Serial.printf("WebSocket client #%u disconnectedn", client->id());
cameraClientId = 0;
break;
case WS_EVT_DATA:
break;
case WS_EVT_PONG:
case WS_EVT_ERROR:
break;
default:
break;
}
}
void setupCamera()
{
camera_config_t config;
config.ledc_channel = LEDC_CHANNEL_0;
config.ledc_timer = LEDC_TIMER_0;
config.pin_d0 = Y2_GPIO_NUM;
config.pin_d1 = Y3_GPIO_NUM;
config.pin_d2 = Y4_GPIO_NUM;
config.pin_d3 = Y5_GPIO_NUM;
config.pin_d4 = Y6_GPIO_NUM;
config.pin_d5 = Y7_GPIO_NUM;
config.pin_d6 = Y8_GPIO_NUM;
config.pin_d7 = Y9_GPIO_NUM;
config.pin_xclk = XCLK_GPIO_NUM;
config.pin_pclk = PCLK_GPIO_NUM;
config.pin_vsync = VSYNC_GPIO_NUM;
config.pin_href = HREF_GPIO_NUM;
config.pin_sscb_sda = SIOD_GPIO_NUM;
config.pin_sscb_scl = SIOC_GPIO_NUM;
config.pin_pwdn = PWDN_GPIO_NUM;
config.pin_reset = RESET_GPIO_NUM;
config.xclk_freq_hz = 20000000;
config.pixel_format = PIXFORMAT_JPEG;
config.frame_size = FRAMESIZE_VGA;
config.jpeg_quality = 10;
config.fb_count = 1;
// camera init
esp_err_t err = esp_camera_init(&config);
if (err != ESP_OK)
{
Serial.printf("Camera init failed with error 0x%x", err);
return;
}
if (psramFound())
{
heap_caps_malloc_extmem_enable(20000);
Serial.printf("PSRAM initialized. malloc to take memory from psram above this size");
}
}
void sendCameraPicture()
{
if (cameraClientId == 0)
{
return;
}
unsigned long startTime1 = millis();
//capture a frame
camera_fb_t * fb = esp_camera_fb_get();
if (!fb)
{
Serial.println("Frame buffer could not be acquired");
return;
}
unsigned long startTime2 = millis();
wsCamera.binary(cameraClientId, fb->buf, fb->len);
esp_camera_fb_return(fb);
//Wait for message to be delivered
while (true)
{
AsyncWebSocketClient * clientPointer = wsCamera.client(cameraClientId);
if (!clientPointer || !(clientPointer->queueIsFull()))
{
break;
}
delay(1);
}
unsigned long startTime3 = millis();
Serial.printf("Time taken Total: %d|%d|%dn",startTime3 - startTime1, startTime2 - startTime1, startTime3-startTime2 );
}
void setUpPinModes()
{
dummyServo1.attach(DUMMY_SERVO1_PIN);
dummyServo2.attach(DUMMY_SERVO2_PIN);
panServo.attach(PAN_PIN);
tiltServo.attach(TILT_PIN);
//Set up flash light
ledcSetup(PWMLightChannel, 1000, 8);
pinMode(LIGHT_PIN, OUTPUT);
ledcAttachPin(LIGHT_PIN, PWMLightChannel);
}
void setup(void)
{
setUpPinModes();
Serial.begin(115200);
WiFi.softAP(ssid, password);
IPAddress IP = WiFi.softAPIP();
Serial.print("AP IP address: ");
Serial.println(IP);
server.on("/", HTTP_GET, handleRoot);
server.onNotFound(handleNotFound);
wsCamera.onEvent(onCameraWebSocketEvent);
server.addHandler(&wsCamera);
wsServoInput.onEvent(onServoInputWebSocketEvent);
server.addHandler(&wsServoInput);
server.begin();
Serial.println("HTTP server started");
setupCamera();
}
void loop()
{
wsCamera.cleanupClients();
wsServoInput.cleanupClients();
sendCameraPicture();
//Serial.printf("SPIRam Total heap %d, SPIRam Free Heap %dn", ESP.getPsramSize(), ESP.getFreePsram());
}Install the Camera Module Mount the cam module with pan-tilt
insert your SD card into the cam’s slot, push that little piece of rubber back in, power the camera up by sliding the switch on the rear, and find its unique IP camera web-server.
Now you will be able to see the live video on the Smartphone.
I am super happy with the final outcome of this little gadget. You may gift this little gadget to someone on any occasion
Be the First to Share
Schematics, diagrams and documents
Code
Credits
Related products


Leave your feedback...