
Control Insteon Lights Wirelessly Using Motion Detection!

Made by Dillon1337 / Environmental Sensing / Fire & Pyrotechnics / Lights / Sensors
About the project
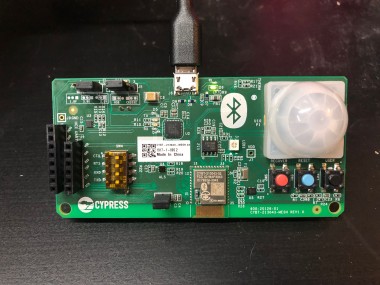
This project will use the EZ-BT Bluetooth Mesh Development Kit with one board located in each room to monitor. The motion sensor detects when someone enters the room and turns on the light. After motion is not detected for a defined period, the lights automatically turn off.
Project info
Difficulty: Easy
Platforms: Cypress
Estimated time: 2 hours
License: GNU Lesser General Public License version 3 or later (LGPL3+)
Items used in this project
Hardware components

Story
My house uses Insteon Remote Control Switches in nearly every room. I can automate some things based on time, but besides that, I'd have to manually press the switch as I walk into and leave the room (how historic!). This project ditches that manual work and uses Bluetooth Mesh sensors in each room to detect motion and alert the hub if the lights should be turned on or off.
All of my code in posted in my Github here: https://github.com/dwaq/Code-Examples-BT-SDK-for-ModusToolbox. This code is a fork of the main code examples repo, but I removed all of the code that isn't used, and added some Python scripts to read the status and control the lights. I did not have to modify any of the code that runs on the Cypress devices. My Python code gathers the data and does all of the hard work.
Here's a video of the Mesh remote sensor (see the green light on the far wall?) detecting my motion and automatically turning on the room's lights.
Now here's a step by step guide to run the project yourself:
- Download and install ModusToolbox 1.1 IDE and BTSDK 1.3 (I see that BTSDK is at 1.4 now, but I used 1.3)
- Clone or download my code (git clone https://github.com/dwaq/Code-Examples-BT-SDK-for-ModusToolbox.git)
- Import the mesh provision client into ModusToolbox (/apps/snip/mesh/mesh_provision_client) (this document can help you through this process)
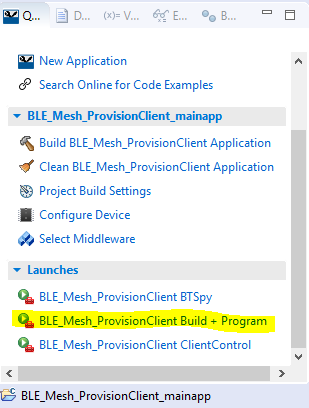 Build and program this code to one device. This will be the device that sets up all the others and remains connected to your computer. I'm using a Windows computer for this project.
- Open MeshClientControl.exe (located here if you installed to the default location: C:ModusToolbox_1.1librariesbt_sdk-1.1componentsBT-SDKcommonappssnipmeshClientControlReleaseClientControlMesh.exe)
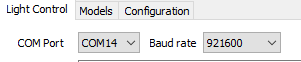
- Find your device's serial port in Device Manager (use the one called HCI UART).

- Open that com port in MeshClientControl at 921600 baud
 Create a new network (name and then hit create - only need to do this once). Then click open. Any time you open the app, you have to open your network. MAKE SURE YOU HIT "CLOSE" BEFORE CLOSING THE APP OR YOUR DATA WILL GET CORRUPTED. I had a ton of issues where things just stopped working but ever since I was careful to close the network before closing the app, it's been fine.
- If the trace shows "network opened" and "done" then it is successful.

- Close the network, close the app, and unplug the device. We're going to program the remote sensor now.
- Plug in another MESH dev board and import the SensorMotion app (/apps/demo/mesh/sensor_motion) and build + program that board.
- Plug in the provisioning device again and open MeshClientControl. Open the network you created before.
 Click "Scan Unprovisioned" and the Motion Sensor should pop up. Then hit "Stop Scanning" and then "Provision and configure". It will end up with some text like this if its successful:
- Now we configure the Motion Sensor to send its status every 5 minutes. Enter "320000" into the Publish period text box and set device to send SENSOR status to all nodes and then click Configure Publication.
 (This file explains why you need that number and how the code operates)
 - Now you can unplug your Motion Sensor from your PC and place it in the room you want to monitor. Right now, I only have it working via USB power, but it should be easy to configure to make it battery powered with the low power mode settings. The mesh network is now completely set up and working. Let's move to the Python scripts.
- I'm using Python 3.7 on Windows, so install that if you don't have it.
- Let's install the Python code for the Insteon communication. git clone https://github.com/phareous/insteonlocal THEN cd insteonlocal THEN pip install . (that period is important)
- Next we need to set up the code to talk to your device. Copy config.py.example to config.py and update the host/user/pass to your own hub's information. Go to http://connect.insteon.com/getinfo.asp to get the IP address. The user and password is the information from the bottom of the hub (not your Insteon login information!).
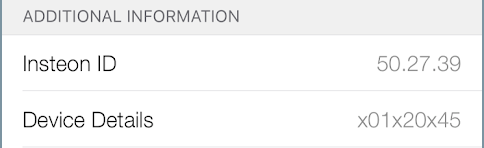
- Use the Insteon app on your phone to get the Insteon device address you want to control. Go to Settings -> Devices -> Edit Device -> Insteon ID (don't use the dots) and put that address in the config.py.
- To test that the Insteon control works, you can run it by typing `python control-insteon.py 100`. You can change the number to anything from 0-100 to set the brightness level accordingly.
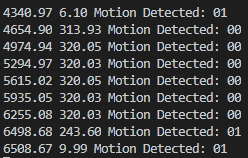
- Now we can run the `sensor.py` which does all the fun stuff. First you'll need to change the serial port number on line 8 to the device's Peripheral UART (shown earlier at step 6). In a nut shell, the code reads the debug data from the provision client's port and parses it and sets the light based on the property ID. When you run the code, you'll see that each line is two numbers and the parsed data. The first number is the amount of time since you started the script and the next number is the time between each message. Constant motion sends a message every 10 seconds. No motion updates every 320 seconds (~5 minutes, just like we set before!). The final piece of data is 00 for no motion and 01 for motion detection. Here's an example of the data when I run it:
That's it! I did all the hard work for you so it's really as simple and downloading the code and running it appropriately. Keep the sensor.py code running and you'll always have motion detection!
You may notice that my sensor.py code also deals with temperature readings (but it's commented out). Follow the same steps above but use the temperature sensor (/apps/demo/mesh/sensor_temperature) instead of the motion sensor and you can collect some remote temperature data.
Also note that I only have this working with one remote sensor of each type. It's definitely possible to change the code to support multiple of the same type of sensor (and tell between them), but I have not implemented it because there's only one room in my house where motion detection makes sense.

Leave your feedback...