

Bring Your Hand Puppet To Life With Hexabitz Modules

Made by Aula_Jazmati / Art / Games & Gaming / Kids & Family / Music / Voice
About the project
In this project, bring your hand puppet to life with Hexabitz modules.
Project info
Difficulty: Easy
Platforms: DFRobot, STMicroelectronics
Estimated time: 1 hour
License: MIT license (MIT)
Items used in this project
Hardware components

Story
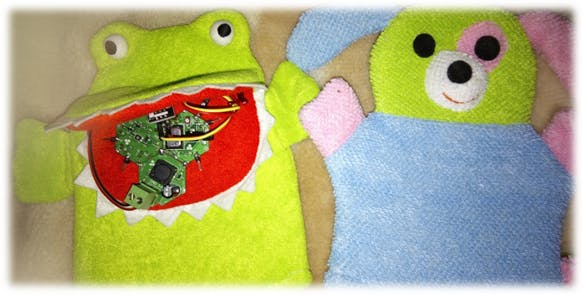
Hand puppets are a great project for children, and Puppet Theater can be a lot of fun too.
In this project, bring your hand puppet to life with Hexabitz modules.
We will see using Mercury Tilt switch to activate Audio Speaker Hexabitz Module and RGB Led Hexabitz Module. Put your hand inside the puppet, start practicing working the arms and head of the puppet and see the results.
Tools:
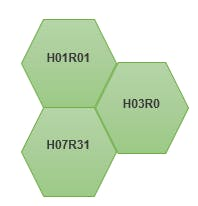
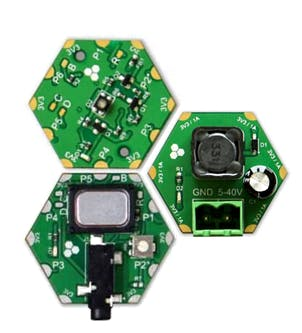
1. RGB Led Hexabitz Module (H01R01).
2. Mercury Tilt switch.
3. Audio Speaker Module (H07R31).
4. FTDI USB to UART Serial cable.
5. DC-DC power module (H03R0).
Note:
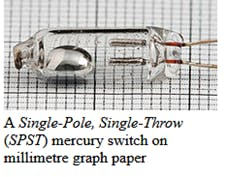
Mercury switches have one or more sets of electrical contacts in a sealed glass envelope that contains a small quantity of mercury. The envelope may also contain air, an inert gas, or a vacuum. Gravity constantly pulls the drop of mercury to the lowest point in the envelope. When the switch is tilted in the appropriate direction, the mercury touches a set of contacts, thus completing an electrical circuit. Tilting the switch in the opposite direction moves the mercury away from that set of contacts, breaking that circuit. The switch may contain multiple sets of contacts, closing different sets at different angles, allowing, for example, single-pole, double-throw (SPDT) operation
Warnings:
Mercury compounds are highly toxic and accumulate in any food chain, so you should put the switch in a small plastic case or you can use Metal Ball Tilt Switch Sensor.
Step 1- Make a Hand Puppet
Use these links to learn how to make hand puppet.
1- https://www.wikihow.com/Make-a-Hand-Puppet
2- https://www.handmadecharlotte.com/7-diy-sock-puppets/
3- https://www.sesamestreet.org/parents/topicsandactivities/crafts/sockpuppet

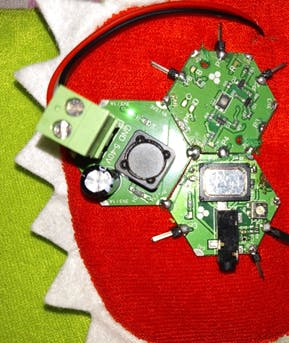
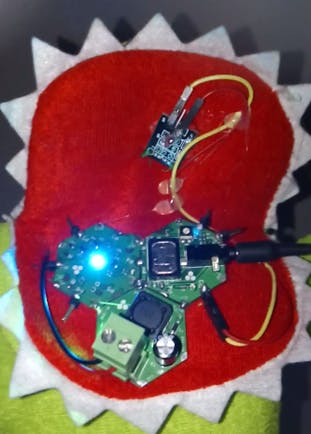
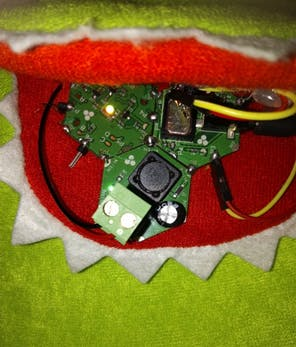
Step 2 - Plan the array and assemble the hardware
We plan our array design by aligning modules side-by-side. Then we solder the modules together.

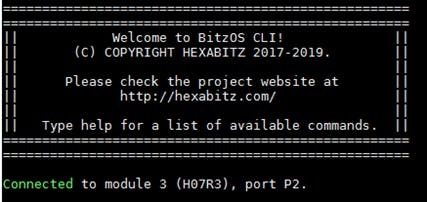
Step 3 - CLI Connection
1. Install MobaXtrem from here for Windows OS.
2. Connect the FTDI USB to UART Serial cable to the USB hub.
3. Connect the red wire of the FTDI cable to H07R31 module power port top side.
4. Connect the black wire of the FTDI cable to H07R31 module power port bottom side.
5. Connect the yellow wire of the FTDI cable to module port P2 top side.
6. Connect the orange wire of the FTDI cable to module port P2 bottom side.
7. You should see a single red indicator LED blink on the modules.
8. Press enter in the Commands window, you should see BOS CLI welcome message. You can use backspace if you misspell a letter.
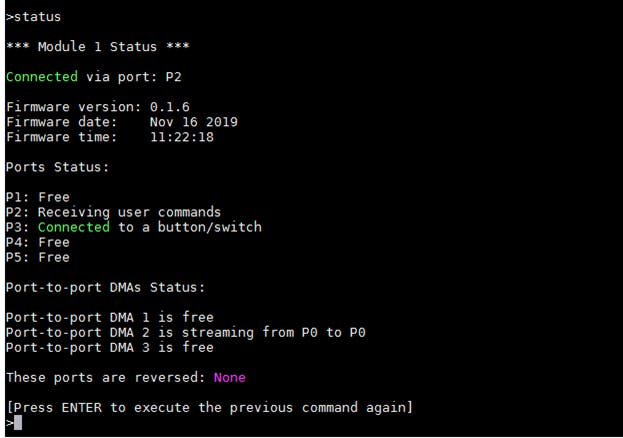
9. Type status to view a report on module ports, firmware, etc.
10. Type add-button momentary-no p3.
11. Type status again and you will see the added button.
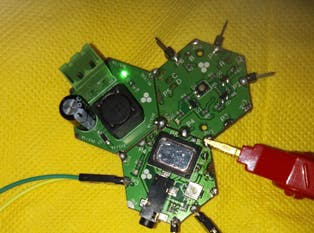
12. Connect the reed sensor to p3 ports.
Step 4 - Array Exploration:
1. Connect to H07R31 module and type explore, the modules start discovering each other and building their array topology.
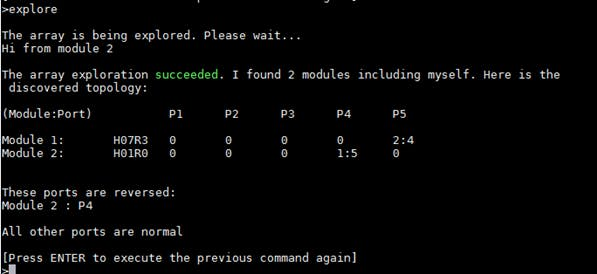
2. Type all.ping, both module will ping.

3. The array topology is stored permanently. If you power cycle, the modules keep their topology and show multiple blinks.

Note:
Type default array to remove the topology and restore native firmware when you decided start a new project.
4. Enable array response with:
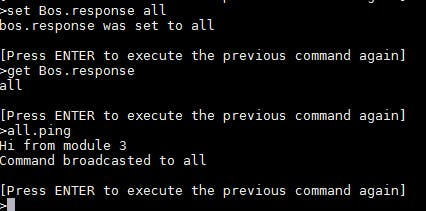
5. Then try sending command to Modules and seeing the result.
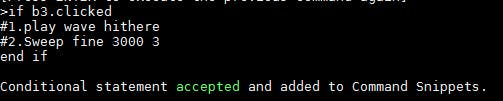
Step 5 - Command Snippets:
Type the following commands each on a separate line followed by pressing enter.
You can choose any wave file or RGB colors to activate it when the mouth of puppet moving:
Test the hand puppet by moving mouth and notice what it will say.
or
Notes:
· To play a musical wave file type this command:
play wave file
· Type this command to list embedded WAVE files:
list
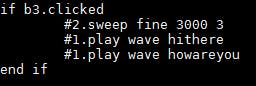
· Type snip, to view the list of Command Snippets, then type del-snip 1 to delete Snippet 1. Snippets and button settings are stored permanently. If you power cycle the module, they are still there.
· You can also activate and deactivate (pause) a Snippet without deleting it.
Step 6: Attaching the Battery
· Using DC-DC power module (H03R0) with 9V battery to power your system.
· Note that it's better to write Command Snippets using power from USB cable connection without DC-DC power module (to avoid power confusion and reset states). Once done, you can insert the batteries and then remove the USB cable.


Step 7 – Test the system:
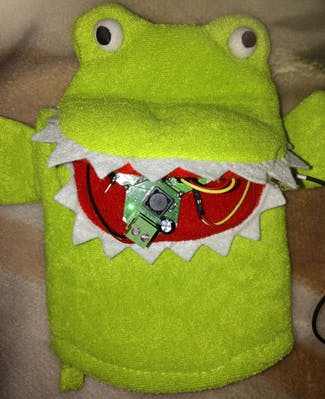
Put your hand inside the puppet, start practicing working the arms and head of the puppet and see the results.
This bright and interactive puppet will provide hours of fun for the family. With adorable detail such as a moving mouth, the crocodile puppet with Hexabitz modules really be nice when children use it to stage their very own puppet shows.

Note:
· You can use potentiometer to adjust audio level.
· You can use headphone stereo audio jack to High audio level.
Schematics, diagrams and documents
Code
Credits
Related products


Leave your feedback...