
Blink A Led With Esp32 And Micropython

Made by feiticeir0 / Environmental Sensing / Home Automation / IoT
About the project
Learn some basics of MicroPython by blinking an LED. Learn how to upload MicroPyhon to your ESP32 and where to seek help
Project info
Difficulty: Easy
Platforms: MicroPython
Estimated time: 1 hour
License: GNU General Public License, version 3 or later (GPL3+)
Items used in this project
Story
To those who like Python and IOT, MicroPython is the marrying of both worlds.
I'll show how to use MicroPython and ESP32 to start making something interesting.
MicroPython
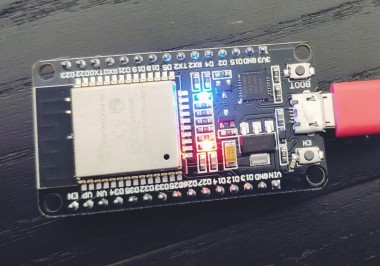
First, we need to put MicroPython into the ESP32 so we can program it and blink the ONBOARD LED .
For more information and a quick MicroPython reference in ESP32, just go here:
http://docs.micropython.org/en/latest/esp32/quickref.html
To put MicroPython into the ESP32, we need a small utility called esptool.py . You can install it using your distro package manager or you can get it in GitHub.
https://github.com/espressif/esptool
If you're using windows, just install python (you can download it from Python.org) for Windows. After that, just install esptool using pip
- pip3.7.exe install esptool
- PS I:> pip3.7.exe install esptool
- Collecting esptool
- Using cached https://files.pythonhosted.org/packages/68/91/08c182f66fa3f12a96e754ae8ec7762abb2d778429834638f5746f81977a/esptool-2.8.tar.gz
- Collecting pyserial>=3.0 (from esptool)
- Using cached https://files.pythonhosted.org/packages/0d/e4/2a744dd9e3be04a0c0907414e2a01a7c88bb3915cbe3c8cc06e209f59c30/pyserial-3.4-py2.py3-none-any.whl
- Collecting pyaes (from esptool)
- Using cached https://files.pythonhosted.org/packages/44/66/2c17bae31c906613795711fc78045c285048168919ace2220daa372c7d72/pyaes-1.6.1.tar.gz
- Collecting ecdsa (from esptool)
- Using cached https://files.pythonhosted.org/packages/b8/11/4b4d30e4746584684c758d8f1ddc1fa5ab1470b6bf70bce4d9b235965e99/ecdsa-0.15-py2.py3-none-any.whl
- Collecting six>=1.9.0 (from ecdsa->esptool)
- Using cached https://files.pythonhosted.org/packages/65/26/32b8464df2a97e6dd1b656ed26b2c194606c16fe163c695a992b36c11cdf/six-1.13.0-py2.py3-none-any.whl
- Installing collected packages: pyserial, pyaes, six, ecdsa, esptool
- Running setup.py install for pyaes ... done
- Running setup.py install for esptool ... done
- Successfully installed ecdsa-0.15 esptool-2.8 pyaes-1.6.1 pyserial-3.4 six-1.13.0
- WARNING: You are using pip version 19.2.3, however version 19.3.1 is available.
- You should consider upgrading via the 'python -m pip install --upgrade pip' command.
It gives a warning about upgrading pip - just execute the command given to upgrade - change python to python3.7.exe
Versions
There are two versions of MicroPython
- version 3.x with LAN and PPP support, but no bluetooth
- version 4.x with bluetooth, but without LAN and PPP
Since we're not going to use bluetooth, just download (at least when writing this) version esp32-idf3-20191220-v1.12.bin
If you want to learn more, head here and read about both versions:
http://micropython.org/download#esp32
If this is the first time you're putting MicroPython into the ESP32, a flash erase is needed.
- esptool.py --chip esp32 --port /dev/ttyUSB0 erase_flash
- feiticeir0@nightcrawler ~ $ esptool.py --port /dev/ttyUSB0 erase_flash
- esptool.py v2.1
- Connecting........___
- Detecting chip type... ESP32
- Chip is ESP32D0WDQ6 (revision 1)
- Uploading stub...
- Running stub...
- Stub running...
- Erasing flash (this may take a while)...
- Chip erase completed successfully in 3.8s
- Hard resetting...
Using windows (check your COM port):
- esptool.py.exe --chip esp32 --port COM3 erase_flash
- esptool.py v2.8
- Serial port COM3
- Connecting........_____....._____....._____....._____....._____....
- Chip is ESP32D0WDQ6 (revision 1)
- Features: WiFi, BT, Dual Core, Coding Scheme None
- Crystal is 40MHz
- MAC: 30:ae:a4:8d:da:80
- Uploading stub...
- Running stub...
- Stub running...
- Erasing flash (this may take a while)...
- Chip erase completed successfully in 4.0s
- Hard resetting via RTS pin...
Note: If it is taking a while to connect, just press the boot button until it does.
Next, flash it with MicroPython (remember were you downloaded it)
- esptool.py --chip esp32 --port /dev/ttyUSB0 write_flash -z 0x1000 esp32-idf3-20191220-v1.12.bin
- feiticeir0@nightcrawler ~/Downloads $ esptool.py --chip esp32 --port /dev/ttyUSB0 write_flash -z 0x1000 esp32-idf3-20191220-v1.12.bin
- esptool.py v2.1
- Connecting........_
- Chip is ESP32D0WDQ6 (revision 1)
- Uploading stub...
- Running stub...
- Stub running...
- Configuring flash size...
- Auto-detected Flash size: 4MB
- Compressed 1247280 bytes to 787794...
- Wrote 1247280 bytes (787794 compressed) at 0x00001000 in 69.6 seconds (effective 143.5 kbit/s)...
- Hash of data verified.
- Leaving...
- Hard resetting...
- feiticeir0@nightcrawler ~/Downloads $
If using windows:
- PS C:UsersbvsantosDownloads> esptool.py.exe --chip esp32 --port COM3 --baud 460800 write_flash -z 0x1000 .esp32-idf3-20191220-v1.12.bin
- esptool.py v2.8
- Serial port COM3
- Connecting........__
- Chip is ESP32D0WDQ6 (revision 1)
- Features: WiFi, BT, Dual Core, Coding Scheme None
- Crystal is 40MHz
- MAC: 30:ae:a4:8d:da:80
- Uploading stub...
- Running stub...
- Stub running...
- Changing baud rate to 460800
- Changed.
- Configuring flash size...
- Auto-detected Flash size: 4MB
- Compressed 1247280 bytes to 787794...
- Wrote 1247280 bytes (787794 compressed) at 0x00001000 in 18.4 seconds (effective 541.2 kbit/s)...
- Hash of data verified.
- Leaving...
- Hard resetting via RTS pin...
Everything running smoothly, you should have MicroPython installed.
More information, just go here:
http://docs.micropython.org/en/latest/esp32/tutorial/intro.html#esp32-intro
MicroPython
To write your first MicroPython code, let's connect to the board. As soon we connect, we're presented with REPL (Read Evaluate Print Loop), which is the name given to the interactive MicroPython prompt.
To connect, we need a USB cable to connect the ESP32 board to the computer. Next, let's use minicom to connect to the board
- minicom /dev/ttyUSB0
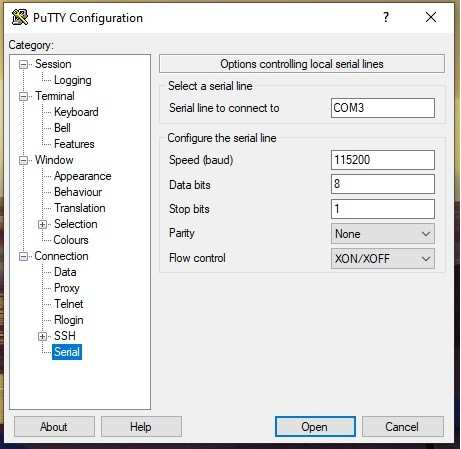
MicroPython uses 115200 bauds , 8 data bits and 1 stop bit. Configure minicom accordingly.
- Welcome to minicom 2.7
- OPTIONS: I18n
- Compiled on Oct 5 2019, 16:48:25.
- Port /dev/ttyUSB0, 23:42:48
- Press CTRL-A Z for help on special keys
- >>>
If you're using another SO, Putty also does a great job
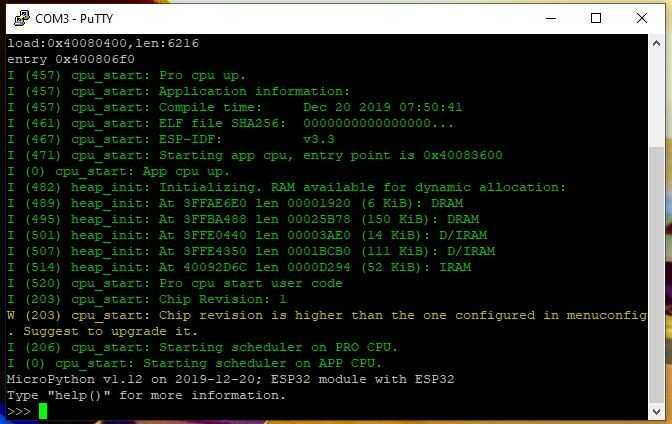
Now in the prompt, we can write an small Python program like in the Python interpreter
- >>> import machine
- >>> import time
- >>> led = machine.Pin(2, machine.Pin.OUT)
- >>> while True:
- ... led.value(1)
- ... time.sleep(1)
- ... led.value(0)
- ... time.sleep(1)
- ...
- ...
- ...
NOTE: The >>> are from the REPL. The .... and spaces are inserted automatically when indenting the code inside the while loop. To exit, just press <enter> several times until the LED starts to blink - your app will look like its hang.. It is not. Just press Ctrl+C to exit.
Here's the result:
Code execution
MicroPython does not work like Arduino code about code execution. If you turn the ESP32 off, and turn it back on again, the program you've writen will not be executed - it even doesn't exist anymore.
MicroPython has a small filesystem to where you can copy files.
Here's how, using Adafruit's ampy program. (listing filesystem contents)
- feiticeir0@nightcrawler ~ $ ampy -p /dev/ttyUSB0 ls
After booting, the ESP32 with MicroPython will execute 2 files - boot.py and main.py, by this order. If boot.py exists, it´s executed first and then main.py.
If you want something to be executed at boot, put the code in main.py or boot.py
To execute the above code every time the ESP32 turns on, we should put the above code in a file named main.py or boot.py and copy it to the ESP32
- vi main.py
- import machine
- import time
- led = machine.Pin(2, machine.Pin.OUT)
- while True:
- led.value(1)
- time.sleep(1)
- led.value(0)
- time.sleep(1)
Now, copy the file to the ESP32:
- ampy -p /dev/ttyUSB0 put main.py
Now, turn your ESP32 off and turn it back on again and see that the ONBOARD LED starts to blink.
You know now have an idea on how MicroPython works in the ESP32. Look around, find more MicroPython resources and explore.
Credits
feiticeir0
Linux and Raspberry PI lover!Systems Administrator, programmer, kind of a Nerd! Love to create things that may or not work, but could save the world someday ! ?
Related products


Leave your feedback...