
Use Visual Studio Code For Your Particle Development Needs

Made by gusgonnet / Home Automation
About the project
Use this lightweight, cross-platform editor while developing Particle software.
Items used in this project
Hardware components

Story
2018 UPDATE
Starting with version 1.27.2, Visual Studio Code deprecated the use of tasks 0.1.0 and hence the scripts described here did not work anymore. I fixed that now.
Thanks to Randy for the heads up.
Story
In this article I will show you how to use Visual Studio Code for coding, building and flashing your Particle projects.
Why
I think it was the Hackster bounty to install Visual Studio Code that got me started with it. I remember falling in love with it the first time I ran it. Its dark theme, the distribution of the panels, and the great looks in general.
Anyhow, lately I've been using it more and more for my scripting needs and wondered if I could use it for developing my IoT projects, for which I used Atom most of the time (since I prefer to code on my laptop, not a browser).
It turns out I can, and I will show you how I did it here.
Note: I'm pretty sure one would be able to do the same thing I describe here in the Atom editor, but I did not explore that option.
Advantages
These are the advantages I see:
- code completion and navigation by installing the C/C++ and Arduino extensions in VS Code
- better information during the build process (since we will be using Particle CLI to build)
- easier to identify problems, since a problem matcher mechanism in VS Code will point us exactly to where are the issues in the code
Sometimes when you write some faulty code in Particle Dev and build it, the error you get back is insufficient for finding the root cause, specially when the error is in a library (or a missing library). Some people prefer to use the Particle CLI for building your projects in order to get better information back from the compiler when errors happen, so this is exactly what I did in VS Code with the help of a Task Runner.
Atom and VS Code - One happy family
Particle's recommended editor is Particle Dev, no surprise there. Particle Dev is based on Atom, which in turn is based on Electron. VS Code is also based on Electron.
This means both will take around the same time to start. This also means VS Code won't start as fast as SublimeText.
Prerequisites
It is always a good idea to stay up to date with the Particle CLI, specially when you are about to use it more intensively than ever with VS Code.
So please consider updating it:
npm install -g particle-cli
Setup
Install VS Code by following the instructions here.
You will need to install Particle CLI, if you don't have it already. There is a Windows installer here, or follow the instructions here if you are a Mac or Linux user. Don't forget to log in with your Particle's credentials as explained here.
Once installed, execute VS Code from the command line providing a project path. Example:
$ code /home/gustavo/myParticleProject
This will open VS Code and load all the files under the path provided.
Install the C/C++ and Arduino Extensions
Install the C/C++ extension for VS Code as described in the Getting Started section of this page.
While at it, don't forget to configure the c_cpp_properties.json file to enable code completion and navigation. Look at the same Getting started section.
Also install the Arduino Support for VS Code (from Steve Yin) and the Arduino extension for Visual Studio Code (from moozzyk). Now I'm not sure which one helps the most, but my setup runs smooth with both.
Configure the build and flash tasks
Again, in the same Getting Started section, generate a tasks.json file. Once the file pops up in your workspace, modify it to look like this:
{
   // See https://go.microsoft.com/fwlink/?LinkId=733558
   // for the documentation about the tasks.json format
   "version": "2.0.0",
   "tasks": [
       {
           "label": "Build Particle firmware",
           "type": "shell",
           "command": "particle",
           "windows": {
               "command": "particle"
           },
           "args": [
               "compile",

               // choose here your hardware
               // "duo",
               "photon",
               // "electron",
               // "bluz",

               "${workspaceRoot}",
               "--saveTo",
               "${workspaceRoot}/firmware.bin"
           ],
           "group": "build",
           "presentation": {
               "reveal": "always",
               "panel": "new"
           },
           "problemMatcher": {
               "owner": "cpp",
               "fileLocation": ["relative", "${workspaceRoot}"],
               "pattern": {
                   "regexp": "^(.*?):(\d+):(\d+):\s+(warning|error|fatal error):\s+(.*)$",
                   "file": 1,
                   "line": 2,
                   "column": 3,
                   "severity": 4,
                   "message": 5
               },
               "severity":"error"
           }
       },
       {
           "label": "Flash Particle firmware",
           "type": "shell",
           "command": "particle",
           "windows": {
               "command": "flash"
           },
           "args": [
               "flash",

               // use hardware name for cloud flashing
               // use --usb for usb flashing
               "myParticleDeviceIdOrName",
               // "--usb",

               "firmware.bin"
           ],
           "group": "test",
           "presentation": {
               "reveal": "always",
               "panel": "new"
           }
       }
   ]
}
Things to adapt to your environment:
- "photon" with your Particle hardware (I think options are core, photon, electron, bluz, duo)
- "myParticleDeviceIdOrName" with your Particle's photon/Electron/Core/BluzDK/Duo name or Id
Flashing via USB: the way things are configured so far, you would be using the Particle Cloud to compile and flash. In case you want to build in the cloud but flash a Particle connected to your computer via usb, the "flash" task above would need to be changed. Usb flashing requires changing the parameter "myParticleDeviceIdOrName" to "--usb". Here are the docs.
Code formatting, building and flashing
Now you have access to these features:
1- Format your code with right click -> Format Code.
2- Build it by hitting Ctrl+Shift+B. The output panel will be shown at the bottom of your editor. You can toggle it on and off with Menu -> View -> Output or using its shortcut Ctrl+K Ctrl+H.
3- Flash your firmware by hitting Ctrl+P, then entering task and space, then selecting flash from the list.
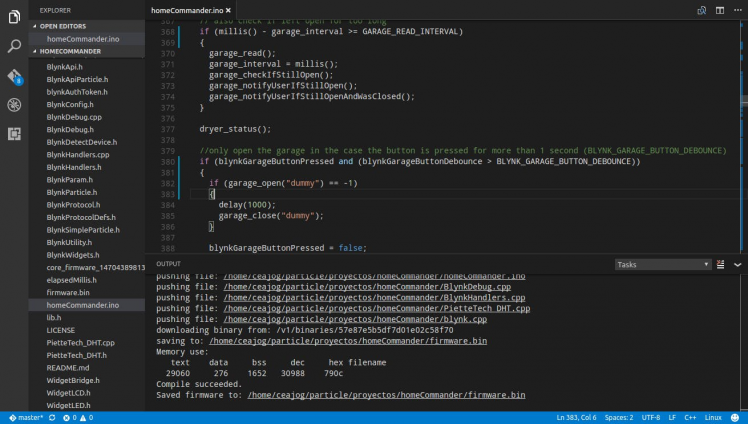 Here we see VS Code just built my project
NOTE for Electron users only: if you find that CLI gives you a warning and that blocks the flash, see picture below, please follow the instructions here to fix it (Thanks Chrissy for the tip!)
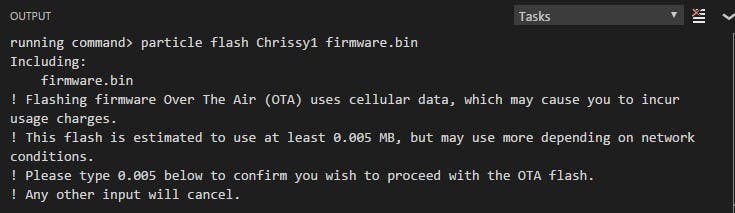 Flashing an Electron from VS Code can be tricky sometimes
Error reporting
Errors in your code are flagged right after you build, in this way:
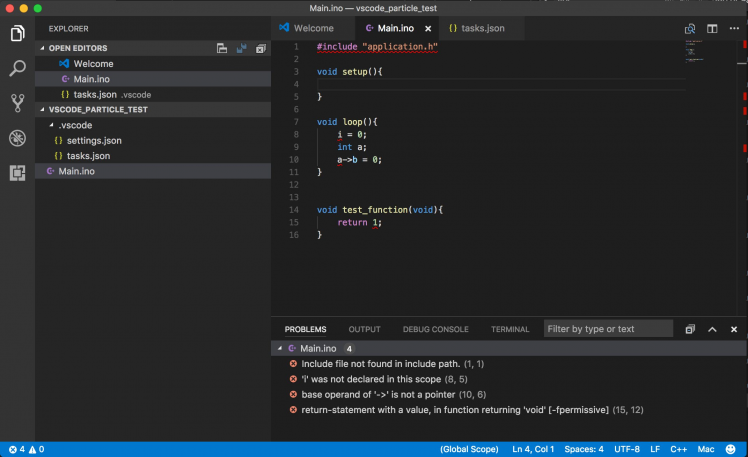 VS Code reporting errors in our code
Thank you Andrew for the tip!
Additional tips and tricks
1- Open an integrated Terminal: Hit CTRL + ` or Menu->View->Toggle Integrated Terminal
2- Install this Arduino extension for syntax highlighting in .ino files (thanks to Joachim for the tip)
3- You can flash via the Particle Cloud or usb. Check out the note in the section "Configure the flash task" (thanks to Laurence HR for proposing this)
Conclusion
Hope you find value in this article. Feel free to respect it and/or check my other projects here.
Leave a comment below if you struggle with something, maybe we can figure it out together.
Gustavo.
Need help?
If you require professional help with your projects, don't hesitate to write me a line about your needs at gusgonnet@gmail.com. Thank you!
Leave your feedback...