
Solar-powered Tinyml Bird Feeder!

Made by justin-lutz / Animals / Artificial intelligence / IoT
About the project
Use an ESP-32 Cam and an Edge Impulse model to take photos of your avian friends visiting your solar-powered bird feeder!
Project info
Difficulty: Moderate
Platforms: Adafruit, Edge Impulse, Espressif
Estimated time: 1 day
License: MIT license (MIT)
Items used in this project
Hardware components

View all
Story
Solar-power bird feeder camera!

Solar-power bird feeder camera!
For Christmas, my daughter received a "Build your own Bird Feeder" from her grandfather. I thought it would be a fun project to make a solar powered bird feeder camera so she could see the birds in her bird feeder! I've seen some image recognition bird feeder projects on here before, but they were with pretty hefty Raspberry Pi SBCs and hard-wired for power. I figured I would give it a shot with a solar-powered version with a lower-powered MCU. And with me being more and more comfortable with Edge Impulse, I figured I could add some image recognition as well! As usual, I ran into some hiccups, but overall I'm happy with how the project turned out.
The project started with my 5 year old building, drawing on, and decorating the bird house. You can see her finished product in the above photo. Once her masterpiece was complete, I took over.
I had a 1W solar panel, plus the solar charger, the Powerboost, and a 2500 mAh 3.7V battery lying around. I also had a ESP32 Cam lying around as well. It's a pretty inexpensive microcontroller (~$10 with the USB adapter) but not a lot of memory (~520 kB) for image recognition models, However, it does have Wifi on it with the ESP32-S!
Since I was going to put the bird feeder a good distance from my house, I figured I needed an external WiFi antenna for the MCU to boost the WiFi range. The ESP-32 Cam had a uFL connector already, so it's just plug and play, right? Well, not so much....turns out there are 2 settings for the antenna: the default on-board antenna (with 0 Ohm resistor) and the external antenna.
The 2 settings for the ESP-32 CAM. This is reaaaallllyyyy small.

The 2 settings for the ESP-32 CAM. This is reaaaallllyyyy small.
Random Nerd Tutorials has a great tutorial on how to set up the external antenna that I followed. With my rudimentary equipment (soldering iron with standard tip, no magnification) it was a PAIN to remove the resistor and put in the solder bridge between the two pads for the external antenna. The image above is magnified and those pads are tiny. But I got it done! I recommend you get a fine tip for your soldering iron and a magnifying glass to do this. I found that most boards have the on-board antenna as the default setting so you will have to do this if you intend to use an external antenna.
Once I had the external antenna configured and tested on the MCU, I drilled a hole in the side of the bird feeder to feed the antenna cable through to the food storage area, where I was going to put the camera. I mounted the camera using a 3D printed enclosure that I found (and had printed at my local library!) and double-sided tape to mount to one of the plastic housings of the bird feeder. Then I mounted the solar panel to the roof of the bird feeder facing south (since I am in the Northern Hemisphere).
Solar Panel mounted to the roof. You can see the antenna to the right

Solar Panel mounted to the roof. You can see the antenna to the right
I found an old plastic container lying around and put in the solar charger, the Power boost and the battery into one neat package. I cut holes in the side to feed in the connector from the solar panel and the USB cable going to the ESP-32 Cam in the bird feeder. Once I had that set up I used some double-sided tape to mount it to the bottom of the bird feeder.
I used an old plastic container I had as a housing for the battery, Power Boost, and solar charger.

I used an old plastic container I had as a housing for the battery, Power Boost, and solar charger.
Then it was time to start coding! I started with the CameraWebServer example that comes with the ESP-32 library in the Arduino IDE. I spent some time to learn how it worked, and then I slimmed it down to remove a lot of the functionality from the webserver. Basically, I wanted the ability to see a live stream of the video, perform inference on that video using an Edge Impulse model, and then save any bird photos to an SD card on the ESP32 Cam.
For the most part, the coding went pretty well. It's a little tricky to learn how the app_httpd.cpp file relates to the Arduino sketch, but the more time you spend in it, the more it makes sense. It also took me a bit to learn that the webpage for the webserver is an encoded array. I used Cyber Chef to decode the array into html, make changes, and then encode again back into hex format. It slowed me down a bit, but was able to figure it out and move forward.
I used Cyber chef to decode and encode the webserver html

I used Cyber chef to decode and encode the webserver html
Now that I had the webserver up and running, it was time to make the Edge Impulse model! I've made my project public, so you can see it here. I kept the model really simple. I downloaded a bird dataset from kaggle and filtered on birds that are common to my area. I created a dataset in Edge Impulse consisting of birds and not birds, about 1400 images in each category. I had to keep the model simple because of the memory constraints on the MCU so a binary classifier had to do. I kept the impulse in color (RGB) but I did reduce the resolution to 48x48 to keep the model smaller. Not ideal but a tradeoff I had to make.
Bird image classifier impulse

Bird image classifier impulse
I then trained for 50 epochs and the results were not too bad:
Results from training the bird classifier dataset

Results from training the bird classifier dataset
For pulling the model together pretty quickly, these are results I could live with. Also note the RAM and flash size. Small enough that it could be run on the MCU.
I then deployed the model to an Arduino library. This is where I really appreciate the Arduino ecosystem. Edge Impulse makes it easy to import the model in the form of an Arduino library. You just add it as you would any library, and then include your inference header file in the Arduino sketch. Louis Moreau from Edge Impulse has a pretty good tutorial on how to integrate an Edge Impulse model into ESP-32 Cam. I spent a lot of time digging through his code to see how it worked.
My code is kind of lengthy, so I won't put many snippets in the write-up, but you can see it on my github. But the general process flow is that an image (aka a frame buffer) is received from the ESP-32 CAM. That frame buffer is converted to RGB888 format, then resized to 48 x 48 pixels (the size that the Edge Impulse model is expecting). Once it is resized, the buffer is classified. The Edge Impulse classify code is actually really straight-forward:
//Perform Edge Impulse classification
void classify()
{
  signal_t signal;
  signal.total_length = EI_CLASSIFIER_INPUT_WIDTH * EI_CLASSIFIER_INPUT_WIDTH;
  signal.get_data = &raw_feature_get_data;

  // Feed signal to the classifier
  EI_IMPULSE_ERROR res = run_classifier(&signal, &result, false /* debug */);

  // Returned error variable "res" while data object.array in "result"
  if (res != 0) {
    Serial.printf("Error....returningn");
    return;
  }

  //bird found!
  if(result.classification[0].value > 0.8)
  {
    ei_printf("**** Bird found with %f probability! ****n", result.classification[0].value);
    jpg_sent = true;
  }
}
If a bird is found, a flag is set so the code can save the image to the SD card. And the process repeats! I have this code running for 6 hours, then I have the MCU go into deep-sleep so I can recharge the battery a bit. The ESP32 Cam runs around 1W I think (~ 310 mA @ 3.3V) and the solar panel I have is only 1W (and with loss and imperfect sun, it's probably half that as input) so I need some downtime for the battery to recharge. Below is the deep sleep code that runs in the loop() method of the Arduino sketch.
//plan would be to wakeup during daylight, stay on for a certain period of time (6 hours), then go into deep sleep at night
//wakeTime is the amount of time that the camera is awake, if this time is exceeded by the run time, go to sleep
unsigned long wakeTime = 6 * ms_TO_S_FACTOR * s_TO_HOUR_FACTOR;
if(millis() > wakeTime) {
  Serial.print("Time in ms: ");
  Serial.print(String(millis()));
  Serial.println(". Going to sleep now");
  Serial.flush();
  esp_deep_sleep_start();
}
The next area that I ran into trouble was how do I view the photos once they are stored to the SD card? Most tutorials that I saw just pulled the SD card from the ESP32 Cam and put it into a computer to see the photos. I did NOT want to go out to the bird feeder and try to remove the SD card each time I wanted to see photos. I figured there had to be a way to use Wifi to view the images in the webserver. I spent 2 nights after work trying to figure out a way that I could do it with my meager coding skills. I finally stumbled upon jameszah's ESP32 SD File Manager. It was straightforward with only a few lines to integrate into my code and it worked great. It saved me a lot of headaches with trying to create my own, so thank you James!
Once I had the webserver setup I was able to download the photos from the SD card. Success!
Snapshot of my implementation of jameszah's ESP32 SD File Manager

Snapshot of my implementation of jameszah's ESP32 SD File Manager
When I first got it working, I was just using millis() to get a unique ID for the file name. I later learned that you could use an NTP server to get the current time, so I was able to add the date time to my files instead. Much easier to read and know when the photo was taken!
The Camera in Action!Here are some sample snapshots of what the camera captured. Very exciting!
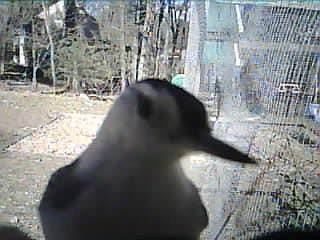
What are you looking at?

What are you looking at?
Making a run (flight?) for it
 for it")
Making a run (flight?) for it
"Wait, is that a camera?"
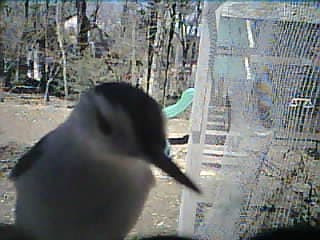
"Wait, is that a camera?"
Overall, this was a great project that really tested me. I love that it is a self-contained system that gets its power from the sun and stores it to a battery. This tested my systems engineering skills and forced me to think about design around an already built bird feeder. And it tested me with an Edge AI model on a fairly resource constrained MCU. If I could do it again, I would use a bigger solar panel if I could (maybe 1.5-2W) and a larger battery (3 Ah).
Overall a lot of work, but I'm pretty happy with the results. Onward to my next project!!!
Schematics, diagrams and documents
Code
Credits
Related products


Leave your feedback...