
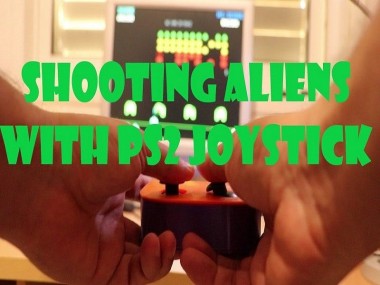
Shooting Aliens With Ps2 Joystick
Made by talofer99 / Games & Gaming
About the project
A true blast from the past
Project info
Difficulty: Moderate
Platforms: Arduino
Estimated time: 1 hour
License: GNU General Public License, version 3 or later (GPL3+)
Items used in this project

Story
It’s if this project did not want to come to life, it’s a joystick that act like a PS2 keyboard, which was supposed to be an easy build since I done a few PS2 projects in the past.
I was mid project, when I noticed that there is a glitch in the system once in a while one of the keys will get “stuck” For example, I would release the fire button and yet the firing in the game will continue. and this sent me down the rabbit hole, and this project was on the table for over 2 months now, It got to the point I thought of just letting it go, but let’s start at the beginning. At the end of the ZORK episode I mentioned that I want to turn this bundle of wires to a proper board.
2 days later I came across the TTGO ESP32 VGA, It’s an esp32, SD card, usb for the esp, VGA output, 2 PS2inputs, sound jack and it even has a connector for battery. They are considerably cheap, so I just ordered one. And when it arrived the first thing I done was to run ZORK on it. I immediately noticed a big difference. When the game is loaded on my board the VGA had interference or noise, on this board, it’s just crisp. I did had to change the setting of the VGA pinout in the code, but it was a very simple change. One thing I’m not a big fan of on this board, is the SD connector, I get the cost and size constrain, but this is an accident waiting to happen. So to reduce the chance of destroying the SD I printed out this great case. https://www.thingiverse.com/thing:4570375
Makes the SD somewhat more protected. Do note this is meant for the 1.4 version of the board. When I posted this a lot of people commented that I should have used a joystick for playing. Which made me come up with the idea to make a ps2 joystick that will act like a keyboard.
I done projects with PS2 in the past so I was prepared. I had a cable ready for it, some code and most important old library of ps2dev.
I created a simple code that will send a press and release of the key “1” every1 second, In order for the code to work well I made several adjustments to the old library and to the code itself. But eventually I got it working. At this point I turned to create the joystick part of the project, to start it going I used the 8 button breakout I created for the Port manipulation video, since I really do not like using buttons on breadboards. They tend to jump out.
I connected the last 4 buttons, while actually using just 3 out of them, 2 for directions and one for the space so we can shoot thus aliens. And the last wire is ground the buttons are pulled up in the software. The logic for the code was simple. Make sure we debounce the buttons.
Then if we take this case for example, to send the keyboard right key command to a host, we need to first send 0xe0 that mark the next byte is a special key and in our case its 0x74. Also note that if the button state is HIGH, which means the button was released, we also send the oxf0 in the middle to signal it’s a key release and not a key press. I will explain later why the command is placing the data into a buffer.
Now all happy and ready to play, I uploaded the space invaders example to the TTGO, uploaded the new code to the nano and was good to go. This is when the glitch was found. And it is also the point I stoppeddocumenting the process I spent hours debugging the issue and at some point just gave up. The setup was sitting on the table for few good weeks, then one day I just powered it up, this time powering the joystick from the esp. It’s only when I got to level 3, I noticed there were no glitches. Happy with that I completed the project – not with ease – as I said it did not want to come to life. The case was designed in fusion 360. This set of analog joysticks were scraped from a joystick long time ago
This is the nano you seen before, this is the PS2connector, and all of this is soldered on a PCB that is glued to the based. I will pull the nano out of its socket. The wiring is underneath, going to the connector and the analog joystick. You can use both of the joystick buttons for firing. And there are 2 pulldown resistors, since the buttons are connected to the 5V and you cannot pulldown programmatically. And off course lots of hot glue to keep everything in place
Code
Credits
Related products


Leave your feedback...