

Server Monitoring With Qubitro

Made by pradeeplogu0 / Communication / Productivity / IoT
About the project
In this blog, I have shown, how to use Python and Qubitro to monitor the Server Load with the use of IoT.
Project info
Difficulty: Easy
Platforms: Python
Estimated time: 1 hour
License: GNU General Public License, version 3 or later (GPL3+)
Items used in this project
Story
Have you thought about the servers? Which uses the internet to load and process a high number of user requests. You might notice a warning that says "Server Down, " which means the server attained its maximum capability or performance, but we don't know what caused it.

Python's Psutill package allows us to track system details and execute utilities, which will allow us to monitor the server's status and Qubitro will help us to transfer data to the cloud. Now we can keep an eye on the data from anywhere in the world.
How To Do?First, we have to install python and VS Code on our Windows machine. Please see my previous blog for instructions on how to install Python and VS Code on a Windows system.
Once you have installed the Python and VS Code now we are good to go. Open up the terminal and type "pip install psutil".

?"pip install psutil"
I have already installed the library, so it's showing Requirement already satisfied.
import psutil
import paho.mqtt.client as mqtt
import time
import json
broker_host = "broker.qubitro.com"
broker_port = 8883
device_id = "XXXXXXXXXXXXXXXXXXXXXXXXXXXXXXXXXXXX"
device_token = "XXXXXXXXXXXXXXXXXXXXXXXXXXXXXXXXX"
def on_connect(client, userdata, flags, rc):
    if rc == 0:
        print("Connected to Qubitro!")
        client.on_publish = on_publish
    else:
        print("Failed to connect, visit: https://docs.qubitro.com/client-guides/connect-device/mqttn return code:", rc)

def on_publish(client, obj, publish):
    print("Published: " + str(payload))

client = mqtt.Client(client_id=device_id)
client.tls_set_context(context=None)

client.username_pw_set(username=device_id, password=device_token)
client.connect(broker_host, broker_port, 60)
client.on_connect = on_connect
client.loop_start()

while True:
    payload = {'CPU usage': psutil.cpu_percent(interval=0.5) , 'CPU frequency': int(psutil.cpu_freq().current),
    'RAM Percentage': psutil.virtual_memory().percent,'Swap Percentage': psutil.swap_memory().percent,
    'Memory Percentage':psutil.disk_usage('/').percent}

    client.publish(device_id, payload=json.dumps(payload))
    time.sleep(10)
Copy and paste the above python script to your VS Code IDE and save it as.py extension.
Qubitro Cloud Setup:There are many possibilities and suppliers on the IoT Cloud side, but we need something more user-friendly and cost-effective, as well as a free trial without a credit card.

Qubitro is the fastest way to build IoT applications with predictable pricing, and developer-friendly features. And most importantly, Qubitro offers always free accounts without credit card information. Please visit https://qubitro.com/ to know more about Qubitro.
Once you are signed up to your Qubitro Portal account and create a new project using the MQTT Connection; copy and paste the Device ID and Device Token in the Code.

?Device ID & Token
Let's Start the Monitoring:After entering the device ID and tokens, simply run the script. Now you can see the below messages in your IDE Terminal.

?Terminal OP
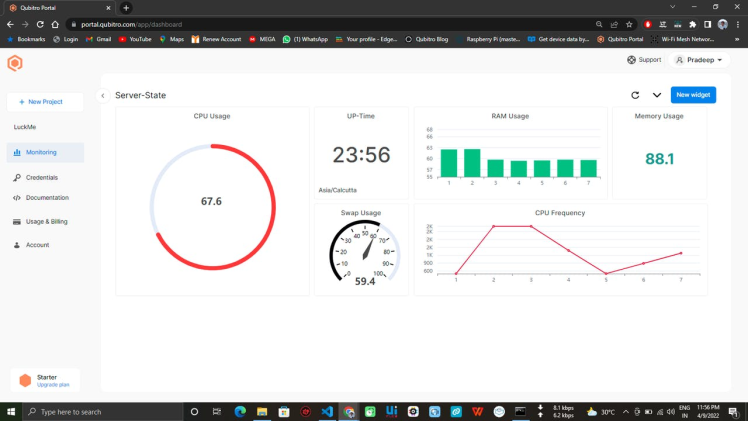
Open the Qubitro portal and select the data ranges and wait for the incoming data.

?Portal Output Readings
Now you can see the CPU Usage, Frequency, RAM / Memory / Swap Percentage levels. And visualize the readings according to your needs.
For more interesting projects and information, join the Qubitro Discord channel and Qubitro community forum.
Code
Credits


Leave your feedback...