
Safety Helmet Detection System Based On Yolov7 Algorithm
Made by shakhizat / Artificial intelligence / IoT
About the project
In this step-by-step tutorial, I will show how to train a 3-class Safety Helmet detector with the NVIDIA Jetson board using YOLOv7 algorithm
Project info
Difficulty: Moderate
Estimated time: 4 hours
License: GNU General Public License, version 3 or later (GPL3+)
Items used in this project

Story
The main safety equipment of people in industrial places is the safety helmet. The helmet protects against accidents. Head injuries can result in short- and long-term effects such as: Concussions, Memory loss, Brain damage, Fatality, etc. In this blog we will see how we can implement Safety Helmet Detection System using Computer Vision techniques, in particular through Object detection in order to detect if a worker is wearing his helmet or not, and reduce the number of accidents for the lack of a safety helmet.
An object detection model is a machine learning algorithm that has learned to recognize and locate objects in images and videos. There are various object detection algorithms out there like YOLO (You Only Look Once), Single Shot Detector (SSD), Faster R-CNN, Histogram of Oriented Gradients (HOG), etc. Here, we are going to use Yolo-V7 to train our custom object detection model. You only look once or YOLO is a state of the art object detection algorithm. It’s famous for being very accurate and fast at the same time. YOLOv7 is the latest versions of the YOLO family.
This guide will walk you through the process of training an object detection model. This tutorial consists of below phases:
- Install YOLOv7 dependencies
- Preparing dataset
- Annotation conversation from PASCAL VOC format to YOLO
- Setup the directories
- Setup the YAML files for training
- Training the model
- Running inference on test images and videos
Let me briefly talk about the prerequisites that are essential to proceed towards your own object detector:
- Nvidia Jetson Xavier NX Developer Kit (You could also use the Nvidia Jetson Nano, which is slightly cheaper and consumes less energy)
- To run the NVIDIA Jetson board headless(without the monitor), set up either SSH access or RDP connection from your laptop. I recommend to useVScode IDE jointly with Remote Development using SSH extension.
- Familiar with the Python and Linux command line, a shell like bash, and an editor like nano. It’s good to have a basic knowledge of deep learning computer vision area.
For simplicity we will assume everything is installed. So take a look at the requirements before starting the tutorial.
Without further ado, let’s get started!
The NVIDIA Jetson Xavier NX Developer KitAs the brain of our safety helmet detector, I used a Jetson Xavier NX Developer Kit. NVIDIA Jetson devices are small low-power AI accelerators that can run machine learning algorithms in real-time. However, deploying complex deep learning models on such devices with limited memory is challenging. In this case, we need to use inference optimization tools, such as TensorRT, to be able to run deep learning models on these platforms, on the edge devices.

The Nvidia JetPack has in-built support for TensorRT, cuDNN (CUDA-powered deep learning library), OpenCV, and other developer tools.
Desktop PCs or server-level graphics cards (such as Nvidia 3080Ti, etc.) are very expensive, not suitable for edge computing needs, and are too bulky. Therefore, this embedded artificial intelligence development board Jetson boards launched by NVIDIA is very suitable for current industry needs. It is believed that embedded development boards empowered by deep learning will become the mainstream of the industry in the future.
Install YOLOv7 dependencies for object detectionYolov7 model is implemented in the Pytorch framework. PyTorch is an open-source machine learning library based on the Torch library, used for computer vision and natural language processing applications.
Let's get started with the cloning of the yolov7 official repository from the github. In a terminal, type:
git clone https://github.com/WongKinYiu/yolov7I recommend you create a new python virtual environment(virtualenv) to run your YOLO v7 projects
Using a virtualenv for your Yolo projects, especially if you have a lot of different packages or Python versions floating around. It's great for keeping different development environments with different Python packages and libraries isolated. That it is almost mandatory to create a virtual environment in order to properly Yolo.
We will configure our Python environment. For managing virtual environments we'll be using virtualenv, which can be installed like below:
sudo pip3 install virtualenv virtualenvwrapperTo get virtualenv to work we need to add the following lines to the ~/.bashrc file:
nano ~/.bashrcAnd add the below lines
# virtualenv and virtualenvwrapper
export WORKON_HOME=$HOME/.virtualenvs
export VIRTUALENVWRAPPER_PYTHON=/usr/bin/python3
source /usr/local/bin/virtualenvwrapper.sh
To activate the changes the following command must be executed:
source ~/.bashrcNow we can create a virtual environment using the mkvirtualenv command.
mkvirtualenv yolov7 -p pythonOpenCV is also need to be there in virtualenv. You can create symbolic link of cv2.so inside virtualenv, if you have installed openCV globally.
Create a symbolic link from the OpenCV install directory to your virtual environment
cd ~/.virtualenvs/xxxx/lib/python3.6/site-packages/
ln -s /usr/lib/python3.6/dist-packages/cv2/python-3.6/cv2.cpython-36m-aarch64-linux-gnu.so cv2.s
xxxx = virtual environment folder name
Navigate to Yolov7 folder. Modify requirements file by editing using below command
nano requirements.txtComment out the below lines. We are going to install PyTorch and torchvision using procedure provided by Nvidia Jetson community.
#torch>=1.7.0,!=1.12.0
#torchvision>=0.8.1,!=0.13.0
With that sorted, let us go ahead with the installation.
pip3 install -r requirements.txtInstall PyTorch 1.8 using below commands:
pip3 install -U future psutil dataclasses typing-extensions pyyaml tqdm seaborn
wget https://nvidia.box.com/shared/static/p57jwntv436lfrd78inwl7iml6p13fzh.whl -O torch-1.8.0-cp36-cp36m-linux_aarch64.whl
pip3 install torch-1.8.0-cp36-cp36m-linux_aarch64.whl
At this point, you can check whether PyTorch was installed correctly. We can check it through below command:
python -c "import torch; print(torch.__version__)"And you will see the following output:
1.8.0Install torchvision v0.9.0 (version for torch 1.8)
sudo apt install libjpeg-dev zlib1g-dev libpython3-dev libavcodec-dev libavformat-dev libswscale-dev
pip3 install --upgrade pillow
git clone --branch v0.9.0 https://github.com/pytorch/vision torchvision
cd torchvision
export BUILD_VERSION=0.9.0
python3 setup.py install --user
cd .. # running torch from torchvision/ will fail
then run below command:
python3 -c "import torchvision; print(torchvision.__version__)"You should get the following output
0.9.0We are going to use a pre-trained YOLOv7 model. There are different versions of YOLOv7 weights.
- Small - yolov7-tiny.pt. A lightweight version of the YOLO architecture. This version is ideal for real-time applications and deployment in embedded devices like Nvidia Jetson boards.
- Medium - yolov7.pt.
- Large - yolov7-e6e.pt
We can use any of these networks based on our requirements.
Download the trained weights for this model and copy it into yolov7 folder:
wget https://github.com/WongKinYiu/yolov7/releases/download/v0.1/yolov7.ptThen, you can run the detection on one image:
python3 detect.py --weights yolov7.pt --conf 0.25 --img-size 640 --source inference/images/horses.jpgWe have the default confidence threshold of 0.25. It means that every detection under the confidence threshold of 25% will be removed.
An image called horses.jpg will be saved in /runs/detect/ext# directory.
Here are some output images:
1 / 3 • Example of object detection on test images

Example of object detection on test images

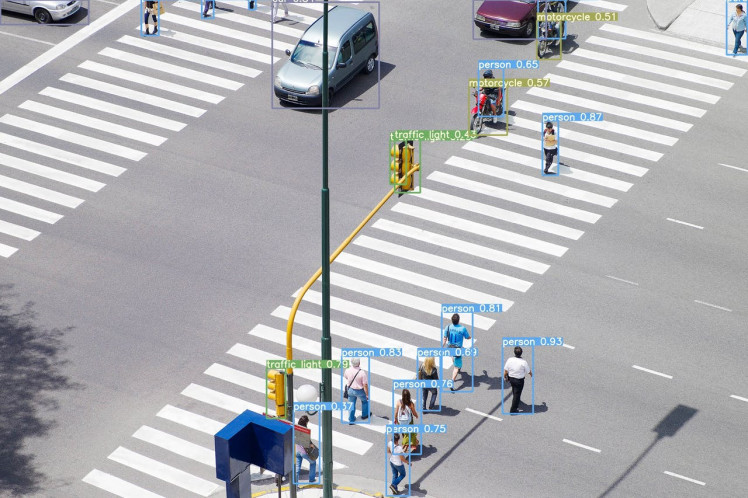
Seems pretty accurate! Now you’re ready to start working Safety Helmet Detection system. The next section will explain how to do that properly.
Preparing the dataset for the Safety Helmet Detection SystemAs with any deep learning task, the first most important task is to prepare the dataset. Dataset is the fuel that runs any deep learning model. To properly train the YOLO neural network, it is essential to have a good dataset. The larger the dataset, the higher the chances of training the network to have good performance.
We are going to use the MakeML dataset, which is available to the public. You can check out more datasets that are there. You can directly download the dataset from here. This dataset contains 5000 images of 3 distinct classes for the objective of helmet detection. I am going use only first 500 images, since Nvidia Jeston NX board is not capable to perform very high-load operations like model training with the dataset of the 5000 images.
The more data you have for training, the better your model will be. So feel free to download as many images as you want to, given that you have the resources to do so.
The dataset includes images of the following class:
- Helmet
- Person
- Head.
We will create a directory called Dataset. This directory needs to be in the same folder as the yolov7 repository folder we just cloned.
To download the dataset you need to run below command.
wget -O hardhatworkerspascalvoc.zip https://arcraftimages.s3-accelerate.amazonaws.com/Datasets/HardHatWorkers/HardHatWorkersPascalVOC.zip?region=us-east-2Unzip the dataset.
unzip hardhatworkerspascalvoc.zipThat’s all for data preparation!
Conversation annotations from PASCAL-VOC to YOLOv7YoloV7 model requires data to be in yolo format. The next step is to label(annotate) them. Since we've already had our annotations file in Pascal VOC xml format, we just need to convert these file to YOLO format. PASCAL-VOC is a very common object recognition data format, probably more common than the YOLO format. Label format in YOLOv7 is the same as YOLOv5.
We can write the python script that will take the annotations in VOC format and convert them to a YOLO format. Please follow the following sections in How to Train YOLO v5 on a Custom Datasetby Ayoosh Kathuria, where these steps are covered in detail.
Below is a little script that does it for you.
import xml.etree.ElementTree as ET
import os
from tqdm import tqdm
# Dictionary that maps class names to IDs
class_name_to_id_mapping = {"helmet": 0,
                           "person": 1,
                           "head": 2}

def extract_info_from_xml(xml_file):
    root = ET.parse(xml_file).getroot()

    # Initialise the info dict
    info_dict = {}
    info_dict['bboxes'] = []

    # Parse the XML Tree
    for elem in root:
        # Get the file name
        if elem.tag == "filename":
            info_dict['filename'] = elem.text

        # Get the image size
        elif elem.tag == "size":
            image_size = []
            for subelem in elem:
                image_size.append(int(subelem.text))

            info_dict['image_size'] = tuple(image_size)

        # Get details of the bounding box
        elif elem.tag == "object":
            bbox = {}
            for subelem in elem:
                if subelem.tag == "name":
                    bbox["class"] = subelem.text

                elif subelem.tag == "bndbox":
                    for subsubelem in subelem:
                        bbox[subsubelem.tag] = int(subsubelem.text)
            info_dict['bboxes'].append(bbox)

    return info_dict


# Convert the info dict to the required yolo format and write it to disk
def convert_to_yolov5(info_dict):
    print_buffer = []

    # For each bounding box
    for b in info_dict["bboxes"]:
        try:
            class_id = class_name_to_id_mapping[b["class"]]
        except KeyError:
            print("Invalid Class. Must be one from ", class_name_to_id_mapping.keys())

        # Transform the bbox co-ordinates as per the format required by YOLO v5
        b_center_x = (b["xmin"] + b["xmax"]) / 2
        b_center_y = (b["ymin"] + b["ymax"]) / 2
        b_width    = (b["xmax"] - b["xmin"])
        b_height   = (b["ymax"] - b["ymin"])

        # Normalise the co-ordinates by the dimensions of the image
        image_w, image_h, image_c = info_dict["image_size"]
        b_center_x /= image_w
        b_center_y /= image_h
        b_width    /= image_w
        b_height   /= image_h

        #Write the bbox details to the file
        print_buffer.append("{} {:.3f} {:.3f} {:.3f} {:.3f}".format(class_id, b_center_x, b_center_y, b_width, b_height))

    # Name of the file which we have to save
    save_file_name = os.path.join("annotations", info_dict["filename"].replace("png", "txt"))

    # Save the annotation to disk
    print("n".join(print_buffer), file= open(save_file_name, "w"))

annotations = [os.path.join('annotations', x) for x in os.listdir('annotations') if x[-3:] == "xml"]
annotations.sort()

# Convert and save the annotations
for ann in tqdm(annotations):
    info_dict = extract_info_from_xml(ann)
    convert_to_yolov5(info_dict)
annotations = [os.path.join('annotations', x) for x in os.listdir('annotations') if x[-3:] == "txt"]
Your project directory structure should be similar to the following:
yolov7
└─── Dataset
    │
    └─── images
            │
            └─── test
            │
            └─── train
            │
            └─── val
    └──  labels
            │
            └─── test
            │
            └─── train
            │
            └─── val
We have the images and labels in their respective folder. Images and labels must have the same name.
Split your datasetI have a total of 500 images labeled. So we need to divide the dataset into train, validation, and test sets containing 80%, 10%, and 10% of the data, respectively. Generally people use 60-90% of the total dataset for training and keep the remaining for testing/validation.
You can use below python script from the How to Train YOLO v5 on a Custom Dataset, written by Ayoosh Kathuria.
import os
from sklearn.model_selection import train_test_split
import shutil
# Read images and annotations
images = [os.path.join('images', x) for x in os.listdir('images')]
annotations = [os.path.join('annotations', x) for x in os.listdir('annotations') if x[-3:] == "txt"]

images.sort()
annotations.sort()

# Split the dataset into train-valid-test splits
train_images, val_images, train_annotations, val_annotations = train_test_split(images, annotations, test_size = 0.2, random_state = 1)
val_images, test_images, val_annotations, test_annotations = train_test_split(val_images, val_annotations, test_size = 0.5, random_state = 1)

#Utility function to move images
def move_files_to_folder(list_of_files, destination_folder):
    for f in list_of_files:
        try:
            shutil.move(f, destination_folder)
        except:
            print(f)
            assert False

# Move the splits into their folders
move_files_to_folder(train_images, 'newimages/train')
move_files_to_folder(val_images, 'newimages/val/')
move_files_to_folder(test_images, 'newimages/test/')
move_files_to_folder(train_annotations, 'newannotations/train/')
move_files_to_folder(val_annotations, 'newannotations/val/')
move_files_to_folder(test_annotations, 'newannotations/test/')
Feel free to change the split depending upon how much labeled data you have.
After running the below code snippet, we should have the folder structure as we expected and ready to train the model.
The most important properties of YOLOv7 training is the dataset YAML file. Create a new file called safety_helmet_data.yaml and place it in the yolov7/data folder. Then populate it with the following.
train: /home/jetson/yolov7/dataset/images/train/
val:  /home/jetson/yolov7/dataset/images/val/
test: /home/jetson/yolov7/dataset/images/test/
# number of classes
nc: 3
# class names
names: ["helmet","person", "head"]
We have to specify the train, val and test folders. We are now done with all the configuration and initial setup that are needed to kick start the training.
Model trainingWe’ve done a lot of work in order to get to this step. Before training the model, we need to set up a few hyperparameters and the configuration to be used. I have used the default hyperparameters. An existing pre-trained neural network model called YOLO (You Only Look Once) is re-trained on your dataset.
Start training using the following command:
python3 train.py --workers 4 --img 640 --cfg cfg/training/yolov7-tiny.yaml --hyp data/hyp.scratch.p5.yaml --batch 16 --epochs 50 --data data/safety_helmet_data.yaml --weights yolov7-tiny.pt --name yolo_safety_helmet_detectionwhere,
- --data: This accepts the path to the dataset YAML file that we created earlier.
- --workers n: n = maximum number of workers for dataloader. If you have a multi-core CPU, this parameter defines the number of cores that can be used for the training job.
- --weights: As we are using the small model from the YOLOv7 family, the value is yolov7-tiny.pt
- --img: We can also control the image size while training. The images will be resized to this value before being fed to the network. We are resizing them to 640 pixels which is also one of the most common ones used.
- --epochs: This argument is used to specify the number of epochs.
- --batch-size: This is the number of samples that will be loaded into one batch while training. Although the value is 16 here, you can change it according to the GPU memory that is available.
- --name: We can provide a custom mode name where all the results will be saved.
During the training process, you can check the current performance of the Nvidia Jetson boards is using jetson-statsutility developed by Raffaello Bonghi.
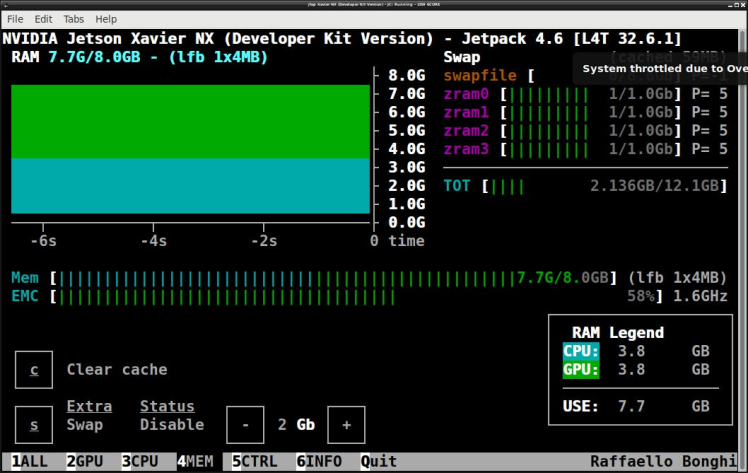
You can now monitor the resources that your models are using in real time and get maximum utilization out of your hardware.
Once the training completes, we will have two weights in weights/ directory. best.pt and last.pt.best.pt is the one that gives better performance and last.pt is the model after the last epoch and it can be used to resume the training again if needed. I choose the best one.
In the output, we can see that we have trained our model using 50 epochs. After training, we need to check our trained model’s metrics to get an insight as to whether the model is performing well on unseen data or not. Navigate to run/train/yolo_safety_helmet_detection# and determine the file called results.png.
The resulting matrix graph of the model performance

The resulting matrix graph of the model performance
Precision measures how accurate are the predictions. It is the percentage of your correct prediction. And Recall measures how good it finds all the positives.
Now that we have successfully trained our custom model.
So, we can entirely focus on the inference and check out the results. Let’s start with the image inference using the trained YOLOv7 model and visualizing them.
python3 detect.py --weights runs/train/yolo_safety_helmet_detection9/weights/best.pt --conf 0.25 --img-size 640 --source inference/images/helmet.jpgAs you can see that, the result images located on “runs/detect/exp” folder.
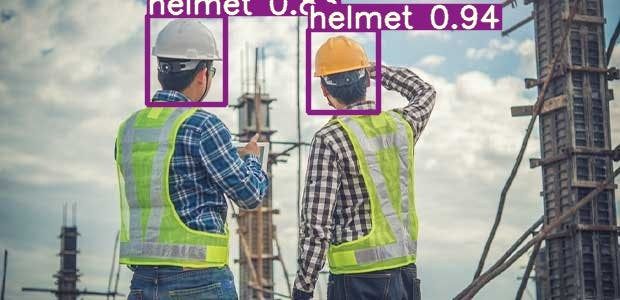
Example of people not wearing a helmet:
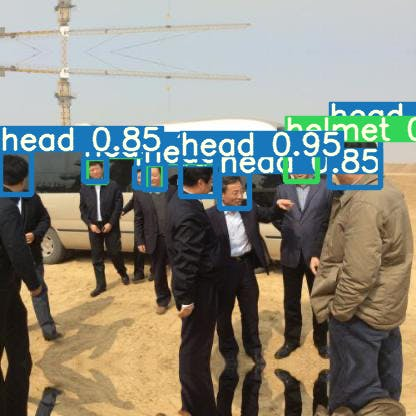
In the above output, we can see how the model has detected and assigned a label for the objects present in the images.
To run the model inference using video file we can use the following command.
python3 detect.py --weights runs/train/yolo_safety_helmet_detection9/weights/best.pt --conf 0.25 --img-size 640 --source inference/images/Construction.mp4Finally, the test video is as follows:
Source: Theatre At Work youtube channel, https://youtu.be/hTN6S7T5UUgCongratulations! You've finished training your first object detection model, and it's now ready to use. For 50 epochs and 500 images dataset we have got pretty decent performance and accuracy. From the results shown above it is evident that the YOLO object detection is well suited for real-time processing and was able to accurately classify and localize all the object classes. I hope you got some idea about how to train YOLOv7 on other datasets you have.
If you have any questions or need any help, let me know in the comments! Thank you for reading this blog post.
ReferencesCode
Credits
Related products


Leave your feedback...