
Raspberry Pi Tic-tac-toe Game With Hexabitz Sound Effects

Made by Aula_Jazmati / Displays / Games & Gaming / Holidays / Kids & Family / Music
About the project
This tutorial will help you play and create Tic-Tac-Toe, a very renowned game we have all got our hands on since our childhood.
Project info
Difficulty: Moderate
Platforms: DFRobot, Raspberry Pi, STMicroelectronics
Estimated time: 1 hour
License: MIT license (MIT)
Items used in this project
Hardware components

Story
This tutorial will help you play and create Tic-Tac-Toe, a very renowned game we have all got our hands on since our childhood.
To do this task, we will use some in-built libraries of Python and Hexabitz Modules to add sound effects to this game ? ??
What is the game?Tic Tac Toe is a 2 player game where each player has a symbol (either ❌ or ⭕️) and plays alternately to mark their symbol on a 3x3 grid. If any player gets their symbol consecutively 3 times in a row, column or diagonal then that player is the winner.
1

1
Audio Speaker and Headphone Jack (H07R3x):H07R3x is an audio amplifier and speaker module based on ST TS4990 1.2W audio amplifier and STM32F0 MCU.
2

2
This module features an on-board 8-ohm rectangular CUI speaker and a headphone output jack. You can use this module to play sounds and tunes stored in the MCU embedded Flash or streamed from an external hardware/another module via array ports.
3

3
You can use potentiometer to adjust audio level.
4

4
5

5
Micro SD Memory Card (H1BR6x):H1BR6x is a nifty little SPI-based, micro-SD card module based on STM32F0 MCU and running Fatfs file system. You can use it as a stand-alone data-logger or easily integrate with other hardware via serial interfaces. Also you can setup and control logging via a Command Line Interface (CLI).
6

6
This module receive a message from the audio module that contains the name of the wave file and check if it contains that certain wave file doing by parsing the header of the wave file.
You can use CLI command "playfile (wave file name)" to play the wave. If everything works correctly you will see this message "the file was played successfully". and if the file name was wrong or the SD-card does not contain the file, you will see this massage "wrong Name".
Note1: You need to solder the modules together using Hexabitz Fixture.
Note2: You should connect the Audio module with a computer or Raspberry pi to use the CLI command "playfile" to play the wave in SD-card module where the wave file is saved.
Note3: You need to build fixed topology.
https://hexabitz.com/docs/how-to/make-a-pre-built-array-topology-file/
Note4: You can use this nice free software WAVToCode to convert WAVE files into a WAV file or C file.
7

7
8

8
HDMI Interface TFT Display:This TFT Display with Touch Screen (5 inch or 7 inch) is a mini panel-mountable HDMI monitor. So small and simple, but you can use this display with any computer that has HDMI output, and the shape makes it easy to attach to a electronic product.
Download the Display driver :
1. Click here to download LCD-show file (5 inch Display).
git clone https://github.com/goodtft/LCD-show.git2.Please copy the LCD-show file to your Raspberry Pi,then run the following commands on the terminal:
tar xzvf LCD-show.tar.gz3.Run the following commands on the terminal to go into the folder and install:
cd LCD-show/
chmod + x LCD5-show
./LCD5-show
9

9
1 / 2 • 10

10

11
12

12
Python TkinterTkinter is the standard GUI library for Python. Python when combined with Tkinter provides a fast and easy way to create GUI applications.
Tkinter provides a powerful object-oriented interface to the Tk GUI toolkit.
Creating a GUI application using Tkinter is an easy task.
13

13
All you need to do is perform the following steps :
- Import the Tkinter module.
- Create the GUI application main window.
- Add one or more of the above-mentioned widgets to the GUI application.
- Enter the main event loop to take action against each event triggered by the user.
· You can start Python3 from the command line (with python3) then
import tkinter· If you get an error message, then exit out of Python3 and call this command to install it.
sudo apt-get install python3-tkThis module encapsulates the access for the serial port. It provides backends for Python running on Windows, OSX, Linux, BSD (possibly any POSIX compliant system) and IronPython. The module named “serial” automatically selects the appropriate backend.
14

14
Depending on the version of python, there are several commands to install the package pyserial.
sudo apt-get install python-serial python3-serialNote 5:
There are several ways to determine the USB port to which the device is connected. The fastest is to connect the unit to the USB port then to immediately run the command dmesg -s 1024.
You’ll get directly the tty port on which it is connected.
Python code to read the serial port:
This section of code primarily instantiates the serial class, setting it up with all the various bits of information that it needs to make the connection with.
port – This defines the serial port that the object should try and do read and writes over.
baudrate – This is the rate at which information is transferred over a communication channel.
parity – Sets whether we should be doing parity checking, this is for ensuring accurate data transmission between nodes during communication.
stopbits – This is the pattern of bits to expect which indicates the end of a character or the data transmission.
bytesize – This is the number of data bits.
timeout – This is the amount of time that serial commands should wait for before timing out.
import serial
ser = serial.Serial(
               port='/dev/ttyUSB0',
               baudrate = 921600,
               parity=serial.PARITY_NONE,
               stopbits=serial.STOPBITS_ONE,
               bytesize=serial.EIGHTBITS,
               timeout=1
)Tic-Tac-Toe GUI Design in Python Using Tkinter:
we will use some in-built libraries of Python namely which are Tkinter, Random and serial.
We’ll kick off with learning the functions used in this project:
1 / 2 • 16

16

15
1)The Button function:This function makes it possible to define a custom button with custom properties.
def button(frame):          #Function to define a button
    b=Button(frame,padx=1,bg="pink",width=3,text="   ",font=('arial',60,'bold'),relief="sunken",bd=10)
    return b
2)The Hexabitz function:
We are using Hexabitz Audio Speaker Module (H07R3) to add sound effects directly to this game or by using any favorite game music after save it on SD module.
These function use CLI command "playfile (wave file name)" or "play tune(notes)" to play tunes.
We have three functions in code/1/:
1- "Winning or fresh start tune" function.
2- "Button tune ❌ / ⭕️" function.
3- "Try again-Tune" function.
def hexabitz1():
    ser.write ('demo'.encode())
    ser.write ('r'.encode())
def hexabitz2():
    ser.write ('Play tune d5'.encode())
    ser.write ('r'.encode())
def hexabitz3():
    ser.write ('Playfile 2 song1'.encode())
    ser.write ('r'.encode())
3) The Change function:
The change function switches the ‘⭕️’ to ‘❌’ and vice-versa for the other player to play his chance.
def change_a():
    global a
    for i in ['O','X']:
        if not(i==a):
        a=i
        hexabitz2()
        break
4)The Reset function:
The reset function resets the state of all buttons to Normal and clears the text on them.
def reset():                #Resets the game
    global a
    for i in range(3):
        for j in range(3):
        b[i][j]["text"]=" "
        b[i][j]["state"]=NORMAL
    a=r.choice(['O','X'])
5)The Check function:
The check function checks the board row-wise, column-wise and diagonal-wise for equality and displays the result of the game.
def check():
    for i in range(3):
        if(b[i][0]["text"]==b[i][1]["text"]==b[i][2]["text"]==a or b[0][i]["text"]==b[1][i]   ["text"]==b[2][i]["text"]==a):
            hexabitz1()
            messagebox.showinfo("Congrats!!","'"+a+"' has won")
            time.sleep(2)
            reset()
    if(b[0][0]["text"]==b[1][1]["text"]==b[2][2]["text"]==a or b[0][2]["text"]==b[1][1]["text"]==b[2][0]["text"]==a):
    hexabitz1()
    messagebox.showinfo("Congrats!!","'"+a+"' has won")
    time.sleep(2)
    reset()
    elif(b[0][0]["state"]==b[0][1]["state"]==b[0][2]["state"]==b[1][0]["state"]==b[1][1]["state"]==b[1][2]["state"]==b[2][0]["state"]==b[2][1]["state"]==b[2][2]["state"]==DISABLED):
    hexabitz3()
    messagebox.showinfo("Tied!!","The match ended in a draw")
    reset()
6)The Click function:
def click(row,col):
    b[row][col].config(text=a,state=DISABLED,disabledforeground=colour[a])
    check()
    change_a()
    label.config(text=a+"'s Chance")
The above function handles button clicks on the board. This calls the check() function(mentioned as function 4 above) and the change_a() function(mentioned as function 2 above) and sets the state and text of the button clicked.
1 / 2 • 18

18

17
In our main program we follow the steps given below:
1. First of all, define the tk window with the Tk() as the root variable.
2. Then we create the title of the window.
3. Next, we define a variable to store the playable character(say, ‘⭕️’ and ‘❌’).
4. Then we define a list to store all the buttons and place them in the window.
5. Finally, we display a label saying the character which has to be played next.
6. We end by a root.mainloop() function to keep events on the main window active and all other widgets interactive.
7. We are using a messagebox class from the Tkinter library to display prompts during the game for the results.
8. We are using Hexabitz Audio Speaker Module (H07R3) to add sound effects to this game by importing serial python module ? ? ? ??
9. You can use HF1R0 module like this project
1 / 2 • 19

19

20- HDMI Interface 5 Inch 800x480 TFT Display Pins
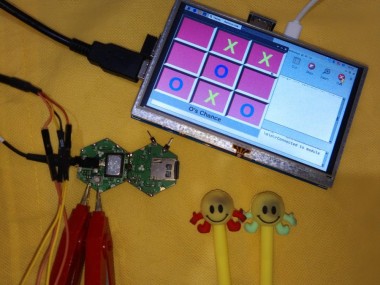
Game Testing:
21

21
22

22
23

23
Raspberry Pi Tic-Tac-Toe Game with Hexabitz Module Sound Effects TestReferences:
2. http://computing.southern.edu/halterman/Courses/Fall2016/124/Labs/lab09_F16.html
3. https://levelup.gitconnected.com/how-to-code-tic-tac-toe-in-python-using-tkinter-e7f9ce510bfb
4.https://www.hackster.io/Najib_Kassab/wave-player-d3fa5b
Schematics, diagrams and documents
CAD, enclosures and custom parts
Code
Credits
Related products


Leave your feedback...