

Monitor a Plant's Soil Moisture with Netduino and Xamarin!
Made by Wilderness Labs / Plants
About the project
Get familiar with Maple, a RESTful web server running on network capable Netduino, and monitor your plant's soil humidity w/ a Xamarin app!
Project info
Difficulty: Moderate
Platforms: Maxim Integrated, Microsoft, Xamarin
Estimated time: 1 hour
License: MIT license (MIT)
Items used in this project
Hardware components


Story
In this project you'll learn how to make your own soil humidity plant monitor that checks the soil moisture periodically and log the data to an SD card stored in the Netduino. You'll query the data using a Xamarin app so you you'll always know when to water your plant.
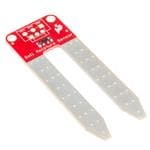
You will use a soil moisture sensor that is placed directly into the plant pot or soil bed. The sensor has two probes and measures the resistance between them. Since water is conductive, as moisture in the soil increases, the resistance decreases allowing the sensor to determine soil humidity.
The Netduino will periodically poll the senor and log the value to the SD card along with the date and time (using a RTC module).
To send the humidity logs over the network you'll use the light-weight Maple REST server. Maple makes it easy to build connected devices with Netduino by exposing control via a Web API. Maple is an open source, ultra-lightweight, JSON enabled, RESTful web server built specifically for Netduino devices with network capabilities.
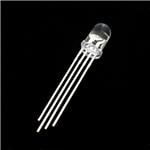
An RGB LED is used to give user feedback based on the state of the soil sensor, for example: when the Netduino joins a network, the soil sensor is active, or Maple receives client requests.
You'll communicate with the sensor using Netduino.Foundation. Netduino.Foundation. is a platform for quickly building connected things using the .NET MicroFramework on Netduino. Created by Wilderness Labs, it's open source and maintained by the Netduino community.
If you're new to Netduino development, I suggest you go to the Getting started with Netduino project to set up your development environment.
Step 1 - Assemble the circuit
The circuit for our plant soil moisture sensor looks like this:
 Soil moisture monitor circuit diagram
Step 2 - Connect your Netduino to the network
Download and open the Firmware Updater and Configuration Tool for Windows or MacOS while your Netduino is connected in bootloader mode. Before using the Network Configuration section, make sure your device is selected automatically in the Model picker control to confirm that your device is properly connected.
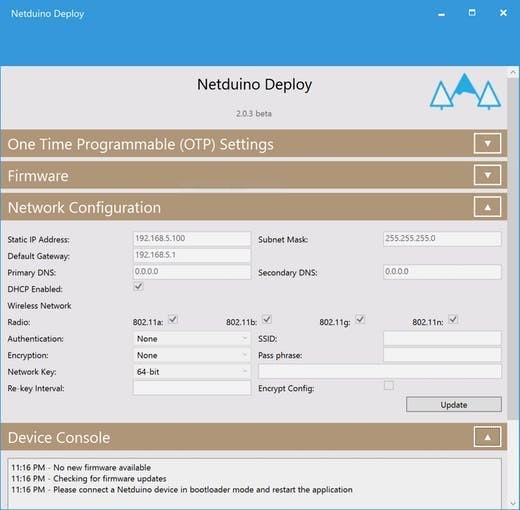 Firmware Updater and Configuration Tool
If you're using a Netduino 3 WiFi, select the proper encryption, authentication, SSID and pass-phrase settings and finally click on Update to save those settings to the Netduino. Once the network settings are saved to the device, remember to disconnect and reconnect your Netduino back to your computer to leave bootloader mode and its ready to run the project once its completed.
Step 3 - Create a Netduino project
Create a Netduino project in Visual Studio 2015 for Windows or in Visual Studio for Mac; name the project PlantHost.
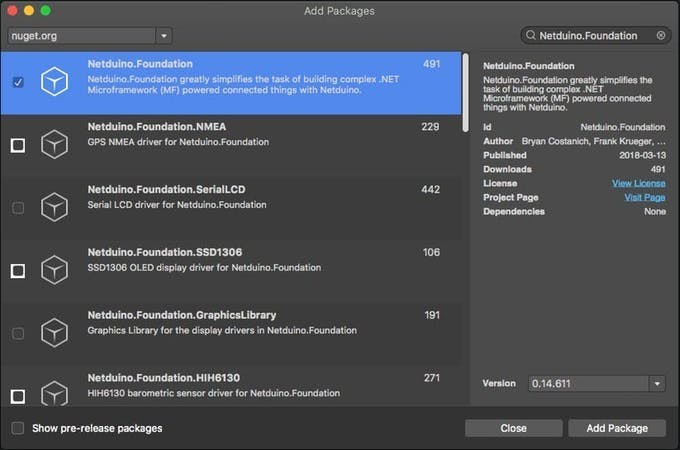
Step 4 - Add Netduino.Foundation Maple NuGet Packages
Windows
Right-click on your PlantHost project and click Manage NuGet Packages. In the Browse tab, search for Netduino.Foundation; it should be the first search result. Click the Install button.
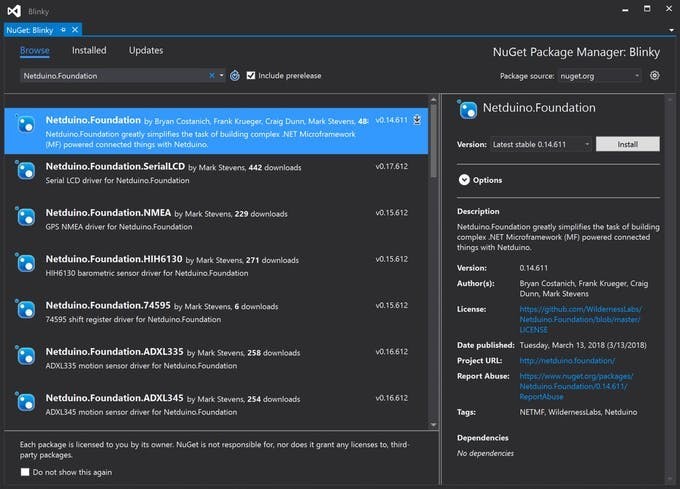 Adding Netduino.Foundation NuGet package to PlantHost
You'll use three (3) additional nuget packages. Search for Maple,Netduino.Foundation.DS3231 and Netduino.Foundation.Network and each one to your project.
macOS
Alt-click on your PlantHost project in the Solution Explorer, and click Add => Add NuGet Package to open the NuGet Package window. Search for the Netduino.Foundation package and click Add Package to add it to your project.
 Adding Netduino.Foundation NuGet package to PlantHost
You'll use three (3) additional NuGet packages. Search for Maple,Netduino.Foundation.DS3231 and Netduino.Foundation.Network and add them to your project.
Step 5 - Write the code for the PlantHost project
Maple web API endpoints are defined by creating custom classes that inherit from RequestHandlerBase. Maple uses reflection to create URLs based on the method names in those custom classes. It supports both the get and post verbs and method names must be prefixed with either one of those strings in order to be automatically made into an endpoint.
Add RequestHandler class
Right click on your project and click Add new => Class, and name it RequestHandler. Here is where you will expose all your URL endpoints, which for this project is only /PlantHumidity. Your RequestHandler class should look like this:
using Microsoft.SPOT;
using Maple;
namespace PlantHost
{
   public class RequestHandler : RequestHandlerBase
   {
       public event EventHandler GetPlantHumidity = delegate { };
       public void getPlantHumidity()
       {
           GetPlantHumidity(this, EventArgs.Empty);
           StatusResponse();
       }
       protected void StatusResponse()
       {
           Context.Response.ContentType = "application/json";
           Context.Response.StatusCode = 200;
           Send(App.HumidityLogs);
       }
   }
}
Notice that when the getPlantHumidity endpoint is invoked, it will trigger an event that will be handled in the App class, and send App.HumidityLogs as a json response message with the ArrayList HumidityLogs that is accessible in the App class.
Add HumidityLog class
Add another class to your project and named it HumidityLog. Declare two (2) properties:Date (string) and Humidity (int). It should look like this:
namespace PlantHost
{
   public class HumidityLog
   {
       public string Date { get; set; }
       public int Humidity { get; set; }
   }
}
This is a simple model that the project will use to log the date and time along with the moisture level.
Add HumiditySensorController class
It is a good practice to create a Controller class for every peripheral involved to make the project more scalable, maintainable and cleaner. These Controller classes abstracts all the peripheral's logic so the main program logic will remain cleaner and easier to understand. Add a HumiditySensorController class with the following code:
using MSH = Microsoft.SPOT.Hardware;
using SLH = SecretLabs.NETMF.Hardware;
using System.Threading;
namespace PlantHost
{
   public class HumiditySensorController
   {
       protected SLH.AnalogInput _analogPort;
       protected MSH.OutputPort _digitalPort;
       public HumiditySensorController(MSH.Cpu.Pin analogPort,
                                       MSH.Cpu.Pin digitalPort)
       {
           _analogPort = new SLH.AnalogInput(analogPort);
           _digitalPort = new MSH.OutputPort(digitalPort, false);
       }
       public float Read()
       {
           int sample;
           float humidity;
           _digitalPort.Write(true);
           Thread.Sleep(5);
           sample = _analogPort.Read();
           _digitalPort.Write(false);
           humidity = 100 - Map(sample, 250, 1023, 0, 100);
           return humidity;
       }
       protected float Map(float value, float fromLow, float fromHigh,
                           float toLow, float toHigh)
       {
           return (((toHigh - toLow) * (value - fromLow)) / (fromHigh - fromLow)) - toLow;
       }
   }
}
This controller is a simple driver for the soil moisture sensor. It uses an analog input, which is in charge of reading the value of moisture in the probe that is placed in the plant's dirt, returning a value from 0 - 1023, 0 being very moist and 1023 very dry. A digital port is also used to quickly activate the sensor, and the analog port to do a read.
Note: When completed this project, you could calibrate your humidity sensor value by placing it on a very dry and very wet dirt sample to check the optimal edge values, and set them in the fromLow and FromHigh parameters of the Map method for better precision.
After reading a value from the sensor, it makes sense to return a more understandable moisture value. We invoke the Map function which is a simple math formula to remap a number from one range to another. In this case, we'd like to get our raw >here.
Add MicroSDControllerclass
Next you need to add a Controller class to read and write data to the MicroSD card. Right click on your project and click Add new => Class, and name it MicroSDController, and copy the following code:
using Microsoft.SPOT;
using Microsoft.SPOT.IO;
using System.Text;
using System.IO;
using System.Collections;
using System;
namespace PlantHost
{
   public static class MicroSDController
   {
       public static void Save(ArrayList humidityLogs)
       {
           var volume = new VolumeInfo("SD");
           if (volume != null)
           {
               try
               {
                   var path = Path.Combine("SD", "logs.txt");
                   string json = Json.NETMF.JsonSerializer.SerializeObject(humidityLogs);
                   File.WriteAllBytes(path, Encoding.UTF8.GetBytes(json));
                   volume.FlushAll();
               }
               catch(Exception ex)
               {
                   Debug.Print(ex.Message);
               }
           }
           else
           {
               Debug.Print("There doesn't appear to be an SD card inserted");
           }
       }
       public static ArrayList Load()
       {
           var volume = new VolumeInfo("SD");
           if (volume != null)
           {
               try
               {
                   var path = Path.Combine("SD", "test.txt");
                   string json = new string(Encoding.UTF8.GetChars(File.ReadAllBytes(path)));
                   var logs = Json.NETMF.JsonSerializer.DeserializeString(json);
                   var humidityLogs = new ArrayList();
                   foreach (Hashtable item in logs as ArrayList)
                   {
                       humidityLogs.Add(new HumidityLog()
                       {
                           Date = item["Date"].ToString(),
                           Humidity = int.Parse(item["Humidity"].ToString())
                       });
                   }
                   volume.FlushAll();
                   return humidityLogs;
               }
               catch(Exception ex)
               {
                   Debug.Print(ex.Message);
               }
           }
           else
           {
               Debug.Print("There doesn't appear to be an SD card inserted");
           }
           return new ArrayList();
       }
   }
}
This can be a static class, with two static methods:
- Save(ArrayList HumidityLogs) - Save the entire array list into a text file named logs.txt, serialized in json format.
- Load() - Reads the content of logs.txt, deserialize it and converts the list into an ArrayList of HumidityLogs, and returns it to the App class, where its invoke in its constructor.
Add App class
For this project, we want to implement a common App software pattern to control all the Network and Controllers make things cleaner and robust. Add a new App class to your project, and copy the following code:
using System;
using Microsoft.SPOT;
using System.Threading;
using Netduino.Foundation.Network;
using Maple;
using Netduino.Foundation.LEDs;
using System.Collections;
using N = SecretLabs.NETMF.Hardware.Netduino;
using Netduino.Foundation.RTCs;
namespace PlantHost
{
   public class App
   {
       public static ArrayList HumidityLogs;
       protected Timer _timer = null;
       protected TimerCallback _timerCallback = null;
       protected DS3231 _rtc;
       protected RgbPwmLed _rgbPwmLed;
       protected MapleServer _server;
       protected HumiditySensorController _humiditySensor;
       public App()
       {
           InitializePeripherals();
           InitializeWebServer();
           HumidityLogs = new ArrayList();
           HumidityLogs = MicroSDController.Load();
       }
       protected void InitializePeripherals()
       {
           _rtc = new DS3231(0x68, 100);
           _rgbPwmLed = new RgbPwmLed
           (
               N.PWMChannels.PWM_PIN_D6,
               N.PWMChannels.PWM_PIN_D5,
               N.PWMChannels.PWM_PIN_D3,
               1.05f,
               1.5f,
               1.5f,
               false
           );
           _humiditySensor = new HumiditySensorController
           (
               N.Pins.GPIO_PIN_A0,
               N.Pins.GPIO_PIN_D7
           );
           _rgbPwmLed.SetColor(Netduino.Foundation.Color.Red);
       }
       protected void InitializeWebServer()
       {
           var handler = new RequestHandler();
           handler.GetPlantHumidity += OnGetPlantHumidity;
           _server = new MapleServer();
           _server.AddHandler(handler);
       }
       public void Run()
       {
           Initializer.InitializeNetwork();
           Initializer.NetworkConnected += OnNetworkConnected;
       }
       private void OnNetworkConnected(object sender, EventArgs e)
       {
           _timerCallback = new TimerCallback(OnTimerInterrupt);
           _timer = new Timer(_timerCallback, null, TimeSpan.FromTicks(0), new TimeSpan(0, 30, 0));
           _server.Start("PlantHost", Initializer.CurrentNetworkInterface.IPAddress);
           _rgbPwmLed.SetColor(Netduino.Foundation.Color.Green);
       }
       private void OnTimerInterrupt(object state)
       {
           HumidityLogs.Add(new HumidityLog()
           {
               Date = _rtc.CurrentDateTime.ToString("hh:mm tt dd/MMM/yyyy"),
               Humidity = (int)_humiditySensor.Read()
           });
           MicroSDController.Save(HumidityLogs);
           Thread _animationThread = new Thread(() =>
           {
               _rgbPwmLed.StartBlink(Netduino.Foundation.Color.Blue);
               Thread.Sleep(1000);
               _rgbPwmLed.SetColor(Netduino.Foundation.Color.Green);
           });
           _animationThread.Start();
       }
       private void OnGetPlantHumidity(object sender, EventArgs e)
       {
           Thread _animationThread = new Thread(() =>
           {
               _rgbPwmLed.StartBlink(Netduino.Foundation.Color.Orange);
               Thread.Sleep(1000);
               _rgbPwmLed.SetColor(Netduino.Foundation.Color.Green);
           });
           _animationThread.Start();
       }
   }
}
Initialization
At this point of this project guide, what's left is to first run the peripherals connected to the Netduino, which in this project, is the DS3231 (which is the RTC chip), a HumiditySensorController and a RgbPwmLed, and this last one will light up a red hue.
After setting up the peripherals, it now calls InitializeWebServer, and here you will use the RequestHandler. Then register the event handler for the exposed GetPlantHumidity method explained previously. Finally create a new Maple instance, and assign your RequestHandler object to its Handler property.
In the Run method, the first thing you need to do when starting the project is to use Initializer.InitializeNetwork();. Netduino boards need to initialize their network every time they're powered on, so before starting the Maple server, you need to make sure that the Netduino has connected to the network successfully, and that it has received a valid IP address. It will do so when the RGB LED has turned green.
Starting Maple
When the Netduino has joined the network, you can now safely start the Maple server by doing server.Start() passing the name of the server and the IpAddress assigned to it. At this point, the app is using a Timer to schedule firing an event to activate the sensor and log the data in the MicroSD card.
OnTimerInterruptevent handler
Three things are happening in this event handler:
- Add a new HumidityLog record to the ArrayList, by activating the soil sensor at that time.
- Save the updated ArrayList in the MicroSD card
- Blink the RGB LED blue for 1 second to indicate that the Netduino is using the sensor.
OnGetPlantHumidity event handler
This method will be fired whenever a client request has been received, and it will make the RGB LED blink for one second in an orange hue to indicate that the Maple has received a server request.
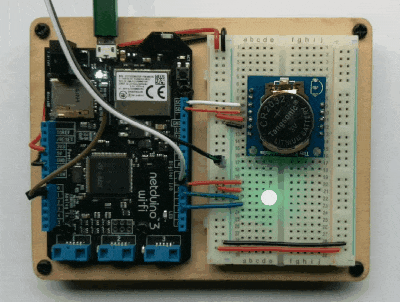
Run the PlantHost project
That is everything that you need to do for the PlantHost project. When you run the project, you will see the RGB LED lighting up red, and it will turn green until it successfully joins your network.
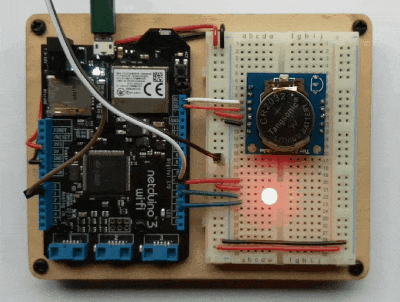
Right after joining the network, the next thing it will do is activate the sensor to check the soil humidity right away. Every time it does that, the RGB LED will blink blue for one second, and then it will go back to green.
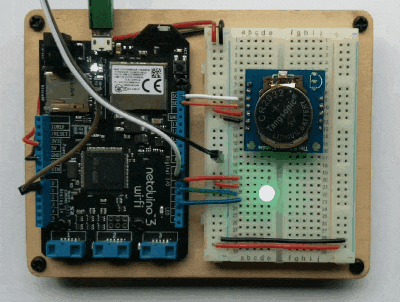
Finally, when PlantHost is receiving client requests, the RGB LED will blink orange for one second, and it will turn back to green.
Step 6 - Setting up the Xamarin.Forms PlantRemote project
Next part in this project getting the Xamarin.Forms app running on your phone. This project can be found in the Netduino_Samples/Connected_Plant repo. The code that runs on the Netduino is in the PlantHost app folder. The Xamarin.Forms project its in the PlantRemote folder. Download the PlantRemote project to your computer/mac, and open it on the latest version of Visual Studio available. The common code project should look like this:
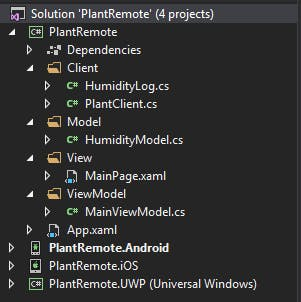 PlantRemote project solution
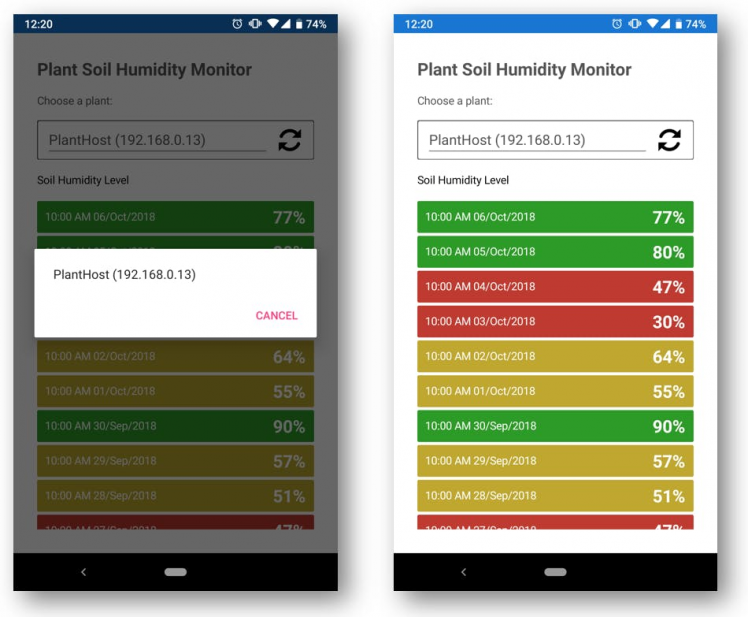
The take away for this project is the how we connect to maple using the MapleClient NuGet Package, which has a simple implementation of a HttpClient to send/receive server requests to/from the Maple server, and a UdpClient to receive UDP broadcast messages coming from one (or more) Maple servers running, and the app will list them on a Picker so you can select to which Netduino you wish to connect to and send requests. Lastly, the class where you send the API requests to maple is in the PlantClient class. Notice that it extends from MapleClient, and it has the /PlantHumidity request data from your Netduino.
The GetHumidityAsync function will send a get PlantHumidity request to the Netduino, and will return the HumidityLogs and display the data in a ListView.
 PlantRemote project
Step 7 - Running the project samples
Now run the PlantHost project on your Netduino, and wait till your RGB LED turns green, this indicates that the Netduino has successfully joined your network and has started the Maple Server.
Finally, run the PlantRemote app on your phone or Windows, and see how once it finds the Maple server, it will automatically request data, and you can manually send a request by pulling the list down, shown below:
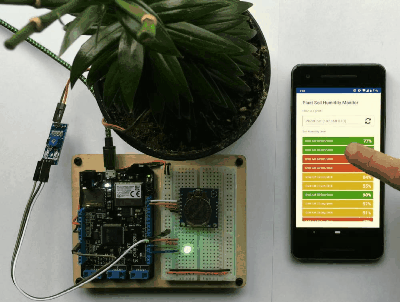
PlantHost and PlantRemote projects in action!
Check out Netduino.Foundation
This project is only the tip of the iceberg in terms of the extensive exciting things you can do with Netduino.Foundation.
- It comes with a huge peripheral driver library with drivers for the most common sensors and peripherals.
- The peripheral drivers encapsulate the core logic and expose a simple, clean, modern API.
- This project is backed by a growing community that is constantly working on building cool connected things and are always excited to help new-comers and discuss new projects.
References
Schematics, diagrams and documents
Code
Credits
Related products


Leave your feedback...