
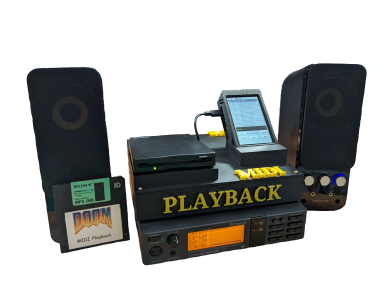
Midi Playback Device (floppy Edition)

Made by RetroAndGaming / 3D Printing / Music / Retro Tech
About the project
Why buy a good looking retro Roland MT-200 to play back your midi files from floppy when you can make your own creation! Right?
Project info
Difficulty: Moderate
Platforms: Raspberry Pi
Estimated time: 1 day
License: Creative Commons Attribution-NonCommercial CC BY-NC version 4.0 or later (CC BY-NC 4+)
Items used in this project
Hardware components


Software apps and online services
Story
Intro
MIDI files fascinated me when I was young. Both because so much music could be stored in so little space but also because they just sounded BAD. At least when I tried to play them. I would later learn however that the reason they did not really sound good was that I did not have the expensive equipment needed to make MIDI shine.
Just listen to how good the game Duke Nukem 3D could have sounded if you had proper equipment back when it was released in 1996. And also have a look at what we're actually trying to make:
I later also learned the secret to why the MIDI files are so small. They do not contain any music at all! Well, not in the modern sense at least. A Midi file just contains the instructions needed to instruct a sound module to play the music!
As you saw in the video above, this MIDI Playback Device is just that. It plays back the instructions from the specified MIDI file located on a floppy disk. These instructions are then sent to a Sound Module that will interpret the instructions and make beautiful sound/music.
That means that to complete this setup you also must buy a sound module or even more interestingly, build your own for which I highly suggest the excellent MT32-Pi project. I’ll leave a link to the project and a video where I build one as well in the references below.
The Build
I’ve made a two-part series on YouTube that shows the build in full including the troubles:
Choosing the correct OS
The Raspberry Pi has to be setup with the Raspberry Pi OS (Debian Bullseye 64-bit). The OS can be found in the Raspberry Pi Imager under Raspberry Pi OS (Other). This OS contains the drivers needed by the screen and it will save you a lot of work.
The build is pretty straight forward actually. Once you have acquired all the stuff I suggest that you attach the touch screen to your Raspberry Pi first. The following tutorial will explain how to set it up and how to rotate it correctly (also rotating the touch settings). This turned out to be the hardest part (borderline black magic) but once I followed this tutorial, I finally made it work:
The next step will be to attach the USB Floppy drive and copy some MIDI files to it. Windows 11 still supports floppy drives, but I had to write A: in Windows Explorer as the device letter A is not automatically listed anymore. Or you can use the Raspberry Pi to copy the files to the floppy as well.
Now that you have a floppy with some MIDI files it’s time to hook it all together! Remember to use a powered USB hub as the Raspberry Pi does not have enough juice to power all of it. Hook up keyboard, floppy drive, the MIDI to USB adapter and the Raspberry Pi to the USB hub. The MIDI to USB adapter needs to be plugged into a sound module (MIDI in).
Next suggested step is to test that everything is working. This can be done by using the command line tool aplaymidi.
To list all devices and find your USB to MIDI adapter type:
- aplaymidi -l
This will list all devices and their corresponding port number. In the video you see that my Roland UM-One USB to MIDI adapter got assigned the port number 20:0. Thus I was able to play a midi file by executing the command:
- aplaymidi -p 20 <path to MIDI file>
If you abort when playing a file some tones may hang. To remedy this we issue the all-notes-off command.
All Notes Off
To list the <device> number:
- amidi -l
To send the all-notes off signal:
- amidi -p <device> -S F07E7F0901F7
The floppy drive is automatically mounted under /media/<username>/<GUID>/ meaning that you will find the MIDI files added to the floppy here. Unfortunately, the GUID changes on every reboot or even when changing the floppy disk.
At this point you should have both found the USB to MIDI adapter (aplaymidi -l) and been able to play your first MIDI from floppy using the command line tools described above.
Software
The code I made for this project is hosted on visualstudio.com:
In essence the software is just a UI on top of the command line tools that we used above to play MIDI files. It will search for the floppy drive, when found list the MIDI files on the root of the floppy and enable the user to play the selected MIDI file.
Install the program by copying the source files in a folder called source under your users home directory /home/<username>/source.
The dependencies for the Python program and how to install them in a virtual python env are specified in the comments at the top of the MidiPlayback.py file. It also specifies some relevant learning articles.
Three variables has to be updated to reflect your system. There are NOTE comments for all of these to make them easy to find inside the MidiPlayback.py file. The note also specifies example values to hopefully make it easier and more clear.
To make the program automatically launch on startup of the OS you might want to create a MidiPlayback.sh file containing the following (change username so it reflects yours) :
#!/bin/bash
cd /home/<username>/source
source ./env/bin/activate
cd MidiPlayback
python MidiPlayback.py
The following article will show you different ways to call a script automatically when your Raspberry Pi boots:
3D Models
- HyperPixel 4 Case: https://www.thingiverse.com/thing:4280820
- Cable holder: https://www.thingiverse.com/thing:2481258
- MIDI Playback Device Case: https://www.thingiverse.com/thing:6629694
References:
- MT32-pi Project: https://github.com/dwhinham/mt32-pi
- Me building the MT32-pi:
Credits
RetroAndGaming
I like to tinker and code. If you want to view other projects head over to my YouTube channel: https://www.youtube.com/@retroandgaming
Related products


Leave your feedback...