
Mearm And Espruino - Remote Controlled Robot Arm
About the project
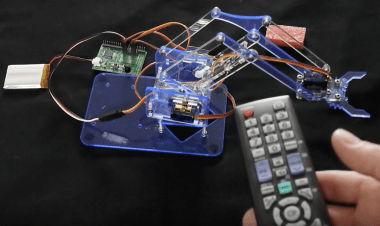
The MeArm is a small, cheap Robot Arm kit designed by Ben Gray of Phenoptix. It uses Servo Motors and laser cut acrylic.
Project info
Difficulty: Easy
Platforms: Espruino
Estimated time: 2 hours
License: Apache License 2.0 (Apache-2.0)
Items used in this project
Hardware components


Story
Wiring Up
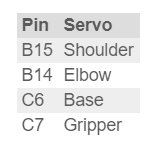
Plug the Servo Motors into the servo header on the Espruino board as follows:
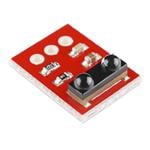
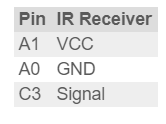
And plug the IR receiver directly onto the board, such that:
Software
Just copy and paste the following code into the right-hand side of the Web IDE, and click Send to Espruino.
We've explained in comments how everything works, but as you won't have the same TV remote control as us, when you press a button Espruino will print Unknown 12345789. Copy the number you get when you press each different button, and replace the numbers that we used with your numbers.
- // Where the Servos are connected
- var servos = {
- shoulder : B15,
- elbow : B14,
- base : C6,
- hand : C7,
- };
- // Add a variable that the 2 functions below will use
- Pin.positions = {};
- // A function that will set pulse width modulation up on the servo
- Pin.prototype.goto = function(pos) { // -1 .. 1
- Pin.positions[this] = pos;
- console.log(this,pos);
- analogWrite(this, E.clip(0.5*pos+1.5,1,2)*0.05, {freq:50});
- };
- // This will just move one step in the direction that is given
- Pin.prototype.move = function(dir) {
- Pin.positions[this] = E.clip(Pin.positions[this]+dir,-1,1);
- this.goto(Pin.positions[this]);
- };
- // Is the hand clenched?
- var clenched;
- // These are the values for how much the servo should move if the hand is clenched or not. The values you need will depend a lot on how you assemble your MeArm
- var hand_on = 0.15;
- var hand_off = -0.2;
- // On initialisation, set the MeArm up to it's default positions
- function onInit() {
- servos.shoulder.goto(-0.5);
- servos.elbow.goto(0);
- servos.base.goto(0);
- clenched = false;
- servos.hand.goto(hand_off);
- }
- /* This is a simple scripted sequence of movements. The base is left alone, but the arm:
- * * Moves to it's starting position with an open gripper
- * * Reaches out
- * * Closes the gripper
- * * Returns to its original position
- * * Releases the gripper
- */
- function doGrab() {
- servos.shoulder.goto(-0.5);
- servos.elbow.goto(0);
- servos.hand.goto(hand_off);
- setTimeout(function() {
- servos.shoulder.goto(-1);
- servos.elbow.goto(-0.4);
- setTimeout(function() {
- servos.hand.goto(hand_on);
- setTimeout(function() {
- servos.shoulder.goto(-0.5);
- servos.elbow.goto(0);
- setTimeout(function() {
- servos.hand.goto(hand_off);
- }, 800);
- }, 500);
- }, 800);
- }, 800);
- }
- /* As we're plugging the IR receiver right into 3 GPIO pins,
- we have to set them up to give it the power it needs */
- A1.write(1);
- A0.write(0);
- /* Set up the IR receiver. The codes used here are the codes that we got
- from our remote control, so you'll have to use the codes shown by the
- `print("Unknown "+code)` statement below. */
- require("IRReceiver").connect(C3, function(code) {
- switch (code) {
- case "111100000111000000100000010111111": onInit(); break; // power
- case "111100000111000000101100010100111": doGrab(); break; // menu - start 'grab' sequence
- case "111100000111000000100100010110111": servos.elbow.move(0.1); break; // ch +
- case "111100000111000000000100011110111": servos.elbow.move(-0.1); break; // ch -
- case "111100000111000001010011001011001": servos.base.move(-0.1); break; // left
- case "111100000111000000100011010111001": servos.base.move(0.1); break; // right
- case "111100000111000000000011011111001": servos.shoulder.move(0.1); break; // up
- case "111100000111000001000011001111001": servos.shoulder.move(-0.1); break; // down
- case "111100000111000000001011011101001": clenched = !clenched;
- servos.hand.goto(clenched ? hand_on : hand_off); break; // ok
- default: print("Unknown "+code);
- }
- });
- // Finally, initialise
- onInit();
Credits
Espruino
Espruino, Espruino Pico and Puck.js are low-power Microcontrollers that run JavaScript. Espruino is a JavaScript Interpreter for Microcontrollers that is designed to make development quick and easy. The Espruino interpreter is firmware that runs on a variety of different microcontrollers, but we also make Espruino Boards that come with the interpreter pre-installed and are the easiest devices to get started with. However Espruino itself isn't just the interpreter firmware or hardware - there's also the Web IDE, command-line tools, documentation, tutorials, and modules that form a complete solution for embedded software development.
Leave your feedback...