
Low Code Gps Asset Tracker And Map Display
About the project
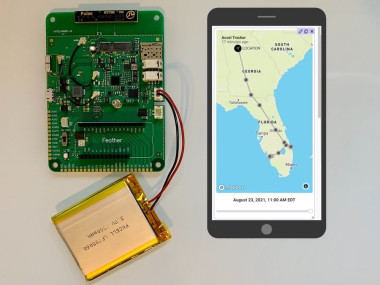
Build a GPS-enabled tracker with just a few lines of code to a Blues Wireless Notecarrier, and visualize it with IoT platform Datacake.
Project info
Difficulty: Easy
Platforms: Adafruit, Blues Wireless
Estimated time: 2 hours
License: GNU Lesser General Public License version 3 or later (LGPL3+)
Items used in this project
Hardware components

Story
Recently, I joined the IoT startup Blues Wireless as a staff software engineer. I had no Internet of Things experience prior to this - sensors and microcontrollers and breadboards were not the kind of development I'd been doing.

Photo by Robin Glauser on Unsplash
But when I learned about how Blues is making cellular connectivity easy for IoT developers - and all the positive implications that has, I was hooked. Imagine being able to have IoT anywhere there's a cell signal - no Wi-Fi ranges, no Ethernet cables, if you've got one bar of cellular service, your IoT app can share the data it's collecting. That's what Blues is enabling.
And so I've begun my IoT learning journey, because although I don't program the Notecards, I want to understand and use the products we sell every day.
And along that vein of IoT virtually anywhere: one thing that's always interested me are the trackers where you can see something going from one place to another, and the steps in between. Packages, pizzas, vehicles - it's cool to be able to see their progress along the way to their final destination.
So when I learned that Blues has products with both cellular and GPS capabilities built-in, I wondered how easy it might be to make my own vehicle tracker, and test out our developer documentation at the same time.
Part of what makes Blues unique is the developer website, which has detailed tutorials to help people (like me) get started using our products.
This tutorial covers building a portable asset tracker recording GPS coordinates, sending that data to a cloud via a cellular module, and displaying that data on a map with the help of a low-code IoT platform.
Why choose a Notecarrier-AF?
The first thing I needed to do for my asset tracker project was decide which Blues Wireless product would best fit my needs of cellular connectivity and GPS location tracking, and I ended up choosing the Notecarrier-AF.
I chose this product for a couple of reasons.
- The Notecarrier-AF (included in the Feather Starter Kit) is the easiest way to get started with the Notecard and a microcontroller, and even comes with an Adafruit Feather ESP32 HUZZAH. It has 500 MB of data and 10 years of cellular service starting at $99. No activation charges, no monthly fees, just configure it upon arrival and you're ready to go.
- It's designed to operate on battery power, be "always-on" to maintain time & location, and typically draw less than 8µA, when idle. The Notecard that attaches to the Notecarrier is ultra-low power, which is critical for portable IoT projects like this one that will rely on battery power instead of steady state power supplies.
Here's a snapshot of the bells and whistles this little development board boasts right out of the box (it's just slightly larger than a deck of playing cards).

Notecarrier AF specs from the Blues website.
In addition to the Notecarrier-AF, I also bought an Adafruit Lithium Ion Polymer Battery - 3.7v 2500mAh (LiPo battery), to power this board as it roams around with me in my car.
When the Notecarrier is connected to a computer via the micro-USB port, as it will be for the initial configuration, the computer can power the board, otherwise it needs its own standalone power source.
There is a LiPo battery JST connector on the side of the board (which can recharge a battery when the board's connected to a computer via the micro-USB power port), and right next to that is a solar panel JST connector. If need be, this tracker can run entirely via solar power and never needs to be plugged in to recharge.
With my Notecarrier-AF in hand, my cellular and GPS wires correctly connected to the board and the Notecard, and a LiPo battery to power the whole thing, it's time to set up the cloud project that will initially receive the data collected.
Note: For this project, don't install the Adafruit Feather microcontroller - it will drain the battery much too fast and is not necessary for this project. It's best kept when you'll be programming it and giving it a steady power source.
Here's a picture of my working development board and its LiPo battery source.

My Notecarrier-AF hooked up to its LiPo battery - this little device is ready to go. Notice I've removed the Feather microcontroller from the development board - it's a battery killer.
Create a Project in Notehub to Send Data to
Before jumping into configuring the Notecarrier itself, we need to set up a cloud project in Notehub.io, which is where the recorded sensor data will flow.
If you haven't, go ahead and create an account now - it's free for up to 5, 000 routed events (routed events = data transmissions from Notehub to your cloud endpoint of choice) per month, which is plenty for what we'll be doing.
I already created a Notehub account (and a few other starter projects), so this is what my current dashboard looks like after signing in.

Notehub dashboard.
To make a new project, click the "Create Project" button in the top right of the screen and fill in the details in the modal of a new project name and product UID.

Notehub create a new project modal.
After the new project is created, copy the project UID - that's what we'll need in the next step to connect the Notecarrier to our Notehub project.
Project Setup: Configure the Notecarrier to Record GPS Coordinates When in Motion
As I said before, I'm a newcomer to IoT development. For my first IoT project, I wanted to ease into the programming portion, and the Notecarrier-AF obliged.
I've been building websites for 5+ years but my tech stack has mainly been JavaScript and Java. Some popular IoT programming languages like Python, Go and C++ are not what I've used on a daily basis for a long time.
Lucky for us, the Blues developer site has thorough documentation, including how to configure a Notecarrier to be an asset tracker (this is what I used to set my project up).
After going to the asset tracking instruction page, you can connect the Notecarrier to a computer via its micro-USB input and use the in-browser Notecard Playground to enter the configuration commands.
The Notecard CLI is a command-line utility for interaction with a Notecard connected directly to a computer over USB. If you're planning to do more Notecard programming, I'd recommend downloading it locally from GitHub so you can use your preferred terminal to interact with the Notecards.
Here's mine connected to my MacBook with a micro-USB to USB-A connector cable. I got this one for cheap from Amazon, plus a USB-A to USB-C adapter -because Apple must always use something different than everyone else (lightning charger, anyone?).

Notecarrier-AF connected to MacBook Pro via micro-USB to USB-A connector cable.
Once you're connected to your computer, you can expand the Notecard Playground on the right side of the screen and follow along with the set up instructions.
I just used the barebones "Tracker Configuration" instructions, so I'll show you my code snippets (also included in the code portion of this article) but spare you the details - you can read them when you visit the page yourself.
Step 1: Factory restore the Notecard and enable the accelerometer
{"req":"card.restore","delete":true}This resets the Notecard to like new in case it was being used in a previous project for other purposes.
The command also enables our accelerometer, which makes all the rest of the requests work. If you choose not to factory reset the Notecard, you can also turn the accelerometer on with this line of code.
{"req":"card.motion.mode","start":true}Step 2: Set the ProductUID, Mode and Sync Times
{
  "req": "hub.set",
  "product": "[YOUR_COPIED_PRODUCT_UID_HERE]",
  "mode": "periodic",
  "outbound": 60,
  "inbound":  720
}
The periodic setting will only send any un-synced outbound tracking info to Notehub every 60 minutes, and it will always sync on the inbound interval every 720 minutes in order to process new Notes and environment variables from Notehub.
Step 3: Set the Notecard to use periodic or continuous location mode.
{
  "req":     "card.location.mode",
  "mode":    "periodic",
  "seconds": 3600
}
periodic mode is recommended for battery powered applications such as ours, where near real-time updates aren't necessary.
You can also set "mode":"continuous" if you need low-latency location tracking and power consumption is not a concern. For a battery powered application such as ours, periodic data syncs are recommended.FYI, if you set your periodic outbound data syncing to 5 minutes or less, the Notecard will operate as if it's in continuous mode instead.
Note: When in periodic mode, the GPS module will only activate to take a reading if the Notecard detects movement through its onboard accelerometer - this is a battery saving feature as well.
Step 4: Configure the Notecard to store tracking results in a tracking file that will be synced to Notehub, and set a heartbeat to check-in even if the device has not moved.
{
  "req":  "card.location.track",
  "start": true,
  "heartbeat": true,
  "hours": 12
}
card.location.track will store location-tagged tracking data like velocity, bearing, and distance in a Notefile that will be sent to Notehub on each sync. The default file is _track.qo, but you can specify your own file name with the file field.
If you expect your asset to be stationary for periods of time (like in a parked car overnight), you can use heartbeat and hours to instruct the Notecard to create a tracking entry at a defined interval, regardless of motion. The heartbeat is just a gut check that the Notecard tracker is still working.
And now we're ready to start collecting some data with our tracker. Put yours in your car or take it for a walk and then we'll check that the data's reaching our Notehub project.
Check Out Event Data in Our Notehub Project
After you've gathered some data by toting the Notecarrier with its LiPo battery around for a bit, let's check out our data in Notehub.
Log in to Notehub again, click on your new project and select the "Events" tab on the left hand side.
You should see some events on this page and if you filter in the top bar to just track.qo-type files, you should see a bunch like the screenshot below.

Tracking events that my Notecarrier recorded as I was visiting Florida for vacation.
Select one of these events at a time and click into it to see even more data - the data we'll be interested in is contained in the raw JSON request, which you can see when you click on the "JSON" tab along the top.

The event's JSON data has the latitude and longitude of the Notecarrier's location, which is what we'll need for our asset tracker project.
Contained within all this data are the properties of where_lat and where_lon - this is our Notecarrier's location at a certain point in time, and what we'll need to generate our location points on a map.
So now that we've got data syncing to Notehub, it's time to send this data somewhere to display.
Setup Datacake to Accept Data from Notehub
There are plenty of options that Notehub will send its data to: lots of the popular cloud services like AWS, GCP and Azure have route tutorials on the developer site, but the low-code option I chose was Datacake because it already has a map widget option available once you feed the correct data in.

Datacake homepage
Once again, there is a Notehub to Datacake integration tutorial available on the Blues developer site, which is really helpful to get going.
Here's the important parts of that tutorial which are relevant to us:
Step 1: Create a Datacake account
Create a new account in Datacake. The free account option includes accessing data from two devices, unlimited team members, and unlimited workspaces.
Step 2: Create a device in Datacake
Once registration is done, we're directed to a default workspace where devices (like the Notecarrier) and products (like the map widget) are added.
Click the "Add a Device" button in the workspace, select the "API" product option and Datacake product option of "New Product", and give it a product name like "Notecarrier GPS Data".
Step 3: Associate a Notecard with Datacake
The next thing Datacake needs is a Serial Number for the device to be associated with the account.
Notecard's globally unique Device UID can work here. Open Notehub and navigate to the "Devices" menu. Copy the relevant Device UID.

The globally unique Device UID for the Notecard in Notehub.
Take the Device UID and paste it into the Serial Number input and give it a name like "Asset Tracker".
Datacake device associated with Notecard's unique Device UID.

Datacake device associated with Notecard's unique Device UID.
Step 4: Choose a Datacake dataplan
After the device info is added, select the free Datacake plan - you can always upgrade later if you want longer data retention. And we're almost ready to start sending our Notecard data to Datacake!
Step 5: Create a route in Notehub for Datacake
Final step before we can start consuming our Notehub data in Datacake: create a route to connect the two services.
Under your Datacake device's "Configuration" tab, there's a section labelled "HTTP endpoint URL". Copy this URL.

The HTTP endpoint URL available in Datacake's device configuration tab.
Then head over to Notehub, and in your project's "Routes" tab, you'll click the "CreateRoute" button, select the first option "General HTTP/HTTPS Request/Response", and fill in all the relevant info about this route that will allow Notehub to send any data it receives to Datacake.

The route type you want to connect to Datacake: General HTTP/HTTPS Request/Response.
We'll give the route a Name like "Datacake", paste the URL from Datacake into the Route URL input and choose to send only "Select Notefiles" - the `_track.qo` Notefiles because those are the Notefiles with the GPS location data we're after.

The details for creating a new Notehub route connection to our Datacake instance.
Save your new route, and we should be ready to interpret the data being sent to Datacake.
Add Fields & Decode Data with Datacake HTTP Decoder
All right. We're now to the part where we need Datacake to do something with the JSON payload Notehub is sending.
- Define fields
In Datacake, head back to the "Configuration" tab and we'll define a few fields to hold various pieces of data we're receiving.
By default, our Notecarrier-AF is recording its current location, current temperature, motion and time, so let's pull out a couple of these data points.
In Configuration, scroll down towards the bottom of the page to the Fields section and click the "Add Field" button.
This will open a modal with a variety of different data types, one of which is "Geolocation". Select this Type option, give it a Name like "location" and a matching Identifier that will be the same as name but in all caps.
Click "Add Field" and you're done with this first field.

Location field in the Datacake "Configuration" tab.
After that, I'd add a couple more Fields just for some more data to play with in the display section later. I added a field for TEMP and TIME and MOTION - we may not use all the data fields but at least we'll have access to them.
For each new field, just try to select the correct Type from the outset - it cannot be updated once it's been created so if something starts as a "Float" and later you realize it needs to be a "String", you'll have to create a new field for it.

Some fields I added in the Configuration for temp, location and time.
2. Decode Notehub Data
With the database fields in place, it's time to configure the payload decoder. Scroll to the HTTP Payload Decoder section, which contains a code editor with syntax highlighting.

HTTP Payload Decoder, also in the Datacake Configuration tab.
Decoder is a JavaScript function that converts the payload from Notehub into a JSON object corresponding to the database fields we just created. The function will return a one-dimensional array of values pulled from the decoded object.
So our values will include the data temp, motion, location, and time.
location is a custom value we created inside this decoder function from a combination of the raw data's where_lat and where_lon values because that's how Datacake's "Geolocation" field needs its data to be structured.
Copy and paste the following function into the code editor, replacing any existing code.
function Decoder(request) {
   var data = JSON.parse(request.body);
   var device = data.device; // this is your Device UID

   var decoded = {};
   decoded.temp = data.body.temperature;
   if(data.body.motion){
        decoded.motion = data.body.motion;
   } else {
        decoded.motion = 0;
   }
   decoded.location = "(" + data.where_lat + "," + data.where_lon + ")";
   decoded.time = data.when;

   return [
      {
            device: device,
            field: "TEMP",
            value: decoded.temp
      },
      {
            device: device,
            field: "MOTION",
            value: decoded.motion
      },
      {
            device: device,
            field: "LOCATION",
            value: decoded.location
      },
      {
            device: device,
            field: "TIME",
            value: decoded.time
      }
   ];
}
And now you'll be getting those values too in your Datacake decoder.
If you'd like to test out the decoder and make sure it works before the next data payload is delivered automatically from Notehub, you can copy one of the raw JSON payloads from Notehub and paste it in to the Try Decoder section's Body and click the "Try Decoder" button.
This is also helpful for debugging your HTTP Payload Decoder function as you're building it.

The Try Decoder section to test our how the HTTP Payload Decoder function works when JSON is passed into it.
At this point, our Datacake instance should be decoding data from Notehub correctly, so take the Notecarrier out for a drive to generate some new data, and then we'll add widgets to the Datacake dashboard to see our data nicely displayed - including our locations.
Render the GPS Locations with the Datacake Map Widget
We're to the best part now - the data visualizations part.
With data fields defined and data routing from our Notecarrier into Notehub, then from Notehub over to Datacake and through the HTTP Payload Decoder, the last step is displaying those pieces of data.
- Toggle to edit the dashboard
In Datacake, click in to the "Dashboard" tab, toggle the little button on the right side of the screen with the little </> symbol. This lets us edit the display of the dashboard.
2. Add a Map widget
To add a new widget to the dashboard, click the "Add widget" button.

This Datacake dashboard is in "Edit" mode, click the "Add widget" button to add new data displays.
After the button's clicked, a modal will pop open showing all the different options available.
For our asset tracker, we'll select the Map option.

Widget options in the Datacake dashboard.
Once you've got your map widget chosen you can customize all sorts of things with it: the map Title, the map Appearance, the Data (this is the important part for us), and the Timeframe.

Select the data field Datacake should use to populate this map.
3. Choose the location data field
On the Data tab, choose the Field from your data options to display on the map (there should only be one data field that meets those criteria right now, the location option.
Finally, click on the Timeframe tab and decide how much time you'd like the map to display - you can readjust this at any time to see more or less history.
When you're satisfied with how things look in the preview modal click the "Save" button.

Selecting different timeframes to display on the map widget.
Then your map should appear on the dashboard and you can drag and adjust its size and display.
4. Add another widget for temperature
We can also add more widgets for other types of data here too. Let's add a temperature chart too.
Click the "Add widget" button once more and select the Chart option. This widget has very similar tabs to the Map widget; you can add a custom widget Title, select what Data to show on the chart, the Type of chart (Bar, Line, Pie, etc.), custom Axes for the chart, and specific Timeframe too.

The temperature chart widget where I chose to display the temp data decoded from Notehub.
Save these changes as well, and then drag and re-size your widgets until you're satisfied.
5. Toggle the dashboard again and we're done!
Finally, toggle the dashboard out of edit mode to save all your changes and check out your new dashboard.
One cool feature is that the map has a slider so you can drag it along to different points in time and see when different data points were recorded.

Datacake dashboard with our newly added map and temperature widgets.
And that's it.
Success! We've now got a working asset tracker that's sending data to Notehub, which sends it to Datacake, which displays it in a nice map visualization!
Gotchas: Troubleshooting the Asset Tracker
Now although this tutorial seems very straightforward, I did encounter some interesting issues getting to this point, so let me try and call out some of them to help you avoid my mishaps.
Possible issue #1: The Notecarrier-AF battery drains fast
I encountered this issue early on where it seemed like my Lithium Ion battery lasted only a couple of days before the Notecarrier would brown out and stop recording metrics - but the Notecard is supposed be ultra low power, especially when not in use.
Yes, the Notecard is low power, but the Adafruit Feather ESP32 microcontroller on top of the Notecarrier-AF is not. It's quite the battery hog, which one of the embedded hardware engineers revealed to me when we were trying to troubleshoot why my Notecarrier (which is supposed to last atleast 3 years on a single battery charge) was dying so quickly.
Solution: Remove the Feather microcontroller fromthe top of the development board for better battery life (it's not needed for this project anyway).
Here's a second issue you might encounter.
Possible issue #2: Datacake's not displaying themost up-to-date data
There's a couple of possible reasons the Datacake map might not be displaying data even though Notehub has recorded the event in its logs.
Solution #1: Check Datacake's debugging API
In your Datacake URL, you can add on the query parameters of /t/debug to the end of your URL and see exactly what data that Datacake has received and how it's interpreted it.
This may help you determine that some data field you set as a type of String is actually a Float and Datacake doesn't know what to do with it. That's a potential reason data wouldn't display correctly.

Adding the /t/debug query parameters at the end of the URL and see exactly what data's being interpreted by Datacake.
Solution #2: Put the Notecarrier near a window
Another tip I learned from one of my coworkers is that the Notecarrier-AF needs decent access to the sky in order to triangulate its current position. It needs at least a couple of satellites to figure out where in the world it is.
Putting this tracker inside a car's glove box or under the seat probably isn't going to you the best results. If something's not registering when it should (like your tracker thinks it's still at your last location), try moving it nearer to a window to see if it reorients itself.
Solution #3: Give it some time
Finally, if data's not showing up in Datacake, just give it a little time. Early on while I was testing this out, I wasn't seeing data for a drive I'd taken the night before on the map the next morning.
But when I checked the Datacake dashboard again in the afternoon, the data was all there. ?♀️ Just give it some time and come back later, things may be resolved by then.
Real World Applications for the Asset Tracker
This project left me feeling very accomplished as a first foray into the world of IoT development, but you might be wondering about actual real world applications this would be useful for. I can think of a few off hand:
- Fleet tracking - If you have a bunch of trucks making deliveries for a company during the day, this is a low cost way to keep track of where drivers are in their delivery schedules. And combining this with a little machine learning in the future, could help optimize route efficiency for time and gas and let customers know when they might expect their package.
- Kid tracking - Adding a tracker like this to your child's backpack could give you an easy way to discretely keep tabs on them as they walk to and from school or friends' houses, etc. I know most kids have smart phones nowadays, but this could provide extra peace of mind for parents.
- Bike tracking - If you get around by bicycle but have to lock it up when entering buildings and it gets snatched, a little tracker like this, attached to the bike in an unnoticeable location could be helpful in locating it again.
I'd love to know what asset you'd map - happy tracking! ?️
Code
Credits

Related products


Leave your feedback...