
Lora Gateway Based On Micropython Esp32

Made by Makerfabs01 / IoT
About the project
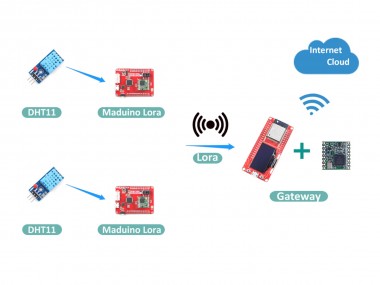
Using two LoRa nodes to send the temperature and humidity data to the gateway, and then upload it to the Internet through the gateway.
Project info
Difficulty: Moderate
Estimated time: 3 hours
License: GNU General Public License, version 3 or later (GPL3+)
Story
 Lora has been very popular in recent years. The wireless communication module using this technology is usually cheap (using free spectrum), small in size, energy-efficient and has a long communication distance, and is mainly used for mutual communication between IoT terminals or data exchange with a host. There are many LoRa modules on the market, such as RFM96W, which is equipped with SX1278 (compatible) chip, which is very small. I use it with MakePython ESP32 as a gateway.
Next, I will use two LoRa nodes to send the temperature and humidity data to the gateway, and then upload it to the Internet through the gateway. Here you will learn how to upload remote data of multiple LoRa nodes to the cloud through the gateway.
Step 1: Supplies

- 2*DHT11
MakePython ESP32 is an ESP32 board with an integrated SSD1306 OLED display.
Maduino Lora Radio is an IoT (Internet of things) Solution based on Atmel’s Atmega328P MCU and Lora module. It can be a real project for IoT projects(especially long-range, low power application )
Step 2: LoRa Node
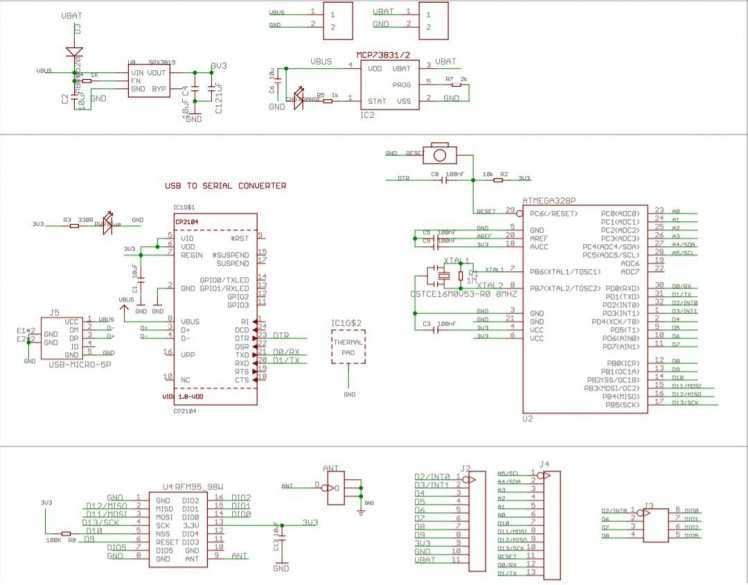
Schematic of Maduino Lora Radio

Arduino Lora Radio module as LoRa node, we use it to send temperature and humidity data to the gateway.
(This Wiki introduces how to use Maduno Lora Radio and send and receive data)
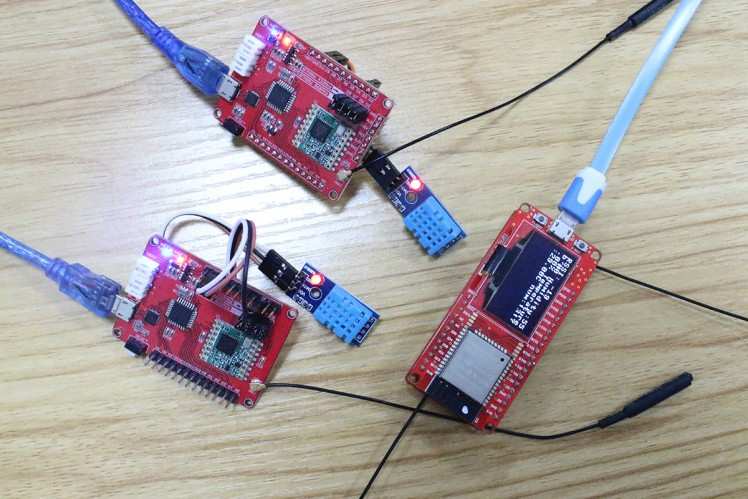
Step 3: Node and Sensor Connection

Node and sensor connection

Testing
The VCC and GND of DHT11 are connected to 3V3 and GND of Maduino, and the DATA pin is connected to D4 of Maduino.
Node 0 is in the park, node 1 is in the office building near the company, they are about 2 kilometers apart, and then I get their temperature and humidity data at home.
Step 4: Send Data to the Gateway
Download TransmitterDHT11.ino, open it on Arduino IDE.
When adding a node, modify the node number accordingly. For example, now use 2 nodes, the first node to modify the nodenum = 0 to run the program, the second node to modify the nodenum = 1 to run the program, and so on, you can add more node.
int16_t packetnum = 0; // packet counter, we increment per xmissionint16_t nodenum = 0; //Modify the node numberCollect data and print it
String message ="#"+(String)nodenum+" Humidity:"+(String)humidity+"% Temperature:"+(String)temperature+"C"+" num:"+(String)packetnum;<br>Serial.println(message);packetnum++;Send a message to rf95_server
uint8_t radioPacket[message.length()+1];message.toCharArray(radioPacket, message.length()+1);radioPacket[message.length()+1]= '�'; rf95.send((uint8_t *)radioPacket, message.length()+1);Open the serial monitor, you can see the collected temperature and humidity data, and send it out.
#0 Humidity:6.00% Temperature:27.00C num:0Transmit: Sending to rf95_serverSending...Waiting for packet to complete...Waiting for reply...No reply, is there a listener around?Put it aside, now we need to make the Lora Gateway.
Step 5: MakePython Lora

MakePython Lora Expansion board

Pin of the RFM96W

MakePython-ESP32-Pin-Definitions
This is the corresponding pin of the RFM96W module and MakePython ESP32. In order to facilitate connection with MakePython ESP32, I made a circuit board with the RFM96W module. Yes, there are two RFM96W on it, which can send and receive data at the same time, but now I only need one.
Step 6: LoRaWAN Gateway

LoRaWAN Gateway
LoRaWAN is a low-power wide-area network based on LoRa, which can provide one: low power consumption, scalability, high quality of service, and safe long-distance wireless network.
Assemble MakePython Lora and ESP32 to make a gateway that can receive remote data and upload it to the Internet.
Step 7: Download Code
Download all ‘xxx.py’ files from WiKi and upload them to ESP32.
Open the LoRaDuplexCallback.py file, You need to make some adjustments so that your ESP32 can connect to the network and upload data to the server.
- Modify the API_KEY you obtained in ThingSpeak (I will introduce how to obtain it later)
#https://thingspeak.com/channels/1047479API_KEY='UBHIRHVV9THUJVUI'- Modify SSID and PSW to connect WiFi
ssid = "Makerfabs"pswd = "20160704"Step 8: Receive Data
Find the on_receive (Lora, payload) function in the LoRaDuplexCallback.py file, where you can tell ESP32 what to do after receiving the data. The following code parses and displays the received temperature and humidity data.
def on_receive(lora, payload): lora.blink_led() rssi = lora.packetRssi() try: length=len(payload)-1 myStr=str((payload[4:length]),'utf-8') length1=myStr.find(':') myNum1=myStr[(length1+1):(length1+6)] myNum2=myStr[(length1+20):(length1+25)] print("*** Received message ***n{}".format(payload)) if config_lora.IS_LORA_OLED: lora.show_packet(("{}".format(payload[4:length])), rssi) if wlan.isconnected(): global msgCount print('Sending to network...') node = int(str(payload[5:6],'utf-8')) if node == 0: URL="https://api.thingspeak.com/update?api_key="+API_KEY+"&field1="+myNum1+"&field2="+myNum2 res=urequests.get(URL) print(res.text) elif node == 1: URL="https://api.thingspeak.com/update?api_key="+API_KEY+"&field3="+myNum1+"&field4="+myNum2 res=urequests.get(URL) print(res.text) except Exception as e: print(e) print("with RSSI {}n".format(rssi))Judging the number to distinguish the nodes, and uploading the data to the Internet through the URL, we can monitor the remote data of different nodes at any time. You can add more nodes and make similar changes to the code.
if node == 0: URL="https://api.thingspeak.com/update?api_key="+API_KEY+"&field1="+myNum1+"&field2="+myNum2 res=urequests.get(URL) print(res.text)Step 9: Use ThingSpeak IoT

ThingSpeak IoT

ThingSpeak IoT-1

ThingSpeak-3.
Steps:
- Sign up for an account at https://thingspeak.com/. If you already have one, sign in directly.
- Click New Channel to create a new ThingSpeak channel.
- Input name, Description, Select Field 1. Then save the channel on the bottom.
- Click the API Keys option, copy the API Key, and we will use it in the program.
Step 10: Result

Result

Result

Result - Internet
You can see the data of node 0 and node 1 on the screen, although they are 2 kilometers apart.
Log in to your ThingSpeak account and click on the channel you created, you can see the uploaded temperature and humidity data.
The field1 graph and the field2 graphs are the humidity and temperature data of the Lora node 0, and the field3 graph and the field4 graph are the humidity and temperature data of the Lora node 1.
Makerfabs provide one-stop PCBA service for you to turn your designs into prototypes and products rapidly. If you need custom PCBA manufactured or small batch PCB assembly, pls contact service@makerfabs.com.
Code
Credits
Makerfabs01
Makerfabs, Turnkey PCB Assemblies | Small Batch PCBA Prototyping | IoT Hardware Engineering.
Related products


Leave your feedback...