
Laser Tag Guns With Arduino

Made by maelstudio / Games & Gaming / Kids & Family
About the project
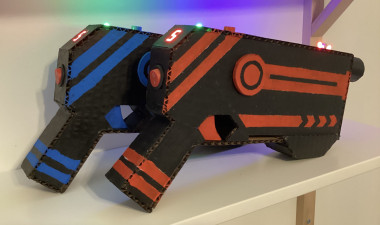
If you're a fan of Laser Tag, this project is for you. Combining basic electronics and cheap materials such as cardboard, you too can create Laser Tag guns with Arduinos to play at home with friends and family! The guns feature a cool pump reloading mecanism and a working trigger.
Project info
Difficulty: Moderate
Platforms: Arduino
Estimated time: 3 weeks
License: GNU General Public License, version 3 or later (GPL3+)
Items used in this project
Hardware components

View all
Story
!!! COMPONENTS LIST IS FOR 1 GUN.
I wanted to be able to play Laser Tag whenever I wanted so I created "laser" guns at home with Arduino and cardboard. Let's get started!
- Every player has 10 health points and a maximum of 5 ammo
- You can shoot by pressing the trigger and reload by pulling a pump
- A sensor is placed on top of your gun to detect when you get shot at. When you do, an indicator LED lets you and your opponent know
- You lose a health point when you get shot at, and you lose the game if you reach 0 HP
- Sound effects are played by a piezo buzzer!
I) Electronics
Let's start by making something clear. I know this is called Laser Tag, but my guns don't actually use lasers! Lasers, while being very precise, can be harmful if pointed in the eyes. So instead, I used infrared light for shooting. By placing a convex lens 4 cm away from the infrared emitter LED, we can focus the light beam to increase range and accuracy. They actually are infrared guns but laser sounds cooler.
I first designed a Tinkercad simulation of the circuit to see how everything would be connected. Here, I used an Arduino UNO but an Arduino Nano is more suitable for the project as it is smaller.

(from right to left): One push button is for detecting when we press the trigger to shoot, another one is for detecting when we pull the pump to reload and the third one is for restarting the game. The IR LED is for shooting and the red LED turns off when we are being shot at. The buzzer plays sound effects, the RGB LED displays our health points and the 7-segment display shows our ammunition count.
I then put everything together on a breadboard and wrote some code to make everything work together.
II) The build
The next thing to do was design the guns that would hold everything in place (each square is 5 mm, gun thickness is 38mm):

I included in my design a functional trigger and a "pump" to reload the gun, as well as an ammo counter and health points indicator LED. For the sliding parts, I used normal push buttons to detect when they are pulled. But this is not ideal as they require some force to be pressed. Instead, I recommend limit switches which are more lightly pressed. Also, the sketch is missing the IR receiver. It is placed at the front of the top wall, in between two colored LEDs.
~~~
So, here is how to build your own laser gun. For a detailed build video, I suggest you watch my YouTube video of the project. It is in French but there are subtitles that can be translated automatically.
- To get started, cut a flat piece of cardboard in the shape of side of the gun, with a hole for the trigger and space for the reload pump to slide. Everything will be constructed from here.
- Tape/glue an Arduino and a breadboard to it.
- Add the bottom wall of the gun.
- Glue identical pieces together to make the trigger. Leave two smaller pieces in the middle to attach a rubber band.
- Place the trigger with walls to make it stay in place. Use a rubber band to pull it forward and a limit switch behind to detect when it is pressed
- Create sliding pump for reloading mechanism, with a pin to attach a rubber band and a small square coming out to press the limit switch.
- Slide the pump onto the bottom wall. Use a rubber band to pull it forward and a limit switch behind to detect when it is pulled.
- Place front wall of the gun, with a circular hole (same diameter as lens) for the IR LED.
- Place IR LED
- Create a circular "barrel" (3cm long) and place the convex lens inside (lens should be 4cm away from IR LED). Glue the barrel to the front wall.
- Add top wall with holes for 2 colored LEDs, the IR receiver, the RGB LED (HP indicator) and the reset button. Connect all of those components as well with 220Ω resistors for the LEDs. One colored LED is facing you and another one is facing away from you, for your opponent to see.
- Add angled wall with hole for the 7-segment display to stick out. Connect the 7-segment display to the Arduino with seven 220Ω resistors.
- Place back wall of the gun with a hole for the on/off slide switch.
- Add handle walls and place the 9V battery holder inside, connecting it to the switch and the Arduino for power.
- Create 7 screw holders to screw on the top cover of the gun. I just glued pieces of cardboard together. Place 6 around the gun and 1 for the battery cover.
- Finally, cut the top cover the same shape as the bottom one. Cut the battery holder cover off so it can be easily opened with just 1 screw to swap the battery out when it dies.
- Finish it with some paint so your gun looks cool. Have fun with your design!
- Your laser gun is done! Now just repeat everything to make another one.
Schematics, diagrams and documents
Code
Credits
Related products


Leave your feedback...