

Dobot Magician Server

Made by jason-l-bogle / 3D Printing / Robotics
About the project
A web server for controlling a Dobot Magician robotic arm. My purpose for it is to use it as a feeding machine.
Project info
Items used in this project
Hardware components


Hand tools and fabrication machines
Story
A web server for controlling a Dobot Magician robotic arm
I needed to replace my 20+ year old machine and all of the specialized devices were just too expensive, so I got a Dobot Magician because it's much less expensive and more versatile than any of the specialized devices. Being in software development, I knew I could write code to make it work how I wanted. And being decent with Fusion 360 made me confident I could design the necessary models.
Video of how it works:
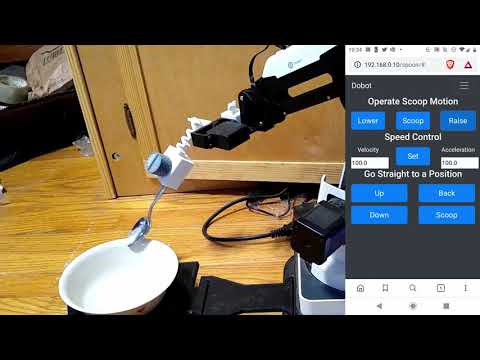
The video shows a pi zero w, but I'm using a pi 3b+ now as I think there's something in the code I need to fix so it works more reliably over longer periods of time. Right now the Dobot service I setup needs to be restarted every so often or it stops serving and the 3b+ handles that much better than the zero w. I'm pretty sure that issue is fixed now.
Feel free to take the models and code and modify them for anything you need. I want this to be easily accessible an modifiable by anyone who needs it. I'm including the f3d and step files to make that easier.
I want to thank luismesas for creating the pydobot project. It made getting this to work much easier. I use a modified version of his library. You can find that project at https://github.com/luismesas/pydobot
What You NeedThe following are necessary for this to work right.
- Dobot Magician (Note: I have only tested this on the Magician, not the Magician Lite and my research shows that it will need quite a few modifications to work with the Lite)
- A 3d-printer or access to a 3d-printer. I used an Ender 3.
- A Raspberry Pi you can leave connected to the Dobot. I use a Raspberry Pi 3b+
- USB-A to USB-B cable (and a USB-A to micro USB adapter if using a Pi Zero W)
- If you want to control it without using another device, I suggest getting a small touchscreen. I use the Eyoyo Small Touchscreen Monitor 10 inch and it works great.
3d-Print the following models from the models directory. I printed everything in PLA, so I don't know if other materials will require design changes, particularly for the spring. If anything does require a change to the design, the f4d and step files are included. Every model can be oriented to print without support.
- 90 degree bracket.stl
- adapter acrew.stl
- utensil holder.stl
- utensil screw.stl
- mount screw.stl
- base.stl
- spacer.stl
- bowl panel.stl
- bowl disc.stl
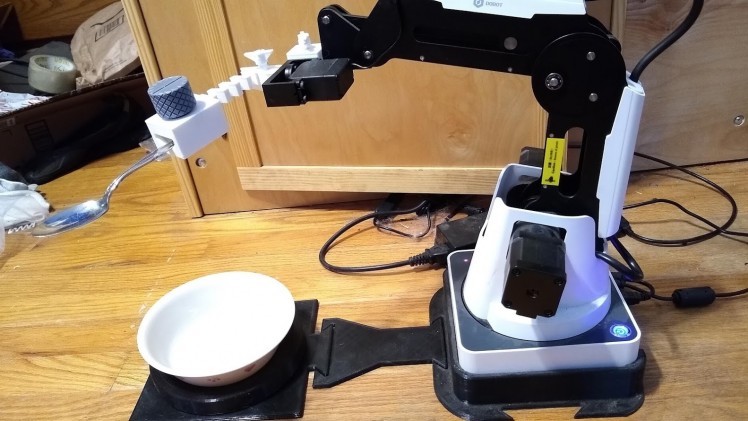
Place the Dobot in the base with the ports visible over the short portion of the base.
Attach the spacer to the base on the opposite side of the ports.
Attach the bowl panel to the other end of the spacer and put the bowl disc on top of it.
The Dobot comes with several toolheads and one of them should have a servo motor attached to it. Detach the servo.
Take the 90 degree bracket and attach it to the dobot. Tighten the thumb screw on the bottom of where it attaches.
Attach the servo to the 90 degree bracket and use the adapter screw to keep it in place.
Attach the the utensil holder to the servo motor, making sure the flat portion of the shaft faces the screw hole on the utensil holder, then use to the mount screw to help keep it in place.
Screw the untensil screw in some.
Now it's ready to have a spoon in the utensil holder and a bowl on the bowl disc and it should like the picture at the top except the arm won't stay up like that while powered off.
Plug it into power and use the USB cable to connect it to the Raspberry Pi. Plug the Pi into power.
Software SetupFollow this guide to initally setup the Pi if you don't want to attach a monitor, keyboard, and mouse to it. https://www.tomshardware.com/reviews/raspberry-pi-headless-setup-how-to,6028.html
If you don't mind connecting the monitor, keyboard, and mouse to it, this guide is comprehensive. https://projects.raspberrypi.org/en/projects/raspberry-pi-setting-up
If you set it up without the monitor, keyboard, and mouse, connect to it using SSH. Otherwise, open a terminal on it.
Install git with the following command
sudo apt install git
Use git to clone this repository.
git clone https://github.com/kicker10BOG/DobotMagicianServer.git
Install Python 3
sudo apt install python3
Dependencies
You're going to need to use pip to install the following libraries:
- cherrypy
- ws4py
- pyserial
- jinja2
pip3 install cherrypy ws4py pyserial jinja2
That should be it for dependencies, but it's been a while since I set it up. If you see something else that needs to go here, create an issue.
Running as a service
Then I suggest using a service to keep it running. Below is the service config I use at /etc/systemd/system/dobot.service.
[Unit] Description=Dobot Magacian Server After=network.target StartLimitIntervalSec=0 [Service] Type=simple Restart=always RestartSec=1 User=pi WorkingDirectory=/home/pi/DobotMagicianServer ExecStart=/usr/bin/python3 DobotServer.py [Install] WantedBy=multi-user.target After creating that file and checking to make sure the paths are correct, run the following command to have the systemd discover it. Depending on your user permissions, you may need to use sudo.
systemctl daemon-reload
The next command is optional but will ensure it is always enabled.
systemctl enable dobot.service
The next one will start it.
systemctl start dobot.service
Now the server should be running on port 8080 (unless you changed that in cherrypy.conf) and accessible from any device on your local network at <Pi-ip-address>:8080. Or if you're using a browser on the Pi itself, you can go to localhost:8080.
Using it
When the Dobot is off, the only option that shows in the port selection is not the Dobot. It likely ends in AMA followed by a number. When you turn it on, a second option should show up ending in USB followed by a number. Select it and hit connect. Now everything should be functional.
It is advised to hit the Home button when you first connect each time so that the Dobot can be sure of how it is positioned.
How It Works
First, it uses websockets to keep everything synced. This is great if you need to have the ability to control it from more than one device.
The home page of the server has standard controls for the arm.
Note that it is important to always home the arm before using it after turning it on. This is especially important when trying to repeat specific movements.
I've tried to design it so that it's easy to create new addons in the future. This is done by using jinja2 for templating and conf files for specifying what addons to use. Right now the only addon is the spoon addon.
Spoon Addon
This addon uses a json file to store profiles for different types of spoons. You can easily swap between profiles in the user interface. I still need to add a way to create, edit, and delete profiles in the browser, but it's possible to do those by editing the json file directly.
The controls on this addon should be pretty self-explanatory, but essentially there are two types of movement in the controls.
When performing a motion, it chains two or more positions together.
- The "lower" motion goes the "back" position then the "down" position.
- The "scoop" motion goes the "down" position then the "scoop" position.
- The "lower" motion goes the "scoop" position then the "up" position.
When using the position buttons, the arm just goes straight to that position.
- The "up" position puts the spoon in a position that should be close to the mouth.
- The "back" position should put the spoon at the top of the back of the bowl.
- The "down" position puts the spoon either at the bottom of the bowl or close to it. I have profiles that do both and I switch between them depending on how full the bowl is.
- The "scoop" position should bring the spoon up just out of the bowl in a level position so nothing falls off (usually).


Leave your feedback...