

Internet Speed Monitoring With Qubitro

Made by pradeeplogu0 / Home Automation / IoT
About the project
In this blog, I'll teach you how to use Qubitro to monitor your home Internet Speed from anywhere in the world.
Project info
Difficulty: Easy
Platforms: Python
Estimated time: 1 hour
License: GNU General Public License, version 3 or later (GPL3+)
Story
When I started working from home, I frequently experienced poor internet, but things improved after raising multiple complaints with the support team. As a result, I decided to monitor my internet speed 24/7, and now I have data to my claims. In this blog, I'll teach you how to use Qubitro to monitor your home Internet Speed from anywhere in the world.

You should first download and install Python 3 on your computer. To get the newest version of Python, go to https://www.python.org/downloads/.

"Add Python to Path Variable" should be selected.

You've now successfully installed Python on your computer. Let's get started by installing the VS Code IDE. Download the appropriate IDE for your operating system. To get Visual Studio Code, go to https://code.visualstudio.com/download.

To work with Python in VS Code, start the IDE and browse to Extensions; add python extension.

Copy the Python code below, paste it into Visual Studio Code, and save it with the.py extension.

import speedtest
import paho.mqtt.client as mqtt
import json

broker_host = "broker.qubitro.com"
broker_port = 8883
device_id = "bae59a13-822d-4e20-8b18-e4cbd534dc00"
device_token = "ShVwmHXpVv9Idvywv6QPbs4UzJzWAq8inveKOzqj"
def on_connect(client, userdata, flags, rc):
    if rc == 0:
        print("Connected to Qubitro!")
        client.on_publish = on_publish
    else:
        print("Failed to connect, visit: https://docs.qubitro.com/client-guides/connect-device/mqttn return code:", rc)

def on_publish(client, obj, publish):
    print("Published: " + str(payload))

client = mqtt.Client(client_id=device_id)
client.tls_set_context(context=None)

client.username_pw_set(username=device_id, password=device_token)
client.connect(broker_host, broker_port, 60)
client.on_connect = on_connect
client.loop_start()

while True:
    st = speedtest.Speedtest()
    st.get_best_server()
    payload = {'Download': round(st.download() / 1000000, 2) , 'Upload': round(st.upload() / 1000000, 2), 'Ping': round(st.results.ping, 2)}
    client.publish(device_id, payload=json.dumps(payload))
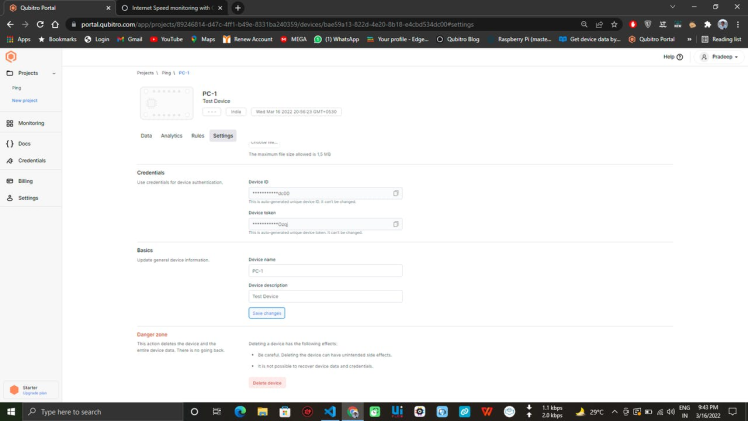
Then log in to your Qubitro Portal account and create a new project using the MQTT Connection; copy and paste the Device ID and Device Token in the Code.
That's all; simply execute the python script to monitor the internet speed.

Open your portal to examine what data is coming in from the PC.

Add some visuals to the data; now, you can see the Download, Upload, and Ping speed.

Now you can show the data to your service provider ?. That's all about this tutorial & don't forget to join Discord Channel.
Code
Credits


Leave your feedback...