
Interfacing Hexabitz Digital Compass With Raspberry Pi ?

Made by Aula_Jazmati / Astronomy / Displays / Kids & Family / Sensors / Wearables
About the project
Build your own Hexabitz Compass With Raspberry Pi.
Project info
Difficulty: Moderate
Platforms: DFRobot, Raspberry Pi, STMicroelectronics
Estimated time: 1 hour
License: MIT license (MIT)
Items used in this project
Hardware components

Story
In the spirit of innovation and reverence, this project presents a digital compass designed to assist the people in locating the directions and in locating the direction of the Kaaba in Mecca. Utilizing the Python Turtle library for the interface and Hexabitz magnetometer for directional accuracy, this application not only serves a practical purpose but also celebrates the holy month of Ramadan with a beautifully integrated 'Ramadan Kareem' display ⭐️?
This project is more than a navigational aid; it's a celebration of devotion, bringing together the Raspberry Pi and Hexabitz community and those observing Ramadan. It stands as an example of how technology can enrich religious practice s, offering a modern twist to the age-old tradition of finding the Qibla ?
Muslims are interested in knowing the direction of Mecca, as it is their Qibla for prayer direction. The direction of the Qibla varies from one place and country to another. Of course, there are several methods to determine the direction of the Qibla, including the compass, which is one of the most accurate and correct methods to determine the direction of Mecca. Through it, the direction of the Qibla can be known anywhere, including at home. Here is the mechanism for using the compass: First, it is necessary to know the direction of Mecca relative to the location where the Qibla direction is desired, whether Mecca is north, east, south, or west of the location. The compass is placed flat on the hands, for example, making sure to stabilize it and prevent its movement, with the aim of the compass settling on the four directions. The Qibla is determined according to the direction where Mecca is located. For example, if Mecca is to the north of the location, one looks at the compass to see where the north is pointing, and the Qibla will be in the direction it indicated.

A traditional Magnetic compass consists of a small, lightweight magnet balanced on a nearly friction less pivot point. The magnet is generally called a needle. The Earth’s Magnetic field will cause the needle to point to the North Pole.
To be more accurate, the needle points to the Magnetic North. The angle difference between true North and the Magnetic North is called declination. Declination is different in different locations. This angle varies depending on position on the Earth’s surface, and changes over time.
The strength of the earth’s magnetic field is about 0.5 to 0.6 gauss.
There is also a component parallel to the earth’s surface that always points toward the magnetic north pole. In the northern hemisphere, this field points down. At the equator, it points horizontally and in the southern hemisphere, it points up. This angle between the earth’s magnetic field and the horizontal plane is defined as an inclination angle.
Magnetometer, is usually a microelectromechanical system (MEMS) instrument for measuring the strength and the direction of a magnetic field on 3 axis.
Magnetometer

Magnetometer
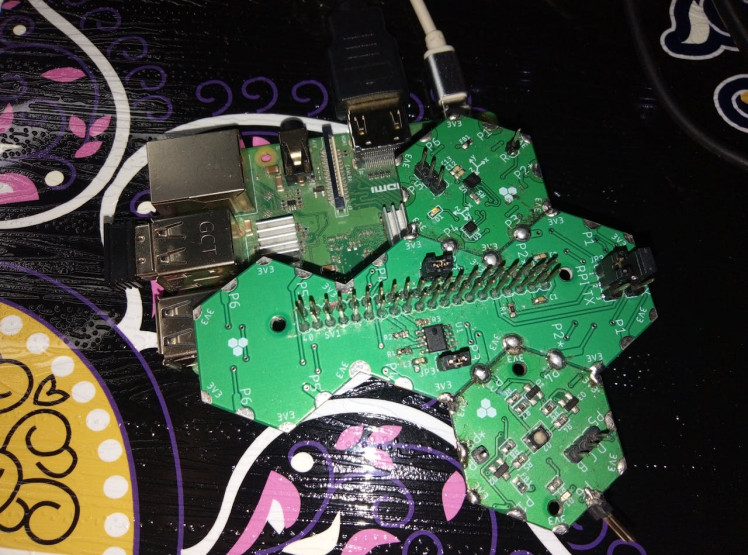
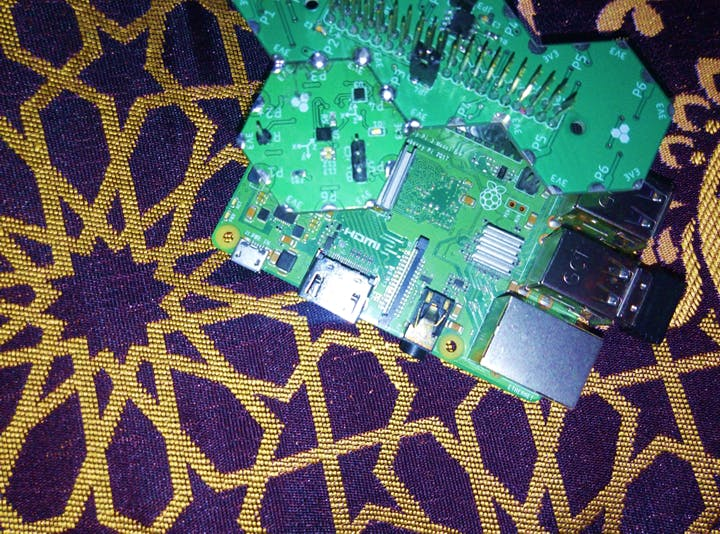
⭐️Raspberry Pi Interface (HF1R0x):
HF1R0x is Hexabitz Raspberry Pi interface module. It interfaces seamlessly to Raspberry Pi 3B/4B single-board computers and enables you to connect and control your favorite Hexabitz modules from the Raspberry Pi operating system and build your own Raspberry Pi Hat. This is the world’s first build-your-own-Pi-Hat system!
Raspberry Pi Interface (HF1R0x)
")
Raspberry Pi Interface (HF1R0x)
⭐️IMU and Digital Compass (H0BR4x):
H0BR4x is a 3-axis inertial measurement unit (IMU) combined with a 3-axis digital compass module based on STM32G0 MCU, LSM6DS3 IMU and LSM303AGR compass.
- 2 x 3-axis accelerometers for inertial force and gravity vector measurements.
- 3-axis gyroscope for angular rate measurements.
- 3-axis magnetometer for measuring magnetic inclination and orientation.
- Digital temperature sensor to provide temperature measurements and calibrate gyroscope temperature drift.
- Use H0BR4x as an integrated IMU for attitude estimation in drones and other robotic platforms.
- Use as inertial-/gesture-based input device.
- Supports sample readings of all sensors to an internal SRAM buffer, the CLI output or to a port in a remote module.
- Supports streaming of any sensor data to an internal SRAM buffer, the CLI output or to a port in a remote module. Streaming duration and period (sampling frequency) can be adjusted.
- Connect to external hardware or combine with other Hexabitz modules!
IMU and Digital Compass (H0BR4x)
")
IMU and Digital Compass (H0BR4x)
IMU Specifications

IMU Specifications
MAG Sample to port API

MAG Sample to port API
? Hexabitz Module Setup:- Check out this article for writing code with STM32CubeIDE.
IMU Firmware main.c code:
while(1){
uint8_t port = 3;
uint8_t module = 0;
SampleMagMGaussToPort (port, module);
Delay_s(1);
}
port = 3

port = 3
?️ Raspberry Pi Setup:⭐️Python pyserial: This module encapsulates the access for the serial port. It provides backends for Python running on Windows, OSX, Linux, BSD (possibly any POSIX compliant system) and IronPython. The module named “serial” automatically selects the appropriate backend.
Depending on the version of python, there are several commands to install the package pyserial.
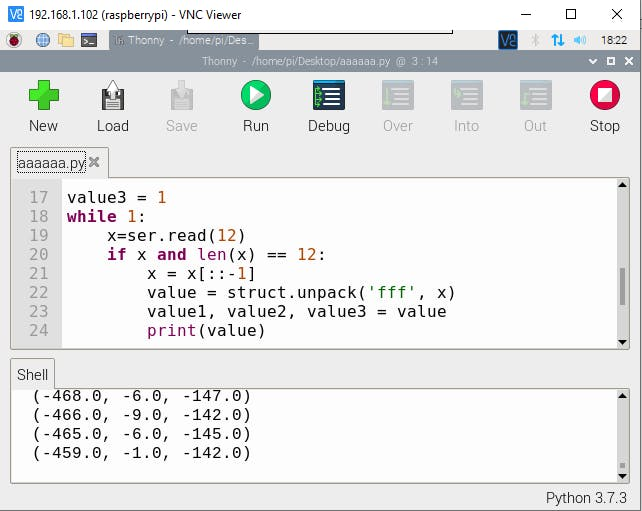
sudo apt-get install python-serial python3-serial⭐️Python code to read the serial port: This section of code primarily instantiates the serial class, setting it up with all the various bits of information that it needs to make the connection with.
port – This defines the serial port that the object should try and do read and writes over.
baudrate – This is the rate at which information is transferred over a communication channel.
parity – Sets whether we should be doing parity checking, this is for ensuring accurate data transmission between nodes during communication.
stopbits – This is the pattern of bits to expect which indicates the end of a character or the data transmission.
bytesize – This is the number of data bits.
timeout – This is the amount of time that serial commands should wait for before timing out.
import serial
ser = serial.Serial(
               port='/dev/ttyUSB0',
               baudrate = 921600,
               parity=serial.PARITY_NONE,
               stopbits=serial.STOPBITS_ONE,
               bytesize=serial.EIGHTBITS,
               timeout=1
)⭐️Python struct Module:
This module performs conversions between Python values and C structs represented as Python bytes objects. This can be used in handling binary data stored in files or from network connections, among other sources. It uses Format Strings as compact descriptions of the layout of the C structs and the intended conversion to/from Python values.
⭐️Python Turtle Module: Turtle graphics is a popular way for introducing programming to kids. It was part of the original Logo programming language developed by Wally Feurzig & Seymour Papert in 1966. Imagine a robotic turtle starting at (0, 0) in the x-y plane. After an import turtle, give it the command turtle.forward(15), and it moves (on-screen!) 15 pixels in the direction it is facing, drawing a line as it moves. Give it the command turtle.right(25), and it rotates in-place 25 degrees clockwise. By combining together these and similar commands, intricate shapes and pictures can easily be drawn..

⭐️The turtle graphics is build ontop of tkinter and is very easy to use. At the beginning you have an "arrow" on a canvas. With the commands "forward(distance), left(angle), right(angle)" you can draw on the canvas.
These steps are necessary to get the interface and compass working properly:
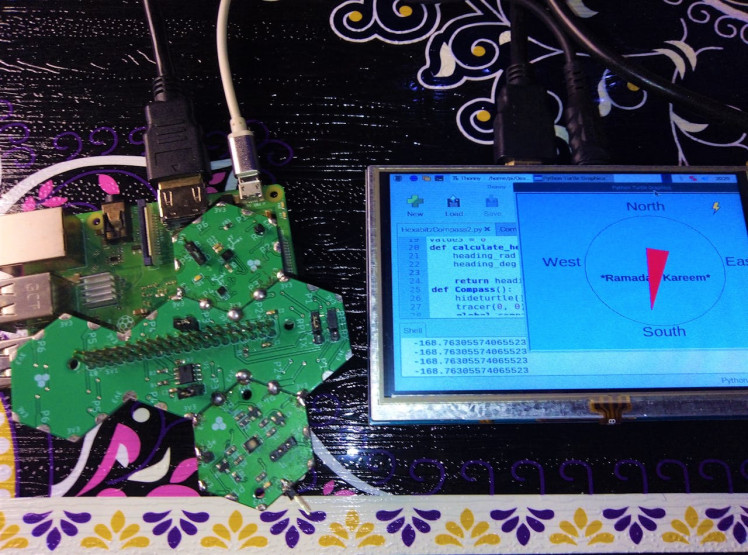
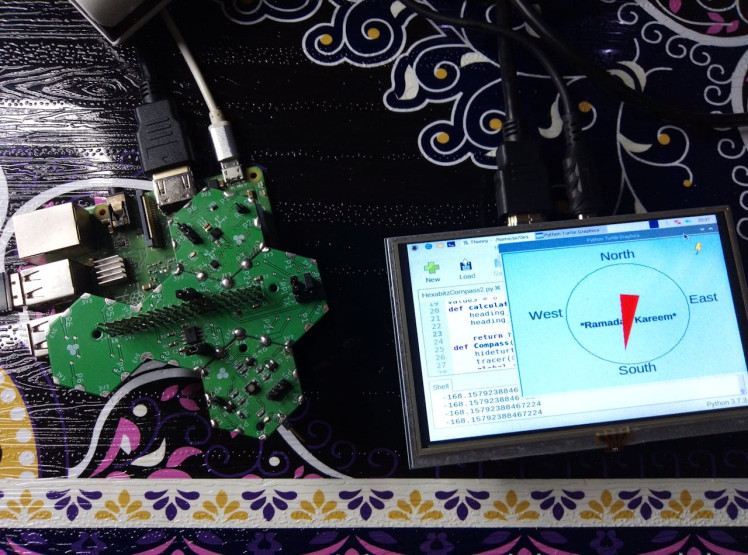
- Draw a circle and name the headings
- Either create your own shape (this is my pointer) or use an exising one (I used the shape "triangle")
- Install the pyserial packages.
- Set up the serial interface in python and connect your Hexabitz module.
⭐️ The reason why I used the turtle graphics and not tkinter directly is the following: Drawing on a canvas with the turtle graphics is easier than drawing on a canvas with tkinter. But the main reason is, that the turtle understands methods like settiltangle(angle). With this method I was able to get my pointer turning. I chose the shape "triangle", with the command turtlesize() I enlarged it. Then I decided to color it red. The only thing which is still left is reading data from the serial interface, transforming it to an integer and call the method compasspointer.settiltangle(received_data). This can be run in an endless loop and ready is the compass! ??
1 / 5

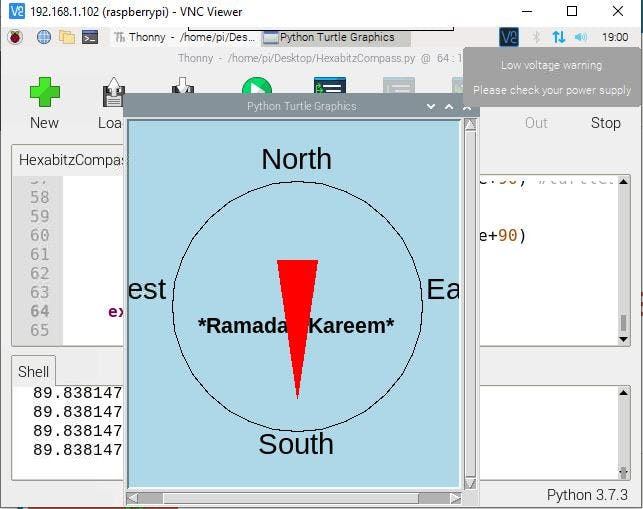
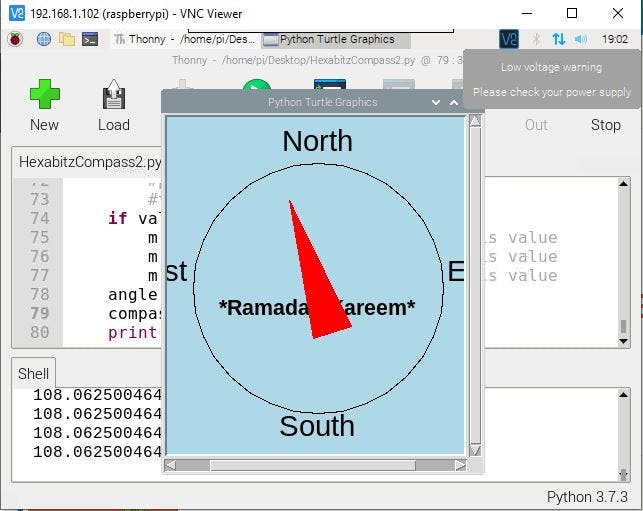
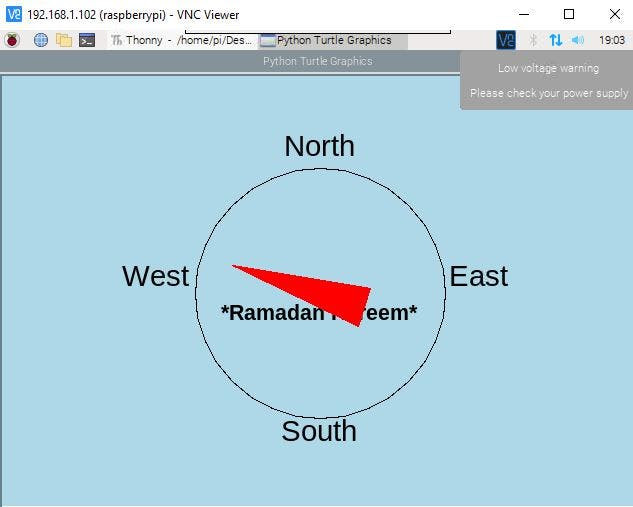
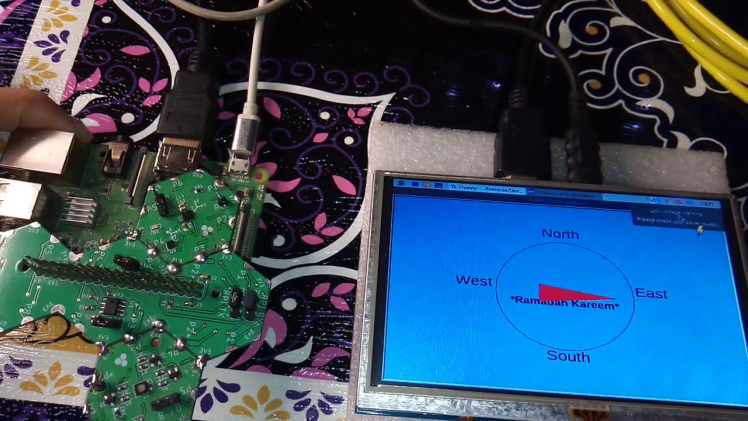
As a homage to the holy month, the interface is adorned with a 'Ramadan Kareem' banner, adding to the festive and spiritual ambiance. The project is not just a tool but a celebration of faith, precision, and community during one of the most sacred times of the year.
This project is perfect for those who seek a blend of devotion and technology, providing a digital aid to the age-old practice of prayer direction. It's an open invitation to explore how technology can enhance spiritual practices in an increasingly digital world ?
⭐️ Test The System ??1 / 3
1 / 3
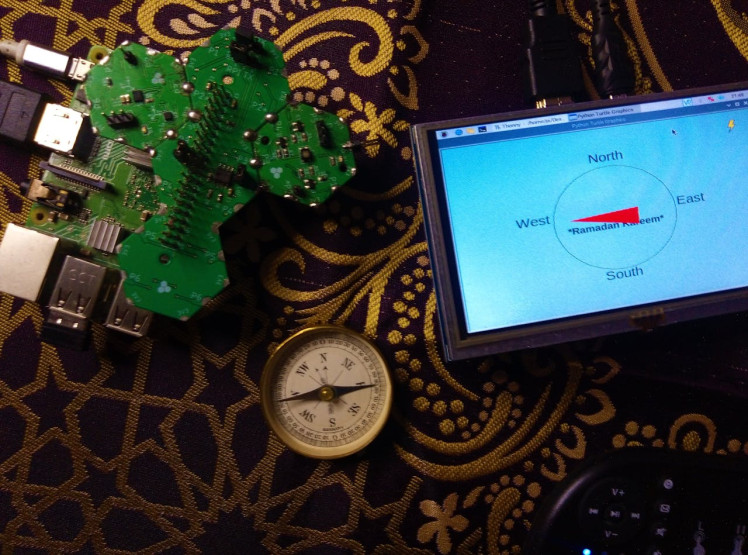
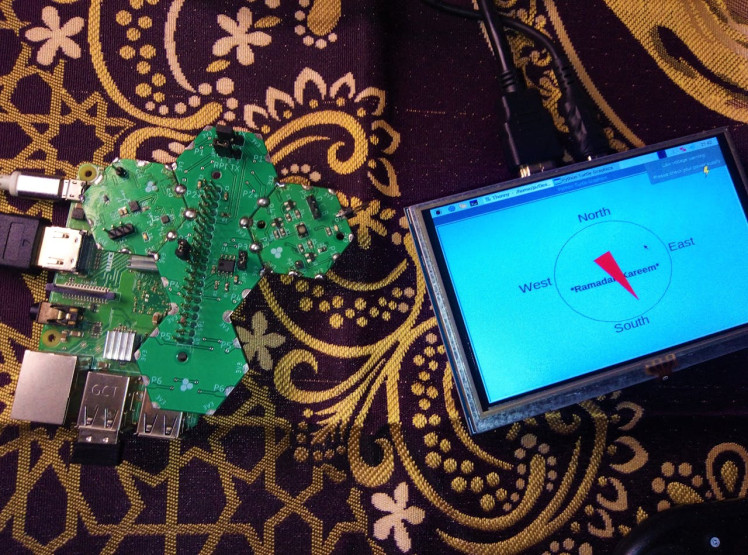
Compass GUI

Compass GUI
Compass GUI

Compass GUI
⭐️ Future Work:For future development of a Qibla direction compass project using Raspberry Pi and Hexabitz, utilizing longitude and latitude is a precise way to determine the location of Mecca. Here's an example of how you could develop such a project:
from math import radians, cos, sin, asin, sqrt, atan2, degrees
MECCA_COORDS = (21.422487, 39.826206)

# Function to calculate the Qibla direction
def calculate_qibla_direction(user_coords):
    user_lat, user_lon = map(radians, user_coords)
    mecca_lat, mecca_lon = map(radians, MECCA_COORDS)

    lon_diff = mecca_lon - user_lon
    x = cos(mecca_lat) * sin(lon_diff)
    y = cos(user_lat) * sin(mecca_lat) - (sin(user_lat) * cos(mecca_lat) * cos(lon_diff))

    qibla_angle = atan2(x, y)
    qibla_angle = degrees(qibla_angle)
    qibla_angle = (qibla_angle + 360) % 360  # Normalize to 0-360 degrees

    return qibla_angle

# Example usage
user_coords = (33.019843, -96.698886)  # Example coordinates
qibla_direction = calculate_qibla_direction(user_coords)
print(f"The Qibla direction is: {qibla_direction:.2f} degrees from North.")
This code calculates the direction of the Qibla from the user's location using longitude and latitude (Using GPS Hexabitz module). You can connect this code to the Raspberry Pi and GPS module to guide the user accurately towards the Qibla direction.
?⭐️??? Ramadan Kareem Mubarak ??⭐️??
⭐️? References:
- https://docs.python.org/2/library/turtle.html
- https://johanneskinzig.de/index.php/systems-engineering/11-reading-and-visualising-sensor-data-compass-heading
- https://ozzmaker.com/compass1/
- https://hexabitz.com/product/imu-and-digital-compass-h0br4x/
- https://hexabitz.com/product/raspberry-pi-interface-hf1r0x/
- https://www.geeksforgeeks.org/turtle-speed-function-in-python/
- https://makersportal.com/blog/calibration-of-a-magnetometer-with-raspberry-pi
Schematics, diagrams and documents
Code
Credits
Related products


Leave your feedback...