
Innovation: Unleashing The Power Of Robot Arms And 3d Camera
Made by Elephant Robotics
About the project
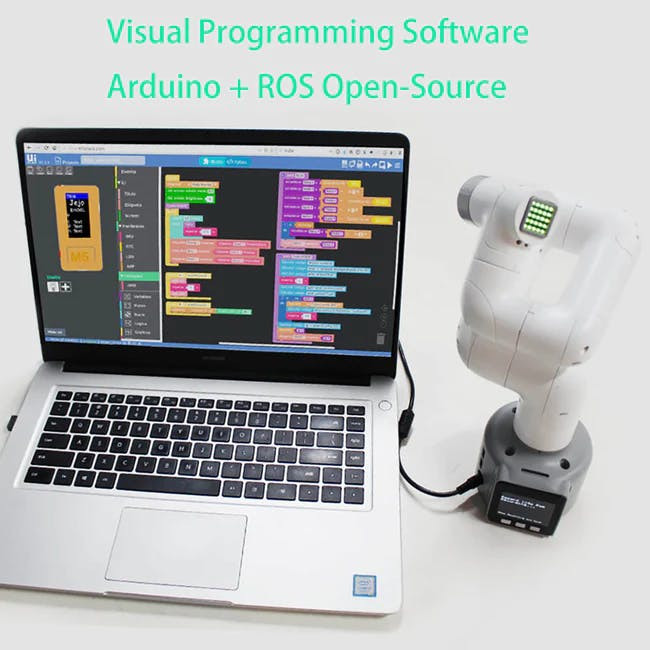
Empower learning and explore the future with our user-friendly Robotic Arm and Depth Camera Kit, mastering 3D camera technology.
Project info
Difficulty: Moderate
Platforms: Intel, ROS, Elephant Robotics
Estimated time: 1 hour
License: GNU General Public License, version 3 or later (GPL3+)
Items used in this project
Hardware components

Software apps and online services
Story
Today we mainly understand how 3D cameras are combined with robotic arm applications. We are preparing to launch a new robotic arm kit, the AI Kit 3D. Familiarize yourself with our old users; they should know that our previous AI Kit 2023 kit used a 2D camera. With technological progress, market demand, and the expansion of fields, 2D cameras can no longer meet many scenarios. 3D cameras have also gained popularity in recent years. As we move forward, let's get to know the applications that 3D cameras bring to us.
ProductRealSence-Depth camera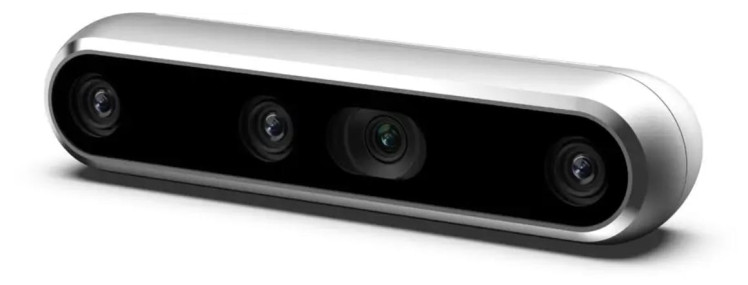
The 3D camera we are discussing today is RealSense, developed by Intel, a type of depth-sensing camera. As seen in the image, this camera has four lenses, including an infrared laser projector, two infrared cameras, and a color camera. These lenses serve specific purposes:
Infrared Laser Projector:
Projects an infrared light point grid into the scene, and these points are captured by the infrared cameras. Because the positions of the projector and cameras are fixed, calculating the offset of the light points in the cameras can infer the distance of each point from the camera, thus obtaining the depth information of the scene.
Infrared Cameras:
Infrared cameras can capture the infrared spectrum. Infrared spectrum is part of the electromagnetic spectrum with wavelengths longer than visible light but shorter than microwaves. The main function of infrared cameras is to image in conditions without visible light illumination, as many objects emit, reflect, or transmit infrared light.
Color Camera:
Typically used to capture the standard visual information of the scene, while other cameras capture additional information, such as depth information or images in low-light conditions. This information can be combined with the images captured by the color camera to provide richer visual data, supporting advanced functions like facial recognition, augmented reality, or 3D modeling.
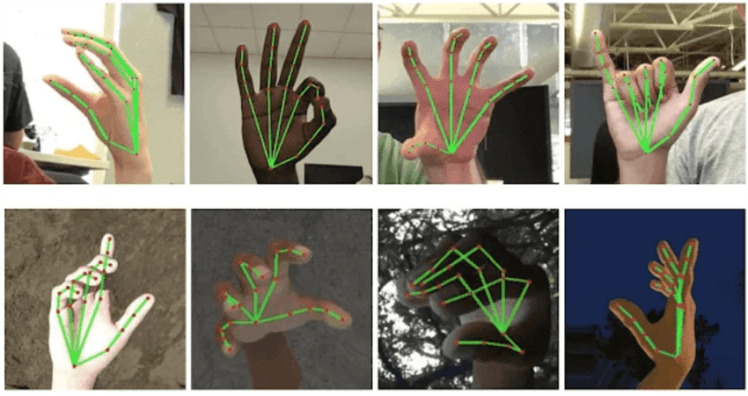
Combining the functionalities of these four cameras allows for obtaining three-dimensional information about an object. This technology can be used in various applications, including facial recognition, gesture recognition, object recognition, and measuring object depth.

The Artificial Intelligence 3D Kit is an entry-level package for robotic arm applications in artificial intelligence and machine vision. The kit utilizes four recognition algorithms, including color recognition, shape recognition, YOLOv8, etc. It is compatible with a visualized operating interface and addresses the limitations of 2D cameras requiring marker positioning by using a 3D camera. The open-source code is based on the Python platform, allowing for mechanical arm control through development software.
This kit is designed to be used with robotic arms (myCobot, mechArm, myArm), creating a simulated industrial scenario.
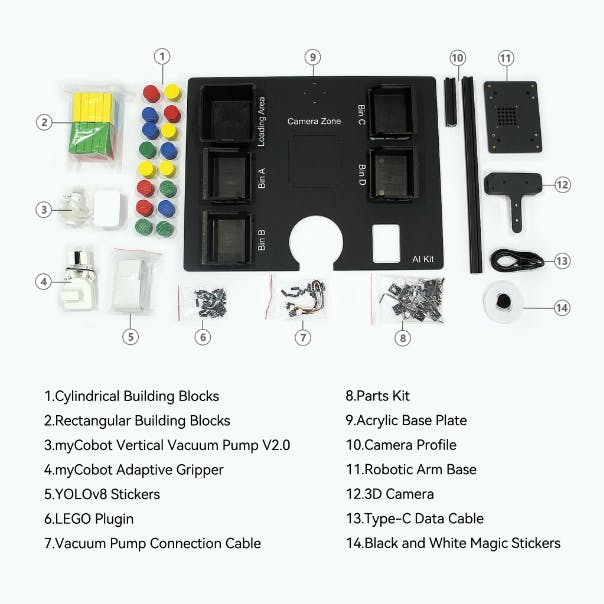
The myCobot 280 M5 is the smallest and lightest 6-axis collaborative robot developed in collaboration by Elephant Robotics and M5Stack. It adopts an integrated modular design, weighing only 850 grams, making it exceptionally lightweight. Equipped with 6 high-performance servo motors, it features rapid responsiveness, low inertia, and smooth rotation.
In the same application field, let's explore the phenotypic performance of 2D cameras and 3D cameras based on their common usage around us:
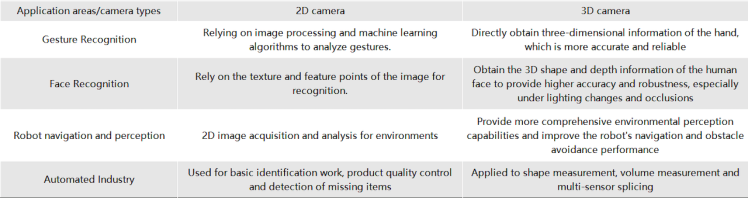
From the icons, it's evident that 2D cameras require specific algorithms to derive certain parameters, while 3D cameras can directly obtain more information, offering more precise performance in the same application domain. In the future, the trend for 3D cameras is undoubtedly rapid growth!
This is one of the reasons why we are introducing the 3D Artificial Intelligence Kit – to keep pace with the evolving times.
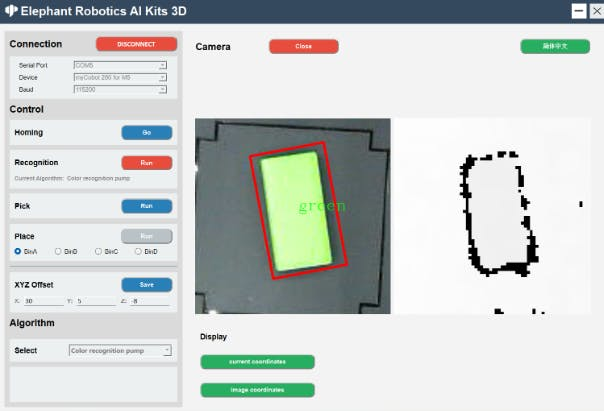
AlgorithmVision recognition for robotic arms inevitably involves hand-eye calibration. Although the processes for both 2D and 3D versions of hand-eye calibration are similar, there are some differences in their calculations. Let's first examine their recognition areas.
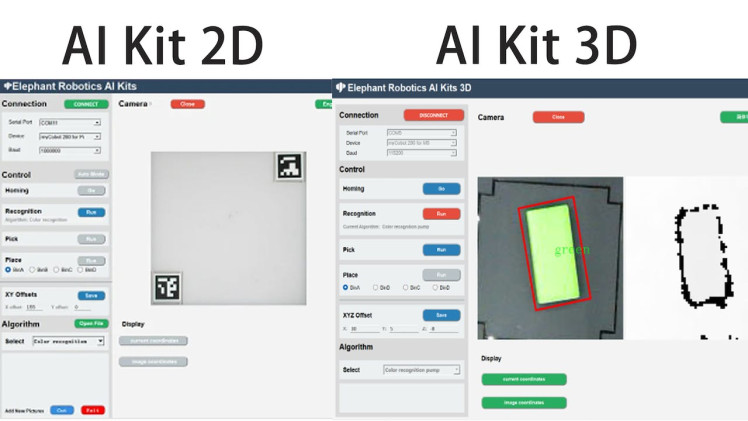
As seen in the middle image, the 3D version no longer has the QR code identification present in the 2D version. In the 2D version, the primary function of the QR code is to determine the recognition area and provide a fixed height value. After obtaining 3D data, there is no need for QR code identification, as the camera can directly acquire the height value from the plane.
This highlights the capability of 3D cameras to directly obtain depth information.
RealSence in python environment build
operate system:window10/11
program language:python 3.9+
libraries:
from typing import Tuple, Optional
import pyrealsense2 as rs
import numpy as np
import cv2
import time
class RealSenseCamera:
def __init__(self):
super().__init__()
# Configure depth and color streams
self.pipeline = rs.pipeline()
self.config = rs.config()
self.config.enable_stream(rs.stream.color, 1920, 1080, rs.format.bgr8, 30)
# Is the camera mirror image reversed
self.flip_h = False
self.flip_v = False
# Get device product line for setting a supporting resolution
pipeline_wrapper = rs.pipeline_wrapper(self.pipeline)
pipeline_profile = self.config.resolve(pipeline_wrapper)
# set auto exposure
color = pipeline_profile.get_device().query_sensors()[0]
color.set_option(rs.option.enable_auto_exposure, True)
device = pipeline_profile.get_device()
sensor_infos = list(
map(lambda x: x.get_info(rs.camera_info.name), device.sensors)
)
# set resolution
self.config.enable_stream(rs.stream.color, 640, 480, rs.format.bgr8, 30)
self.config.enable_stream(rs.stream.depth, 640, 480, rs.format.z16, 30)
align_to = rs.stream.color
self.align = rs.align(align_to)
def capture(self):
# Start streaming
self.pipeline.start(self.config)
# warm up
for i in range(60):
pipeline = self.pipeline
frames = pipeline.wait_for_frames()
def release(self):
self.pipeline.stop()
def update_frame(self) -> None:
pipeline = self.pipeline
frames = pipeline.wait_for_frames()
aligned_frames = self.align.process(frames)
self.curr_frame = aligned_frames
self.curr_frame_time = time.time_ns()
def color_frame(self) -> Optional[np.ndarray]:
frame = self.curr_frame.get_color_frame()
if not frame:
return None
frame = np.asanyarray(frame.get_data())
if self.flip_h:
frame = cv2.flip(frame, 1)
if self.flip_v:
frame = cv2.flip(frame, 0)
return frame
def depth_frame(self) -> Optional[np.ndarray]:
frame = self.curr_frame.get_depth_frame()
if not frame:
return None
frame = np.asanyarray(frame.get_data())
if self.flip_h:
frame = cv2.flip(frame, 1)
if self.flip_v:
frame = cv2.flip(frame, 0)
return frameBoth color recognition and shape recognition are based on algorithms provided by OpenCV to identify and grasp objects. A simple algorithm for HSV detection is all that's needed to detect colors.
# init color
def __init__(self) -> None:
self.area_low_threshold = 15000
self.detected_name = None
self.hsv_range = {
"green": ((40, 50, 50), (90, 256, 256)),
# "blueA": ((91, 100, 100), (105, 256, 256)),
# "yellow": ((20, 240, 170), (30, 256, 256)),
"yellow": ((15, 46, 43), (30, 256, 256)),
"redA": ((0, 100, 100), (6, 256, 256)),
"redB": ((170, 100, 100), (179, 256, 256)),
# "orange": ((8, 100, 100), (15, 256, 256)),
"blue": ((100, 43, 46), (124, 256, 256)),
}
# process of image
result = []
for color, (hsv_low, hsv_high) in self.hsv_range.items():
hsv_frame = cv2.cvtColor(frame, cv2.COLOR_BGR2HSV)
in_range = cv2.inRange(hsv_frame, hsv_low, hsv_high)
# Dilate and corrode color areas
kernel = np.ones((5, 5), np.uint8)
in_range = cv2.morphologyEx(in_range, cv2.MORPH_CLOSE, kernel)
in_range = cv2.morphologyEx(in_range, cv2.MORPH_OPEN, kernel)
contours, hierarchy = cv2.findContours(
in_range, cv2.RETR_EXTERNAL, cv2.CHAIN_APPROX_SIMPLE
)
contours = list(
filter(lambda x: cv2.contourArea(x) > self.area_low_threshold, contours)
)
rects = list(map(cv2.minAreaRect, contours))
boxes = list(map(cv2.boxPoints, rects))
boxes = list(map(np.int32, boxes))
if len(boxes) != 0:
if color.startswith("red"):
color = "red"
for box in boxes:
result.append(ColorDetector.DetectResult(color, box))
# self.detected_name = result
self.detected_name = result[0].color
return result
In this kit, we also utilize a currently popular recognition model, YOLOv8, which involves functionalities such as deep learning and model training.
YOLOv8 is an object detection algorithm, representing the latest version in the You Only Look Once (YOLO) series based on deep learning. The YOLO algorithm is a real-time object detection algorithm known for simultaneously performing object detection and localization in a single forward pass, achieving high speeds.
Key Features:
● High Performance: YOLOv8 demonstrates high accuracy and speed in object detection tasks. It can perform real-time or near-real-time object detection, suitable for various application scenarios.
● Simple yet Effective Design: YOLOv8 adopts a simple and effective design, enhancing detection performance through the use of deeper network structures and more feature layers. It also employs an adaptive training strategy for rapid training and adjustment across different object detection tasks.
● Multi-Scale Detection: YOLOv8 provides different model sizes, including small, medium, and large models, to meet the demands of various scenarios. These models can be deployed and used on different hardware devices.
● Open Source and User-Friendly: YOLOv8 is open source, and both code and pre-trained models are available on GitHub. It also offers a simple and user-friendly API, allowing users to easily train, infer, and deploy models.
To use YOLOv8, custom training of the model is required. In the process of object detection tasks, the model is trained based on specific application scenarios and requirements using a custom dataset.
Why train the model? The purpose of training the model is to enable the computer to automatically recognize and locate objects in images or videos. Through training, computers can learn how to identify different types of objects and accurately locate their positions. This is crucial for many applications, including autonomous driving, security monitoring, intelligent transportation, etc.
Our source code files already include models trained by us. If you are proficient in YOLOv8 technology, you can customize and train the model for object recognition on your own.
class YOLODetector:
DetectResult = List[ultralytics.engine.results.Results]
def __init__(self) -> None:
"""
init YOLO model。
"""
self.model_path = os.path.dirname(os.path.dirname(os.path.abspath(__file__))) + '/resources/yolo/best.pt'
self.model = YOLO(self.model_path)
self.predict_args = {"conf": 0.2}
self.detected_name = None
def get_radian(self, res: DetectResult):
return 0
def detect(self, frame: np.ndarray):
"""
Perform object detection on input images.
Args:
frame (np.ndarray): Input image frame.
Returns:
List[DetectResult]: A list containing the detection results.
"""
res = self.model.predict(frame, **self.predict_args)
res = list(filter(lambda x: len(x.boxes) != 0, res))
if len(res) == 0:
return None
else:
names = self.get_names(res)
self.detected_name = names
return res
def draw_result(self, frame: np.ndarray, res: List[DetectResult]):
"""
Draws the bounding box of the detection results on the image.
Args:
frame (np.ndarray): Input image frame.
res (List[DetectResult]): List of detection results.
"""
res = list(filter(lambda x: len(x.boxes) != 0, res))
for r in res:
boxes = r.boxes.xyxy.numpy()
for box in boxes:
x1, y1, x2, y2 = box.astype(int)
cv2.rectangle(frame, (x1, y1), (x2, y2), color=(0, 255, 0), thickness=1)
cv2.putText(frame, "Name: " + str(self.detected_name), (20, 80),
cv2.FONT_HERSHEY_COMPLEX_SMALL, 1,
(0, 0, 255))
# x1, y1, x2, y2 = np.squeeze(r.boxes.xyxy.numpy()).astype(int)
# cv2.rectangle(frame, (x1, y1), (x2, y2), color=(0, 255, 0), thickness=1)
def target_position(self, res: DetectResult) -> Tuple[int, int]:
"""
Extract the location information of the target from the detection results.
Args:
res (DetectResult): detection result.
Returns:
Tuple[int, int]: The position coordinates (x, y) of the target.
"""
boxes = res.boxes.xywh.numpy()
boxs_list = []
for box in boxes:
x, y, w, h = box.astype(int)
boxs_list.append((x, y))
boxs_list = tuple(boxs_list)
return boxs_list
def get_rect(self, res: DetectResult):
"""
Obtain the bounding box coordinate information of the target from the detection result.
Args:
res (DetectResult): detection result.
Returns:
List[Tuple[int, int]]: The bounding box coordinate information of the target, including four vertex coordinates.
"""
boxes = res.boxes.xywh.numpy()
box_list = []
for box in boxes:
x, y, w, h = box.astype(int)
size = 3
rect = [
[x - size, y - size],
[x + size, y - size],
[x + size, y + size],
[x - size, y + size],
]
box_list.append(rect)
return box_list
def get_names(self, res: DetectResult):
"""
Get the category name in the detection results
Args:
res (DetectResult): detection result.
Returns:
List[names]: A list category names.
"""
names_dict = {
0: 'jeep', 1: 'apple', 2: 'banana1', 3: 'bed', 4: 'grape',
5: 'laptop', 6: 'microwave', 7: 'orange', 8: 'pear',
9: 'refrigerator1', 10: 'refrigerator2', 11: 'sofa', 12: 'sofa2',
13: 'tv', 14: 'washing machine1'
}
ids = [int(cls) for cls in res[0].boxes.cls.numpy()]  # Assuming you have only one result in the list
names = [names_dict.get(id, 'Unknown') for id in ids]
return names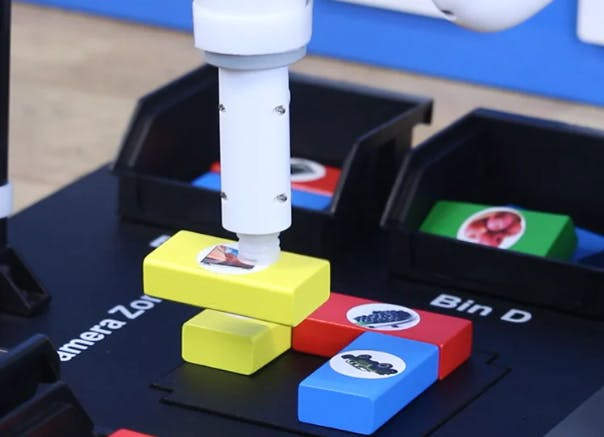
Coupled with the characteristics of the 3D camera, the height of the recognized objects is obtained to realize the demo of depalletizing, and they can be dismantled like building blocks.
Our robotic arm and 3D camera kit is not just a product; it's an opportunity to open the door to learning. This kit provides a user-friendly platform, allowing beginners to explore and learn the knowledge of robotic arm operations and machine vision through practical experience. More importantly, it offers a unique opportunity for users to delve into and master 3D camera algorithms.
As technology advances, the application of 3D cameras is rapidly expanding into multiple fields, including but not limited to manufacturing, security, entertainment, and healthcare. We firmly believe that by using our kit, users will be able to grasp this technological trend, laying a solid foundation for their future learning and careers.
Code
Credits
Elephant Robotics
Elephant Robotics is a technology firm specializing in the design and production of robotics, development and applications of operating system and intelligent manufacturing services in industry, commerce, education, scientific research, home and etc.
Related products


Leave your feedback...