
Fully Functional Rc Plane
Made by 3dsimo / 3D Printing / Drones / Kids & Family / Retro Tech / Vehicles
About the project
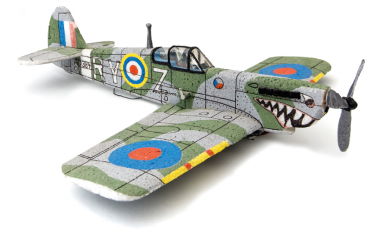
Just imagine that you throw a model plane and it doesn’t fall down on the other side of the classroom to provide the teacher with an easy opportunity to pick it up and never return it to you. Rather, you will control its motion with a sophisticated, hidden RC and possibly navigate it to a safe place
Project info
Difficulty: Moderate
Estimated time: 6 hours
License: GNU General Public License, version 3 or later (GPL3+)
Items used in this project
Hardware components

Story
By now, you already know how to make a fully functional throwing plane but when it comes to throwing planes and their full functionality, it is basically only about balancing them well so that they would fly as far and accurately as you want them to. Obviously, there is one essential capability a throwing plane is missing in order for it to be, so to speak, uncapturable by teachers (in case you are throwing it in the classroom, of course) — control. Just imagine that you throw a model plane and it doesn’t fall down on the other side of the classroom to provide the teacher with an easy opportunity to pick it up and never return it to you. Rather, you will control its motion with a sophisticated, hidden RC and possibly navigate it to a safe place (say, the top of a high bookcase). Isn’t that the dream? Leastways for any little rascal, that is. Of course, this project is not primarily meant to be used for a mischief like that, there are many other useful ways of using it; and we will leave to you the decision of what to do with it once it’s done.
- The first step has to be the choice of the right material for your project. You can pick any of the following materials and you can get them at a building supply store or a model-making shop (EPS, EPP, XPS, DEPRON). If you want a more detailed description of each of them, take a look at the intro to this chapter.
- We decided to go for the EPP material for our model because we like it most and also because it is ideal for beginner model-makers due to its high durability. Our template is for a simple low-wing aircraft which glides nicely. Start with the body of the aircraft by copying the outlines from the template to a sturdy paper or a cardboard. Pin this sturdy paper to a 2 cm (0.79 in) thick EPP board and run the FOAM-CUTTING ATTACHMENT or your hot-wire foam cutter along it. It is important to make sure that the shape of the body is really smooth. If you are having a hard time achieving it, just pin another sturdy paper from the bottom side. That way you will get a perfect shape.
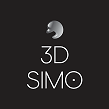
- Apply the same process to the wing which is composed of two parts. Use the wire to make the leading edge round and when the rough shape is done, perfect it with medium-coarse sandpaper. Another step for completing the wing is to make the trailing edge which can well be done with the help of a template suggested in the illustrations.
- Now it is time for the rudder and ailerons. When you have the shape, you need to create the joint by burning a V-shaped hole in the bend. The thin part of the joint has to be at least 1 mm (0.04 in) wide in order for it to be at least a little durable.
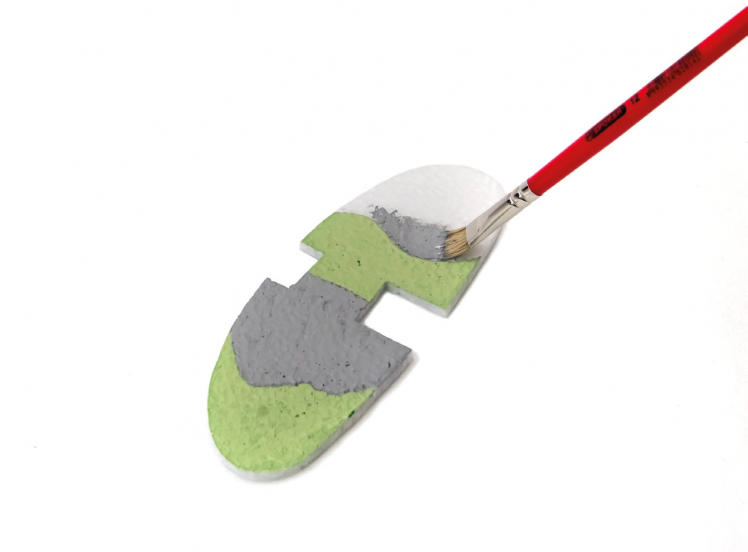
- All the separate parts are now made so you can start bringing them to life, so to speak, by coloring them. You can use a spray or, better yet, a universal paint and a small sponge. When the priming coat is done, you can use a small brush to put the final touches to your model.
- Several hours of drying have passed and you can finally get down to putting the parts together. We suggest sticking the parts together either with a superglue or UHU polyurethane adhesives.
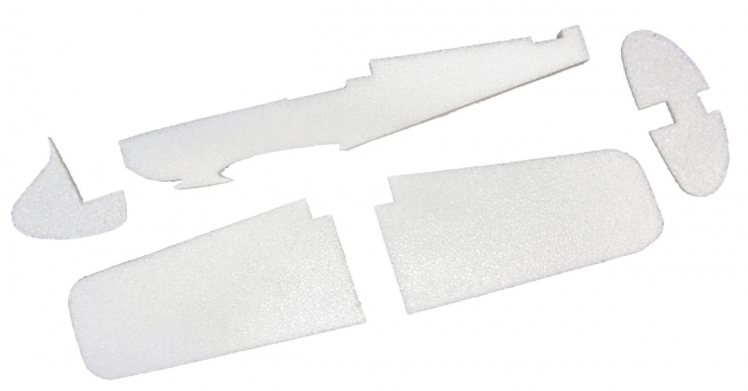
- The very last thing for you to do is to fit the RC electronics and 3D draw the hitches and small levers for servos.
Schematics, diagrams and documents
Credits
3dsimo
We are manufacturers of multi-functional tools for creators under the same brand. Our Company was established in 2014, it originates in Czech Republic, where both manufacturing and R&D are still located. We are only ones on the market with 3Dpen with switchable extensions and a smart device connection, which is our 3Dsimo mini. Kids 8+ can use 3DSimo Basic, it is very intuitive. It uses build-in battery, so user can draw up to 3 hours without any cables. The device is safe, and you cannot burn yourself with it. Our last products is 3Dsimo Kit, which is First building KIT of multi-material 3D pen that you can modify according to your wishes. It is an open source building kit based on Arduino Nano. You can find everything on our GitHub.
Related products


Leave your feedback...