

Fire Equipment Management

Made by Jolley71717
About the project
Firefighters must manage their equipment out in the field. Paper gets lost, and WIFI is rare. Simply transmit tracking info via cellular.
Project info
Difficulty: Moderate
Platforms: Adafruit, Everything ESP, Hologram, NodeMCU, Particle, Raspberry Pi, SparkFun
Estimated time: 1 hour
License: GNU General Public License, version 3 or later (GPL3+)
Items used in this project
Hardware components


View all
Software apps and online services
Story
Background
I work for an organization that has faced one of the worst fire years in recent memory. By the end of September 2017, Montana had lost over 1,295,959 acres wildfires. Montana is the 4th largest state in the US, with most of it being classified as rural areas. Keeping track of inventory in an environment like this is very difficult. Fire crews should be able to manage their inventories locally and have automated alerts sent out when items fall below a specified trigger level. This would free up valuable time and allow the firefighters to use their skills in ways other than maintaining inventory logs in awful notebooks.
In a Nut Shell
This inventory system allows remote users to modify their inventory quantities in the field (as long as the system maintains cellular connectivity). The Particle Photon sends a url request with the parameters of ItemID, Description, and Quantity. The url request connects with a local Phant stream based off of the >phant.io. When the quantity for a given item drops below the trigger level, the Raspberry Pi uses the Hologram Nova to send a cellular message to a webhook on Hologram.io. Using a pre-established "route" you can send an email to your inventory manager that contains the inventory item description, current quantity, and trigger level.
I have provided two different options for wireless interface below. The first option involves setting up the ESP8266 NodeMCU as an access point that lets the Photon connect to the Raspberry Pi. The second option is the more direct (And Prefered) route and allows the the Photon to connect directly to the Raspberry Pi.
Setting up the wireless access point (Option 1)
Using the ESP8266 and the Arduino IDE, flash the following code onto your device so that it can serve as your wireless access point between the Particle Photon and the Raspberry pi. This will most likely be the easies part of the project.
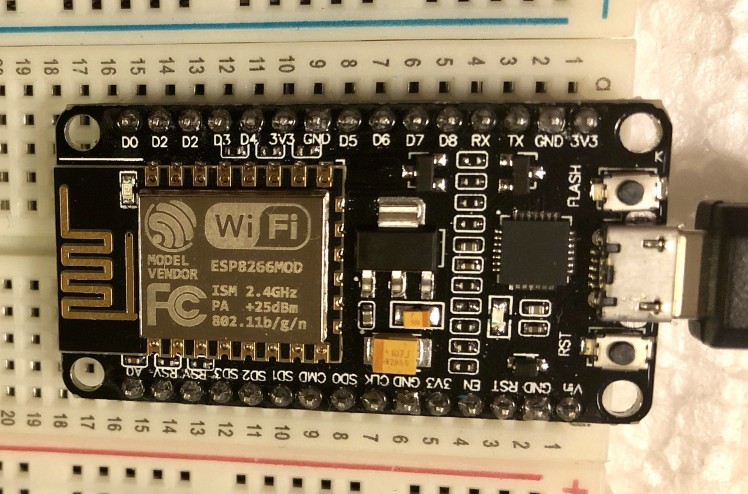 ESP8266 Wireless chip
I obtained it from the the examples listed for the ESP8266.
/* * Copyright (c) 2015, Majenko Technologies * All rights reserved. * * Redistribution and use in source and binary forms, with or without modification, * are permitted provided that the following conditions are met: * * * Redistributions of source code must retain the above copyright notice, this * list of conditions and the following disclaimer. * * * Redistributions in binary form must reproduce the above copyright notice, this * list of conditions and the following disclaimer in the documentation and/or * other materials provided with the distribution. * * * Neither the name of Majenko Technologies nor the names of its * contributors may be used to endorse or promote products derived from * this software without specific prior written permission. * * THIS SOFTWARE IS PROVIDED BY THE COPYRIGHT HOLDERS AND CONTRIBUTORS "AS IS" AND * ANY EXPRESS OR IMPLIED WARRANTIES, INCLUDING, BUT NOT LIMITED TO, THE IMPLIED * WARRANTIES OF MERCHANTABILITY AND FITNESS FOR A PARTICULAR PURPOSE ARE * DISCLAIMED. IN NO EVENT SHALL THE COPYRIGHT HOLDER OR CONTRIBUTORS BE LIABLE FOR * ANY DIRECT, INDIRECT, INCIDENTAL, SPECIAL, EXEMPLARY, OR CONSEQUENTIAL DAMAGES * (INCLUDING, BUT NOT LIMITED TO, PROCUREMENT OF SUBSTITUTE GOODS OR SERVICES; * LOSS OF USE, DATA, OR PROFITS; OR BUSINESS INTERRUPTION) HOWEVER CAUSED AND ON * ANY THEORY OF LIABILITY, WHETHER IN CONTRACT, STRICT LIABILITY, OR TORT * (INCLUDING NEGLIGENCE OR OTHERWISE) ARISING IN ANY WAY OUT OF THE USE OF THIS * SOFTWARE, EVEN IF ADVISED OF THE POSSIBILITY OF SUCH DAMAGE. */ /* Create a WiFi access point and provide a web server on it. */ #include <ESP8266WiFi.h> #include <WiFiClient.h> #include <ESP8266WebServer.h> /* Set these to your desired credentials. */ const char *ssid = "<ssid>"; const char *password = "<password>"; ESP8266WebServer server(80); /* Just a little test message. Go to http://192.168.4.1 in a web browser * connected to this access point to see it. */ void handleRoot() {  server.send(200, "text/html", "<h1>You are connected</h1>"); } void setup() {  delay(1000);  Serial.begin(115200);  Serial.println();  Serial.print("Configuring access point...");  /* You can remove the password parameter if you want the AP to be open. */  WiFi.softAP(ssid, password);  IPAddress myIP = WiFi.softAPIP();  Serial.print("AP IP address: ");  Serial.println(myIP);  server.on("/", handleRoot);  server.begin();  Serial.println("HTTP server started"); } void loop() {  server.handleClient();
}
Setting up the Raspberry Pi Zero Wireless
Set up the Raspberry pi zero wireless using the tutorials found on the Sparkfun website https://learn.sparkfun.com/tutorials/getting-started-with-the-raspberry-pi-zero-wireless . I have set up Raspbian Stretch with Desktop.
Enable the Raspberry Pi Zero Wireless as an Access Point (Option 2)
I had originally utilized Raspiban Stretch on my Raspberry Pi but I found that it dit not play well with the wireless access point DHCP add-ons.
Image the the raspberry pi using Etcher.
run all of the updates and upgrades
I navigated to http://downloads.raspberrypi.org/raspbian/images/raspbian-2015-11-24/ to get Raspian Jessie which was listed in most of the stand-alone wireless AP tutorials.
You'll need telnet to create your different Phant streams, so you might as well install it at this point using sudo apt-get install telnet
I followed this tutorial to set up the Wireless Access point.
https://www.raspberrypi.org/documentation/configuration/wireless/access-point.md
However, I found that setting it up manually kept getting me into trouble, so I just utilized the code found here
https://gist.github.com/Lewiscowles1986/fecd4de0b45b2029c390
You need to save this file on your pi as a .sh file and then modify it to an executable file, then run it.
I also realized that after I set up the stand-alone wireless Access Point (since I was no longer connected to my router), I wouldn't be able to download the node.js install, so I downloaded it to my computer and then passed it over using the following command:
scp node-v8.9.4-linux-armv6l.tar.xz pi@raspberrypi.local:/home/pi
To copy a file from B to A while logged into B:
scp /path/to/file username@a:/path/to/destination
For more detailed instructions on Installing node.js, follow this tutorial:
http://www.instructables.com/id/Install-Nodejs-and-Npm-on-Raspberry-Pi/
You can also plug in an ethernet adapter from your Raspberry Pi Zero to your router for an internet connection.
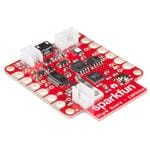
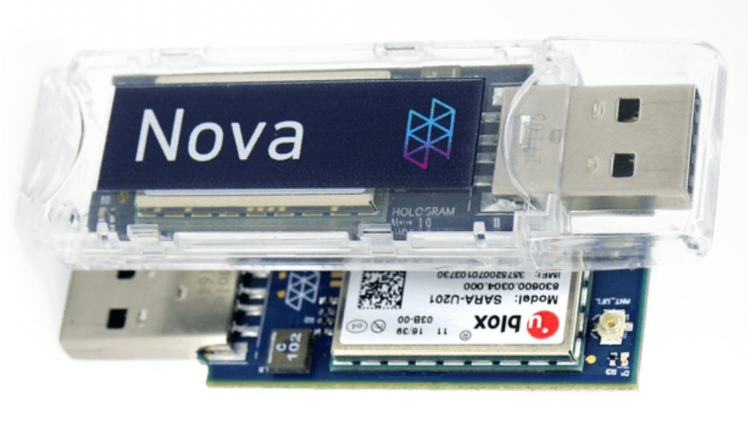
Set up the Hologram-CLI
Next, set up Hologram Nova and software on your raspberry pi zero w.
Follow the tutorial here: https://hologram.io/docs/guide/connect/connect-device/
OR
Download and install the hologram CLI library by running the following commands.
curl -L hologram.io/python-install | bash
Please run this command to download the script that updates the Python SDK:
curl -L hologram.io/python-update | bash
If everything goes well, you’re done and ready to use the SDK.
Follow this tutorial to make sure that your hologram device is connected and working:
https://www.hackster.io/hologram/hologram-python-sdk-sending-data-45f305
The fun thing about the pi is that it is still powerful enough to run a keyboard, the nova, and a monitor if you want to set it up using a GUI. Otherwise ssh-ing into your pi zero will do just fine.
Confirm that you can run the terminal/command line Hologram codes, i.e. sending and receiving messages and obtaining your latitude and longitude.
At this point, we're finished with Raspberry Pi, so you can set it off to the side.
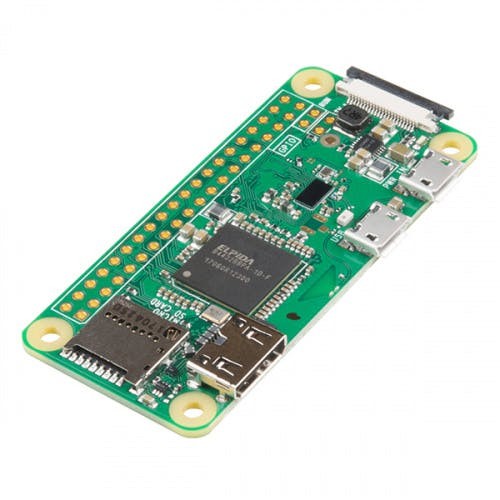 Raspberry Pi Zero Wireless
Creating the Phant Streams
In order for the project to be successful, we need something that receives input from the Particle Photon and stores it so that the java application can pick it up and act on it. I found some software distributed by Sparkfun that does just the trick (even though it is no longer supported). After installing phant on your pi via npm, see https://www.npmjs.com/package/phant, you can run the database by simply typing 'Phant'.
When I ran the initial build, I ran into some problems and scoured the internet. After making a few alterations, I published my version up to git, and it can be found here. https://github.com/Jolley71717/MyPhant.git
After you clone down the repository, cd into the project and use the code
npm install -g
If you want to run phant without it taking up a window, or automatically when your Pi starts, use 'Phant &'
(If you need to, install telnet using sudo apt-get install telnet)
You then telnet to the phant from your computer or from the pi. From the pi it would look like Telnet 127.0.0.1 8080
From there you can type `help` to get the available options. I created the phant streams the following way. The output gives you a Public Key, a Private Key, and a Delete Key (You won't be using the Delete Key).
The different http requests below show how to create the different streams, add items, and get the output :
Phant  phant http server running on port 8080
phant telnet server running on port 8081
 >telnet 127.0.0.1 8081
Trying 127.0.0.1...
Connected to 127.0.0.1.
Escape character is '^]'
welcome to phant.
Type 'help' for a list of available commands
phant> create Enter a title> Inventory - photon pushes inventory changes to this stream Enter a description> The inventory information and updates sent to the Rpi Enter fields (comma separated)> ItemID,Description,Quantity Enter tags (comma separated)> inventory, sqlite, photon 	(Output shows below)
 PUBLIC KEY: [publicKey]  PRIVATE KEY: [privateKey]  DELETE KEY: [deletekey] INPUT  http://[piAddress]:8080/input/[PUBLIC_KEY]?private_key=[PRIVATE_KE]Y&FIELD1=VALUE1&=FIELD2=VALUE2  curl -X GET 'http://192.168.1.107:8080/input/[publicKey]?private_key=[privateKey]&ItemID=1&Description=Hose&Quantity=4' OUTPUT  http://[piAddress]:8080/output/[PUBLIC_KEY].FORMAT DELETE  http://[piAddress]:8080/streams/[PUBLIC_KEY]/delete/[DELETE_KEY] phant> create Enter a title> Inventory - Photon will pull json info from here Enter a description> The inventory information that the Photon will use Enter fields (comma separated)> ItemID,Description,Quantity Enter tags (comma separated)> inventory, sqlite, photon  Stream created!  PUBLIC KEY: [publicKey]  PRIVATE KEY: [privateKey]  DELETE KEY: [deleteKey] INPUT  http://[piAddress]:8080/input/[PUBLIC_KEY]?private_key=[PRIVATE_KEY]&FIELD1=VALUE1&=FIELD2=VALUE2  curl -X GET 'http://[piAddress]:8080/input/[publicKey]?private_key=[privateKey]&ItemID=1&Description=Hose&Quantity=4' OUTPUT  http://[piAddress]:8080/output/PUBLIC_KEY.FORMAT DELETE  http://[piAddress]:8080/streams/PUBLIC_KEY/delete/DELETE_KEY
Now that you have two Phant streams, you can set up your hardware to communicate with each other using the streams
Setting up the Particle Photon
This portion was arguably the most difficult piece, as it seems like my Photon was being pushed to the limit in terms of functionality. The Photon seems to be geared towards being in a place with full-time internet connectivity. Many of the built in features like webhooks, and 'Particle.publish()' do not work unless you are connected to the Particle cloud.
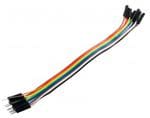
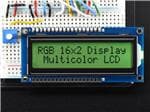
You'll need 4 different buttons to mimic my setup, as well as an lcd screen and several resistors. Finally, you'll need some jumper wires, or a way to connect the pieces. Please see the board diagram I have in the schematic section.
As for the code below, I toyed around with several different ways to publish the inventory updates to the phant stream. Since you're somewhat limited with what you can do with the Photon, I opted for just building a url and pushing that through a request. I included examples of how you could also build the code using request.body and by also including information in the headers. Phant.io has since been retired by Sparkfun, so some of the documentation out there has dwindled.
Follow the tutorials here for setting up your Particle Photon. For the initial testing, I hooked the device right up to my regular router. Once I ironed out the kinks, and confirmed that the httpclient was working, I switched the Photon over to the wireless network being broadcast by the ESP8266 or the Raspberry pi described above.
*Important note*
You'll need to make sure you have SYSTEM_MODE(SEMI_AUTOMATIC); marked so that the photon doesn't try to endlessly contact the Particle Cloud. The particle cloud connection is a nifty feature that works well when you have internet connection, but prevents any further code from running if you don't and your Photon will look like this (blinking cyan, maybe green, and orange/red)
 Photon Gone Wrong (Blinking Cyan and Yellow/Orange)
// This #include statement was automatically added by the Particle IDE.
#include <HttpClient.h>
// This #include statement was automatically added by the Particle IDE.
#include <SparkJson.h>
// This #include statement was automatically added by the Particle IDE.
#include <Grove_LCD_RGB_Backlight.h>
#include "Wire.h"
#include "application.h"
//prevents the particle photon from trying to contact the mothership, thereby blocking all user code.
SYSTEM_MODE(SEMI_AUTOMATIC);
//for the LCD
rgb_lcd lcd;
const int colorR = 255;
const int colorG = 0;
const int colorB = 0;
// Integers that contain which item in the array you're looking at
int itemSelected=0;
int quantitySelected = 0;
char intString[90];
char finalPath[200];
//Loop controls for decision making
bool start = false;
bool itemWasSelected = false;
bool quantityWasSelected = false;
bool confirmationCheck = false;
// Size of the library holding your items
int itemLibrarysz = 3;
// For the buttonPressed counting
int buttonPressed = 0;
// For the http request section
HttpClient http;
http_request_t request;
http_response_t response;
http_header_t headers[] = {
 { "Accept" , "*/*"},
 { NULL, NULL } // NOTE: Always terminate headers will NULL
};
//May eventually turn this into an object, or use set index [?][2] to the existing quantity in the json
String Items[3][3] = {  {"1", "Hose", "0"} , /* initializers for row indexed by 0 */
 {"2", "Extinguisher", "0"} , /* initializers for row indexed by 1 */
 {"3", "Helmet", "0"} /* initializers for row indexed by 2 */
};
void setup() {
 // set up the LCD's number of columns and rows:
 lcd.begin(16, 2);
 lcd.setRGB(colorR, colorG, colorB);
 lcd.clear();
 lcd.setCursor(0,0);
 lcd.print("Starting");
 delay(900);
 //WiFi.disconnect();
 WiFi.setCredentials("[RaspberryPiSSIDHere]", "[SSID_Password]", WPA2);
 WiFi.connect();
 lcd.clear();
 while(!WiFi.ready()){
 lcd.setCursor(0, 0);
 lcd.print("WiFi Not Ready");
 delay(300);
 lcd.clear();
 }
 lcd.clear();
 // Network address of the Raspberry Pi
request.ip= IPAddress(10,0,0,1);
 request.port = 8080;
 delay(1000);
 //Set up the listening pins for button input
 // For the reading of the Start/Select
 pinMode(D3, INPUT);
 // For the reading of the Up Button
 pinMode(D4, INPUT);
 // For the reading of the Down Button
 pinMode(D5, INPUT);
 // For the reading of the Cancel Button
 pinMode(D6, INPUT);
 // output each array element's value  for ( int i = 0; i < 3; i++ ){
 for ( int j = 1; j < 2; j++ ) {
 String item = Items[i][j];
 lcd.setCursor(0, 0);
 lcd.print(item);// had errors in the past with converting body to string
 delay(1000);
 // Clear the screen.
 lcd.clear();
 }
 }
}
// pushes the inventory changes for the selected item
// Will need to look something like void postPhantPushRequest(Integer ItemID, String Description, Integer Quantity)
void postPhantPushRequest() {
 // TODO  // Use in final version
 String inputPath = "/input/[YourPhantStreamPublicKey]?private_key=[YourPhantStreamPrivateKey]";
 String itemIDString = "&ItemID=" + Items[itemSelected][0];  String descriptionString = "&Description=" + Items[itemSelected][1];
 String quantityString = "&Quantity=";
 sprintf(finalPath, inputPath + itemIDString  + descriptionString + quantityString + "%d", quantitySelected);
 request.path = finalPath;
 http.get(request, response, headers);
 lcd.clear();
 lcd.setCursor(0, 1);
 lcd.print(response.status);// had errors in the past with converting body to string
 delay(800);
 lcd.clear();
 lcd.setCursor(0,0);
 lcd.print(response.body);
 delay(800);
}
//retrieves json from the phant server to populate the inventory options
//For future void postPhantPullRequest() {
 request.path = "/output/[YourOtherPhantOutputStream-UpdatedByRPi].json";
 http.get(request, response, headers);
}
void adQuantity(){
 quantitySelected = quantitySelected + 1;
}
void rmQuantity(){
 quantitySelected = quantitySelected - 1;
}
void loop() {
 // set cursor at the beginning
 lcd.setCursor(0,0);
 lcd.print("Push To Begin");
 // need to add in about a second of load time so that it doesn't re read the same button push
 if(digitalRead(D3) == HIGH)
 {
 start = true;
 lcd.clear();
 lcd.setCursor(0, 0);
 //delay so you don't get a second select read
 lcd.print("Loading.");
 delay(180);
 lcd.clear();
 lcd.setCursor(0, 0);
 lcd.print("Loading..");
 delay(180);
 lcd.clear();
 lcd.setCursor(0, 0);
 lcd.print("Loading...");
 delay(180);
 lcd.clear();
 lcd.setCursor(0, 0);
 lcd.print("Loading....");
 delay(180);
 }
 while(start){
 delay(100);
 lcd.clear();
 lcd.setCursor(0, 0);
 lcd.print("Item:");
 lcd.setCursor(0,1);
 lcd.print(Items[itemSelected][1]);
 // Up button was pressed
 if(digitalRead(D4) == HIGH){
 // itemSelected is a 0 based index and  // itemLibrarysz is a one based size variable
 if(itemSelected < (itemLibrarysz - 1)){
 itemSelected ++;
 delay(100);
 }
 }
 //Down Button was pressed
 else if (digitalRead(D5) == HIGH){
 // Don't let them reduce below zero
 if(itemSelected > 0){
 itemSelected --;
 delay(100);
 }
 }
 // Select was pressed
 else if (digitalRead(D3) == HIGH){
 // Enter the quantity loop here
 itemWasSelected = true;
 lcd.clear();
 lcd.setCursor(0, 0);
 //delay so you don't get a second select read
 lcd.print("Loading.");
 delay(180);
 lcd.clear();
 lcd.setCursor(0, 0);
 lcd.print("Loading..");
 delay(180);
 lcd.clear();
 lcd.setCursor(0, 0);
 lcd.print("Loading...");
 delay(180);
 while(itemWasSelected){
 delay(100);
 lcd.clear();
 lcd.setCursor(0,0);
 lcd.print("Item:" + Items[itemSelected][1]);
 lcd.setCursor(0,1);
 sprintf(intString, "Quantity:%d", quantitySelected);
 lcd.print(intString);
 if(digitalRead(D4) == HIGH){
 // itemSelected is a 0 based index and  // itemLibrarysz is a one based size variable
 if(quantitySelected < 99)
 adQuantity();
 delay(100);
 }
 // Down Button was pressed
 else if (digitalRead(D5) == HIGH){
 // Don't let them reduce below zero
 if(quantitySelected > 0)
 rmQuantity();
 delay(100);
 }
 // Select button was pressed
 // Enter confirmation loop
 else if (digitalRead(D3) == HIGH){
 lcd.clear();
 lcd.setCursor(0, 0);
 //delay so you don't get a second select read
 lcd.print("Loading.");
 delay(180);
 lcd.clear();
 lcd.setCursor(0, 0);
 lcd.print("Loading..");
 delay(180);
 lcd.clear();
 lcd.setCursor(0, 0);
 lcd.print("Loading...");
 delay(180);
 quantityWasSelected = true;
 lcd.clear();
 lcd.setCursor(0,0);
 sprintf(intString, "I:" + Items[itemSelected][1] + " Qty:%d", quantitySelected);
 lcd.print(intString);
 lcd.setCursor(0,1);
 lcd.print("Yes Or No?");
 while(quantityWasSelected){
 delay(100);
 if (digitalRead(D3) == HIGH){
 sprintf(intString, "ItemID:" + Items[itemSelected][0] + "Item:"  + Items[itemSelected][1] + " Quantity:%d", quantitySelected);
 delay(1000);
 lcd.clear();
 lcd.setCursor(0,0);
 delay(300);
 lcd.clear();
 postPhantPushRequest();
 quantityWasSelected = false;
 itemWasSelected = false;
 quantitySelected = 0;
 itemSelected = 0;
 start = false;
 delay(2000);
 lcd.clear();
 }
 else if (digitalRead(D6) == HIGH)
 {
 // Reset the quantity because you are leaving the quantity loop
 quantityWasSelected = false;
 lcd.clear();
 }
 }
 }
 else if (digitalRead(D6) == HIGH)
 {
 // Reset the quantity because you are leaving the quantity loop
 itemWasSelected = false;
 quantitySelected = 0;
 lcd.clear();
 }
 }
 }
 // Cancel button was pressed
 else if (digitalRead(D6) == HIGH)
 {
 // Reset all the items because you are leaving the loop
 start = false;
 itemSelected = 0;
 quantitySelected =0;
 lcd.clear();
 }
 }
 delay(100);
}
/********
 END FILE
********/
In addition to the code I've written, you could also scale your Photon to check for different wireless signals (makes troubleshooting and initial set up much easier).
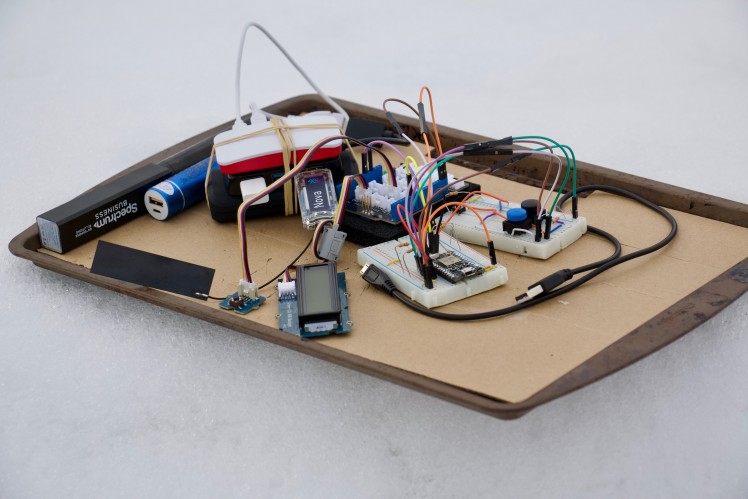
My initial setup looks like this.
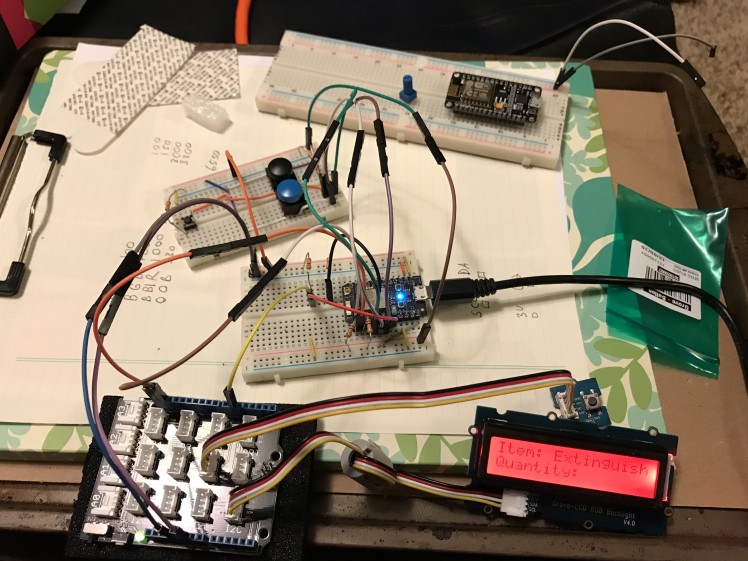 Particle Photon Inventory Management Device
Creating the Sqlite3 database
I followed the tutorial information found here to initially set up the SQLite3 database. You could probably make one using your IDE of choice, but I found the sqlite3 tutorials and documentation to be very helpful.
http://www.sqlitetutorial.net/
I used the following setup information once I downloaded and installed Sqlite3. Make sure to save the sqlite database file so that it can be used later by your application.
Begin; CREATE TABLE INVENTORY (ItemID NUMERIC, Description TEXT, Quantity NUMERIC, TriggerLvl NUMERIC, Triggered NUMERIC); Commit; Begin; INSERT INTO INVENTORY values(1,"Hose",4,2,0); INSERT INTO INVENTORY values(2,"Extinguisher",3,1,0); INSERT INTO INVENTORY values(3,"Helmets",8,7,0); Commit;
Creating the Java Application
I like programming in Java, so I felt that developing an application that could spin all the plates of my sqlite3 database, manage the phant streams, and run bash scripts would be in my best interest.
The application first establishes a connection to the SQLite database file that will be used for the duration of the programs life. Next, the application reaches out to the Incoming Phant stream (the stream that the Particle Photon pushes quantity changes to). If the application finds that json information is in the stream, it pulls it down and takes the appropriate steps to load that information into the SQLite database. Once that information is utilized, the phant stream is cleared of its information so that it is not duplicated. Finally, the application pushes the current inventory list with IDs, Descriptions, and Quantities back up to a different Phant stream. In the future, the Particle Photon will use this stream to populate its options instead of them being hardcoded.
The next phase of the application is to check the quantity and trigger levels of the inventory. I added a "Triggered" field because if the inventory manager has already been messaged about low inventory, we don't want to send them the same message every time the program loops.
If the application finds that an item should trigger, and isn't already triggered, it runs through the process of creating a local bash script that creates the message that will be seen by the inventory manager. The script is the executed and the application marks that item as "triggered". If items are found to be triggered, but are no longer in the category of should-be-triggered, i.e. the quantity on hand is greater than the pre-established trigger level, the application sets the "triggered" level to false;
I went through several iterations with this code. The code I have in the "Code" section below has the final version (Minus my actual "sensativeInvormation.java" file) of what I put on the raspberry Pi. When I was first running the code, I was debugging on my Macbook Pro. So you'll just need to adjust your code accordingly. I utilized Maven to package the application with all of its dependencies so that I could send it over to the Pi later.
I ran into an issue with where the sqlite3 database was stored when I brought it over to the Pi, but since SQLite is just a simple file, I was able to move the file and place it in the appropriate directory structure to establish the sqljdbc connection.
I packaged the application using Maven Shade, which packages the application with all dependencies (not taking any chances here). Making it easy to zip up your target folder and use the scp source target command to transfer the folder over to your raspbe
Setting up the Hologram "Route"
The final piece of this project is to create the route on the Hologram site that acts in a similar fashion as a webhook, only it offers more functionality.
Earlier, you set up your Hologram Nova Device so that it could communicate with your Hologram.io dashboard. Now, log into your dashboard, and you should see your device listed with a few statistics
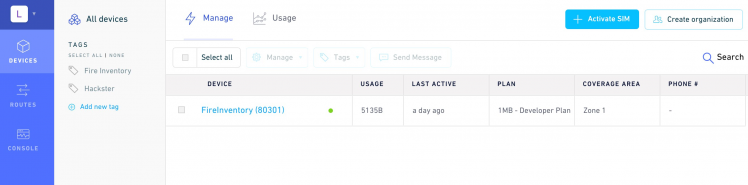 Hologram Dashboard
Now, click on the Routes button on the left and you'll see existing routes and have the option to add a new one.
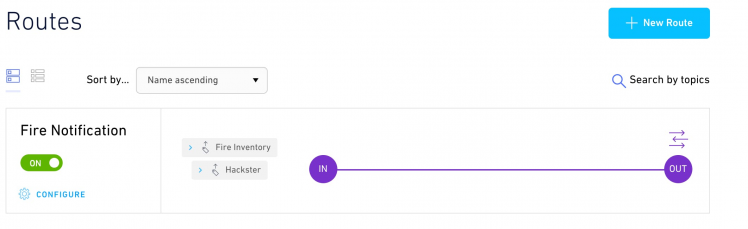 Hologram Routes
Select "New Route" and you'll be presented with various tags to detect (the tags associated with your device and the message that is sent)
 Hologram Route
In this section you'll have the option to tell the route what it should be looking for, the tags, and then what it should do once it receives that information and payload. I have mine selected to send an email. In this situation, an inventory manager would be located at a central warehouse and would receive a message stating that certain supplies were running low. This message is what gets sent from the Raspberry Pi Zero W using the Hologram command line tools.
Run that Puppy
Once all of the pieces of hardware and software are in place, run through the inventory selection menu on your Photon and change the inventory level to something that would trigger an alert and you'll receive a message that looks something like this:
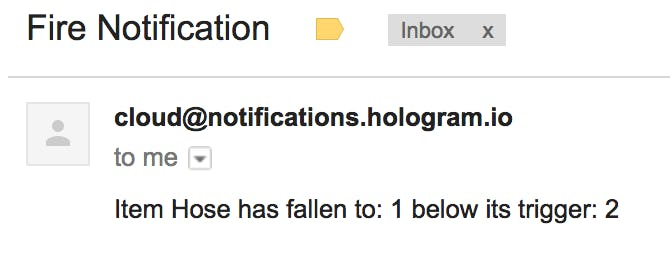 Hologram notification
Of course you can tweak the message to your desired verbiage and even include gps coordinates.
Here are some photos and a video of the the whole thing in action.
Fire Inventory project completion
 Nova Operation
 Particle Photon starting up
 On Location
That's All Folks
Let me know if you have any questions, comments, or concerns. I just do this for fun, so I'm always interested in hearing from other experts.
Schematics, diagrams and documents
Code
Credits
Related products


Leave your feedback...