
Expanding Io Ports Of A Meadow With A 74hc595

Made by jorgedevs
About the project
Running out of ports on your Meadow? Learn how to use a 74HC595 IO Expander to connect more things using Meadow.Foundation.
Project info
Difficulty: Easy
Platforms: Microsoft, SparkFun, Meadow, Wilderness Labs
Estimated time: 1 hour
License: MIT license (MIT)
Items used in this project
Hardware components


Story
This project consists on cycling through all the output ports on a 74HC595 to power on LEDs connected to each pin using the Meadow.Foundation library. The intention of this project is to familiarize yourself with using shift registers connected to a Meadow to expand its number of ports.Everything you need to build this project is included in the Wilderness Labs Meadow F7 w/Hack Kit Pro. We'll see how easy is to program these peripherals using Meadow.Foundation.
Shift registers are used to increase the number of outputs on a micro controller by using I2C or SPI interfaces. In the case of the 74xx595 series of shift registers, the SPI interface is used to output a series of bits that are then latched to the output pins of the chip.
Meadow.Foundation: A platform for quickly and easily building connected things using.NET on Meadow. Created by Wilderness Labs, it's completely open source and maintained by the Wilderness Labs community.
If you're new working with Meadow, I suggest you go to the Getting Started w/ Meadow by Controlling the Onboard RGB LEDproject to properly set up your development environment.
Step 1 - Assemble the circuitTo connect the 74HC595 chip, consider the Pin Datasheet below. The necessary pins for the shift register to work is wire up the GND and VCC for power (it works for both 3.3V and 5V). SER is the serial input pin, where set the bits of data along with the shift register clock (SRCLK). When setting all 8 bits, you enable the Latch pin (SRCLK) to copy all the 8 bit values to the latch register.
For this project, you will need to wire up the Output Enable (OE) pin, to see the output changes for when the bit values are latched to the shift register. This pin is an active low, so it needs to be connected to ground. For more information, you can find the data sheet here.
74HC595 Pinout

74HC595 Pinout
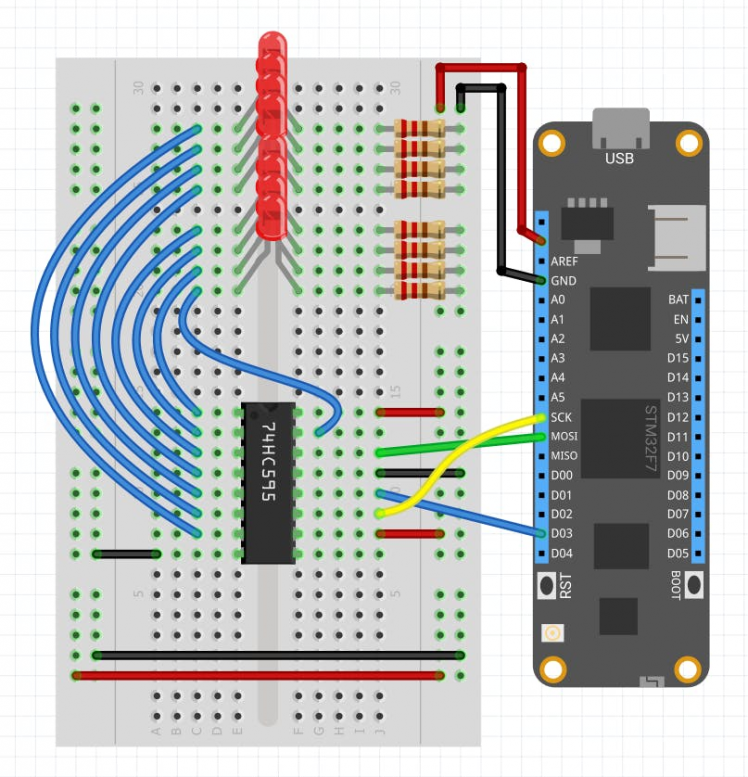
Now that you've gone through the Pin-out on the 74HC595, build the circuit on a breadboard along with your Meadow. Follow the diagram below, and make sure you're connecting everything exactly as illustrated.
Create a new Meadow Application project in Visual Studio 2019 for Windows or macOS and name it ShiftRegisterLeds.
Step 3 - Add the required NuGet packagesWindows
Right-click on your ShiftRegisterLeds project and click Manage NuGet Packages. In the Browse tab, search for Meadow.Foundation.ICs.IOExpanders.x74595 and click Install to add it to your project.
macOS
Alt-click on your ShiftRegisterLeds project in the Solution Explorer, and click Add => Add Nuget Package to open the NuGet Package window. Search for Meadow.Foundation.ICs.IOExpanders.x74595 and click Install to add it to your project.
Step 4 - Write the code for ShiftRegisterLedsCopy the following code below:
using Meadow;using Meadow.Devices;using Meadow.Foundation.ICs.IOExpanders;using System.Threading;namespace ShiftRegisterLeds{ public class MeadowApp : App<F7Micro, MeadowApp> { x74595 shiftRegister; public MeadowApp() { shiftRegister = new x74595( device: Device, spiBus: Device.CreateSpiBus(), pinChipSelect: Device.Pins.D03, pins: 8); TestX74595(); } void TestX74595() { while (true) { shiftRegister.Clear(); for (int i = 0; i < shiftRegister.Pins.AllPins.Count; i++) { shiftRegister.WriteToPin(shiftRegister.Pins.AllPins[i], true); Thread.Sleep(500); shiftRegister.WriteToPin(shiftRegister.Pins.AllPins[i], false); } } } }}In the MeadowApp's constructor the first thing the app does is initialize a x74595 object, passing the IODevice which in this case is the Meadow F7 board, an SPI bus, which we create by doing Device.CreateSpiBus(), the pin D03 for the Chip Select pin, and finally number of pins which in this case is 8.
In the TestX74595method, we first clear the x74595 from any values by doing shiftRegister.Clear(); and in the infinite while loop, we change the value of one pin of the shift register to true for 500ms ( or half a second), and then we set it to false before going to the next iteration to update the next pin, lighting up the LEDs connected to it one by one.
Click the Run button in Visual Studio. It should look like to the following GIF:
ShiftRegisterLeds project running

ShiftRegisterLeds project running
Check out Meadow.Foundation!This project is only the tip of the iceberg in terms of the extensive exciting things you can do with Meadow.Foundation.
- It comes with a huge peripheral driver library with drivers for the most common sensors and peripherals.
- The peripheral drivers encapsulate the core logic and expose a simple, clean, modern API.
- This project is backed by a growing community that is constantly working on building cool connected things and are always excited to help new-comers and discuss new projects.
Leave your feedback...