
Esp32 With Webserial: A Comprehensive Guide

About the project
Will guide you to add Webserial on ESP32.
Project info
Difficulty: Easy
Platforms: Arduino, RakWireless, Espressif, Relayr
Estimated time: 1 hour
License: GNU General Public License, version 3 or later (GPL3+)
Items used in this project

Story
The ESP32 is a versatile and inexpensive microcontroller that has taken the hobbyist and professional world by storm. It’s a powerful tool with built-in Wi-Fi and Bluetooth capabilities, making it an ideal choice for Internet of Things (IoT) projects. One of its many features is the ability to communicate over serial, which can be extended to the web using WebSerial. This blog post will delve into setting up an ESP32 with WebSerial.
Understanding WebSerialWebSerial is a web standard that allows websites to communicate with serial devices. It bridges the web and the physical world, enabling web applications to interact with hardware devices. This opens up a world of possibilities for IoT projects, allowing real-time interaction between web applications and physical devices.
Get PCBs for Your Projects Manufactured
You must check out PCBWAY for ordering PCBs online for cheap!
You get 10 good-quality PCBs manufactured and shipped to your doorstep for cheap. You will also get a discount on shipping on your first order. Upload your Gerber files onto PCBWAY to get them manufactured with good quality and quick turnaround time. PCBWay now could provide a complete product solution, from design to enclosure production. Check out their online Gerber viewer function. With reward points, you can get free stuff from their gift shop. Also, check out this useful blog on PCBWay Plugin for KiCad from here. Using this plugin, you can directly order PCBs in just one click after completing your design in KiCad.
Setting Up the ESP32Before we can use WebSerial with the ESP32, we need to set up the ESP32 development environment. Here are the steps:
- Install the Arduino IDE: The Arduino IDE is a popular platform for writing and uploading code to the ESP32. You can download it from the official Arduino website.
- Install the ESP32 Board in Arduino IDE: You can add the ESP32 board to the Arduino IDE by going to
File > Preferences > Additional Boards Manager URLsand adding the ESP32 board manager URL. This will allow the Arduino IDE to recognize the ESP32 board and provide the appropriate options for programming it. - Select the ESP32 Board: Go to
Tools > Board > ESP32 Arduinoand select your ESP32 board. This tells the Arduino IDE that you will be programming an ESP32 board.
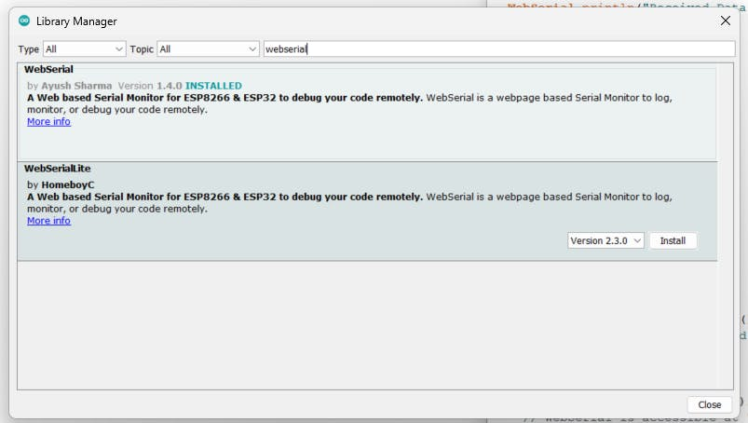
Next, we need to install the WebSerial library. Here’s how:
- Go to
Sketch > Include Library > Manage Libraries. - In the search bar, type
WebSerial. - Click
Install.
Once the ESP32 is set up, we can write a program to enable WebSerial communication. Here’s a simple example:
/*
WebSerial Demo
------
This example code works for both ESP8266 & ESP32 Microcontrollers
WebSerial is accessible at your ESP's <IPAddress>/webserial URL.
Author: Ayush Sharma
Checkout WebSerial Pro: https://webserial.pro
*/
#include <Arduino.h>
#if defined(ESP8266)
#include <ESP8266WiFi.h>
#include <ESPAsyncTCP.h>
#elif defined(ESP32)
#include <WiFi.h>
#include <AsyncTCP.h>
#endif
#include <ESPAsyncWebServer.h>
#include <WebSerial.h>
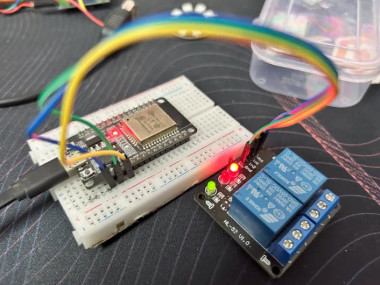
#define Relay 2
AsyncWebServer server(80);
const char* ssid = "ELDRADO"; // Your WiFi SSID
const char* password = "amazon123"; // Your WiFi Password
/* Message callback of WebSerial */
void recvMsg(uint8_t *data, size_t len){
WebSerial.println("Received Data...");
String d = "";
for(int i=0; i < len; i++){
d += char(data[i]);
}
WebSerial.println(d);
if (d == "ON"){
digitalWrite(Relay, HIGH);
}
if (d=="OFF"){
digitalWrite(Relay, LOW);
}
}
void setup() {
Serial.begin(115200);
pinMode(Relay, OUTPUT);
WiFi.mode(WIFI_STA);
WiFi.begin(ssid, password);
if (WiFi.waitForConnectResult() != WL_CONNECTED) {
Serial.printf("WiFi Failed!n");
return;
}
Serial.print("IP Address: ");
Serial.println(WiFi.localIP());
// WebSerial is accessible at "<IP Address>/webserial" in browser
WebSerial.begin(&server);
/* Attach Message Callback */
WebSerial.msgCallback(recvMsg);
server.begin();
}
void loop() {
}in this above sketch, I have added a relay control part with GPIO Pin2, if the serial input data is "ON" the really will on if it's "OFF" it will turn off the relay.
Once you upload the code to ESP32, look for the serial terminal to know the IP address of the ESP32.
Node: Change the Wi-Fi credentials.
In my case here is the response.

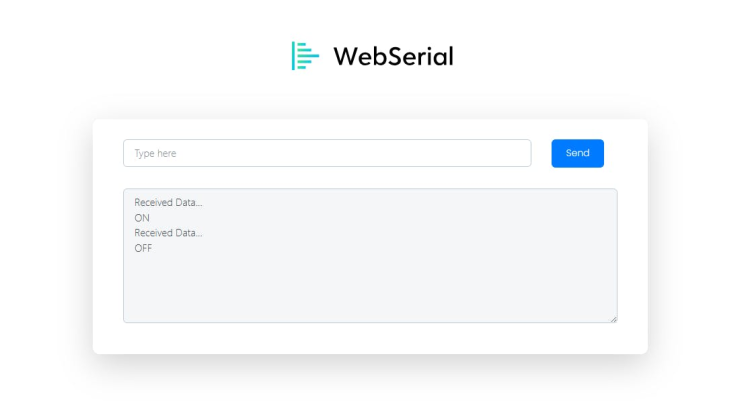
Open the IP with /WebSerial in the end.

In this type ON and OFF and look at the ESP32.

The ESP32 with WebSerial opens up a world of possibilities for IoT projects. By bridging the gap between the web and the physical world, we can create interactive, real-time applications that communicate with hardware devices. Whether you’re a hobbyist or a professional developer, the ESP32 with WebSerial is a powerful tool in your IoT toolkit. With this detailed guide, you should now have a solid understanding of how to set up and use the ESP32 with WebSerial. Happy coding!
Credits
Related products


Leave your feedback...