

Diy How To Display Time On M5stickc Esp32 Using Visuino

About the project
In this tutorial we will learn how to program ESP32 M5Stack StickC with Arduino IDE and Visuino to Display the time on the LCD.
Project info
Difficulty: Easy
Platforms: Arduino, Visuino, M5Stack
Estimated time: 1 hour
License: GNU General Public License, version 3 or later (GPL3+)
Items used in this project

Story
In this tutorial we will learn how to program ESP32 M5Stack StickC with Arduino IDE and Visuino to Display the time on the LCD.
Step 1: What You Will Need
- M5StickC ESP32: you can get it here
- Visuino program: Download Visuino
Note: Check this tutorial here on how to Install StickC ESP32 board
Step 2: Start Visuino, and Select the M5 Stack Stick C Board Type
1 / 2
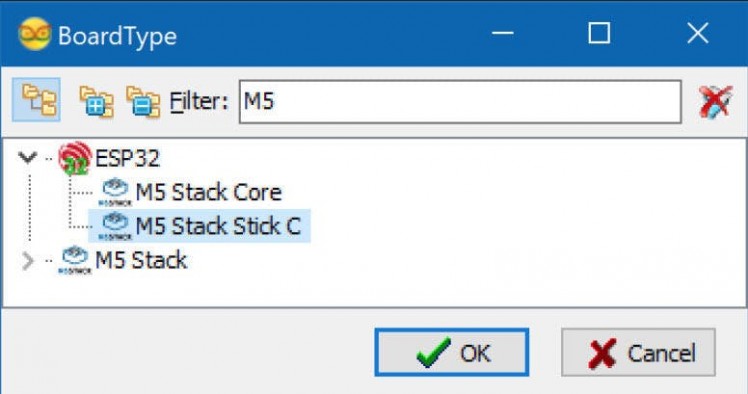
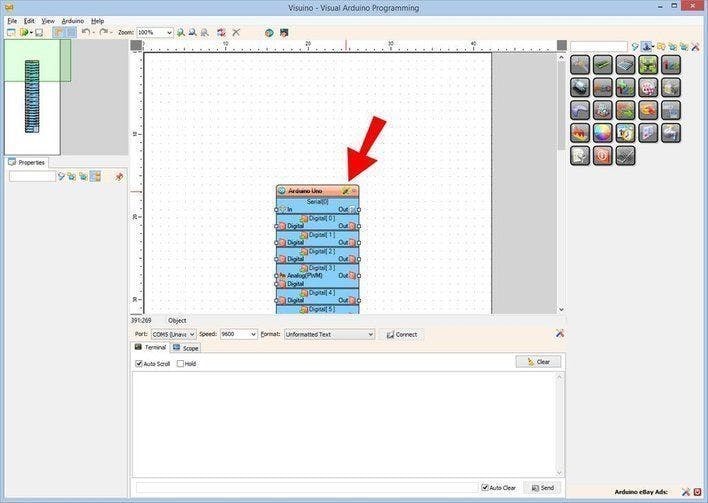
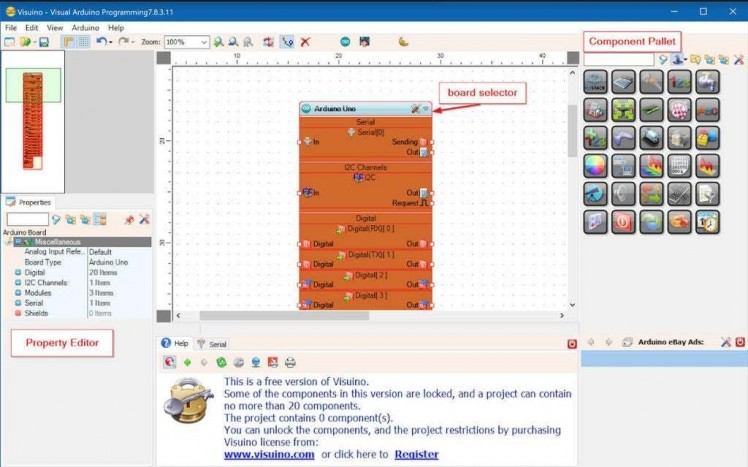
Start Visuino as shown in the first picture Click on the "Tools" button on the Arduino component (Picture 1)
in Visuino When the dialog appears, select "M5 Stack Stick C" as shown on Picture 2
Step 3: In Visuino Add and Set Components
1 / 4
- Click on "M5 Stack Stick C" Board to select it
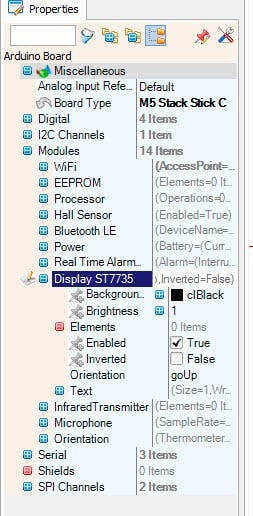
- In "Properties" window select "Modules" and click "+" to Expand, Select "Display ST7735" and click "+" to expand it
- Set Orientation to "goRight" < this means how the time will be oriented on the LCD
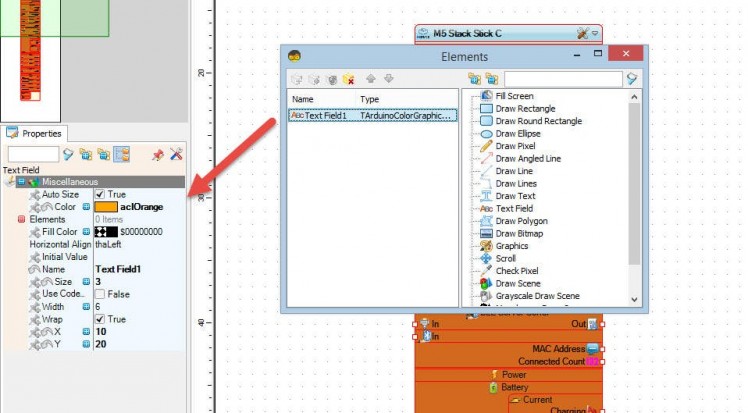
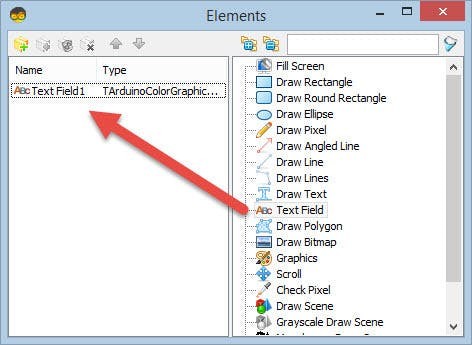
- Select "Elements" and click on blue button with 3 dots...
- Elements Dialog will show
- In the Elements Dialog drag "Text Field" from the right side to the left
Click on the "Text Field1" on the left side to select it, then in the "Properties window" click on color and set it to "aclOrange"
-also in properties windows set X:10 and Y:20 this is where you want to display the time on the LCD
-set size:3 this is the font size of the time
-You can set the text size and color if you want
Close the elements window
Optionally:
Click on "M5 Stack Stick C" Board to select it
In "Properties" window select "Modules" and click "+" to Expand, Select "Display ST7735" and click "+" to expand it and you will see "Background color" this is the default color of the display, change it to your favourite color, you can alse set display brightness, the default is 1 (max) you can set it to 0.5 or some other value to make it more dim
6. Add "Decode (Split) Date/Time" component 7. Add "Formatted text" component
Step 4: In Visuino Set Components
1 / 2
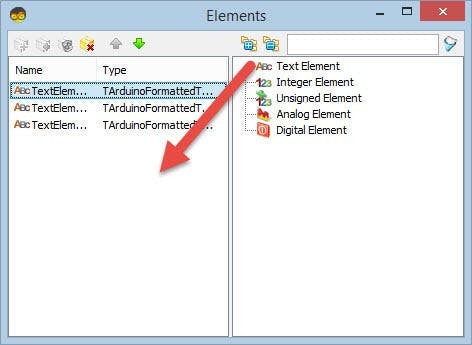
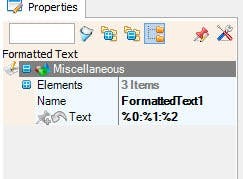
- Select "FormattedTxt1" component and under "Properties" window set "Text" to: %0:%1:%2
- Double click on "FormattedText1" component and in the Elements dialog drag 3x "Text Element" to the left
Step 5: In Visuino Connect Components
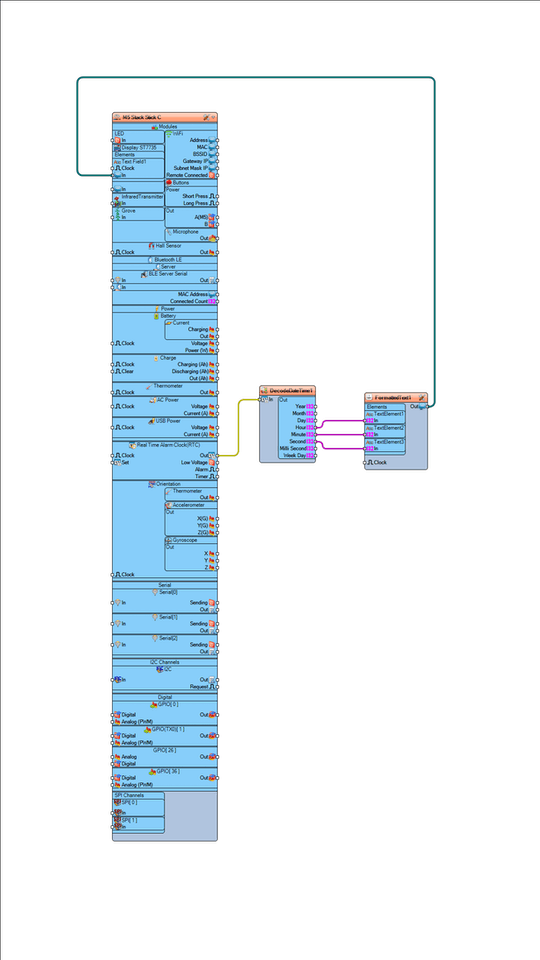
- Connect "M5 Stack Stick C" > Real Time Alarm Clock(RTC) > Pin [Out] to "DecodeDateTime1" component pin[In]
- Connect "DecodeDateTime1" component pin [Hour] to "FormattedText1" component "TextElement1" pin[In]
- Connect "DecodeDateTime1" component pin [Minute] to "FormattedText1" component "TextElement2" pin[In]
- Connect "DecodeDateTime1" component pin [Second] to "FormattedText1" component "TextElement3" pin[In]
- Connect "FormattedText1" component pin [Out] to "M5 Stack Stick C" board "Display ST7735">"Text Field1" pin [In]
Step 6: Generate, Compile, and Upload the Arduino Code
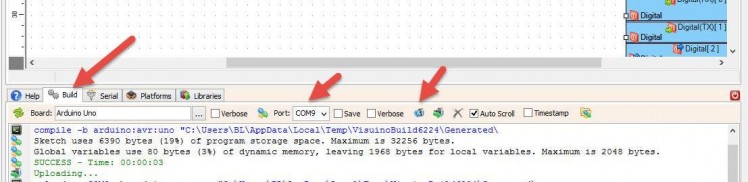
- In Visuino, at the bottom click on the "Build" Tab, make sure the correct port is selected, then click on the "Compile/Build and Upload" button.
Step 7: Play
If you power the M5Sticks module, the display should start to show the time.
Congratulations! You have completed your M5Sticks project with Visuino. Also attached is the Visuino project, that I created for this tutorial, you can download it here.
You can download and open it in Visuino: https://www.visuino.com
Step 8: Extra: Simple Trick
You can use the current time that was on your computer on the moment you compiled the code in Arduino.
- To do that just drop a "Compile Date/Time" component and connect it to "M5 Stack Stick C" > "Real Time Alarm Clock(RTC)" pin [Set]
You can download the Project file with this trick here.
Step 9: In the Next Tutorial..
In the next tutorial I will show you how to make a Cool Looking watch where you can set the time using the StickC buttons!Stay tuned and check out my other tutorials here.
Schematics, diagrams and documents
Code
Credits
Related products


Leave your feedback...