
DIY Auto Voice Record and Playback

Made by electrouser780 / Home Automation / Voice
About the project
Record your voice using Arduino and ISD1820. This is a very simple project which takes less than 10 min and < 8$.
Project info
Difficulty: Easy
Platforms: Arduino
Estimated time: 1 hour
License: GNU General Public License, version 3 or later (GPL3+)
Items used in this project
Hardware components


Story
The Idea Behind It!
I was juggling the internet to find devices which record voice and play it again. I found out ISD1820, which is so reasonable (only 3$), and can record sound alone using some rec. and play button. I require to control this device using Arduino, I mean recording and playing voice through Arduino only.
This project is just for beginners and for those who want to learn about the functioning of ISD1820 with Arduino, but you can extend it to very big sense.
You should visit www.gadgetprogrammers.online for full description and new ideas.
How It Works!
Firstly, we just record voice through ISD1820, which can record 20 seconds for once (you can store voice in sd card too), and you can play it again and again. so here we are recording voice when user press 'r' in serial monitor and play it when user press 'p' in serial monitor.
So this was the whole working of our system
.
; ;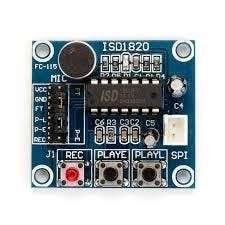 1 / 2 • ISD1820 IMAGE OF DEVICE
Below is pin workings (you can skip it):
- VCC– 3.3V power supply
- GND– Power ground
- REC – The REC input is an active‐HIGH record signal. The module starts recording whenever REC is HIGH. This pin must remain HIGH for the duration of the recording. REC takes precedence over either playback (PLAYL or PLAYE) signal.
- PLAYE – Playback, Edge‐activated: When a HIGH‐going transition is detected on continues until an End‐of‐Message (EOM) marker is encountered or the end of the memory space is reached.
- PLAYL – Playback, Level‐activated, when this input pin level transits for LOW to HIGH, a playback cycle is initiated.
- Speaker Outputs – The SP+ and SP‐ pins provide direct drive for loudspeakers with impedances as low as 8Ω.
- MIC – Microphone Input, the microphone input transfers its signals to the on‐chip preamplifier.
- FT – Feed Through: This mode enable the Microphone to drive the speaker directly.
- P‐E – Play the records endlessly.
Let's Make It!
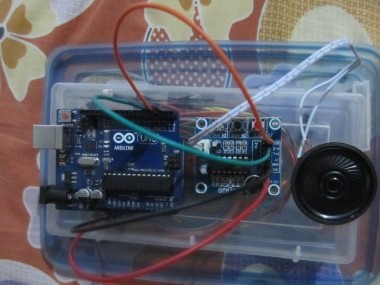
Please connect As given below:
- VCC => Arduino 5v
- GND => Arduino GND
- FT => Arduino pin 5
- Play L (PL) => Arduino pin 4
- PLAY_E(P-E) => Arduino Pin 3
- REC => Arduino pin 2
After Above pinout upload the code SAMPLE1 :
SAMPLE 1: IF YOU WANT USER TO DECIDE FOR RECORDING VOICE
SAMPLE 2: AUTOMATICALLY RECORD VOICE FOR 3 SECONDS AND PLAY IT FOR 5 SECONDS.
Sample 1:
/*
* ISD1820 Arduino Voice Recorder
* to record and play sound using Arduino and ISD1820 Sound Recorder
* get this code from https://www.gadgetprogrammers.online
/*
* ISD1820 Arduino Voice Recorder
* Code Written by Anshul Pareek for the purpose of education
* on June 06, 2018 at 11:20 pm,
*/
#define REC 2 // pin 2 is used for recording
#define PLAY_E 3 // pin 3 is used for playback-edge trigger
#define FT 5 // pin 5 is used for feed through
// and will NOT record
#define playTime 5000 // playback time 5 seconds
#define recordTime 3000 // recording time 3 seconds you can extend time upto 10 seconds
void setup()
{
 pinMode(REC,OUTPUT);// set the REC pin as output
 pinMode(PLAY_E,OUTPUT);// set the PLAY_e pin as output
 pinMode(FT,OUTPUT);// set the FT pin as output
 Serial.begin(9600);// set up Serial monitor
}
void loop() {
   while (Serial.available() > 0) {
         char inChar = (char)Serial.read();
           if(inChar =='p' || inChar =='P'){
           digitalWrite(PLAY_E, HIGH);
           delay(50);
           digitalWrite(PLAY_E, LOW);
             Serial.println("Playbak Started");
           delay(playTime);
             Serial.println("Playbak Ended");
           break;
           }
           else if(inChar =='r' || inChar =='R'){
             digitalWrite(REC, HIGH);
             Serial.println("Recording started");
             delay(recordTime);
             digitalWrite(REC, LOW);
             Serial.println("Recording Stopped ");
           }

     Serial.println("###Serial Monitor Exited");
   }// wihile
Serial.println("### Enter r to record, p to play");
 delay(500);
}
Sample 2:
#define REC 2 // pin 2 is used for recording
#define PLAY_E 3 // pin 3 is used for playback-edge trigger
// when PLAY_E goes HIGH device will playbak STARTS and continues
#define FT 5 // pin 5 is used for feed through
#define playTime 5000 // playback time 5 seconds
#define recordTime 3000 // recording time 3 seconds
#define playLTime 900 // press and release playback time 0.9 seconds
void setup()
{
 pinMode(REC,OUTPUT);// set the REC pin as output
 pinMode(PLAY_E,OUTPUT);// set the PLAY_e pin as output
 pinMode(FT,OUTPUT);// set the FT pin as output
 Serial.begin(9600);// set up Serial monitor
}
void loop() {
   digitalWrite(REC, HIGH);
   delay(recordTime);
   digitalWrite(REC, LOW);
   digitalWrite(PLAY_E, HIGH);
   delay(50);
   digitalWrite(PLAY_E, LOW);
   delay(playTime);

 delay(500);
}
So now you've built whole system hurry!
FUTURE SCOPE:
You can record voice and store it in SD Card for future purpose and you can create walkie talkie and more..... as per your imagination :)
If you like please share.......:)
Please visit and promote us so that we can build new projects for you www.gadgetprogrammers.online
Schematics, diagrams and documents
Code
Credits
Related products


Leave your feedback...